Buick Enclave: Repair Instructions
COOLING SYSTEM DRAINING AND FILLING (STATIC FILL)
Draining Procedure
Special Tools
- J 26568 Coolant and Battery Tester
WARNING: To avoid being burned, do not remove the radiator cap or surge tank cap while the engine is hot. The cooling system will release scalding fluid and steam under pressure if radiator cap or surge tank cap is removed while the engine and radiator are still hot.
Before beginning the draining procedure, make sure the vehicle is positioned on a stable, level surface and the engine has cooled completely. The cooling system on the Buick Enclave can remain under pressure even after the engine has been shut off, so the pressure cap must not be opened until the system is safe to handle. Wear eye protection and use a suitable container because coolant can damage painted surfaces and should never be allowed to drain onto the ground.
1. Place a drain pan under the radiator hose. Position the pan so it can catch coolant flow from the hose and any splash from nearby components. A wide drain pan is recommended because coolant may travel along the hose before dropping.
NOTE: Draining the cooling system with the pressure cap installed will siphon the coolant from the overflow tank.
2. Remove the radiator outlet hose from the engine. Refer to Radiator Outlet Hose Replacement. Loosen the hose carefully and avoid damaging the sealing surface on the outlet connection. If the hose is stuck, work it loose gradually rather than pulling sharply, since an aged hose or plastic fitting can be damaged by excessive force.
3. Move down the end of the radiator hose to drain the radiator. Keep the hose directed into the drain pan until the coolant flow slows. This helps control spills and gives a cleaner drain before the rest of the system is opened.
4. Drain the cooling system. Allow enough time for the coolant to leave the radiator and accessible passages. If coolant flow stops too early, check that the hose end is not blocked or lifted above the lowest drain point.
5. Remove the coolant pressure cap. Removing the cap after the initial drain can help the remaining coolant flow out more completely. Open it slowly and keep the cap clean so debris does not enter the surge tank or sealing area.
6. If a complete engine block drain is required, remove the engine drain plugs. This step is normally used when old coolant must be removed from the block, when contamination is present, or when a more complete service is needed. Be prepared for additional coolant to drain from the engine block once the plugs are removed.
7. Inspect the coolant. Look at the color, clarity, odor, and any visible debris. Coolant that is clean and normal in appearance usually indicates a straightforward drain-and-fill service. Coolant that appears rusty, muddy, oily, or heavily discolored may point to corrosion, contamination, incorrect fluid, or a system that needs flushing before refilling.
8. Follow the appropriate procedure based on the condition of the coolant. Do not refill a dirty or contaminated system without correcting the cause, because poor coolant condition can reduce heat transfer and shorten the life of cooling system components.
- Normal in appearance-Follow the filling procedure.
- Discolored-Follow the flush procedure. Refer to Flushing.
Filling Procedure
1. Install the radiator outlet hose to the engine. Refer to Radiator Outlet Hose Replacement. Make sure the hose is fully seated and the clamp is installed in the correct position. A hose that is not seated evenly can leak only after the system reaches pressure and temperature.
CAUTION: The procedure below must be followed. Improper coolant level could result in a low or high coolant level condition, causing engine damage.
Correct filling is just as important as draining. Air trapped in the Buick Enclave cooling system can cause unstable temperature readings, poor heater output, overheating, or a coolant level that drops after the first heat cycle. Fill slowly and allow air to move out of the system as the coolant level rises.
2. If the engine block drain plug was removed, perform the following:
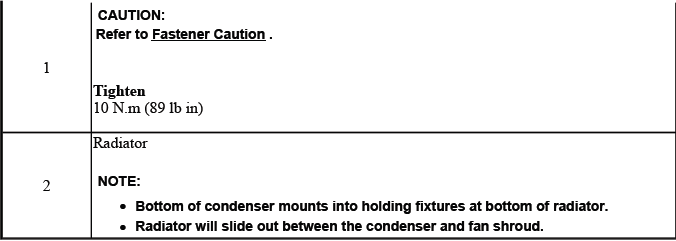
CAUTION: Refer to Fastener Caution.
- Apply pipe sealer to the drain plugs. Apply only the required amount so excess sealer does not enter the cooling passages.
- Install the drain plugs. Start the plugs by hand first to avoid cross-threading.
Tighten
- Tighten the drain plug to 22 N.m (16 lb ft).
3. Lower the vehicle. Confirm that all hoses, clamps, drain plugs, and related components are properly installed before adding coolant.
4. Slowly fill the cooling system with a 50/50 coolant mixture. Refer to Approximate Fluid Capacities. Pouring too quickly can trap air inside the system, so add coolant gradually and pause as needed to allow the level to settle.
NOTE: Use a 50/50 mixture of DEX-COOL antifreeze and clean, drinkable water. This mixture provides the required freeze protection, corrosion protection, and heat transfer performance for the system.
5. Install the coolant pressure cap. Make sure the cap seats fully and the sealing surfaces are clean. A loose or damaged cap can allow pressure loss and may cause coolant to escape during operation.
6. Start the engine. Watch the coolant level and temperature behavior during the warm-up period. Keep clear of moving fans, belts, and hot engine components.
7. Run the engine at 2, 000-2, 500 RPM until the engine reaches normal operating temperature. This helps circulate coolant through the engine, radiator, heater core, and related passages so trapped air can move toward the fill area.
8. Allow the engine to idle for 3 minutes. During idle, monitor the temperature gauge and listen for abnormal fan operation or coolant boiling sounds. The heater output should also begin to stabilize if the system is properly filled.
9. Shut the engine OFF. Do not remove the pressure cap while the engine is hot.
10. Allow the engine to cool. As the coolant contracts, the level may drop. This is normal after a cooling system service and is the reason the final level check is required.
11. Top off the coolant as necessary. Add only the correct 50/50 coolant mixture, and bring the level to the proper mark after the system has cooled.
12. Inspect the concentration of the engine coolant, using the J 26568 coolant and battery tester. Verifying the mixture is important because too much water can reduce freeze and corrosion protection, while too much antifreeze can reduce heat transfer efficiency.
13. Rinse away any excess coolant from the engine and the engine compartment. Removing spilled coolant makes it easier to detect new leaks during final inspection and prevents residue from creating odor when the engine warms up.
COOLING SYSTEM DRAINING AND FILLING (VAC N FILL)
Special Tools
- GE-47716 Vac-N-Fill Coolant Refill Tool
- J 26568 Coolant and Battery Tester
Draining Procedure
WARNING: To avoid being burned, do not remove the radiator cap or surge tank cap while the engine is hot. The cooling system will release scalding fluid and steam under pressure if radiator cap or surge tank cap is removed while the engine and radiator are still hot.
The Vac-N-Fill method is used to remove coolant and refill the system with less risk of trapped air. This is especially useful after major cooling system service, hose replacement, radiator service, or any repair where a large amount of coolant has been removed. When used correctly, the tool helps create a vacuum in the system and then draws in the coolant mixture evenly.
1. Remove the radiator cap. Confirm the engine is cool before removing the cap, and clean the cap area so dirt does not fall into the fill opening.
2. Attach the venturi assembly to the vacuum tank. Make sure the connection is secure so the tool can create the required vacuum without air leaks.

|
Fig. 4: View Of Venturi Assembly & Vacuum Tank
3. Attach a shop air hose to the venturi assembly. Use clean, regulated shop air and keep the hose routed so it does not pull on the tool during operation.

Fig. 5: View Of Shop Air Hose & Venturi Assembly
Ensure the valve on the venturi assembly is closed. Starting with the valve closed gives better control over the vacuum draw and prevents accidental coolant movement before the hoses are positioned correctly.
4. Attach the vacuum hose to the vacuum tank. Check that the hose is not kinked, cracked, or loose at the fitting.
5. Attach the extraction hose to the vacuum hose. The connection should be tight enough to maintain suction while coolant is being removed.

Fig. 6: Attaching Extraction Hose To Vacuum Hose
6. Insert the extraction hose into the radiator cap opening and into the radiator until the extraction hose contacts the bottom of the radiator end tank. This position allows the tool to draw coolant from the lowest accessible area inside the radiator.
7. Open the valve on the venturi assembly to start a vacuum draw. Watch the hose and tank while the coolant is being extracted so the process remains controlled.

Fig. 7: Identifying Valve On Venturi Assembly
8. Use the extraction hose to draw out coolant until the radiator is empty. If suction becomes weak, check the shop air supply, hose connections, and whether the extraction hose has moved away from the coolant.
9. The vacuum tank has a drain valve on the bottom of the tank. Open the valve to drain coolant from the vacuum tank into a suitable container for disposal. Used coolant must be handled according to local environmental rules and should never be poured into drains, soil, or stormwater systems.
10. If a complete engine block drain is required, remove the engine block drain plug. This may be needed when replacing contaminated coolant or when the repair requires a more complete coolant removal from the Buick Enclave engine.
11. Inspect the coolant. Normal coolant should be consistent in color and free from oil, heavy particles, rust scale, or sludge. Contaminated coolant should be treated as a sign that further cleaning or diagnosis may be needed.
12. Follow the appropriate procedure based on the condition of the coolant.
- Normal in appearance-Follow the filling procedure.
- Discolored-Follow the flush procedure. Refer to Flushing.
Vac-N-Fill Procedure
NOTE: To prevent boiling of the coolant/water mixture in the vehicles cooling system, do not apply vacuum to a cooling system above 49ºC (120ºF). The tool will not operate properly when the coolant is boiling.
Before connecting the refill tool, allow the system to cool below the specified temperature. A hot system can produce vapor pockets that interfere with vacuum formation and may prevent the coolant mixture from being drawn in smoothly.
1. Attach the Vac-N-Fill cap to the vehicles coolant fill port. Make sure the cap is sealed evenly at the fill opening, because even a small air leak can prevent the system from reaching the proper vacuum.
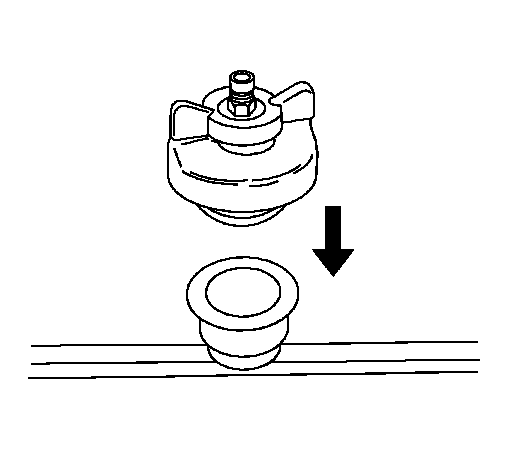
Fig. 8: Identifying Vac-N-Fill Cap
2. Install the extension hose. Route the hose so it does not kink or interfere with nearby components.
3. Attach the vacuum gauge assembly to the Vac-N-Fill cap. The gauge must be visible during the procedure so vacuum level can be monitored accurately.
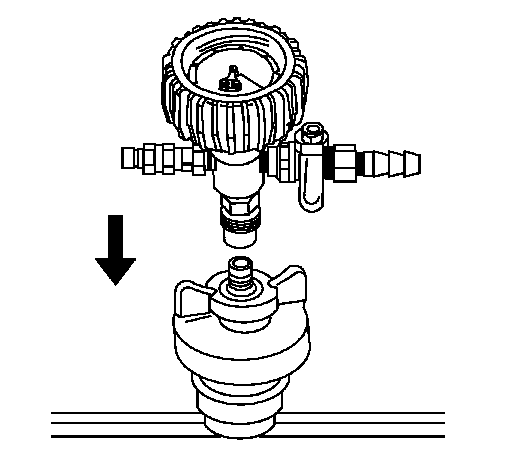
Fig. 9: Attaching Vacuum Gauge Assembly To Vac-N-Fill Cap
4. Attach the fill hose to the barb fitting on the vacuum gauge assembly. Push the hose fully onto the fitting to avoid drawing air into the system during the refill stage.
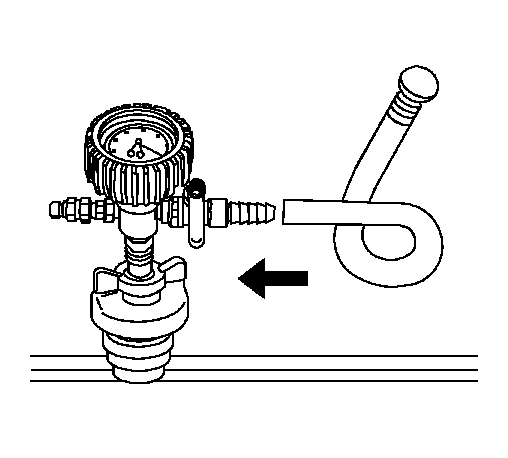
Fig. 10: Attaching Fill Hose To Barb Fitting On Vacuum Gauge Assembly
Ensure that the valve is closed. Keeping the valve closed at this point prevents coolant from entering the line before the system is ready to be filled.
5. Pour the coolant mixture into the graduated reservoir. Use enough coolant to complete the refill without allowing the hose to uncover and pull air into the system.
Fig. 11: View Of Graduated Reservoir & Hose
NOTE: Use a 50/50 mixture of DEX-COOL anti-freeze and clean, drinkable water.
Always use more coolant than necessary. This will eliminate air from being drawn into the cooling system.
Using extra coolant in the reservoir is a simple way to keep the fill hose submerged during the procedure. If the hose draws air, the system may not fill correctly and additional bleeding may be required after the engine is started.
6. Place the fill hose in the graduated reservoir. Confirm that the hose end stays below the coolant level throughout the filling process.
7. Install the vacuum tank on the graduated reservoir with the fill hose routed through the cut-out area in the vacuum tank. Make sure the hose is not pinched by the tank, because restricted flow can slow the refill or interrupt coolant draw.
NOTE: Prior to installing the vacuum tank onto the graduated reservoir, ensure that the drain valve located on the bottom of the tank is closed.
8. Attach the venturi assembly to the vacuum tank. Once the assembly is connected, the tool can be prepared to pull the cooling system into vacuum and draw the coolant mixture into the Buick Enclave without introducing unnecessary air pockets.

Fig. 12: View Of Venturi Assembly & Vacuum Tank
9. Attach a shop air hose to the venturi assembly. Confirm that the air hose is fully seated and that the shop air supply is clean and stable. A weak or leaking air connection can prevent the tool from creating the vacuum needed to refill the Buick Enclave cooling system correctly.
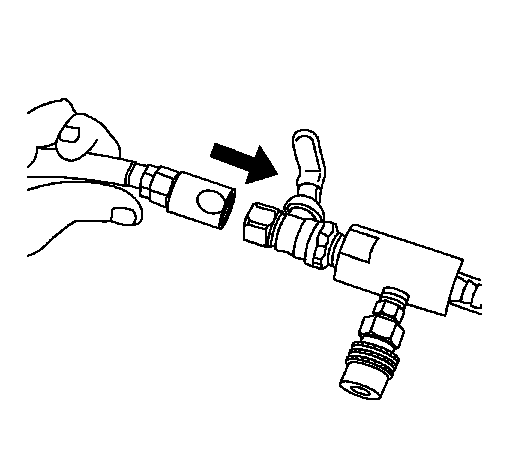
Fig. 13: View Of Shop Air Hose & Venturi Assembly
Ensure the valve on the venturi assembly is closed. Starting with the valve closed gives better control over the procedure and prevents the system from drawing air or coolant before all hoses and adapters are ready.
10. Attach the vacuum hose to the vacuum gauge assembly and the vacuum tank. Make sure the hose is not kinked, twisted, loose, or routed in a way that can pull on the gauge assembly during the vacuum draw. A secure hose connection is necessary for accurate gauge readings.
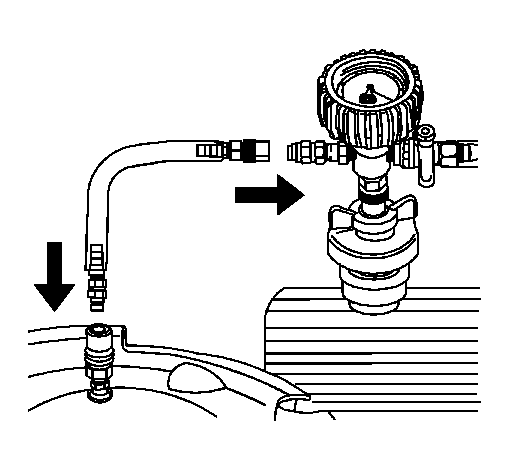
Fig. 14: Attaching Vacuum Hose To Vacuum Gauge Assembly & Vacuum Tank
11. Clamp off the overflow hose. This helps isolate the system so the vacuum tool can pull down the cooling system instead of drawing air through the overflow path. Use a suitable hose clamp that will not cut, crush, or permanently deform the hose.
12. Open the valve on the venturi assembly. The vacuum gauge will begin to rise and a hissing noise will be present. The hissing sound is expected because air is being drawn through the venturi. Watch the gauge steadily rather than opening and closing the valve repeatedly.
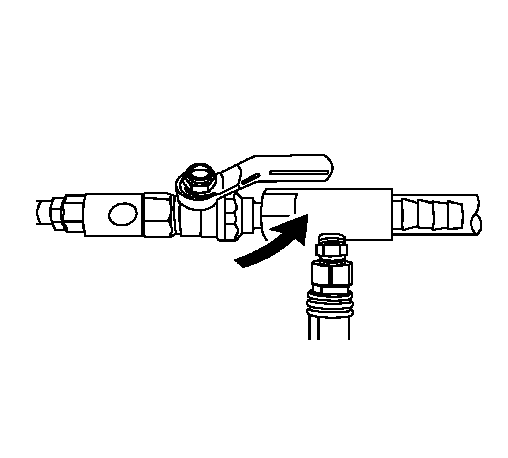
Fig. 15: Identifying Valve On Venturi Assembly
13. Continue to draw vacuum until the needle stops rising. This should be 610-660 mm Hg (24-26 in HG). Reaching this range indicates that the system has been pulled into a strong vacuum and is ready to draw coolant in without trapping excessive air.
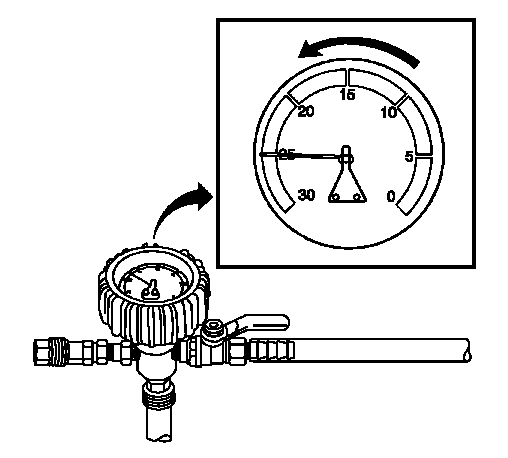
Fig. 16: View Of Vacuum Gauge
Cooling hoses may start to collapse. This is normal due to vacuum draw. Do not confuse this with a hose failure unless the hose cracks, splits, or remains permanently deformed after vacuum is released. On older vehicles, this step is also a useful moment to notice weak hoses that may need closer inspection.
14. To aid in the fill process, position the graduated reservoir above the coolant fill port. Raising the reservoir allows gravity to assist coolant flow once the valve is opened. Keep the reservoir stable so it cannot tip over while the system is drawing in coolant.
15. Slowly open the valve on the vacuum gauge assembly. When the coolant reaches the top of the fill hose, close the valve. This will eliminate air from the fill hose. Removing the air from the hose before the actual fill begins helps prevent a pocket of air from being pulled into the Buick Enclave cooling passages.
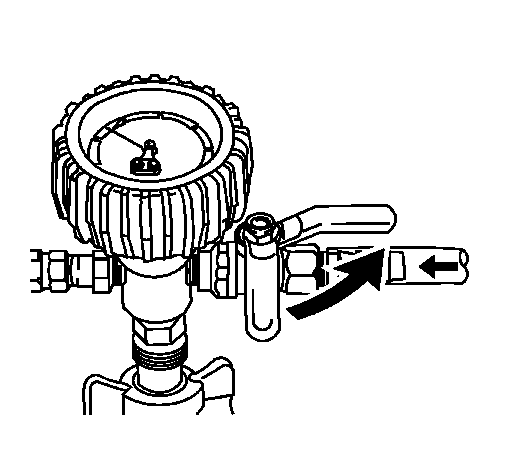
Fig. 17: Identifying Valve On Vacuum Gauge Assembly
16. Close the valve on the venturi assembly. Closing the venturi valve stops the vacuum draw and prepares the system for the controlled coolant fill stage. Do not disconnect the tool at this point, because the system must remain sealed.
17. If there is a suspected leak in the cooling system, allow the system to stabilize under vacuum and monitor for vacuum loss. A stable gauge reading indicates the cooling system is holding vacuum. A falling reading may point to an external leak, a loose tool connection, a damaged hose, a weak adapter seal, or another opening in the system.
If vacuum loss is observed, refer to Loss of Coolant. Before condemning a vehicle component, recheck every tool connection, cap adapter, hose fitting, and clamp position. A small leak at the service equipment can look the same as a leak in the cooling system.
18. Open the valve on the vacuum gauge assembly. The vacuum gauge will drop as coolant is drawn into the system. Allow the coolant to flow smoothly from the reservoir, and keep the hose end submerged so air is not pulled into the line.
19. Once the vacuum gauge reaches zero, close the valve on the vacuum gauge assembly and repeat steps 11- 17. Repeating the vacuum and fill cycle helps ensure that the coolant level is correct and that remaining air pockets are removed as much as possible before final inspection.
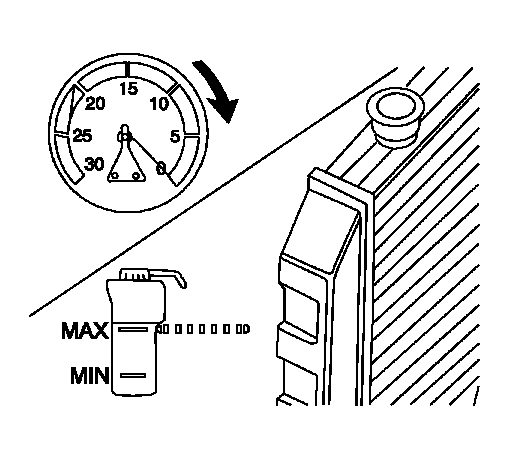
Fig. 18: View Of Vacuum Gauge & Radiator
Remove the extension hose. Remove it carefully so coolant does not spill over surrounding components. Wipe away any coolant immediately to make later leak checks easier.
20. Remove the J 42401 radiator cap and surge tank test adapter. Keep the adapter clean and inspect the sealing surface after removal. Damaged adapter seals can affect future pressure or vacuum testing.
21. Detach the Vac-N-Fill cap from the vehicles coolant fill port. Work slowly so the seal releases without splashing coolant. Check the fill port area for trapped debris or coolant residue before installing the regular cap.
22. Add coolant to the system as necessary. Use the specified coolant mixture only, and bring the level to the correct mark. Do not overfill, because expansion during engine warm-up can push excess coolant out of the recovery system.
23. Inspect the concentration of the coolant mixture using J 26568 coolant and battery tester. Correct concentration is important for freeze protection, corrosion resistance, and proper heat transfer. A mixture that is too weak or too strong can create service problems even when the fill level appears correct.
24. Detach the vacuum hose form the vacuum gauge assembly. Keep the open hose end pointed upward or toward a suitable container to avoid dripping coolant onto belts, electrical connectors, or painted surfaces.
NOTE: After filling the cooling system, the extraction hose can be used to remove excess coolant to achieve the proper coolant level.
25. Attach the extraction hose to the vacuum hose. Make sure the hose connection is tight enough to maintain suction. This setup allows controlled removal of excess coolant without opening the system unnecessarily.
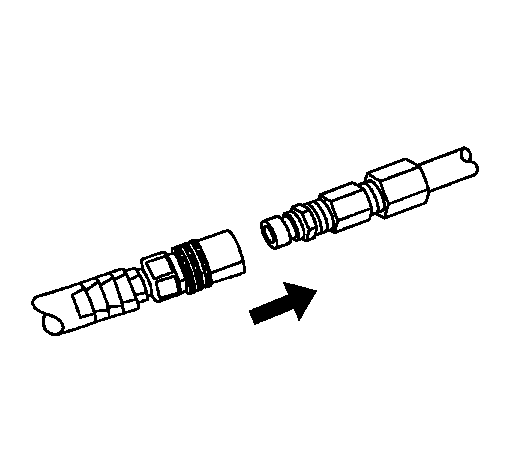
Fig. 19: Attaching Extraction Hose To Vacuum Hose
26. Open the valve on the venturi assembly to start a vacuum draw. Start the draw gradually and keep the extraction hose positioned so it removes only the amount of coolant needed to reach the correct level.
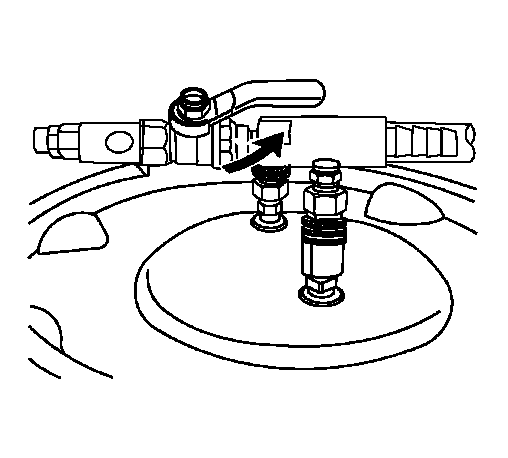
Fig. 20: Identifying Valve On Venturi Assembly
27. Use the extraction hose to draw out coolant to the proper level. Do not remove too much coolant. The final level should match the service specification after the engine has cooled and the system has stabilized.
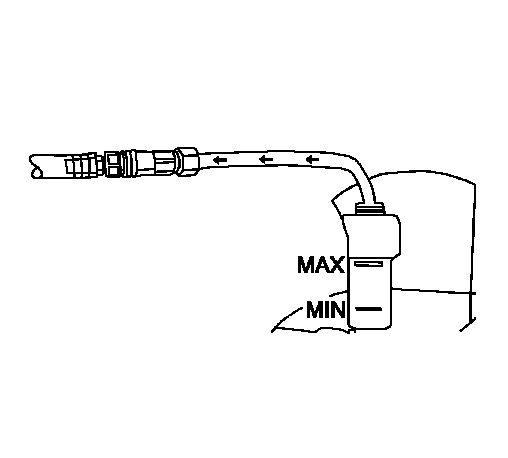
Fig. 21: Using Extraction Hose To Draw Out Coolant
28. The vacuum tank has a drain valve on the bottom of the tank. Open the valve to drain coolant from the vacuum tank into a suitable container for disposal. Used coolant should be stored in a sealed container and handled according to local environmental regulations. Do not pour coolant onto the ground, into storm drains, or into household plumbing.
FLUSHING
IMPORTANT: Do not use a chemical flush.
Store used coolant in the proper manner, such as in a used engine coolant holding tank. Do not pour used coolant down a drain. Ethylene glycol antifreeze is a very toxic chemical. Do not dispose of coolant into the sewer system or ground water. This is illegal and ecologically unsound.
Various methods and equipment can be used to flush the cooling system. If special equipment is used, such as a back flusher, follow the manufacturer's instruction. Always remove the thermostat before flushing the cooling system. Removing the thermostat allows water to move more freely through the system and helps prevent trapped contamination from remaining behind the closed thermostat.
When the cooling system becomes contaminated, the cooling system should be flushed thoroughly to remove the contaminants before the engine is seriously damaged. Contamination may appear as rust-colored coolant, sludge, oil film, heavy scale, or coolant that no longer has a clean and consistent appearance. In the Buick Enclave, poor coolant condition can reduce heat transfer, restrict passages, damage seals, and contribute to overheating or heater performance complaints.
1. Drain the cooling system. Refer to Cooling System Draining and Filling (Static Fill), Cooling System Draining and Filling (Vac N Fill). Allow the system to cool before draining, and collect all coolant in an approved container.
2. Remove the coolant recovery reservoir. Refer to Coolant Recovery Reservoir Replacement. Removing the reservoir allows sediment and old coolant residue to be cleaned out instead of being mixed back into the fresh coolant.
3. Clean and flush the coolant recovery reservoir with clean, drinkable water. Shake the reservoir gently if needed to loosen deposits, then rinse until the water runs clear. Do not use harsh chemicals or abrasive tools that can damage the plastic.
4. Install the coolant recovery reservoir. Refer to Coolant Recovery Reservoir Replacement. Make sure the reservoir is seated correctly and the hoses are routed without kinks.
5. Follow the drain and fill procedure using only clean, drinkable water. Refer to Cooling System Draining and Filling (Static Fill), Cooling System Draining and Filling (Vac N Fill). This water-only cycle helps carry remaining contamination out of the system before the final coolant mixture is added.
6. Run the engine for 20 minutes. Monitor the temperature gauge during this time and verify that the engine does not overheat. Running the engine allows the clean water to circulate through the radiator, heater core, engine block, and related passages.
7. Stop the engine. Allow the system to cool before opening any cap or disconnecting any hose. Hot coolant and steam can cause serious injury.
8. Drain the cooling system. Refer to Cooling System Draining and Filling (Static Fill), Cooling System Draining and Filling (Vac N Fill). Inspect the drained water for color and debris to determine whether another flush cycle is needed.
9. Repeat the procedure if necessary, until the fluid is nearly colorless. Several cycles may be needed if the system was heavily contaminated or if incorrect coolant was previously used.
10. Fill the cooling system. Refer to Cooling System Draining and Filling (Static Fill), Cooling System Draining and Filling (Vac N Fill). Use the correct 50/50 coolant mixture and verify the level and concentration after the engine has reached operating temperature and cooled again.
RADIATOR CLEANING
WARNING: NEVER spray water on a hot heat exchanger. The resulting steam could cause personal injury.
CAUTION: The heat exchanger fins are necessary for good heat transfer. Do not brush the fins. This may cause damage to the fins, reducing heat transfer.
Radiator and condenser cleaning should be done carefully because the cooling fins are thin and easily bent. Restricted airflow through the radiator can cause high engine temperature, reduced air conditioning performance, or fan operation that seems more frequent than normal. Always clean from the engine side when possible so debris is pushed back out the direction it entered.
- Some conditions may require the use of warm water and a mild detergent. Use only mild detergent and rinse thoroughly so no residue remains between the fins.
NOTE: Remove bugs, leaves, dirt and other debris by blowing compressed air through the engine side of the radiator.
- Clean the A/C condenser fins. Blocked condenser fins can reduce heat transfer and increase cooling system load during air conditioning operation.
- Clean between the A/C condenser and radiator. Leaves, dust, road grit, and insects can collect between these components where they are not easily seen from the front of the vehicle.
- Clean the radiator cooling fins. Use low-pressure water or compressed air carefully, keeping the nozzle at a safe distance to avoid folding the fins.
- Straighten any damaged cooling fins. Use a suitable fin comb or careful hand tool work, and do not force badly crushed areas because the tubes may be damaged.
After cleaning, inspect airflow paths, fan shroud fit, and the condition of nearby seals or air deflectors. The Buick Enclave cooling system depends on clean airflow through the front heat exchangers, especially during low-speed driving, hot weather, or extended idling.
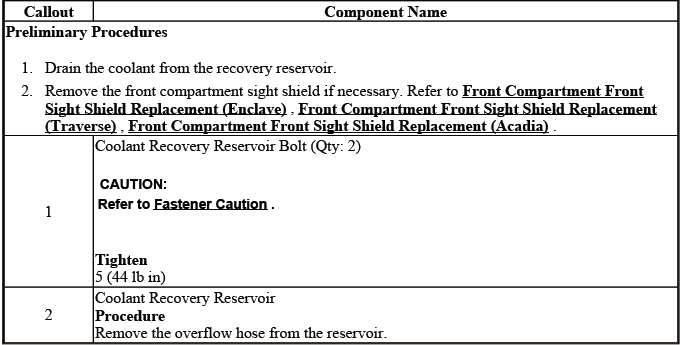
COOLANT RECOVERY RESERVOIR REPLACEMENT
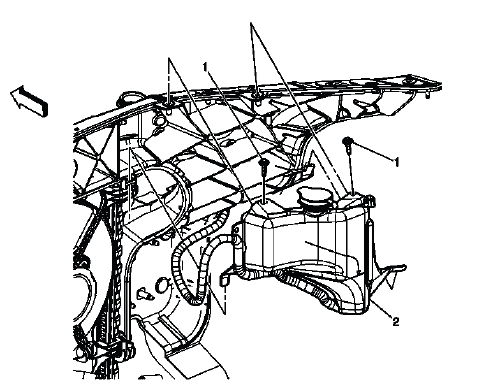
Fig. 22: View Of Coolant Recovery Reservoir
Coolant Recovery Reservoir Replacement
The coolant recovery reservoir stores expanding coolant as the engine warms and returns coolant to the system as it cools. If the reservoir is cracked, stained, leaking, contaminated, or unable to hold the correct level, it can lead to repeated low-coolant warnings or visible coolant loss. During replacement, inspect the cap, hose connections, mounting points, and surrounding area for signs of dried coolant or damage before installing the new reservoir.
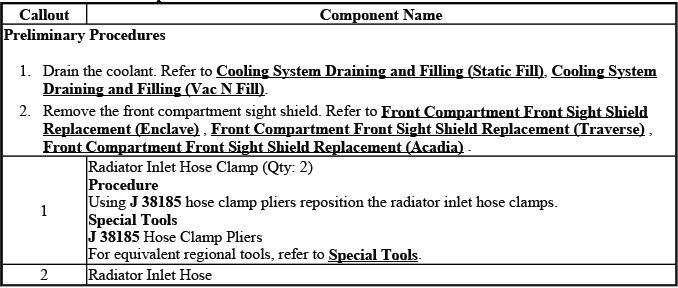
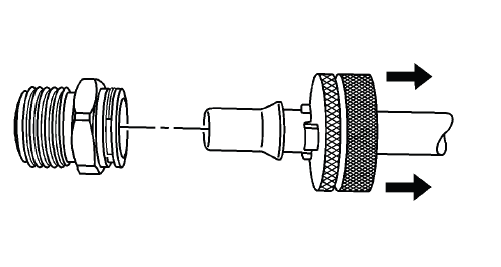
RADIATOR INLET HOSE REPLACEMENT
The radiator inlet hose carries hot coolant from the engine toward the radiator, so its condition has a direct effect on cooling system performance. Before replacement, inspect the hose for swelling, cracks, soft spots, oil contamination, abrasion marks, and dried coolant around the clamp areas. On the Buick Enclave, a weak inlet hose may leak only after the system reaches pressure, so a careful visual inspection should be paired with a pressure test when coolant loss is suspected.
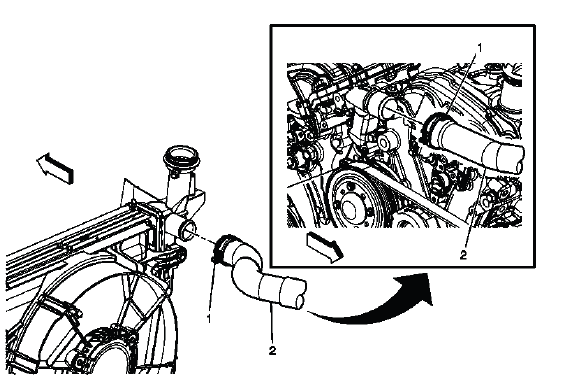
Fig. 23: Identifying Radiator Inlet Hose
Radiator Inlet Hose Replacement
When replacing the radiator inlet hose, allow the engine to cool completely and drain the cooling system to a safe level before disconnecting the hose. Release the clamp carefully, then twist the hose gently to break the seal instead of pulling sharply against the radiator neck or engine fitting. Clean the sealing surfaces before installing the new hose, and position the clamps in their original locations so the hose seals evenly under pressure.
RADIATOR OUTLET HOSE REPLACEMENT
The radiator outlet hose returns cooled coolant from the radiator back to the engine. Because this hose is part of the main circulation path, a restriction, collapse, or leak can cause unstable engine temperature, reduced heater performance, or overheating during driving. Inspect the hose after the engine has warmed and cooled, because some hose defects are more noticeable after repeated heat cycles.
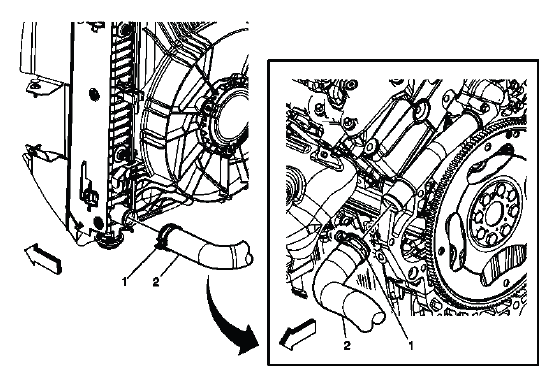
Fig. 24: Identifying Radiator Outlet Hose
Radiator Outlet Hose Replacement
During outlet hose replacement, keep the hose routing the same as the original layout. Make sure the hose does not rub against sharp brackets, moving components, or hot engine surfaces. After installation, refill the cooling system with the correct coolant mixture, bleed air as required, and inspect the connection points after the engine reaches operating temperature.
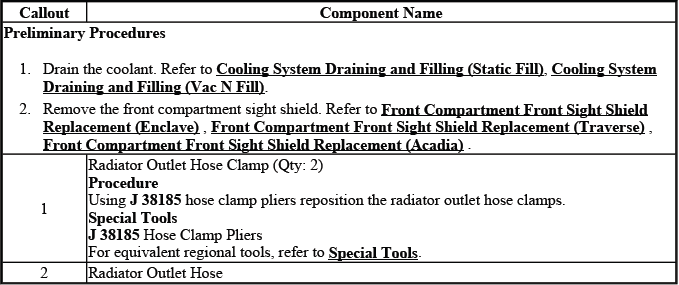
ENGINE OIL COOLER CONNECTOR REPLACEMENT
The engine oil cooler connector must seal properly to prevent fluid leaks and maintain reliable oil cooling. Before removing the connector, clean the surrounding area so dirt cannot enter the fitting or line. Any sign of oil residue, damaged seals, distorted retaining features, or looseness should be addressed during service rather than reused.

Fig. 25: View Of Engine Oil Cooler Connector
Engine Oil Cooler Connector Replacement
Replace the engine oil cooler connector with care, keeping the line straight as it is removed and installed. Do not pry aggressively against the fitting body, because damage to the sealing surface can create a leak after the repair. After installation, inspect the connector under operating conditions and verify that no seepage appears around the fitting.
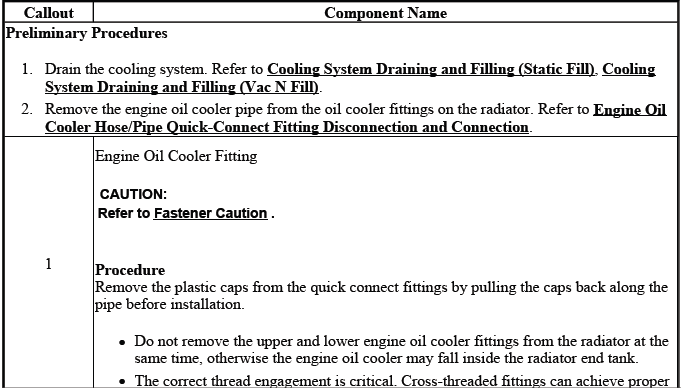

ENGINE OIL COOLER HOSE/PIPE QUICK-CONNECT FITTING DISCONNECTION AND CONNECTION
The quick-connect fitting is designed to secure the cooler pipe while allowing service access without cutting or damaging the line. The fitting, retaining clip, and sealing area must be handled cleanly and squarely. For the Buick Enclave, forcing the pipe at an angle can damage the retainer or sealing surface, which may lead to leaks after reassembly.
Special Tools
- DT-47731 1/2 in. Cooler Line Quick Release Tool
- J 28585 Universal Snap Ring Remover for the 5/8 in. Cooler Line
Removal Procedure
1. Remove the plastic caps from the quick connect fittings by pulling the caps back along the pipe before installation. Keep the caps clean if they will be reused, and inspect them for cracks or distortion. These caps help protect the fitting area from dirt and splash after service.
2. Install the DT-47731 1/2 in. cooler line quick release tool onto the transmission oil cooler (TOC) pipe or use the J 28585 universal snap ring remover for the 5/8 in. cooler line. Select the tool that matches the line size and fitting design. Using the wrong tool can bend the retainer, scar the pipe, or prevent the fitting from releasing cleanly.
Fig. 26: View Of J 41623-B & Generator Cooling Inlet Pipe
3. Slide the DT-47731 1/2 in. cooler line quick release tool toward the TOC pipe fitting or use the J 28585 universal snap ring remover for the 5/8 in. cooler line. Move the tool evenly so it enters the fitting squarely and contacts the retainer without binding.
Fig. 27: Sliding J 41623-B Toward Generator Cooling Inlet Pipe Fitting
4. Connect the DT-47731 1/2 in. cooler line quick release tool onto the TOC pipe fitting. Confirm that the tool is properly seated before attempting to rotate or pull the line. A partially engaged tool may not lift the retainer far enough to release the pipe.
Fig. 28: Rotating Quick-Connect On Coolant Pipe
NOTE: Rotate the DT-47731 1/2 in. cooler line quick release tool to engage the TOC pipe fitting's retainer slots. The DT-47731 1/2 in. cooler line quick release tool should be nearly flush with the fitting.
5. Rotate the DT-47731 1/2 in. cooler line quick release tool or use the J 28585 universal snap ring remover for the 5/8 in. cooler line until the retainer clip (1) rises above the fitting retainer seat. Do not force the retainer past its normal travel. If the clip does not move, stop and check tool position, dirt buildup, or fitting damage.
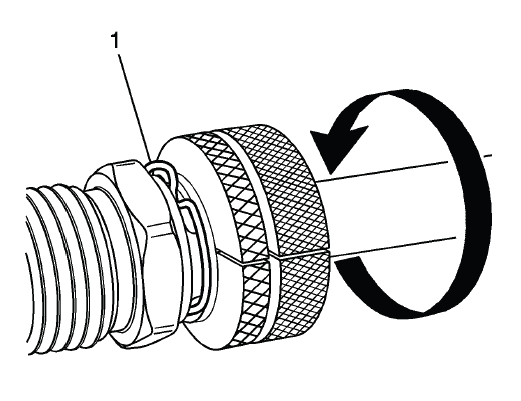
Fig. 29: Rotating Quick-Connect Until Retainer Clip Rises Above Fitting
Retainer Seat
6. Pull back on the TOC pipe to disengage the pipe from the TOC pipe fitting. Pull in line with the fitting and avoid rocking the pipe excessively. If the pipe resists removal, verify that the retainer clip is fully released before applying more force.
7. Remove the DT-47731 1/2 in. cooler line quick release tool or the J 28585 universal snap ring remover for the 5/8 in. cooler line from the TOC pipe. After removal, inspect the pipe end, sealing surface, and retainer area. Replace damaged clips or seals as required before reconnecting the line.
Installation Procedure
1. Install the TOC pipe into the TOC pipe fitting. Align the pipe straight with the fitting and push it in until it seats fully. Lubricate seals only as specified and keep the connection area clean so the new retainer can lock securely.
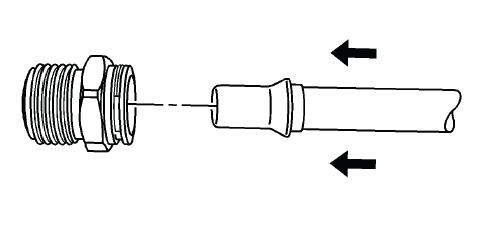
Fig. 31: View Of Generator Cooling Inlet Pipe & Generator Cooling Inlet Pipe
Fitting
NOTE: Discard the TOC retaining clip and install a new retaining clip.
A distinct snap should be heard or felt when assembling the TOC pipe to the fitting. This snap confirms that the retaining clip has engaged the pipe correctly. If the connection does not lock, remove the pipe and inspect the clip and fitting before trying again.
2. To ensure the cooler line is properly installed, give the cooler pipe a gentle pull. The pipe should remain locked in the fitting. After the engine is started and the system reaches normal operating conditions, inspect the connection again for any sign of seepage or movement.
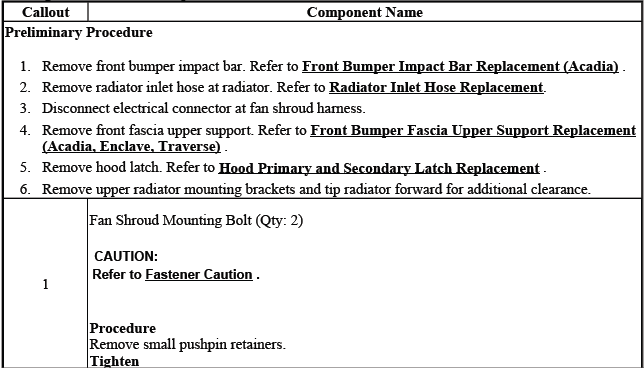
COOLING FAN AND SHROUD REPLACEMENT
The cooling fan and shroud assembly helps pull air through the radiator and condenser, especially during idle, slow traffic, and air conditioning operation. A damaged shroud, weak fan motor, loose connector, or restricted fan blade movement can reduce cooling efficiency. Before replacement, check for broken mounting points, debris in the fan path, and wiring that may be stretched or rubbed through.
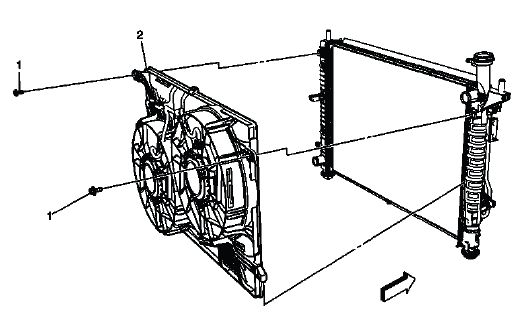
Fig. 32: View Of Cooling Fan & Shroud
Cooling Fan and Shroud Replacement
When removing the fan and shroud, disconnect the electrical connector and move the harness away from the fan blades. Lift the assembly carefully to avoid damaging the radiator fins or condenser. During installation, confirm that the shroud sits correctly in its lower mounts and that no hoses, wires, or clips interfere with fan blade rotation.

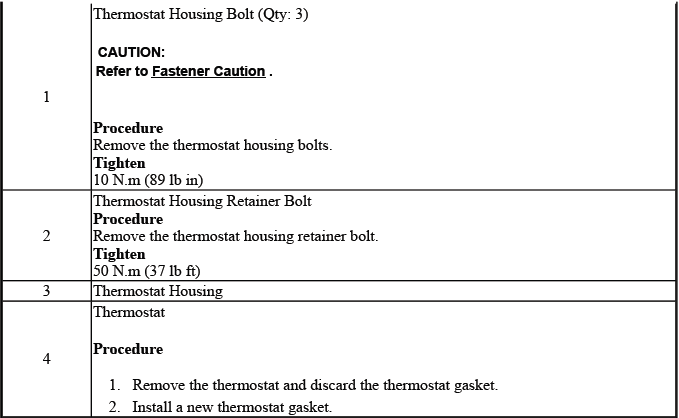
ENGINE COOLANT THERMOSTAT REPLACEMENT
The engine coolant thermostat controls coolant flow between the engine and radiator. A thermostat stuck open can prevent the engine from reaching normal operating temperature, while a thermostat stuck closed can cause rapid overheating. On the Buick Enclave, thermostat replacement should be followed by a careful refill and air removal procedure so the cooling system stabilizes correctly.
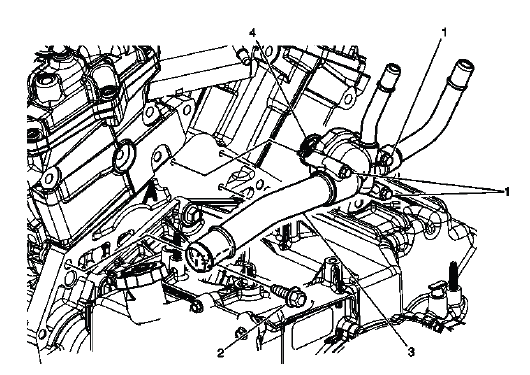
Fig. 33: View Of Thermostat Housing & Components
Engine Coolant Thermostat Replacement
Before removing the thermostat housing, drain the coolant to the proper level and clean the area around the housing. Remove the housing evenly, then inspect the sealing surface for corrosion, old gasket material, or pitting. Install the thermostat in the correct orientation, use the required seal, and tighten fasteners evenly to avoid leaks or housing distortion.
WATER OUTLET REPLACEMENT
The water outlet directs coolant flow from the engine into the cooling system. A leak at this housing can appear as coolant residue, low coolant level, steam odor, or wetness around the outlet area. Inspect the outlet carefully because leaks may only appear after the engine is hot and system pressure has increased.
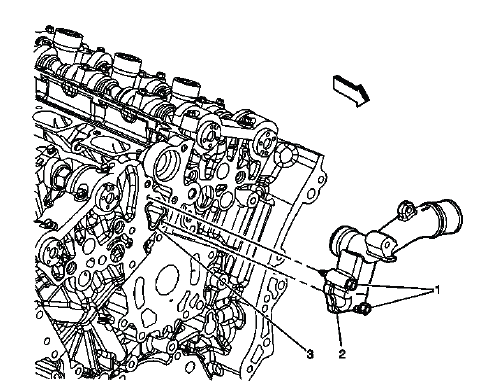
Fig. 34: Identifying Water Outlet Housing
Water Outlet Replacement
During water outlet replacement, clean the mating surface and inspect the housing for cracks, warping, or damaged bolt holes. Install the new seal correctly and tighten fasteners in a controlled manner. After refilling the system, pressure test the repair area and verify that the outlet remains dry during warm-up and after the cooling fan cycles.

WATER PUMP REPLACEMENT
The water pump circulates coolant through the engine, radiator, heater core, and related passages. A failing pump may cause coolant leakage, bearing noise, wobble at the pulley, overheating, or poor coolant circulation. Because the water pump is a central part of the Buick Enclave cooling system, replacement should be performed with attention to sealing surfaces, belt routing, pulley alignment, and final leak inspection.
Special Tools
- EN 46104 Water Pump Pulley Holding Tool
Removal Procedure
1. Drain the cooling system. Refer to Cooling System Draining and Filling (Static Fill), Cooling System Draining and Filling (Vac N Fill). Allow the engine to cool completely before draining, and collect the coolant in a suitable container. If the coolant is clean and serviceable, store it properly; if it is contaminated, dispose of it according to local regulations.
2. Remove the drive belt. Refer to Drive Belt Replacement. Before removal, note the belt routing and inspect the belt for cracks, glazing, frayed edges, or coolant contamination. If coolant has leaked onto the belt, replacement may be necessary to prevent slipping or noise after the repair.
3. Remove the right engine strut mount. Refer to Engine Mount Strut Replacement - Right Side. Removing this mount creates the working clearance needed to access the water pump area without forcing nearby components out of position. Support the engine as required by the related procedure and avoid placing stress on hoses, wiring, or the mount hardware during removal.
4. Remove the right engine mount strut bracket. Refer to Engine Mount Strut Bracket Replacement - Right Side. Keep the fasteners organized and note their original locations so the bracket can be reinstalled correctly. On the Buick Enclave, this area is tight, so clean access and careful tool placement help prevent damage to the surrounding cooling system and engine components.
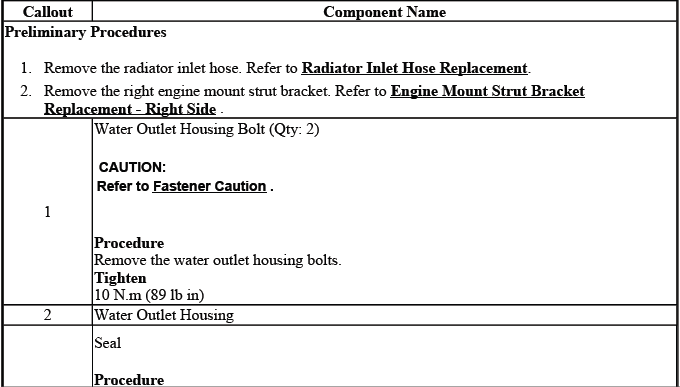
5. Use the EN 46104 tool in order to retain the water pump pulley. The pulley must be held securely before the bolts are loosened, because allowing the pulley to rotate can make removal difficult and may damage the pulley surface or bolt heads.
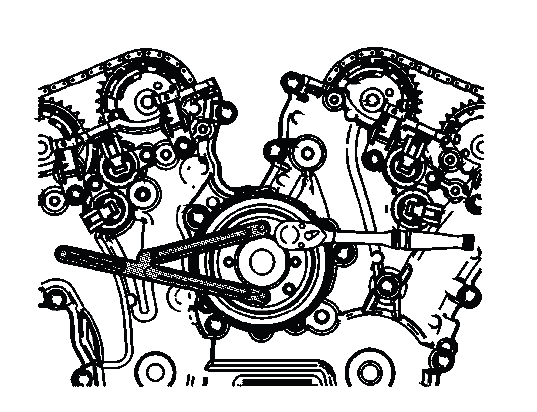
Fig. 35: View Of EN 46104 Installed On Water Pump Pulley
6. Remove the water pump pulley bolts. Loosen the bolts evenly and keep control of the pulley as the final bolt is removed. If the pulley has corrosion or residue around the bolt seats, clean the area before reassembly so the pulley sits flat.
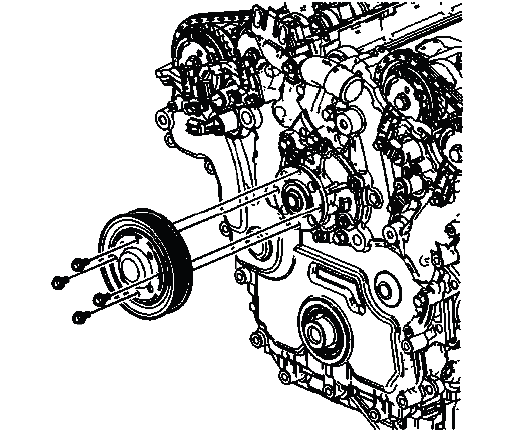
Fig. 36: Locating Water Pump Pulley & Bolts
7. Remove the water pump pulley. Inspect the pulley for cracks, bent edges, worn grooves, or signs of belt slippage. A damaged pulley can cause belt noise, misalignment, or reduced water pump performance after the repair.
8. Remove the water pump bolts and DISCARD the bolts. These bolts must not be reused when they are specified as single-use fasteners. Reusing stretched or weakened bolts can lead to uneven clamping force, coolant leakage, or component damage.
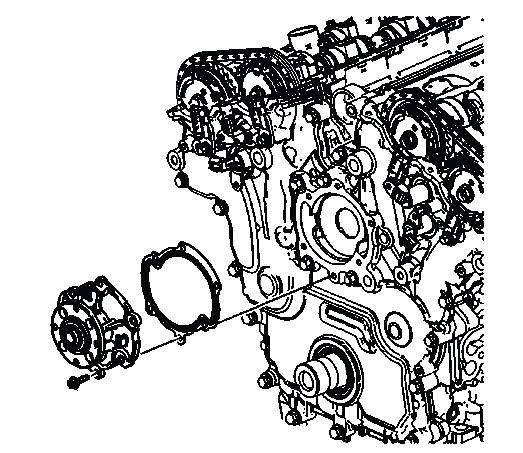
Fig. 37: Identifying Water Pump Components
9. Remove the water pump. Pull the pump away from the engine carefully and keep the sealing surface from being scratched. If the pump does not release easily, work around the housing gradually rather than prying aggressively against the mating surface.
10. Remove and DISCARD the water pump seal. The old seal should never be reused, even if it appears undamaged. Once compressed and heat-cycled, the seal may not provide the same clamping and sealing performance during reinstallation.
11. Carefully clean the water pump sealing surfaces. Remove old seal material, coolant residue, corrosion, and dirt without gouging the aluminum surface. A smooth, clean sealing surface is critical for preventing leaks after the Buick Enclave water pump is installed.
Installation Procedure
1. Install a NEW water pump seal. Confirm that the seal is positioned correctly and is not twisted, pinched, or contaminated with dirt. A misaligned seal can create an immediate leak when the system is refilled and pressurized.
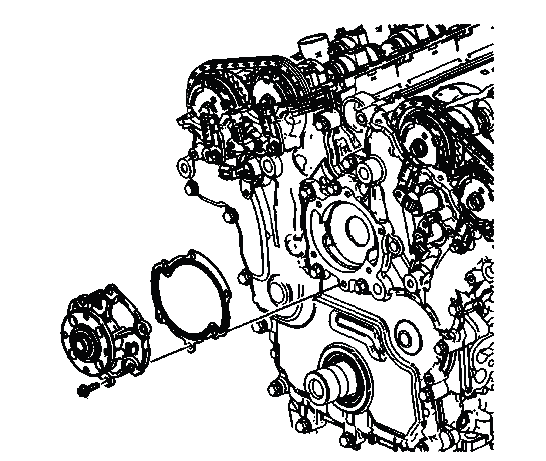
Fig. 38: Identifying Water Pump Components
2. Install the water pump. Set the pump squarely against the engine and keep it aligned with the bolt holes. Do not use the bolts to force the pump into position if it is not seated correctly.
3. Install the NEW water pump bolts and hand tighten the water pump bolts. Starting the bolts by hand helps prevent cross-threading and allows the pump to settle evenly against the sealing surface before final tightening.
CAUTION: This vehicle is equipped with torque-to-yield or single use fasteners.
Install a NEW torque-to-yield or single use fastener when installing this component. Failure to replace the torque-to-yield or single use fastener could cause damage to the vehicle or component.
CAUTION: Refer to Fastener Caution.
4. Tighten the water pump bolts in sequence. Follow the tightening order exactly so the pump housing is drawn down evenly. Uneven tightening can distort the housing, damage the new seal, or create a small leak that appears only after the engine reaches normal operating temperature.
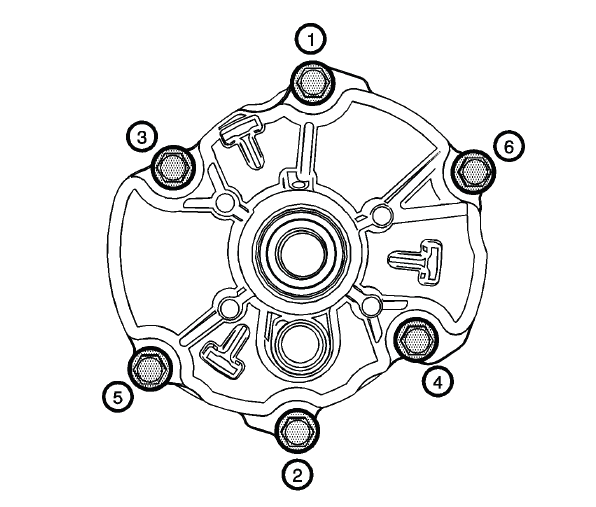
Fig. 39: Water Pump Bolts Tightening Sequence
- On the initial pass, tighten the bolts in sequence to 10 (89 lb in).
- On the second pass, tighten the bolts in sequence to 10 (89 lb in).
- On the final pass, tighten the bolts in sequence shown an additional 45º.
5. Install the water pump pulley bolts. Align the pulley properly before tightening so it sits flat against the pump hub. Do not tighten one bolt fully while the others are still loose.
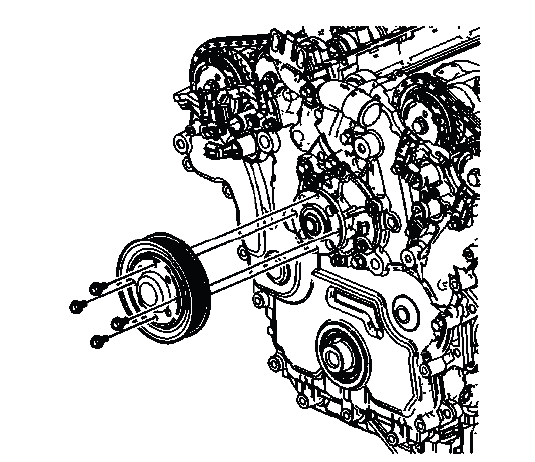
Fig. 40: Locating Water Pump Pulley & Bolts
6. Use the EN 46104 tool in order to retain the water pump pulley. Holding the pulley prevents rotation while the pulley bolts are tightened to specification.
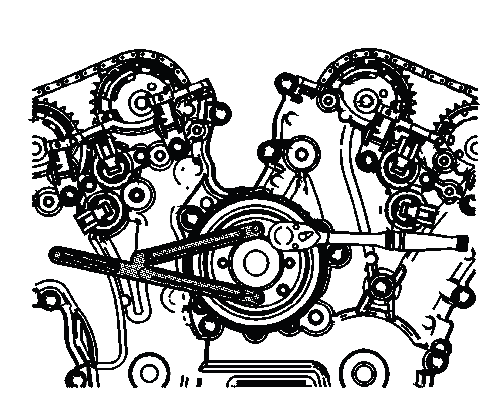
Fig. 41: View Of EN 46104 Installed On Water Pump Pulley
7. Install the water pump pulley bolts and tighten to 10 (89 lb in). After tightening, check that the pulley turns evenly and does not wobble. Any visible runout should be corrected before the drive belt is installed.
8. Install the right engine strut mount. Refer to Engine Mount Strut Replacement - Right Side. Make sure the mount is seated correctly and that its fasteners are started by hand before final tightening.
9. Install the right engine mount strut bracket. Refer to Engine Mount Strut Bracket Replacement - Right Side. Confirm that the bracket is aligned as it was before removal and that no hoses or wiring are trapped behind it.
10. Install the drive belt. Refer to Drive Belt Replacement. Verify the belt routing before starting the engine. A misrouted belt can cause accessory drive noise, poor charging, pulley damage, or overheating if the water pump is not driven correctly.
11. Fill the cooling system. Refer to Cooling System Draining and Filling (Static Fill), Cooling System Draining and Filling (Vac N Fill). Use the specified coolant mixture, remove trapped air as required, and inspect the water pump area for leaks after the engine reaches operating temperature. Final verification is especially important on the Buick Enclave because a small leak around the pump seal may not appear until the system is fully warm and pressurized.
RADIATOR REPLACEMENT
The radiator removes heat from the coolant as air passes through its fins. Replacement may be required if the radiator is leaking, restricted, physically damaged, or unable to transfer heat effectively. Before removing the radiator, inspect the surrounding condenser, fan shroud, hoses, mounts, and air seals so related airflow or sealing problems are not overlooked.
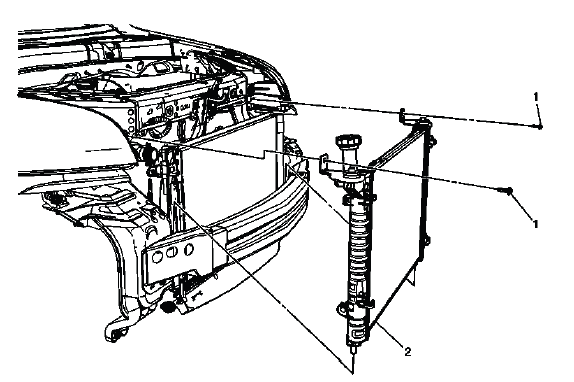
Fig. 42: Identifying Radiator
Radiator Replacement
During radiator replacement, handle the core carefully to avoid bending the fins or damaging the side tanks. Transfer any required mounts, cushions, clips, or fittings exactly as originally installed. After installation, refill the cooling system, check the transmission or engine oil cooler connections if equipped, and verify that the cooling fans and shroud are properly positioned for efficient airflow.

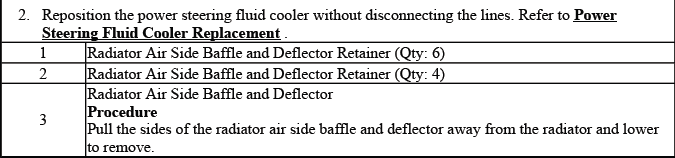
RADIATOR AIR SIDE BAFFLE AND DEFLECTOR REPLACEMENT
Radiator air side baffles and deflectors guide airflow through the radiator and condenser instead of allowing air to escape around them. Missing, cracked, or incorrectly installed deflectors can reduce cooling efficiency, especially during hot weather, low-speed driving, or air conditioning use. These pieces may look minor, but they are part of the designed airflow path.
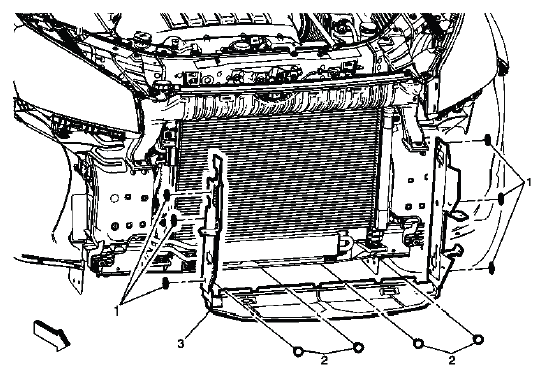
Fig. 43: Radiator Air Side Baffle And Deflector
Radiator Air Side Baffle and Deflector Replacement
When replacing the air side baffle or deflector, match the original position and fastening points. Make sure the deflector seals the intended gap and does not interfere with the cooling fan, radiator, condenser, or nearby harness routing. Correct installation helps the Buick Enclave cooling system maintain stable temperature control under load.

COOLANT HEATER REPLACEMENT
The coolant heater warms coolant in the engine area when external power is connected, helping improve cold-weather starting and reducing the strain of a very cold start. If the heater is inoperative, inspect the heater, cord, connector, routing, and power source before replacing parts. A poor connection or damaged cord can create the same symptom as a failed heater element.
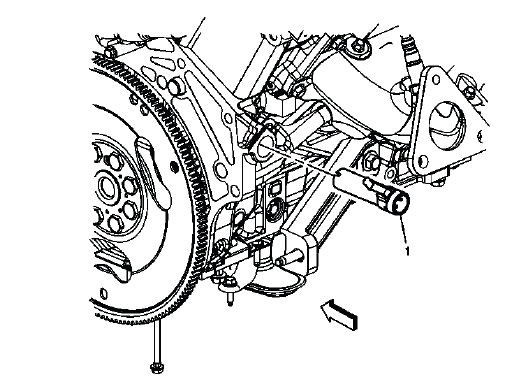
Fig. 44: View Of Coolant Heater
Coolant Heater Replacement
When replacing the coolant heater, allow the engine to cool and drain the coolant to the required level. Clean the heater mounting area and inspect the sealing surface before installing the replacement. After installation, refill the system, check for leaks, and verify that the heater cord connects securely without being stretched or routed near excessive heat.

COOLANT HEATER CORD REPLACEMENT
The coolant heater cord delivers external electrical power to the heater. Its routing is important because the cord is exposed to engine heat, road splash, vibration, and movement during service. Replace the cord if the insulation is cracked, the plug is damaged, the clips are missing, or the connector no longer locks firmly to the heater.
Removal Procedure
1. Raise and support the vehicle. Refer to Lifting and Jacking the Vehicle. Use approved lifting points and make sure the vehicle is stable before working underneath. Do not rely on a jack alone.
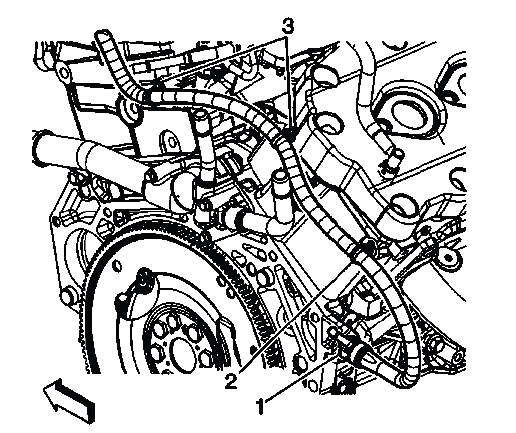
Fig. 45: Identifying Coolant Heater Cord Clips & Coolant Heater
2. Disconnect the coolant heater power supply cord from the coolant heater. Pull on the connector body rather than the cord itself. Inspect the connector for corrosion, moisture, heat damage, or loose terminal fit.
3. Lower the vehicle. Lowering the vehicle provides access to the upper cord routing and clips from the engine compartment area.
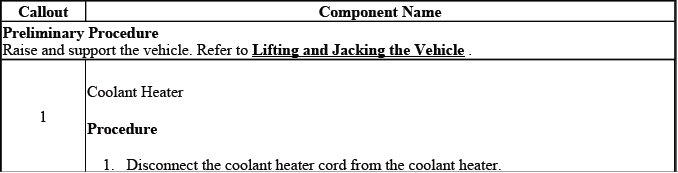
4. Disconnect the coolant heater cord clips (3) from the cylinder heads. Release the clips carefully so they can be removed without breaking surrounding retainers or damaging the harness.
5. Disconnect the coolant heater cord clip from the engine wiring harness. Keep the wiring harness protected and avoid pulling the heater cord across sharp edges or hot components.
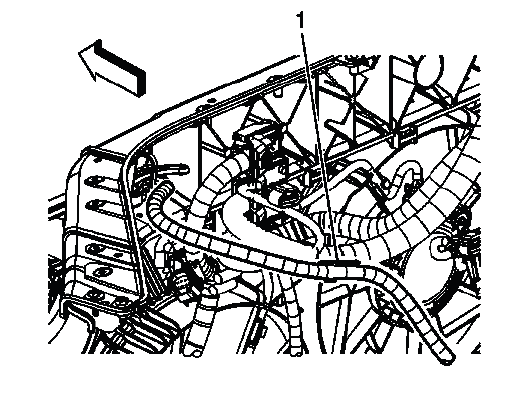
Fig. 46: Identifying Coolant Heater Cord
6. Remove the coolant heater cord (1) from the vehicle. Note the original routing before removal so the replacement cord can be installed in the same protected path. Incorrect routing can allow the cord to rub, melt, or hang too low under the vehicle.
Installation Procedure
1. Position the coolant heater cord (1) to the engine harness. Follow the original routing and keep the cord away from exhaust heat, rotating parts, sharp brackets, and areas where road debris can strike it.
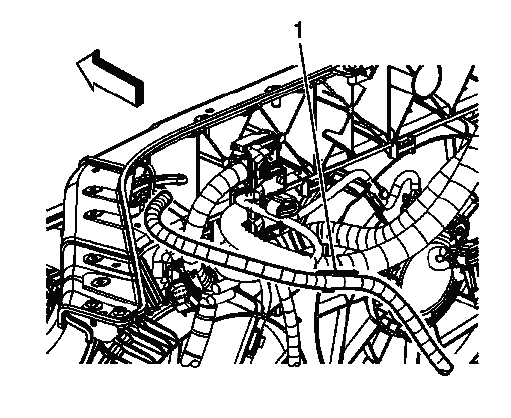
Fig. 47: Identifying Coolant Heater Cord
2. Connect the coolant heater cord clip to the engine wiring harness. The clip should hold the cord securely without pinching or stretching it. A loose cord can move with engine vibration and wear through the insulation over time.
3. Connect the coolant heater cord clips (3) to the cylinder heads. Confirm that each clip is fully seated and that the cord follows the intended path. Proper clip placement helps keep the Buick Enclave coolant heater cord stable during engine movement and cold-weather use.
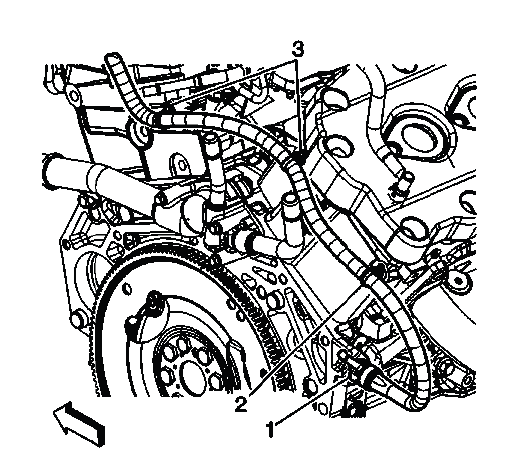
Fig. 48: Identifying Coolant Heater Cord Clips & Coolant Heater
4. Raise and support the vehicle. Refer to Lifting and Jacking the Vehicle. Recheck the lower cord routing from underneath before reconnecting the heater end.
5. Connect the coolant heater cord to the coolant heater. Make sure the connector is fully seated and locked. The connection should be clean, dry, and positioned so water cannot easily collect around the terminals.
6. Lower the vehicle. After lowering, inspect the cord from above and below, then confirm that it is secured in all clips and clear of moving or hot components. If the heater is being serviced for an inoperative condition, verify power supply and operation under the proper temperature conditions after installation.
