Buick Enclave: Timing Chains & Belts
* PLEASE READ THIS FIRST *
NOTE: Examples used in this article are general in nature and do not necessarily relate to a specific engine or system. Illustrations and procedures have been chosen to guide mechanic through engine overhaul process. Descriptions of processes of cleaning, inspection, assembly and machine shop practice are included.
Always refer to appropriate engine overhaul article, if available, in the ENGINES section for complete overhaul procedures and specifications for the vehicle being repaired. Timing components must be serviced with exact attention to alignment marks, tensioner position, guide wear, and engine rotation direction. When this information is used for a Buick Enclave engine repair, it should support the work, but the final timing procedure, torque values, and component limits must always come from the correct engine-specific service data.
TIMING CHAINS
NOTE: Examples used in this article are general in nature and do not necessarily relate to a specific engine or system. Illustrations and procedures have been chosen to guide mechanic through engine overhaul process. Descriptions of processes of cleaning, inspection, assembly and machine shop practice are included.
Always refer to appropriate engine overhaul article, if available, in the ENGINES section for complete overhaul procedures and specifications for the vehicle being repaired.
Timing chains will stretch during operation. Limits are placed upon amount of stretch before replacement is required. Timing chain stretch will alter ignition timing and valve timing. As the chain wears, the relationship between the crankshaft and camshaft begins to drift, which can affect starting, idle quality, power delivery, emissions performance, and overall engine smoothness.
A worn timing chain may also create noise, especially during start-up or when oil pressure is low. Chain guides, tensioners, sprockets, and oil-fed tensioning components should be inspected together because replacing only one worn part can leave the timing system unstable. On a Buick Enclave, correct camshaft timing is especially important because even a small timing error can cause drivability problems or diagnostic trouble codes.
To check timing chain stretch, rotate crankshaft to eliminate slack from one side of timing chain. Mark reference point on cylinder block. Rotate crankshaft in opposite direction to eliminate slack from remaining side of timing chain. Force other side of chain outward and measure distance between reference point and timing chain. See Fig. 23. Replace timing chain and gears if not within specification.
When measuring chain stretch, rotate the crankshaft smoothly and avoid forcing the chain beyond normal movement. The chain should be evaluated with the tensioner, guides, and sprockets in mind, because worn gear teeth or a weak tensioner can make the chain appear worse or better than it really is. If the measurement is near the service limit, replacement is usually the more reliable repair during an engine overhaul.
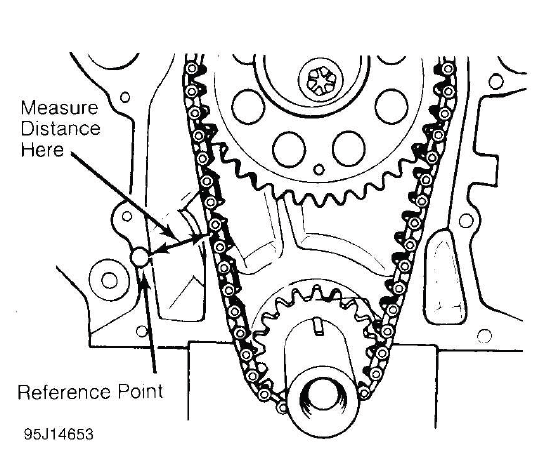
Fig. 23: Measuring Timing Chain Stretch
Timing chains must be installed so timing marks on camshaft gear and crankshaft gear are aligned according to manufacturer. See Fig. 24. The marks must be checked before the chain is installed, after tension is applied, and again after the engine is rotated by hand through the required number of revolutions. A timing mark that appears aligned before tensioning may shift slightly once slack is removed.
Never rely only on memory or visual guesswork when setting timing marks. Clean the sprockets and chain marks so they can be seen clearly, and confirm that the crankshaft and camshaft are positioned exactly as required. Incorrect timing alignment can lead to poor performance, misfire, no-start condition, valve-to-piston contact on some engines, or serious internal engine damage.
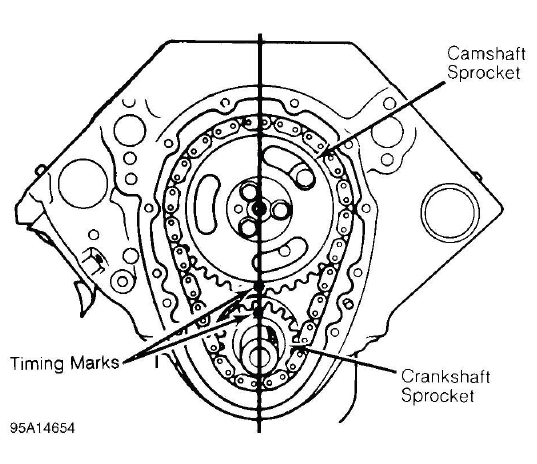
Fig. 24: Typical Gear Timing Mark Alignment
TIMING BELTS
NOTE: Examples used in this article are general in nature and do not necessarily relate to a specific engine or system. Illustrations and procedures have been chosen to guide mechanic through engine overhaul process. Descriptions of processes of cleaning, inspection, assembly and machine shop practice are included.
Always refer to appropriate engine overhaul article, if available, in the ENGINES section for complete overhaul procedures and specifications for the vehicle being repaired.
Cogged tooth belts are commonly used on overhead cam engines. Inspect belt teeth for rounded corners or cracking. Replace belt if it is cracked, damaged, missing teeth or oil soaked. A timing belt should also be replaced if the backing is glazed, frayed, swollen, hardened, or contaminated by coolant. Oil or coolant contamination weakens the belt material and can cause tooth separation or belt failure.
Used timing belt must be installed in original direction of rotation. Inspect all sprocket teeth for wear. Replace all worn sprockets. Sprockets are marked for timing purposes. Engine is positioned so that crankshaft sprocket mark will be upward. Camshaft sprocket is aligned with reference mark on cylinder head or timing belt cover and then timing belt can be installed. See Fig. 25.
If a used belt is being reused only for temporary service or inspection, mark its direction before removal. Reversing a used belt can stress the cords in the opposite direction and shorten belt life. During Buick Enclave-related engine service information, belt procedures should still be interpreted carefully because the exact engine design determines whether a chain or belt system is used and how timing should be set.
Before installing the belt, confirm that the crankshaft and camshaft sprockets are clean, dry, and free of damaged teeth. The belt must sit fully in the sprocket grooves without twisting or riding on the edge. After installation, rotate the engine by hand as specified and recheck all marks before the covers are installed.
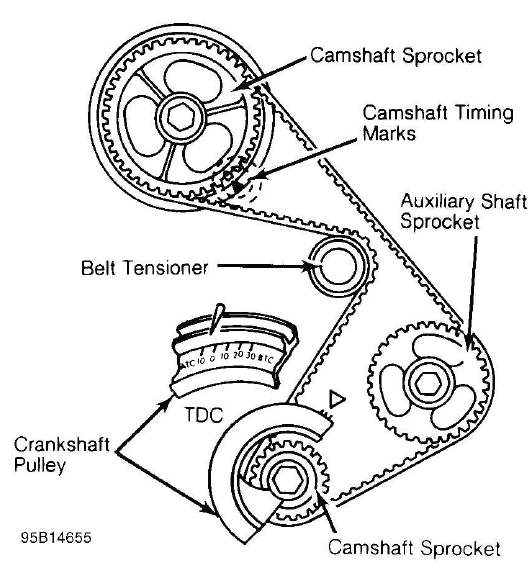
Fig. 25: Typical Camshaft Belt Sprocket Alignment
TENSION ADJUSTMENT
NOTE: Examples used in this article are general in nature and do not necessarily relate to a specific engine or system. Illustrations and procedures have been chosen to guide mechanic through engine overhaul process. Descriptions of processes of cleaning, inspection, assembly and machine shop practice are included.
Always refer to appropriate engine overhaul article, if available, in the ENGINES section for complete overhaul procedures and specifications for the vehicle being repaired.
If guide rails are used with spring loaded tensioners, ensure at least half of original rail thickness remains. Guide rails and chain guides should be inspected for grooves, cracks, broken edges, heat damage, or uneven wear. A worn guide can allow chain slap, unstable timing, and accelerated chain wear even when the chain itself is new.
Spring loaded tensioner should be inspected for damage. Check that the tensioner moves smoothly, applies pressure correctly, and locks or resets according to the service procedure. If the tensioner is oil-fed, inspect the oil feed path and make sure sludge or debris has not restricted tensioner operation.
Ensure all timing marks are aligned. Adjust belt tension using manufacturer's recommendations. Belt tension may require checking using tension gauge. See Fig. 26. Belt or chain tension must not be set by feel unless the service procedure specifically allows it. Too little tension can allow the belt or chain to jump timing, while excessive tension can overload bearings, sprockets, tensioners, and camshaft components.
After tension is adjusted, rotate the crankshaft by hand through the recommended number of revolutions and bring the engine back to the timing position. Recheck timing marks and tension after rotation, because the belt or chain may settle into the sprockets. For a Buick Enclave engine timing service, this final verification helps prevent start-up damage and avoids repeating a major disassembly because of one missed alignment check.
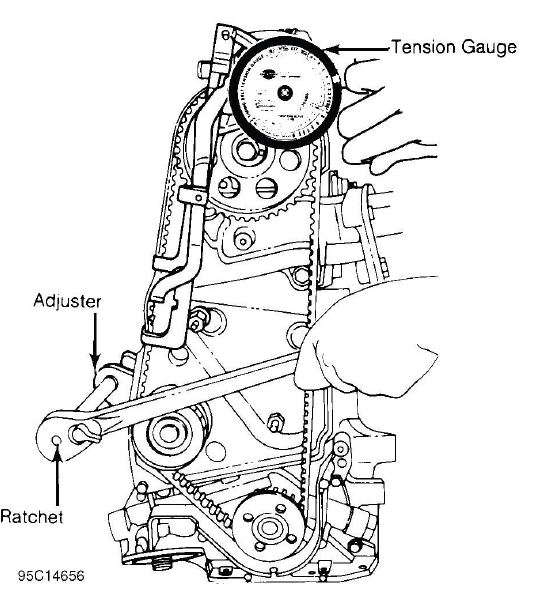
Fig. 26: Adjusting Typical Timing Belt Tension
