Buick Enclave: Specifications, Diagnostic Information and Procedures
SPECIFICATIONS
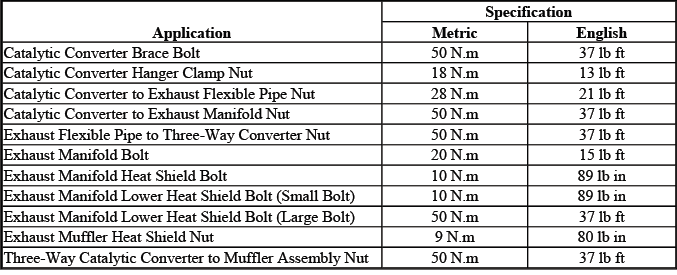
FASTENER TIGHTENING SPECIFICATIONS
Fastener Tightening Specifications
Fastener tightening specifications are provided to help ensure that exhaust system components are secured with the correct clamping force. Proper torque is important because exhaust parts operate under heat, vibration, expansion, and contraction. If a fastener is too loose, the system can develop leaks, rattles, or movement at the joints. If it is overtightened, studs, flanges, brackets, or seals may be damaged.
When servicing the Buick Enclave exhaust system, use the specified tightening values and follow the correct service sequence. Exhaust hardware should be inspected for corrosion, damaged threads, missing retainers, weak hangers, or distorted flanges before reassembly. Reusing damaged hardware can make a repair look complete while still allowing noise, leakage, or premature failure to return.
DIAGNOSTIC INFORMATION AND PROCEDURES
SYMPTOMS - ENGINE EXHAUST
The engine exhaust system should be diagnosed with a clear understanding of how each component is intended to work. Exhaust concerns can be caused by leaks, restrictions, damaged hangers, loose shields, failed seals, incorrect aftermarket parts, impact damage, or internal failure of a converter or muffler. Because several symptoms can sound similar from inside the vehicle, a careful inspection is needed before any parts are replaced.
- Review the exhaust system description to become familiar with the exhaust system components and the intended function of each part. Refer to Exhaust System Description. Understanding the layout helps separate normal operating characteristics from actual concerns such as restriction, leakage, vibration, or abnormal noise.
- All diagnostics on a vehicle should follow a logical process. Strategy Based Diagnostics is a uniform approach for repairing all systems. The diagnostic flow is the proper starting point when repairs are necessary and may always be used to resolve a system problem. For a detailed explanation, refer to Strategy Based Diagnosis. This approach helps avoid unnecessary parts replacement and supports a more accurate repair on the Buick Enclave.
Visual/Physical Inspection
A visual and physical inspection should be performed before more involved testing begins. Many exhaust system problems can be found by looking for obvious damage, loose parts, heat marks, missing insulators, cracked welds, crushed pipes, or evidence of leakage around joints and flanges.
- Inspect for aftermarket or non-OEM devices such as, but not limited to, tailpipe extensions, headers, modified exhaust sections, and exhaust cutouts. Any aftermarket exhaust system device could affect the operation, sound level, back pressure, emissions performance, fit, and proper function of the exhaust system.
- Verify the exact operating conditions under which the concern exists. Note factors such as engine RPM, engine temperature, engine load, vehicle speed, road surface, weather conditions, and how often the concern occurs. A rattle that happens only on cold start, for example, may need a different diagnostic approach than a loud noise under acceleration.
- Inspect the easily accessible or visible system components for obvious damage or conditions that could cause the symptom. Look for loose clamps, missing hangers, broken brackets, damaged heat shields, crushed pipes, rust-through, contact with the body, and signs of exhaust soot near a sealing surface.
Intermittent
Test the vehicle under the same conditions reported by the customer in order to verify that the system is operating as designed. Intermittent exhaust concerns may only appear when the exhaust is hot, when the engine is under load, during deceleration, over bumps, or at a certain RPM range. Duplicating the condition is important because a system may appear normal during a brief inspection but still produce noise, restriction, or leakage during actual driving.
If the symptom cannot be duplicated immediately, note the customer’s description carefully and inspect for witness marks, polished contact points, soot trails, loose shields, or components that may shift as the exhaust expands with heat.
Symptom List
Refer to a symptom diagnostic procedure from the following list in order to diagnose the concern. Each symptom should be matched to the correct diagnostic path so that testing remains focused and efficient.
- Loss of power
- Poor acceleration
- Poor fuel economy
- Excessive smoke diesel
- Exhaust hissing noise
- Exhaust popping noise
- Exhaust rattle noise
- Loud exhaust noise
- Exhaust buzz, groan, hum noise
Some of these symptoms may also be influenced by engine performance, fuel control, ignition, air intake, transmission behavior, or mounting issues. For that reason, the exhaust system should be checked as part of the complete diagnostic picture rather than viewed in isolation.
RESTRICTED EXHAUST
Special Tools
- J-35314-A Exhaust Back Pressure Gauge
Diagnostic Aids
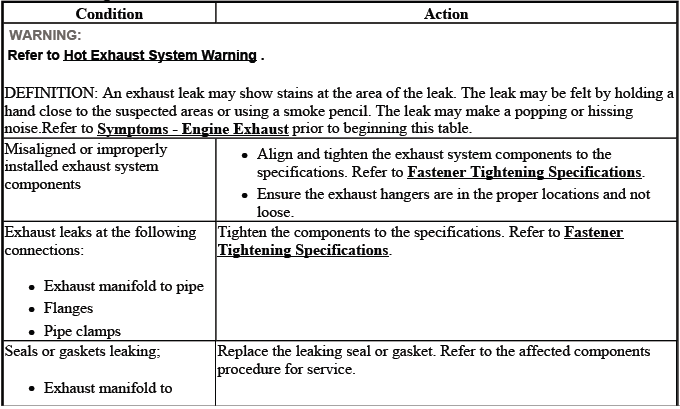
WARNING: Refer to Hot Exhaust System Warning.
The exhaust system can become extremely hot during operation. Allow proper cooling time when required, and use appropriate protective equipment when working near exhaust pipes, catalytic converters, mufflers, or heat shields. Burns can occur quickly if hot components are touched.
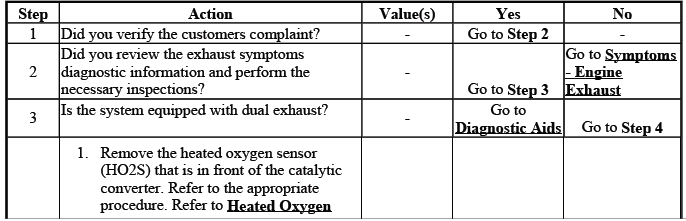
For dual exhaust systems, a quick check of exhaust flow can help determine which side of the system may be restricted. The side with noticeably lower exhaust flow is the suspect side, and diagnosis should begin there. A restricted exhaust can reduce engine power, create poor acceleration, increase fuel consumption, and in some cases cause unusual heat buildup or engine performance complaints.
On the Buick Enclave, exhaust restriction should be verified with proper testing rather than assumed from symptoms alone. Similar drivability concerns can also be caused by ignition, fuel delivery, air intake, sensor, or transmission issues.
Test Description
The numbers below refer to the step numbers on the diagnostic table.
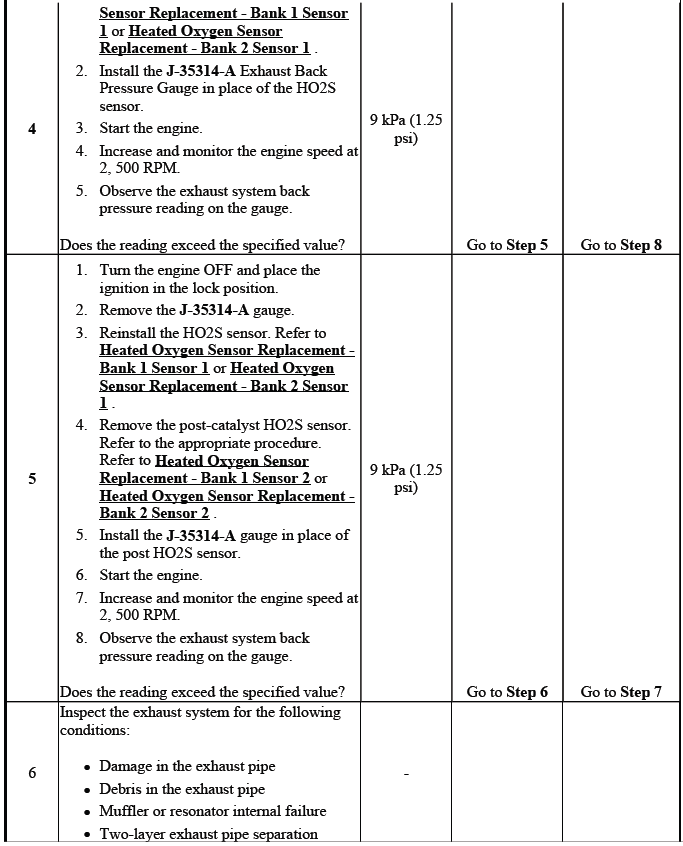
4
The exhaust system has very low back pressure under normal conditions. If the exhaust system is restricted, a significant increase in exhaust pressure will be noticed on the J-35314-A gauge. A high reading indicates that exhaust gases are not flowing freely through the system and that a restriction may be present downstream of the test point.
Removing the HO2S sensor may set a DTC. When finishing this diagnostic table, be sure to clear all codes. After clearing codes, confirm that no unrelated warning lights or stored faults remain because of the diagnostic process.
5
This step isolates the catalytic converter from the remainder of the exhaust system. Separating sections of the system during testing helps identify whether the restriction is in the converter, pipe, muffler, resonator, or another downstream component. This prevents unnecessary replacement of parts that are not actually causing the concern.
8
Confirming that the condition has been corrected is essential. After repair, the vehicle should be tested again under the same conditions that originally produced the symptom. If the symptom still exists and the vehicle has a dual exhaust system, proceed to step 2 and repeat the diagnostic procedure on the opposite exhaust pipe.
Verification should include checking for restored exhaust flow, normal engine response, no abnormal noise, no leaks at disturbed joints, and no diagnostic trouble codes related to removed or disconnected components.
Restricted Exhaust
The restricted exhaust diagnostic charts provide the structured test steps needed to measure exhaust back pressure, isolate the source of restriction, and confirm the repair. Follow the chart in order and do not skip confirmation steps, because a partial restriction can create symptoms that appear only under certain engine loads.

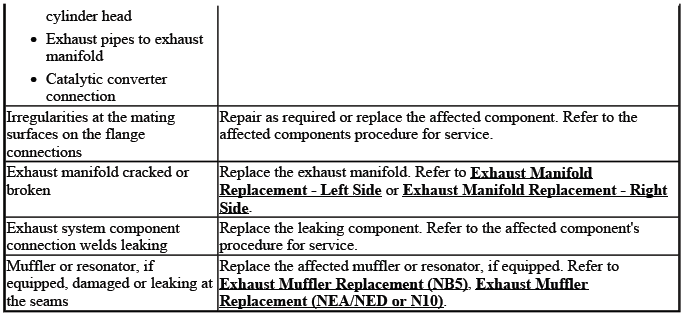
EXHAUST LEAKAGE
Exhaust Leakage
Exhaust leakage can create noise, odor, poor sealing, incorrect sensor readings, reduced emissions performance, and possible safety concerns if exhaust gases enter areas near the passenger compartment. Leaks may occur at flanges, gaskets, welds, pipe seams, flex sections, damaged converters, mufflers, or connections that have loosened because of heat cycles and vibration.
When inspecting for exhaust leakage, look for black soot marks, ticking noises on cold start, visible cracks, rust perforation, loose fasteners, and areas where exhaust pressure can escape. Small leaks can be easier to hear when the engine is cold and the exhaust system has not fully expanded. Any suspected leak should be corrected with the proper parts and sealing method rather than temporary patching.
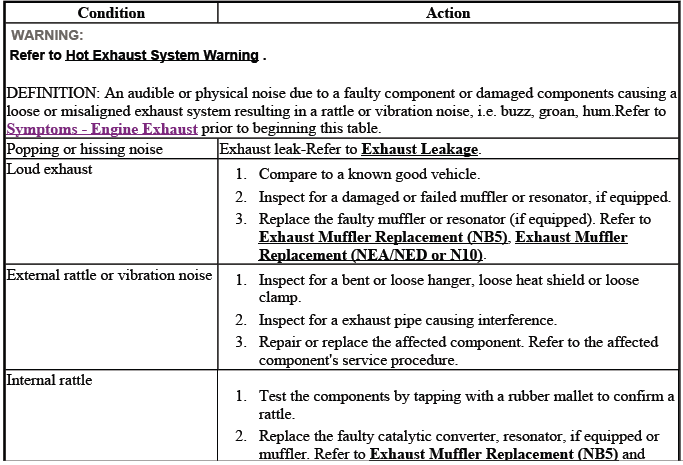
EXHAUST NOISE
Exhaust Noise
Exhaust noise can come from many different areas of the system. A loud exhaust tone may indicate a hole, broken seam, failed gasket, or damaged muffler. A rattle may be caused by a loose heat shield, failed hanger, internal converter damage, pipe contact with the body, or a bracket that has loosened. A buzz, hum, or groan can occur when exhaust vibration transfers into the body or when a component resonates at a specific engine speed.
To diagnose exhaust noise correctly, identify when the sound occurs: cold start, idle, acceleration, deceleration, rough roads, turning, or a certain RPM range. Then inspect the system for contact points, loose shields, damaged isolators, broken welds, and components that shift when the powertrain moves. A proper repair should remove the cause of the noise without creating new stress in the exhaust system.
For the Buick Enclave, maintaining correct exhaust alignment is especially important because the system must remain isolated from the body while still allowing normal movement from heat expansion and powertrain motion.