Buick Enclave: Specifications, Diagnostic Information and Procedures
SPECIFICATIONS
FASTENER TIGHTENING SPECIFICATIONS
Fastener Tightening Specifications
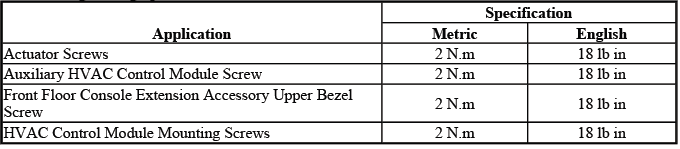
The fastener tightening specifications provide the required torque values for HVAC service work. These values should be followed during component installation to avoid loose fittings, cracked plastic housings, distorted brackets, or damaged aluminum connections. In the Buick Enclave automatic HVAC system, correct torque is especially important around refrigerant fittings, actuator mounts, blower components, module fasteners, and duct-related hardware because many parts rely on accurate seating and clean sealing surfaces.
SENSOR RESISTANCE TABLE
Sensor Resistance Table
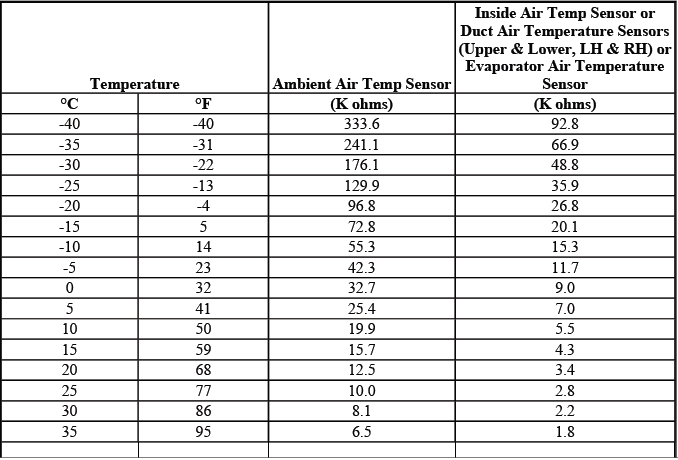
The sensor resistance table is used to compare actual sensor readings with expected resistance values at known temperatures. Temperature sensors in the HVAC system change resistance as air temperature changes, and the control module interprets that change as a temperature input. When a sensor value does not match the table, the concern may be caused by the sensor itself, a poor terminal connection, high resistance in the circuit, a short to ground, an open circuit, or incorrect testing conditions.
SCHEMATIC WIRING DIAGRAMS
HVAC SYSTEM SCHEMATICS
Power, Ground, Blower Control, Serial Data and Sunload Sensor
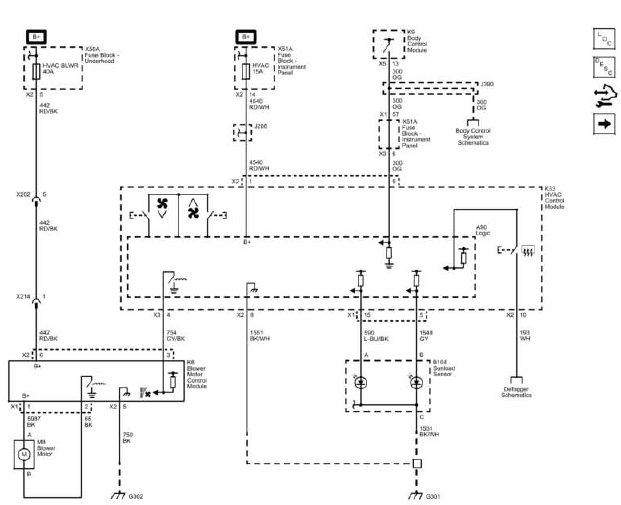
Fig. 1: Power, Ground, Blower Control, Serial Data And Sunload Sensor Wiring Schematic
This schematic shows the main power, ground, blower control, serial data, and sunload sensor circuits used by the automatic HVAC system. These circuits should be checked early during diagnosis because a missing power feed, weak ground, network communication fault, or incorrect sunload input can affect multiple HVAC functions at the same time.
Actuators

Fig. 2: Actuators Wiring Schematic
The actuator schematic identifies the circuits used to move HVAC air doors. These actuators control air temperature blend, airflow mode, and other door positions inside the HVAC module. When diagnosing uneven outlet temperature, incorrect vent selection, clicking noise, or a door that does not respond, this schematic helps trace control, reference, feedback, and ground circuits.
Temperature Sensors

Fig. 3: Temperature Sensors Wiring Schematic
The temperature sensor schematic supports diagnosis of inside air, outside air, duct, evaporator, and related sensor inputs depending on system configuration. These sensors allow the HVAC control module to calculate automatic temperature corrections. A sensor circuit fault may cause wrong temperature display, poor automatic control, delayed blower response, or unexpected heating and cooling behavior.
Compressor Controls
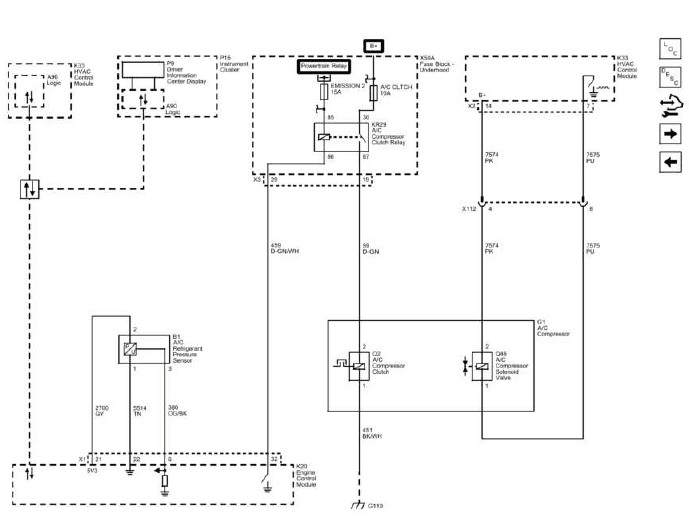
Fig. 4: Compressor Controls Wiring Schematic
The compressor control schematic is used to verify the circuits involved in A/C compressor operation. Compressor engagement depends on HVAC request, pressure information, powertrain control decisions, clutch control, and system protection logic. If the compressor does not engage or cycles incorrectly, the schematic should be used with scan tool data and pressure readings rather than replacing parts by guesswork.
Rear HVAC
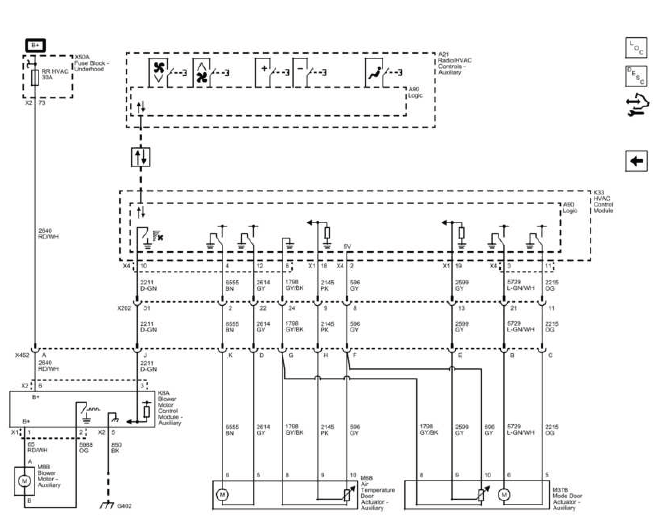
Fig. 5: Rear HVAC Wiring Schematic
The rear HVAC schematic covers the auxiliary climate control circuits used for rear passenger airflow and temperature management. On vehicles equipped with rear HVAC, front system operation, rear control inputs, blower control, actuator movement, and communication signals must all be considered. A rear climate concern may be electrical, refrigerant-related, airflow-related, or caused by a control setting.
DIAGNOSTIC INFORMATION AND PROCEDURES
DIAGNOSTIC CODE INDEX

The diagnostic code index provides a structured starting point for HVAC fault diagnosis. Use the index to identify the correct procedure for the stored or current DTC before testing individual components. A code should not be treated as automatic proof that a component has failed; the related circuit, connector condition, control module data, and operating conditions must be checked before a repair decision is made.
DTC B0158: OUTSIDE AIR TEMPERATURE SENSOR
Diagnostic Instructions
- Perform the Diagnostic System Check - Vehicle before using this diagnostic procedure. This confirms that module communication, power supply, and other broader vehicle conditions are suitable for accurate diagnosis.
- Review Strategy Based Diagnosis for an overview of the diagnostic approach. This helps separate a sensor fault from a wiring, connector, module, or intermittent condition.
- Diagnostic Procedure Instructions provides an overview of each diagnostic category and explains how the test steps should be followed.
DTC Descriptors
DTC B0158 02
Outside Air Temperature Sensor Circuit Short to Ground
DTC B0158 05
Outside Air Temperature Sensor Circuit Short to Battery or Open
Diagnostic Fault Information
Circuit/System Description
The HVAC control module monitors the ambient air temperature sensor through a low reference circuit and a 5-volt signal circuit. The module reads the voltage drop across the sensor and uses that voltage to determine outside air temperature. Because the sensor is temperature-sensitive, its resistance changes as the outside air temperature changes.
When ambient air temperature is cold, sensor resistance is high and the signal voltage remains high. When ambient air temperature is hot, sensor resistance is low and the signal voltage becomes lower. The HVAC control module converts this voltage value into a temperature value in Celsius and Fahrenheit, then sends the information for display in the driver information center (DIC).
In the Buick Enclave, the outside air temperature signal is not only a display value. It can also influence automatic HVAC decisions, because the control module uses outside temperature as part of its comfort calculations. A faulty reading may lead to incorrect temperature display, unusual automatic climate behavior, or a default control strategy.
Conditions for Running the DTC
The ignition is turned ON. The HVAC control module must be powered and able to monitor the outside air temperature sensor circuit before this diagnostic can run.
Conditions for Setting the DTC
- The HVAC control module detects that the sensor signal circuit indicates less than -35ºC (-39ºF).
- The HVAC control module detects that the sensor signal circuit indicates more than 85ºC (185ºF).
These values are outside the normal expected range for the sensor input. A reading beyond these limits usually points to a circuit fault, open condition, short to ground, short to voltage, damaged sensor, poor terminal contact, or wiring damage near the sensor location.
Action Taken When the DTC Sets
The HVAC control module uses a default air temperature value for further automatic control calculations. The default values are not displayed on the scan tool. Because the module substitutes a calculated fallback value, the system may continue to operate, but automatic temperature control may not respond as accurately to real outside conditions.
Conditions for Clearing the DTC
- The DTC will become history if the HVAC control module no longer detects a failure.
- The history DTC will clear after 100 fault-free ignition cycles.
If the DTC returns after clearing, inspect the sensor circuit under the same conditions that originally caused the fault. Intermittent faults may require harness movement, connector inspection, terminal tension checks, and monitoring scan tool data while the circuit is lightly disturbed.
Reference Information
Schematic Reference
HVAC Schematics
Connector End View Reference
COMPONENT CONNECTOR END VIEWS - INDEX
Description and Operation
- Air Temperature Description and Operation
- Air Delivery Description and Operation
Electrical Information Reference
- Circuit Testing
- Connector Repairs
- Testing for Intermittent Conditions and Poor Connections
- Wiring Repairs
Use the reference information to confirm connector pin locations, circuit colors, expected sensor behavior, and proper repair methods. For this Buick Enclave HVAC diagnostic procedure, clean electrical testing is important: backprobe only when approved, avoid spreading terminals, and repair damaged wiring with correct splice and sealing methods.
Scan Tool Reference
Control Module References for scan tool information
Circuit/System Verification
With the ignition ON, observe the scan tool Outside Air Temp. Sensor Raw parameter. The displayed value should remain within the expected operating range of -35ºC (-39ºF) to 85ºC (185ºF), and the value should respond when the ambient air temperature changes. A reading that is fixed, unrealistic, or outside this range may indicate a sensor fault, an open circuit, a shorted circuit, or a poor connection at the sensor or HVAC control module.
Circuit/System Testing
IMPORTANT: An instant Outside Air Temperature (OAT) update must be performed by pressing the A/C and Recirc buttons at the same time before and after the system has been serviced to update the filtered ambient air temperature sensor. This step helps the Buick Enclave HVAC control module refresh the displayed and calculated outside air temperature value after repairs are completed.
1. With the ignition OFF, disconnect the harness connector at the ambient air temperature sensor. Inspect the connector area for loose terminals, corrosion, moisture, damaged locking tabs, or signs of previous repair before beginning electrical tests.
2. With the ignition OFF, test for less than 10 ohms between the low reference circuit terminal B and ground.
- If greater than the specified range, test the low reference circuit for an open or high resistance condition. If the circuit tests normal, replace the HVAC control module.
3. With the ignition ON, verify that the scan tool Outside Air Temp. Sensor Raw parameter is less than -35ºC (-39ºF). This result confirms that the HVAC control module recognizes the circuit response when the sensor is disconnected.
- If greater than the specified range, test the signal circuit terminal A for a short to ground. If the circuit tests normal, replace the HVAC control module.
4. Install a 3A fused jumper wire between the signal circuit terminal A and the low reference circuit terminal B. Verify that the scan tool Outside Air Temp. Sensor Raw parameter is greater than 85ºC (185ºF). The fused jumper protects the circuit during testing and allows the technician to confirm that the module can detect the opposite end of the signal range.
- If less than the specified range, test the signal circuit for a short to voltage, an open circuit, or high resistance. If the circuit tests normal, replace the HVAC control module.
5. If all circuits test normal, test or replace the ambient air temperature sensor. Do not replace the sensor until the low reference and signal circuits have been verified, because wiring damage can produce the same scan tool symptoms as a failed sensor.
Component Testing
1. Test the ambient air temperature sensor by varying the sensor temperature while monitoring sensor resistance. Allow enough time for the sensor body to stabilize at each temperature point before recording the reading.
2. Compare the readings with the Sensor Resistance Table and verify that the resistance is within 5 percent of the specification. The resistance should change smoothly as temperature changes, without sudden dropouts or erratic jumps.
- If not within the specified range, replace the sensor.
Repair Instructions
Perform the Diagnostic Repair Verification after completing the diagnostic procedure. This confirms that the fault has been corrected and that the automatic HVAC system responds normally after the repair.
- Ambient Air Temperature Sensor Replacement (Enclave, Traverse), Ambient Air Temperature Sensor Replacement (Acadia)
- Control Module References for HVAC control module replacement, setup, and programming
DTC B0163: PASSENGER COMPARTMENT TEMPERATURE SENSOR
Diagnostic Instructions
- Perform the Diagnostic System Check - Vehicle prior to using this diagnostic procedure. This helps confirm that the vehicle communication network, power supplies, and related control modules are functioning before detailed HVAC testing begins.
- Review Strategy Based Diagnosis for an overview of the diagnostic approach. This prevents unnecessary part replacement and helps separate a sensor concern from a circuit, connector, or control module condition.
- Diagnostic Procedure Instructions provides an overview of each diagnostic category and explains how to follow the test sequence correctly.
DTC Descriptors
DTC B0163 02
- Passenger Compartment Temperature Sensor Circuit Short to Ground
DTC B0163 05
- Passenger Compartment Temperature Sensor Circuit Short to Battery or Open
Diagnostic Fault Information
Circuit/System Description
The HVAC control module supplies the inside air temperature sensor with a low reference circuit and a 5-volt signal circuit. The module monitors the voltage drop across the sensor and uses that signal to calculate passenger compartment temperature. This value is one of the main inputs used by the automatic HVAC system to decide how much heating, cooling, airflow, and air distribution correction is needed.
As the air temperature increases, the sensor resistance decreases and the voltage signal decreases. As the air temperature decreases, the sensor resistance increases and the voltage signal increases. The HVAC control module interprets these changes as cabin temperature movement and adjusts system output accordingly.
Passenger compartment temperature sensor refers to the inside air temperature sensor. In the Buick Enclave, an incorrect inside air temperature signal can cause the automatic climate control system to overheat the cabin, overcool the cabin, delay blower changes, or react poorly to the selected temperature setting.
Conditions for Running the DTC
The ignition is turned ON. The HVAC control module must be awake and capable of monitoring the inside air temperature sensor circuit before this diagnostic can run.
Conditions for Setting the DTC
The HVAC control module detects that the inside air temperature sensor signal circuit indicates less than -36ºC (-38ºF) or greater than 215ºC (419ºF) for more than 15 seconds. These readings are outside the believable range for cabin temperature and usually point to an open circuit, short to ground, short to voltage, damaged sensor, poor terminal contact, or a wiring concern.
Action Taken When the DTC Sets
The system operates using a default value. With this substitute value, the HVAC system may still run, but automatic temperature regulation may be less accurate because the module is no longer receiving a reliable cabin temperature input.
Conditions for Clearing the DTC
- The DTC will become history if the HVAC control module no longer detects the condition that set the DTC.
- The history DTC will clear after 100 fault-free ignition cycles.
If the code returns after clearing, inspect the circuit during the conditions in which the fault occurs. Intermittent passenger compartment temperature sensor faults may require connector terminal tension checks, harness movement testing, and scan tool monitoring while gently disturbing the wiring.
Reference Information
Schematic Reference
HVAC Schematics
Connector End View Reference
COMPONENT CONNECTOR END VIEWS - INDEX
Description and Operation
- Air Temperature Description and Operation
- Air Delivery Description and Operation
Electrical Information Reference
- Circuit Testing
- Connector Repairs
- Testing for Intermittent Conditions and Poor Connections
- Wiring Repairs
Scan Tool Reference
Control Module References for scan tool information
Circuit/System Verification
With the ignition ON, observe the scan tool Inside Air Temperature Sensor parameter. The reading should be between -35ºC (-39ºF) and 98ºC (208ºF), and it should change as the inside air temperature changes. A reading that does not respond to cabin temperature changes should be investigated before replacing parts, especially if the sensor grille, aspirator path, or connector area may be restricted or contaminated.
Circuit/System Testing
1. With the ignition OFF, disconnect the harness connector at the inside air temperature sensor. Inspect the connector and sensor area for damage, moisture, dust buildup, loose terminals, or signs that airflow across the sensor may be blocked.
2. With the ignition OFF, test for less than 10 ohms between the low reference circuit terminal B and ground.
- If greater than the specified range, test the low reference circuit for an open or high resistance condition. If the circuit tests normal, replace the HVAC control module.
For accurate diagnosis on the Buick Enclave automatic HVAC system, complete each electrical test in sequence and compare scan tool data with actual cabin conditions before making a final repair decision.
3. With the ignition ON, verify that the scan tool Inside Air Temp. Sensor parameter is less than -35ºC (-39ºF). This response confirms that the HVAC control module recognizes the disconnected sensor circuit as a low temperature input.
- If greater than the specified range, test the signal circuit terminal A for a short to ground. If the circuit tests normal, replace the HVAC control module.
4. Install a 3A fused jumper wire between the signal circuit terminal A and the low reference circuit terminal B. Verify that the scan tool Inside Air Temp. Sensor parameter is greater than 85ºC (185ºF). The fused jumper protects the circuit while forcing the signal to the opposite end of the expected range.
- If less than the specified range, test the signal circuit for a short to voltage, an open circuit, or high resistance. If the circuit tests normal, replace the HVAC control module.
5. If all circuits test normal, test or replace the inside air temperature sensor. Do not replace the sensor until both the low reference circuit and signal circuit have been checked, because wiring faults can produce the same scan tool behavior as a failed sensor.
Component Testing
1. Test the inside air temperature sensor by varying the sensor temperature while monitoring sensor resistance. Allow the sensor to stabilize at each temperature point so the resistance reading is accurate.
2. Compare the readings with the Sensor Resistance Table and verify that the resistance is within 5 percent of the specification. The resistance should change smoothly as temperature changes, without sudden spikes, dropouts, or unstable readings.
- If not within the specified range, replace the sensor.
Repair Instructions
Perform the Diagnostic Repair Verification after completing the diagnostic procedure. This final check confirms that the sensor input is accurate and that the automatic HVAC system responds correctly after the repair.
- Inside Air Temperature Sensor Aspirator Replacement
- Control Module References for HVAC control module replacement, setup, and programming
DTC B0173, B0178, B0509 OR B0514: OUTPUT AIR TEMPERATURE SENSOR 1-4
Diagnostic Instructions
- Perform the Diagnostic System Check - Vehicle prior to using this diagnostic procedure. This verifies that the vehicle communication network, module power, and related systems are functioning before detailed HVAC testing begins.
- Review Strategy Based Diagnosis for an overview of the diagnostic approach. This helps prevent unnecessary part replacement by separating sensor, wiring, connector, and control module concerns.
- Diagnostic Procedure Instructions provides an overview of each diagnostic category and explains how the test sequence should be followed.
DTC Descriptors
DTC B0173 02
- Output Air Temperature Sensor 1 Circuit Short to Ground
DTC B0173 05
- Output Air Temperature Sensor 1 Circuit Short to Battery or Open
DTC B0178 02
- Output Air Temperature Sensor 2 Circuit Short to Ground
DTC B0178 05
- Output Air Temperature Sensor 2 Circuit Short to Battery or Open
DTC B0509 02
- Output Air Temperature Sensor 3 Circuit Short to Ground
DTC B0509 05
- Output Air Temperature Sensor 3 Circuit Short to Battery or Open
DTC B0514 02
- Output Air Temperature Sensor 4 Circuit Short to Ground
DTC B0514 05
- Output Air Temperature Sensor 4 Circuit Short to Battery or Open
Diagnostic Fault Information

Circuit/System Description
The HVAC control module supplies the air duct temperature sensors with a low reference circuit and a 5-volt signal circuit. The module monitors the voltage drop across each sensor and uses that signal to calculate the temperature of the air leaving specific HVAC duct positions. These readings help the automatic HVAC system compare requested cabin comfort with the actual air being delivered from the outlets.
As the duct air temperature increases, sensor resistance decreases and the voltage signal decreases. As the duct air temperature decreases, sensor resistance increases and the voltage signal increases. The HVAC control module uses these changing values to adjust blend door operation, airflow strategy, and temperature correction. On the Buick Enclave, accurate duct temperature feedback is important for balanced left and right side comfort, especially when the system is operating in automatic mode.
- DTC B0173 Output Air Temperature Sensor 1 refers to the upper left air duct temperature sensor.
- DTC B0178 Output Air Temperature Sensor 2 refers to the lower left air duct temperature sensor.
- DTC B0509 Output Air Temperature Sensor 3 refers to the upper right air duct temperature sensor.
- DTC B0514 Output Air Temperature Sensor 4 refers to the lower right air duct temperature sensor.
Because these sensors monitor different outlet areas, the related DTC can help narrow the diagnosis to one side or one duct section. A fault in one sensor circuit may cause incorrect outlet temperature feedback, uneven heating or cooling, or default HVAC control behavior.
Conditions for Running the DTC
The ignition is turned ON. The HVAC control module must be powered and able to monitor the output air temperature sensor circuits before these diagnostics can run.
Conditions for Setting the DTC
The HVAC control module detects that the related output air temperature sensor signal circuit indicates less than -36ºC (-38ºF) or greater than 215ºC (419ºF) for more than 15 seconds. These values are outside the normal believable range for duct air temperature and usually indicate an open circuit, short to ground, short to voltage, high resistance, damaged sensor, or poor terminal contact.
Action Taken When the DTC Sets
The system operates using a default value. With a default value substituted, the automatic HVAC system may continue to function, but temperature regulation can become less accurate because the module is no longer receiving reliable feedback from the affected duct sensor.
Conditions for Clearing the DTC
- The DTC will become history if the HVAC control module no longer detects the condition that set the DTC.
- The history DTC will clear after 100 fault-free ignition cycles.
If the code returns after clearing, inspect the sensor circuit under the conditions that originally caused the concern. Intermittent output air temperature sensor faults may require scan tool monitoring while gently moving the harness, checking connector terminal tension, and inspecting the sensor area for moisture or damaged wiring.
Reference Information
Schematic Reference
HVAC Schematics
Connector End View Reference
COMPONENT CONNECTOR END VIEWS - INDEX
Description and Operation
- Air Temperature Description and Operation
- Air Delivery Description and Operation
Electrical Information Reference
- Circuit Testing
- Connector Repairs
- Testing for Intermittent Conditions and Poor Connections
- Wiring Repairs
Scan Tool Reference
Control Module References for scan tool information
Circuit/System Verification
With the ignition ON, observe the appropriate scan tool air duct temperature sensor parameter. The reading should be between -35ºC (-39ºF) and 98ºC (208ºF), and it should change as the duct air temperature changes. Compare the scan tool value with actual outlet air behavior; a sensor value that stays fixed or does not match the duct temperature should be diagnosed before any module or actuator is replaced.
Circuit/System Testing
IMPORTANT: If an air duct temperature sensor has an out-of-range condition caused by a short to voltage, short to ground, or an open/high resistance, the scan tool will display the same value: 39ºF (4ºC). Because the same displayed value can be produced by several different circuit faults, complete the circuit tests in sequence before replacing the sensor on the Buick Enclave automatic HVAC system.
1. With the ignition OFF, disconnect the harness connector at the appropriate air duct temperature sensor. Inspect the connector before testing for loose terminals, corrosion, moisture, damaged locking tabs, or wiring that may have been pulled tight behind the HVAC duct.
2. With the ignition OFF, test for less than 10 ohms between the low reference circuit terminal 2 and ground. This confirms that the sensor has a clean low reference path before the signal circuit is evaluated.
- If greater than the specified range, test the low reference circuit for an open circuit or high resistance. If the circuit tests normal, replace the HVAC control module.
3. With the ignition ON, test for 4.8-5.2 volts between the signal circuit terminal 1 and the low reference circuit terminal 2. A correct voltage reading shows that the HVAC control module is supplying the expected 5-volt signal to the air duct temperature sensor circuit.
- If less than the specified range, test the signal circuit for a short to ground, an open circuit, or high resistance.
- If the circuit tests normal, replace the HVAC control module.
- If greater than the specified range, test the signal circuit for a short to voltage. If the circuit tests normal, replace the HVAC control module.
4. If all circuits test normal, test or replace the air duct temperature sensor. Avoid replacing the sensor until the low reference and signal circuits have been verified, because wiring faults can create the same scan tool symptoms as a failed sensor.
Component Testing
1. Test the air duct temperature sensor by varying the sensor temperature while monitoring sensor resistance. Allow the sensor to stabilize at each temperature point so the resistance value can be compared accurately.
2. Compare the readings with the Sensor Resistance Table and verify that the resistance is within 5 percent of the specification. The resistance should change smoothly as temperature changes, without sudden dropouts, spikes, or unstable readings.
- If not within the specified range, replace the sensor.
Repair Instructions
Perform the Diagnostic Repair Verification after completing the diagnostic procedure. This confirms that the repaired circuit or replaced component now reports a believable duct temperature and that the Buick Enclave automatic HVAC system responds correctly.
- Duct Air Temperature Sensor Replacement - Upper Right Side
- Duct Air Temperature Sensor Replacement - Upper Left Side
- Duct Air Temperature Sensor Replacement - Lower Left Side
- Duct Air Temperature Sensor Replacement - Lower Right Side
- Control Module References for HVAC control module replacement, setup, and programming
DTC B0183 OR B0188: SOLAR LOAD SENSOR 1-2
Diagnostic Instructions
- Perform the Diagnostic System Check - Vehicle prior to using this diagnostic procedure. This verifies that the control modules, power feeds, grounds, and communication circuits are functioning before detailed sunload sensor testing begins.
- Review Strategy Based Diagnosis for an overview of the diagnostic approach. This helps separate a true sensor concern from a wiring fault, connector issue, module problem, or incorrect test condition.
- Diagnostic Procedure Instructions provides an overview of each diagnostic category and explains how the test sequence should be followed.
DTC Descriptors
DTC B0183 02
- Solar Load Sensor 1 Circuit Short to Ground
DTC B0183 05
- Solar Load Sensor 1 Circuit Short to Battery or Open
DTC B0188 02
- Solar Load Sensor 2 Circuit Short to Ground
DTC B0188 05
- Solar Load Sensor 2 Circuit Short to Battery or Open
Diagnostic Fault Information

Circuit Description
The sunload sensor is a 2-wire photo diode assembly used by the automatic HVAC system to measure the amount of sunlight entering the vehicle. The vehicle uses separate left and right sunload sensor inputs, and both sensors are integrated into the sunload sensor assembly together with the ambient light sensor. The circuits used for sensor operation include a ground path and a signal circuit that allow the HVAC control module to interpret solar intensity.
As sunload increases, the sensor signal decreases. The signal can vary between 0 and 5 volts, and the HVAC control module converts that voltage into a count value between 0 and 255. This count value represents the amount of light shining on the vehicle. Bright sunlight can raise interior temperature quickly, even when outside air temperature has not changed, so the automatic HVAC system uses sunload information to adjust cooling strategy.
When high-intensity light is detected, the HVAC system can compensate by increasing cooling demand, adjusting air distribution, and directing additional cool air into the cabin. In the Buick Enclave, this input helps the automatic climate control system react more naturally when one side of the cabin is exposed to strong sunlight through the windshield or side glass.
The following DTCs are for the left and right sunload sensors:
- B0183 is for the left sunload sensor.
- B0188 is for the right sunload sensor.
Conditions for Running the DTC
The ignition is ON. The HVAC control module must be awake and able to monitor the sunload sensor circuits before these diagnostics can run.
Conditions for Setting the DTC
The HVAC control module detects that the signal circuit is less than 5 counts or greater than 250 counts. These readings are outside the normal expected range and may indicate a short to ground, short to voltage, open circuit, high resistance, damaged sensor assembly, or poor terminal contact.
Action Taken When the DTC Sets
- The driver information center (DIC) will display SERVICE A/C SYSTEM.
- The system will operate as if no sunload condition exists.
When the system ignores sunload input, the A/C may still operate, but automatic temperature correction can become less accurate. The cabin may feel warmer in direct sunlight because the HVAC control module is no longer using the affected solar load reading to increase cooling response.
Conditions for Clearing the DTC
- The DTC will become history if the HVAC control module no longer detects the condition that set the DTC.
- The history DTC will clear after 100 fault-free ignition cycles.
If the DTC returns after clearing, inspect the sensor connector, wiring path, and sensor mounting area. Sunload sensor diagnosis should be performed with attention to actual lighting conditions, because the sensor value should react when light intensity changes.
Reference Information
Schematic Reference
HVAC Schematics
Connector End View Reference
COMPONENT CONNECTOR END VIEWS - INDEX
Description and Operation
- Air Temperature Description and Operation
- Air Delivery Description and Operation
Electrical Information Reference
- Circuit Testing
- Connector Repairs
- Testing for Intermittent Conditions and Poor Connections
- Wiring Repairs
Scan Tool Reference
Control Module References for scan tool information
Circuit/System Verification
With the ignition ON, observe the appropriate scan tool Sunload Sensor parameter. The reading should be between 5 and 250 counts and should change as sunlight intensity changes. A value that remains fixed, jumps suddenly, or does not respond to changing light should be diagnosed before replacing the sunload sensor assembly.
Circuit/System Testing
IMPORTANT: If a solar load sensor has an out-of-range condition caused by a short to voltage, short to ground, or an open/high resistance, the scan tool will display the same value: 225 counts. Because several different circuit faults can produce the same scan tool value, complete the wiring and connector tests in sequence before replacing parts on the Buick Enclave automatic HVAC system.
1. With the ignition OFF, disconnect the harness connector at the sunload sensor. Inspect the connector and sensor area for damaged terminals, loose fit, moisture, dashboard debris, or anything that may block or distort the light reaching the sensor.
2. Test for less than 10 ohms between the ground circuit terminal C and ground. This confirms that the sunload sensor has a clean ground path before the signal circuit is evaluated.
- If greater than the specified range, test the ground circuit for an open circuit or high resistance. Repair the circuit as needed before continuing with sensor or module diagnosis.
3. With the ignition ON, test for 4.8-5.2 volts between the appropriate signal circuit terminal and the ground circuit terminal C. This voltage check verifies that the HVAC control module is supplying the expected reference signal to the selected solar load sensor circuit.
- Left solar load sensor circuit terminal A.
- Right solar load sensor circuit terminal B.
- If less than the specified range, test the signal circuit for a short to ground, an open circuit, or high resistance.
If the circuit tests normal, replace the HVAC control module.
- If greater than the specified range, test the signal circuit for a short to voltage. If the circuit tests normal, replace the HVAC control module.
4. If all circuits test normal, test or replace the sunload sensor. Do not replace the sensor until the ground and signal circuits have been verified, because wiring faults can create the same scan tool response as a failed sensor.
Repair Instructions
Perform the Diagnostic Repair Verification after completing the diagnostic procedure. This confirms that the sensor input is now within range and that the automatic HVAC system responds correctly to changes in light intensity.
- Daytime Running Lamp (DRL) Ambient Light Sensor Replacement (Without UV6), Daytime Running Lamp (DRL) Ambient Light Sensor Replacement (With UV6)
- Control Module References for HVAC control module replacement, setup, and programming
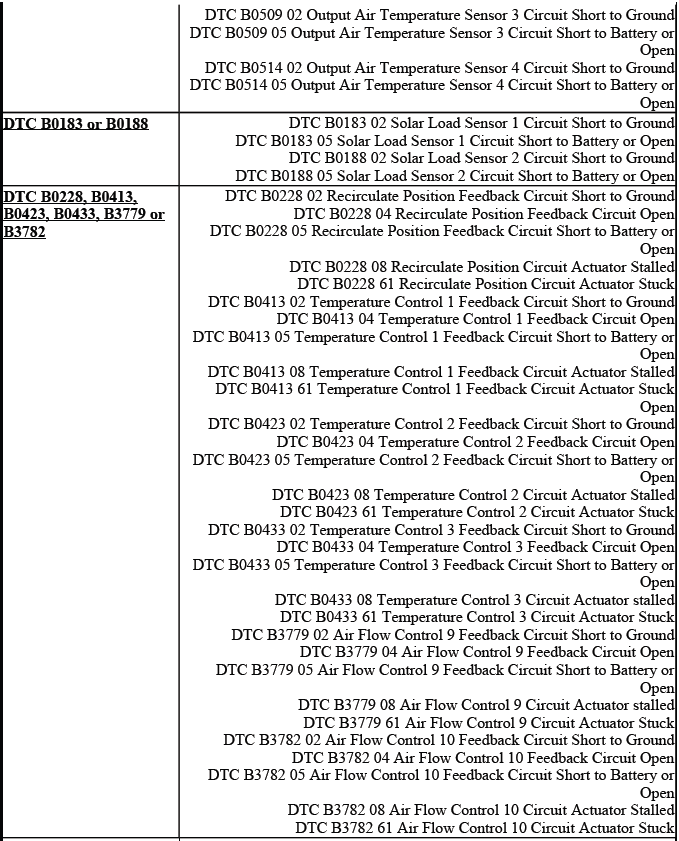
DTC B0228, B0413, B0423, B0433, B3779 OR B3782: RECIRCULATE POSITION FEEDBACK/TEMPERATURE CONTROL 1-3 FEEDBACK
Diagnostic Instructions
- Perform the Diagnostic System Check - Vehicle prior to using this diagnostic procedure. This verifies that the related modules, power feeds, grounds, and communication circuits are operating before actuator feedback diagnosis begins.
- Review Strategy Based Diagnosis for an overview of the diagnostic approach. This helps separate actuator concerns from wiring faults, connector damage, control module issues, and mechanical door binding inside the HVAC case.
- Diagnostic Procedure Instructions provides an overview of each diagnostic category and explains how the test sequence should be followed.
DTC Descriptors
DTC B0228 02
- Recirculate Position Feedback Circuit Short to Ground
DTC B0228 04
- Recirculate Position Feedback Circuit Open
DTC B0228 05
- Recirculate Position Feedback Circuit Short to Battery or Open
DTC B0228 08
- Recirculate Position Circuit Actuator Stalled
DTC B0228 61
- Recirculate Position Circuit Actuator Stuck
DTC B0413 02
- Temperature Control 1 Feedback Circuit Short to Ground
DTC B0413 04
- Temperature Control 1 Feedback Circuit Open
DTC B0413 05
- Temperature Control 1 Feedback Circuit Short to Battery or Open
DTC B0413 08
- Temperature Control 1 Feedback Circuit Actuator Stalled
DTC B0413 61
- Temperature Control 1 Feedback Circuit Actuator Stuck Open
DTC B0423 02
- Temperature Control 2 Feedback Circuit Short to Ground
DTC B0423 04
- Temperature Control 2 Feedback Circuit Open
DTC B0423 05
- Temperature Control 2 Feedback Circuit Short to Battery or Open
DTC B0423 08
- Temperature Control 2 Circuit Actuator Stalled
DTC B0423 61
- Temperature Control 2 Circuit Actuator Stuck
DTC B0433 02
- Temperature Control 3 Feedback Circuit Short to Ground
DTC B0433 04
- Temperature Control 3 Feedback Circuit Open
DTC B0433 05
- Temperature Control 3 Feedback Circuit Short to Battery or Open
DTC B0433 08
- Temperature Control 3 Circuit Actuator stalled
DTC B0433 61
- Temperature Control 3 Circuit Actuator Stuck
DTC B3779 02
- Air Flow Control 9 Feedback Circuit Short to Ground
DTC B3779 04
- Air Flow Control 9 Feedback Circuit Open
DTC B3779 05
- Air Flow Control 9 Feedback Circuit Short to Battery or Open
DTC B3779 08
- Air Flow Control 9 Circuit Actuator stalled
DTC B3779 61
- Air Flow Control 9 Circuit Actuator Stuck
DTC B3782 02
- Air Flow Control 10 Feedback Circuit Short to Ground
DTC B3782 04
- Air Flow Control 10 Feedback Circuit Open
DTC B3782 05
- Air Flow Control 10 Feedback Circuit Short to Battery or Open
DTC B3782 08
- Air Flow Control 10 Circuit Actuator Stalled
DTC B3782 61
- Air Flow Control 10 Circuit Actuator Stuck
Circuit/System Description
The HVAC actuators operate through 5 circuits: a 5-volt reference circuit, a low reference circuit, a position signal circuit, and two bi-directional control circuits that can be driven at 0 volts or 12 volts. The HVAC control module supplies the 5-volt reference and low reference to the actuator potentiometer, then monitors the voltage drop on the door position signal circuit. As the actuator moves the air door, the feedback voltage changes, allowing the module to determine the actual door position.
The two bi-directional control circuits are used to move the actuator in either direction. When the HVAC control module determines from the feedback potentiometer that the actuator has reached the requested position, both control circuits are held at 0 volts. To move the actuator, the module applies 12 volts to the appropriate control circuit while the opposite circuit provides the return path. This allows the module to command precise door movement for temperature control, recirculation, airflow mode, and auxiliary HVAC functions.
On the Buick Enclave automatic HVAC system, a feedback-related DTC may be caused by an electrical fault, a failed actuator, a stuck air door, a restricted door travel path, or a loss of learned position. A stalled or stuck code should not be treated as an actuator failure automatically; the related door and HVAC case movement should be considered during diagnosis.
- DTC B0228 is for the recirculate actuator.
- DTC B0413 is for the left air temperature actuator.
- DTC B0423 is for the right air temperature actuator.
- DTC B0433 is for the auxiliary air temperature actuator.
- DTC B3782 is for the auxiliary mode actuator.
- DTC B3779 is for the mode actuator.
These actuators allow the Buick Enclave HVAC control module to manage fresh air intake, cabin temperature balance, front outlet selection, and rear climate air distribution. Accurate actuator feedback is essential because the module needs to know not only what it commanded, but also where the door actually stopped.
Conditions for Running the DTC
- The ignition is ON, allowing the HVAC control module to monitor actuator position feedback and control circuit activity.
- The HVAC module is ON and capable of commanding the selected actuator through its range of travel.
Conditions for Setting the DTC
The DTC sets when the actual door position differs from the commanded door position by more than 4 counts, or when the HVAC control module detects that the door position signal circuit is less than 3 counts or greater than 253 counts. These limits indicate that the module is seeing an actuator feedback value outside the expected operating range, or that the actuator door is not reaching the position requested by the control module. On the Buick Enclave automatic HVAC system, this may be caused by a wiring fault, a poor terminal connection, a failed actuator, a restricted air door, or a mechanical bind inside the HVAC case.
Action Taken When the DTC Sets
The control circuit is deactivated for the appropriate actuator. This protects the actuator and related control circuits from continued operation when the HVAC control module can no longer confirm accurate door movement or feedback position.
Conditions for Clearing the DTC
- The DTC becomes history when the HVAC control module no longer detects the condition that set the DTC.
- The history DTC will clear after 100 fault-free ignition cycles.
If the code returns after clearing, diagnose the actuator under the same operating conditions that caused the fault. Intermittent actuator concerns may require scan tool observation while gently moving the harness, checking connector tension, and listening for binding or clicking inside the HVAC case.
Reference Information
Schematic Reference
HVAC Schematics
Connector End View Reference
COMPONENT CONNECTOR END VIEWS - INDEX
Description and Operation
- Air Delivery Description and Operation
- Air Temperature Description and Operation
Electrical Information Reference
- Circuit Testing
- Connector Repairs
- Testing for Intermittent Conditions and Poor Connections
- Wiring Repairs
Scan Tool Reference
Control Module References for scan tool information
Circuit/System Verification
With the ignition ON, command the appropriate actuator in both directions using a scan tool. The scan tool Door Position parameter should remain between 3 and 253 counts while the actuator moves through its commanded travel. The reading should change smoothly, without sudden dropouts, fixed values, or erratic movement. If the commanded position changes but the feedback does not respond correctly, check both the electrical circuits and the mechanical travel of the related HVAC door before replacing parts.
Circuit/System Testing
1. With the ignition OFF, disconnect all external devices, including the scan tool and battery charger. Allow more than 10 minutes for all vehicle systems to power down completely. This waiting period is important because some modules remain awake briefly after the ignition is turned off, and early measurements can give misleading results.
2. Disconnect the harness connector at the appropriate actuator. Inspect the connector for corrosion, backed-out terminals, loose fit, damaged locks, moisture, or wiring strain near the actuator body.
3. Test for less than 10 ohms between the low reference circuit terminal 8 and ground. A low resistance reading confirms that the actuator feedback circuit has a usable low reference path.
- If greater than the specified range, test the low reference circuit for an open circuit or high resistance. If the circuit tests normal, replace the HVAC control module.
NOTE: Ground measurements will be abnormally high if taken before all vehicle systems have powered down. Waiting for module sleep prevents false readings during diagnosis.
4. With the ignition ON, test for 4.8-5.2 volts between the 5-volt reference circuit terminal 10 and ground. This confirms that the HVAC control module is supplying the correct reference voltage to the actuator potentiometer circuit.
- If less than the specified range, test the 5-volt reference circuit for a short to ground, an open circuit, or high resistance. If the circuit tests normal, replace the HVAC control module.
- If greater than the specified range, test the 5-volt reference circuit for a short to voltage. If the circuit tests normal, replace the HVAC control module.
5. Verify that the scan tool Door Position parameter is greater than 250 counts. This reading confirms the expected signal response with the actuator disconnected and the circuit in its unloaded state.
- If less than the specified range, test the signal circuit terminal 9 for a short to ground. If the circuit tests normal, replace the HVAC control module.
6. Install a 3A fused jumper wire between the signal circuit terminal 9 and the low reference circuit terminal 8. Verify that the scan tool Door Position parameter is less than 3 counts. The fused jumper safely pulls the signal low so the module response can be confirmed without damaging the circuit.
- If greater than the specified range, test the signal circuit for a short to voltage, an open circuit, or high resistance. If the circuit tests normal, replace the HVAC control module.
7. With the ignition ON, test for less than 10 ohms between the control circuit terminal 5 and ground. This checks whether the control circuit is being held low as expected before actuator command testing.
- If greater than the specified range, test the control circuit for a short to voltage, an open circuit, or high resistance. If the circuit tests normal, replace the HVAC control module.
8. With the ignition ON, test for less than 10 ohms between the control circuit terminal 6 and ground. The second bi-directional control circuit must also be verified because the actuator depends on both circuits to move in opposite directions.
- If greater than the specified range, test the control circuit for a short to voltage, an open circuit, or high resistance. If the circuit tests normal, replace the HVAC control module.
9. Connect a test lamp between control circuit terminal 5 and control circuit terminal 6. This allows actuator command output to be checked without using the actuator itself as the load.
10. With the ignition ON, command the appropriate actuator door in both directions using a scan tool. The test lamp should turn ON and OFF when the actuator is commanded in both directions. A proper lamp response indicates that the HVAC control module can drive the actuator control circuits.
- If the test lamp remains OFF during either command, test for a short to ground on either control circuit. If the circuits test normal, replace the HVAC control module.
11. If both circuits test normal, test or replace the actuator. Before replacing the actuator on the Buick Enclave, confirm that the related door is not physically stuck, jammed by debris, misaligned, or restricted by a damaged HVAC case component.
Repair Instructions
Perform the Diagnostic Repair Verification after completing the repair. The actuator should respond to scan tool commands, the door position parameter should move smoothly through the expected range, and the related HVAC function should operate normally.
- Air Inlet Valve Actuator Replacement
- Mode Valve Actuator Replacement
- Temperature Valve Actuator Replacement - Left Side
- Temperature Valve Actuator Replacement - Right Side
- Auxiliary Temperature Valve Actuator Replacement
- Auxiliary Mode Valve Actuator Replacement
- Control Module References for HVAC control module and HVAC Auxiliary control module or rear seat audio (RSA) replacement, setup, and programming
After actuator or module replacement, follow the required setup, programming, or recalibration procedure. On the Buick Enclave automatic HVAC system, actuator position learning is important because the module must know the travel limits before it can control airflow direction and temperature accurately.
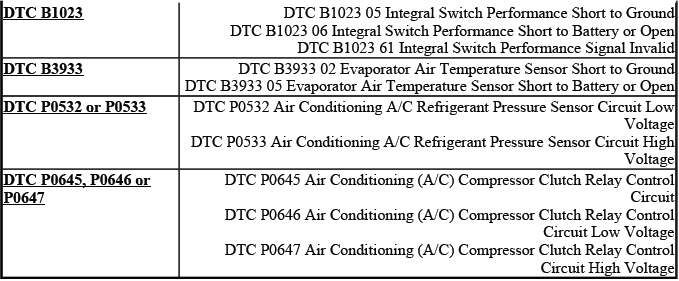
DTC B1023: INTEGRAL SWITCH PERFORMANCE
Diagnostic Instructions
- Perform the Diagnostic System Check - Vehicle prior to using this diagnostic procedure. This confirms that the vehicle systems are ready for accurate diagnosis and that no broader communication or power supply issue is being overlooked.
- Review Strategy Based Diagnosis for an overview of the diagnostic approach. This helps determine whether the concern is caused by the switch input, wiring, connector condition, control module logic, or an intermittent circuit fault.
- Diagnostic Procedure Instructions provides an overview of each diagnostic category and explains how the test steps should be followed.
DTC Descriptors
DTC B1023 05
- Integral Switch Performance Short to Ground
DTC B1023 06
- Integral Switch Performance Short to Battery or Open
DTC B1023 61
- Integral Switch Performance Signal Invalid
Circuit/System Description
This DTC is set when the HVAC control module detects an internal fault related to a stuck, shorted, or invalid control button input. The condition is handled as an internal switch performance concern rather than a separate external sensor or actuator circuit fault. On the Buick Enclave automatic HVAC system, this code should be diagnosed carefully because the module may still appear to respond to some commands while one internal switch input remains electrically invalid.
Conditions for Running the DTC
Battery voltage is between 9-16 volts and data link communications operate normally. Stable voltage and normal communication are required so the module can accurately monitor its internal switch logic and report the fault without interference from a low-voltage or network-related condition.
Conditions for Setting the DTC
The HVAC control module detects an internal fault related to a stuck or shorted control button. This may occur when the internal switch circuit does not return to an expected state, when the module interprets a button as continuously active, or when the switch signal becomes electrically invalid.
Conditions for Clearing the DTC
- A current DTC clears when the malfunction is no longer present.
- A history DTC clears when the module ignition cycle counter reaches the reset threshold without a repeat of the malfunction.
If the code clears and does not return, the concern may have been intermittent. If the DTC resets after programming or after a key cycle, the HVAC control module should be evaluated as the likely source of the fault.
Reference Information
Schematic Reference
HVAC Schematics
Connector End View Reference
COMPONENT CONNECTOR END VIEWS - INDEX
Description and Operation
- Air Delivery Description and Operation
- Air Temperature Description and Operation
Electrical Information Reference
- Circuit Testing
- Connector Repairs
- Testing for Intermittent Conditions and Poor Connections
- Wiring Repairs
Scan Tool Reference
Control Module References for scan tool information
Circuit/System Verification
1. Reprogram the HVAC control module. The module should complete the programming procedure successfully. Use the correct setup method and maintain stable battery voltage during programming so the module is not interrupted while software is being written.
- If the module will not reprogram, replace the HVAC control module that set the DTC.
2. With a scan tool, clear the DTC. After clearing, confirm that no related current HVAC control module codes remain active.
3. Turn the ignition OFF.
4. Wait 60 seconds, then recheck for DTCs. DTC B1023 should not reset. This waiting period allows the module to power down and restart its internal monitoring logic before the code is checked again.
- If DTC B1023 sets again, replace the module.
Repair Instructions
Perform the Diagnostic Repair Verification after completing the diagnostic procedure. The HVAC controls should respond normally, no current B1023 should reset, and the automatic climate control functions should operate as expected after programming or module replacement.
Control Module References for control module replacement, setup and programming
DTC B3933: EVAPORATOR AIR TEMPERATURE SENSOR
Diagnostic Instructions
- Perform the Diagnostic System Check - Vehicle prior to using this diagnostic procedure. This confirms that the vehicle network, module power, and related control systems are operating correctly before evaporator sensor testing begins.
- Review Strategy Based Diagnosis for an overview of the diagnostic approach. This helps separate a sensor fault from wiring damage, connector problems, poor terminal contact, or a control module concern.
- Diagnostic Procedure Instructions provides an overview of each diagnostic category and explains how the test steps should be followed.
DTC Descriptors
DTC B3933 02
- Evaporator Air Temperature Sensor Short to Ground
DTC B3933 05
- Evaporator Air Temperature Sensor Short to Battery or Open
Diagnostic Fault Information
Circuit Description
The HVAC control module supplies the evaporator air temperature sensor with a low reference circuit and a 5-volt signal circuit. The module monitors the voltage drop across the sensor and uses that signal to calculate evaporator air temperature. This input helps the HVAC system protect the evaporator from freezing and supports proper A/C compressor control.
As air temperature increases, sensor resistance decreases and the voltage signal decreases. As air temperature decreases, sensor resistance increases and the voltage signal increases. The HVAC control module interprets these voltage changes as evaporator temperature movement. In the Buick Enclave, an inaccurate evaporator temperature reading can cause poor cooling performance, unnecessary compressor shutoff, evaporator icing, or a disabled A/C compressor depending on the failure mode.
Conditions for Running the DTC
The ignition is turned ON. The HVAC control module must be powered and able to monitor the evaporator air temperature sensor circuit before this diagnostic can run.
Conditions for Setting the DTC
The HVAC control module detects that the evaporator air temperature sensor signal circuit indicates less than -36ºC (-38ºF) or more than 215ºC (419ºF) for more than 15 seconds. These values are outside the believable operating range and usually indicate a short to ground, short to voltage, open circuit, high resistance, damaged sensor, or poor terminal connection.
Action Taken When the DTC Sets
The A/C compressor will be disabled. This action helps protect the A/C system when the module cannot trust the evaporator temperature signal. Although blower operation may still be available, cooling output will be affected because compressor operation is no longer allowed.
Conditions for Clearing the DTC
- The DTC will become history if the HVAC control module no longer detects a failure.
- The history DTC will clear after 100 fault-free ignition cycles.
If the DTC returns after clearing, inspect the sensor connector and wiring while monitoring scan tool data. Intermittent faults may appear only when the harness is moved, the HVAC case temperature changes, or moisture affects the connector area.
Reference Information
Schematic Reference
HVAC Schematics
Connector End View Reference
COMPONENT CONNECTOR END VIEWS - INDEX
Description and Operation
- Air Temperature Description and Operation
- Air Delivery Description and Operation
Electrical Information Reference
- Circuit Testing
- Connector Repairs
- Testing for Intermittent Conditions and Poor Connections
- Wiring Repairs
Scan Tool Reference
Control Module References for scan tool information
Circuit/System Verification
With the ignition ON, observe the scan tool A/C Evaporator Temperature Sensor parameter. The reading should be between -39ºF (-35ºC) and 208ºF (98ºC), and it should change as evaporator air temperature changes. A fixed, unrealistic, or nonresponsive value should be diagnosed before replacing the sensor, especially if the concern may be caused by wiring, connector condition, or an HVAC control module input fault.
Circuit/System Testing
IMPORTANT: If the evaporator air temperature sensor has an out-of-range condition caused by a short to voltage, short to ground, or an open/high resistance, the scan tool will display the same value: 11ºC (51ºF). Because multiple circuit faults can produce the same displayed value, complete the electrical tests in sequence before replacing parts on the Buick Enclave automatic HVAC system.
1. With the ignition OFF, disconnect the harness connector at the evaporator air temperature sensor. Inspect the connector for moisture, loose terminals, corrosion, damaged locks, or wiring strain near the HVAC case.
2. With the ignition OFF, test for less than 10 ohms between the low reference circuit terminal 2 and ground. This confirms that the sensor has a clean low reference path before the signal circuit is evaluated.
- If greater than the specified range, test the low reference circuit for an open circuit or high resistance. If the circuit tests normal, replace the HVAC control module.
3. With the ignition ON, test for 4.8-5.2 volts between the signal circuit terminal 1 and the low reference circuit terminal 2. This voltage check confirms that the HVAC control module is providing the expected signal range for the evaporator air temperature sensor circuit.
- If less than the specified range, test the signal circuit for a short to ground, an open circuit, or high resistance.
If the circuit tests normal, replace the HVAC control module.
- If greater than the specified range, test the signal circuit for a short to voltage. If the circuit tests normal, replace the HVAC control module.
4. If all circuits test normal, test or replace the evaporator air temperature sensor. Do not replace the sensor until the low reference and signal circuits have been verified, because circuit faults can create the same scan tool behavior as a failed sensor.
Component Testing
1. Test the evaporator air temperature sensor by varying the sensor temperature while monitoring sensor resistance. Allow the sensor temperature to stabilize before recording each reading so the comparison is accurate.
2. Compare the readings with the Sensor Resistance Table and verify that the resistance is within 5 percent of the specification. The resistance should change smoothly as temperature changes, without sudden jumps, dropouts, or unstable readings.
- If not within the specified range, replace the sensor.
Repair Instructions
Perform the Diagnostic Repair Verification after completing the diagnostic procedure. This confirms that the evaporator temperature input is believable, that the A/C compressor is no longer being disabled by the fault, and that the Buick Enclave automatic HVAC system responds normally after the repair.
- Evaporator Air Temperature Sensor Replacement
- Control Module References for HVAC control module replacement, setup, and programming
DTC P0532 OR P0533: AIR CONDITIONING A/C REFRIGERANT PRESSURE SENSOR
Diagnostic Instructions
- Perform the Diagnostic System Check - Vehicle prior to using this diagnostic procedure. This verifies that related control modules, power supplies, grounds, and communication circuits are operating correctly before refrigerant pressure sensor testing begins.
- Review Strategy Based Diagnosis for an overview of the diagnostic approach. This helps separate a true pressure sensor concern from a refrigerant system problem, wiring fault, connector issue, or ECM input concern.
- Diagnostic Procedure Instructions provides an overview of each diagnostic category and explains how the test steps should be followed.
DTC Descriptors
DTC P0532
- Air Conditioning A/C Refrigerant Pressure Sensor Circuit Low Voltage
DTC P0533
- Air Conditioning A/C Refrigerant Pressure Sensor Circuit High Voltage
Diagnostic Fault Information

Circuit/System Description
The engine control module (ECM) monitors high-side refrigerant pressure through the A/C refrigerant pressure sensor. The ECM supplies a 5-volt reference circuit and a low reference circuit to the sensor, then reads the sensor signal to determine refrigerant pressure. As A/C refrigerant pressure changes, the pressure sensor signal voltage changes in proportion to the pressure in the high-side circuit.
When refrigerant pressure is low, the sensor signal voltage is low. As pressure rises, the signal voltage increases. If pressure becomes high enough, the ECM can command the cooling fans ON to help reduce condenser temperature and system pressure. If pressure is too low or too high, the ECM will not allow the A/C compressor clutch to engage, because operating the compressor under those conditions could reduce cooling performance or damage system components.
On the Buick Enclave, this sensor input is important for both compressor protection and cooling fan strategy. A pressure-related DTC may be caused by an electrical circuit fault, a failed pressure sensor, low refrigerant charge, restricted airflow through the condenser, an overcharged system, or a refrigerant restriction. Pressure sensor diagnosis should therefore include both electrical testing and an understanding of actual refrigerant system conditions.
Conditions for Running the DTC
The engine is running. The ECM must be active and able to monitor the A/C refrigerant pressure sensor signal while the system is operating.
Conditions for Setting the DTC
- The ECM detects that A/C pressure is less than 1 psi, or approximately 0.01 volt, and sets DTC P0532.
- The ECM detects that A/C pressure is greater than 425 psi, or approximately 4.90 volts, and sets DTC P0533.
These values are outside the normal expected signal range. A low-voltage condition may indicate a short to ground, open reference concern, sensor fault, or very low system pressure. A high-voltage condition may indicate a short to voltage, sensor fault, excessive refrigerant pressure, overcharge, condenser airflow problem, or restriction in the A/C system.
Action Taken When the DTC Sets
- The ECM will not illuminate the malfunction indicator lamp (MIL).
- The ECM stores the failure records for diagnostic review.
- The A/C compressor clutch is disabled to protect the system from operating under unsafe or unreliable pressure conditions.
Conditions for Clearing the DTC
- The DTC will become history if the ECM no longer detects a failure.
- The history DTC will clear after 40 consecutive ignition cycles have occurred without a malfunction.
If the DTC returns after clearing, review both scan tool pressure data and actual A/C system behavior. An intermittent pressure sensor circuit fault may only appear when the harness is moved, when engine heat affects the connector, or when refrigerant pressure changes during system operation.
Diagnostic Aids
A malfunction within the refrigerant system that causes high pressure can set DTC P0533. Before condemning the pressure sensor, check for conditions such as blocked condenser airflow, inoperative cooling fans, system overcharge, restriction in the high-side circuit, or contamination that may raise pressure. For accurate diagnosis on the Buick Enclave A/C system, compare scan tool pressure readings with service equipment readings when available.
Reference Information
Schematic Reference
HVAC Schematics
Connector End View Reference
COMPONENT CONNECTOR END VIEWS - INDEX
Description and Operation
- Air Temperature Description and Operation
- Air Delivery Description and Operation
Electrical Information Reference
- Circuit Testing
- Connector Repairs
- Testing for Intermittent Conditions and Poor Connections
- Wiring Repairs
Scan Tool Reference
Control Module References for scan tool information
Circuit/System Verification
With the ignition ON, observe the scan tool A/C Refrigerant Pressure Sensor parameter. The reading should be between 0.1 volts, or approximately 1 psi, and 4.90 volts, or approximately 425 psi, and should change as A/C refrigerant pressure changes. A fixed value, an unrealistic value, or a reading that does not match actual pressure should be diagnosed before replacing parts.
Circuit/System Testing
1. With the ignition OFF, disconnect the harness connector at the A/C refrigerant pressure sensor. Inspect the connector for loose terminals, corrosion, moisture, damaged locks, or wiring strain near the sensor body.
2. With the ignition OFF, test for less than 10 ohms between the low reference circuit terminal 1 and ground. This confirms that the sensor has a clean low reference path before the reference voltage and signal circuits are evaluated.
- If greater than the specified range, test the low reference circuit for an open circuit or high resistance. If the circuit tests normal, replace the ECM.
3. With the ignition ON, test for 4.8-5.2 volts between the 5-volt reference circuit terminal 2 and ground. A correct voltage reading confirms that the ECM is supplying the required reference voltage to the pressure sensor.
- If less than the specified range, test the 5-volt reference circuit for a short to ground, an open circuit, or high resistance. If the circuit tests normal, replace the ECM.
- If greater than the specified range, test the 5-volt reference circuit for a short to voltage. If the circuit tests normal, replace the ECM.
4. Verify that the scan tool A/C High Side Pressure Sensor parameter is less than 0.1 volts, or approximately 1 psi. This response confirms that the ECM recognizes the expected low signal condition with the sensor disconnected.
- If greater than the specified range, test the signal circuit terminal 3 for a short to voltage. If the circuit tests normal, replace the ECM.
5. Install a 3A fused jumper wire between the signal circuit terminal 3 and the 5-volt reference circuit terminal 2. Verify that the scan tool A/C Refrigerant High Side Pressure Sensor parameter is greater than 4.90 volts, or approximately 425 psi. This step confirms that the ECM can recognize the upper end of the pressure sensor signal range when the circuit is pulled high through a protected jumper.
- If less than the specified range, test the signal circuit for a short to ground, an open circuit, or high resistance.
If the circuit tests normal, replace the ECM.
6. If all circuits test normal, test or replace the A/C refrigerant pressure sensor. Do not replace the sensor until the low reference circuit, 5-volt reference circuit, and signal circuit have all been verified, because wiring faults can produce the same symptoms as a failed pressure sensor.
Repair Instructions
Perform the Diagnostic Repair Verification after completing the diagnostic procedure. Confirm that the A/C refrigerant pressure reading is believable, that the compressor clutch is no longer disabled by the fault, and that the Buick Enclave A/C system responds normally to pressure changes.
- Air Conditioning (A/C) Refrigerant Pressure Sensor Replacement
- Control Module References for the ECM replacement, setup, and programming
DTC P0645, P0646 OR P0647: AIR CONDITIONING (A/C) COMPRESSOR CLUTCH RELAY
Diagnostic Instructions
- Perform the Diagnostic System Check - Vehicle prior to using this diagnostic procedure. This verifies that the vehicle communication network, power feeds, grounds, and related modules are functioning before compressor clutch relay diagnosis begins.
- Review Strategy Based Diagnosis for an overview of the diagnostic approach. This helps separate relay control circuit faults from compressor clutch concerns, HVAC request issues, ECM decisions, pressure sensor faults, or system protection conditions.
- Diagnostic Procedure Instructions provides an overview of each diagnostic category and explains how the test sequence should be followed.
DTC Descriptor
DTC P0645
- Air Conditioning (A/C) Compressor Clutch Relay Control Circuit
DTC P0646
- Air Conditioning (A/C) Compressor Clutch Relay Control Circuit Low Voltage
DTC P0647
- Air Conditioning (A/C) Compressor Clutch Relay Control Circuit High Voltage
Diagnostic Fault Information
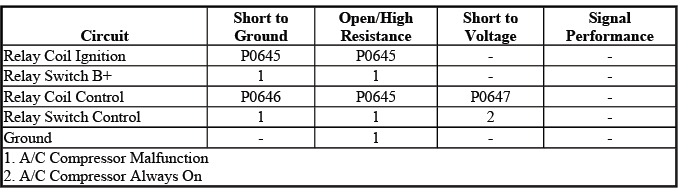
Circuit System Description
When the A/C switch is pressed, the HVAC control module sends a serial data message to the engine control module (ECM). This message is an A/C request. If operating conditions are acceptable, the ECM grounds the A/C compressor clutch relay control circuit, which energizes the A/C CMPRSR CLUTCH relay. When the relay contacts close, battery voltage is supplied to the A/C compressor clutch assembly.
The compressor clutch relay circuit is the electrical link between the A/C request and actual compressor clutch engagement. If the ECM cannot control the relay correctly, the compressor may not engage, may engage at the wrong time, or may be disabled as a protective response. On the Buick Enclave, compressor clutch operation also depends on pressure sensor input, engine speed, coolant temperature, evaporator temperature, ambient temperature, and engine load conditions.
Conditions for Running the DTC
- The ignition voltage is between 11-18 volts.
- The engine speed is greater than 600 RPM.
- An A/C request is made by the HVAC system.
Conditions for Setting the DTC
P0645 or P0646
The ECM detects a short to ground or an open condition at the A/C compressor clutch relay control circuit. This means the relay control circuit is not responding as expected when the ECM attempts to control compressor clutch operation.
P0647
The ECM detects a short to voltage at the A/C compressor clutch relay control circuit. A voltage short can prevent normal relay control and may cause the ECM to disable compressor operation.
Action Taken When the DTC Sets
P0645 or P0646
The A/C compressor may become inoperative or may remain active when it should not. The A/C compressor solenoid is commanded to 0 percent displacement. This can result in warm air from the ducts even if the clutch appears to engage unexpectedly, because the system is being placed into a protective or limited operating state.
P0647
The A/C compressor is inoperative. The ECM prevents compressor clutch operation because the relay control circuit voltage is not within the expected range.
Conditions for Clearing the DTC
A history DTC clears after 40 consecutive warm-up cycles have occurred without a malfunction. If the DTC returns after clearing, test the relay control circuit under the same operating conditions that caused the original fault.
Diagnostic Aids
The following conditions must be met in order for the ECM to turn on the compressor clutch:
- Battery voltage is between 9-18 volts.
- Engine coolant temperature (ECT) is less than 123ºC (253ºF).
- Engine speed is greater than 600 RPM.
- Engine speed is less than 4,760 RPM.
- A/C high side pressure is between 269-2929 kPa (39-425 psi). Refer to Air Conditioning (A/C) System Performance Test.
- Throttle position is less than 100 percent.
- Evaporator temperature is greater than 0ºC (32ºF).
- ECM does not detect excessive torque load.
- ECM does not detect insufficient idle quality.
- The ambient temperature is above 1ºC (34ºF).
If any of these enabling conditions are not met, the ECM may deny compressor clutch engagement even when the relay and clutch circuits are electrically sound. For accurate diagnosis on the Buick Enclave automatic HVAC system, compare scan tool A/C request data, relay command status, pressure readings, engine operating conditions, and compressor clutch response before replacing components.
Reference Information
Schematic Reference
HVAC Schematics
Connector End View Reference
COMPONENT CONNECTOR END VIEWS - INDEX
Description and Operation
- Air Delivery Description and Operation
- Air Temperature Description and Operation
Electrical Information Reference
- Circuit Testing
- Connector Repairs
- Testing for Intermittent Conditions and Poor Connections
- Wiring Repairs
Scan Tool Reference
Control Module References for scan tool information
Circuit/System Testing
1. With the ignition OFF, disconnect the KR29 A/C compressor clutch relay, then turn the ignition ON. This isolates the relay socket so the feed and control circuits can be tested without the relay installed.
2. Verify that a test lamp illuminates between the B+ circuit terminal 30 and ground. A lit test lamp confirms that battery voltage is available at the relay feed circuit.
If the test lamp does not illuminate and the circuit fuse is good
- Turn the ignition OFF.
- Test for less than 2 ohms in the B+ circuit from end to end.
- If 2 ohms or greater, repair the open circuit or high resistance in the circuit.
- If less than 2 ohms, verify that the fuse is not open and that voltage is present at the fuse.
If the test lamp does not illuminate and the circuit fuse is open
- Turn the ignition OFF.
- Test for infinite resistance between the B+ circuit and ground.
- If less than infinite resistance, repair the short to ground on the circuit.
- If infinite resistance, continue testing the compressor clutch control side of the circuit.
- Disconnect the harness connector at the Q2 A/C compressor clutch. This separates the clutch assembly from the relay output circuit so the short can be isolated accurately.
- Test for infinite resistance between the control circuit terminal 87 and ground.
- If less than infinite resistance, repair the short to ground on the circuit.
- If infinite resistance, test or replace the Q2 A/C compressor clutch.
If the test lamp illuminates
3. Turn the ignition ON. This allows the relay ignition feed circuit to be checked under an active electrical condition.
4. Verify that a test lamp illuminates between the ignition circuit terminal 85 and ground. A lit test lamp confirms that the relay coil has the required ignition voltage feed.
If the test lamp does not illuminate
Replace the X50A underhood fuse block. Before replacement, confirm that the fuse block terminals are not damaged, overheated, loose, or contaminated by moisture.
If the test lamp illuminates
5. Connect a test lamp between the ignition circuit terminal 85 and the control circuit terminal 86. This setup checks whether the ECM can control the relay coil by switching the control side of the circuit.
6. Verify that the test lamp turns ON and OFF when commanding the Engine Control Module A/C Compressor Clutch Relay ON and OFF with a scan tool. The lamp response should follow the scan tool command cleanly, without remaining fixed ON or fixed OFF.
If the test lamp is always OFF
- With the ignition OFF, disconnect the harness connector at the K20 engine control module, then turn the ignition ON.
- Test for less than 1 V between the control circuit and ground.
- If 1 V or greater, repair the short to voltage on the circuit.
- If less than 1 V, continue testing the control circuit for continuity and high resistance.
- Turn the ignition OFF.
- Test for less than 2 ohms in the control circuit from end to end.
- If 2 ohms or greater, repair the open circuit or high resistance in the circuit.
- If less than 2 ohms, replace the K20 engine control module.
If the test lamp is always ON
- With the ignition OFF, disconnect the harness connector at the K20 engine control module.
- Test for infinite resistance between the control circuit and ground.
- If less than infinite resistance, repair the short to ground on the circuit.
- If infinite resistance, replace the K20 engine control module.
If the test lamp turns ON and OFF
7. Verify that a test lamp does not illuminate between the control circuit terminal 87 and ground. This confirms that the relay output side is not shorted to voltage when the relay is removed.
If the test lamp illuminates
Repair the short to voltage on the circuit. A voltage short on this circuit can cause incorrect compressor clutch behavior and may prevent normal ECM control of the A/C system.
If the test lamp does not illuminate
8. With the ignition OFF and all vehicle systems OFF, disconnect the harness connector at the Q2 A/C compressor clutch. It may take up to 2 minutes for all vehicle systems to power down. Waiting for module power-down helps prevent misleading resistance readings during diagnosis.
9. Test for less than 10 ohms between the ground circuit terminal 1 and ground. This verifies that the compressor clutch has a usable ground path before the clutch feed circuit is checked.
If 10 ohms or greater
- Turn the ignition OFF.
- Test for less than 2 ohms in the ground circuit from end to end.
- If 2 ohms or greater, repair the open circuit or high resistance in the circuit.
- If less than 2 ohms, repair the open circuit or high resistance in the ground connection.
If less than 10 ohms
10. Connect the harness connector at the Q2 A/C compressor clutch. Make sure the connector locks fully into place and that the wiring is not pulled tight near the compressor.
11. With the ignition ON, connect a 10 A fused jumper wire between the B+ circuit terminal 30 and the control circuit terminal 87. The fused jumper provides protected battery voltage to the clutch output circuit for direct clutch operation testing.
12. Verify that the Q2 A/C compressor clutch is activated. A visible or audible clutch engagement confirms that the clutch assembly and output circuit can operate when supplied with direct fused power.
If the Q2 A/C compressor clutch does not activate
- With the ignition OFF, disconnect the harness connector at the Q2 A/C compressor clutch.
- Test for less than 2 ohms in the control circuit from end to end.
- If 2 ohms or greater, repair the open circuit or high resistance in the circuit.
- If less than 2 ohms, test or replace the Q2 A/C compressor clutch.
If the Q2 A/C compressor clutch activates
13. Test or replace the KR29 A/C compressor clutch relay. If the clutch operates with the fused jumper but does not operate correctly through the relay command path, the relay should be checked before replacing more expensive components on the Buick Enclave A/C system.
Component Testing
1. With the ignition OFF, disconnect the KR29 A/C compressor clutch relay. Inspect the relay terminals and relay cavity for heat discoloration, corrosion, loose fit, or damaged terminals before electrical testing.
2. Test for 60-180 ohms between terminals 85 and 86. This checks the relay coil resistance and confirms whether the coil is within the expected operating range.
If not between 60-180 ohms
Replace the KR29 A/C compressor clutch relay.
If between 60-180 ohms
3. Test for infinite resistance between the terminals listed below. These checks confirm that the relay contacts and coil terminals are not internally shorted when the relay is not energized:
- 30 and 86
- 30 and 87
- 30 and 85
- 85 and 87
If less than infinite resistance
Replace the KR29 A/C compressor clutch relay.
If infinite resistance
4. Install a 15 A fused jumper wire between terminal 85 and 12 V. Install a jumper wire between terminal 86 and ground. This energizes the relay coil so contact operation can be tested directly.
5. Test for less than 2 ohms between terminals 30 and 87. A low resistance reading confirms that the relay contacts close properly when the coil is energized.
If 2 ohms or greater
Replace the KR29 A/C compressor clutch relay.
If less than 2 ohms
6. All OK. The relay has passed the basic coil and contact checks. If the Buick Enclave still has an A/C compressor clutch control concern after the relay tests normally, continue diagnosis of the related control circuits, ECM command status, compressor clutch assembly, and A/C enabling conditions.
Repair Instructions
Perform the Diagnostic Repair Verification after completing the repair. Confirm that the compressor clutch engages only when commanded, that the relay control circuit responds correctly to scan tool commands, and that no related DTC resets after the system is operated.
- Air Conditioning Compressor Replacement
- Relay Replacement (Within an Electrical Center), Relay Replacement (Attached to Wire Harness)
- Air Conditioning Clutch Assembly Replacement
- Control Module References for HVAC control module and ECM replacement, setup, and programming
SYMPTOMS - HVAC SYSTEMS - AUTOMATIC
IMPORTANT: Review the system operation in order to familiarize yourself with the system functions. Refer to the following procedures:
- Air Delivery Description and Operation
- Air Temperature Description and Operation
Before diagnosing automatic HVAC symptoms, understand how air delivery, temperature control, blower operation, sensor input, and compressor control work together. In the Buick Enclave, a single customer concern such as warm air, poor airflow, or incorrect outlet selection may be caused by electrical control logic, actuator feedback, refrigerant pressure, sensor input, or a mechanical airflow restriction. Reviewing system operation first helps avoid unnecessary part replacement and leads to a more accurate repair.
Visual/Physical Inspection
- Inspect for aftermarket devices that could affect HVAC system operation. Refer to Checking Aftermarket Accessories. Added electrical equipment, non-factory control modules, remote start wiring, audio installations, alarm systems, or poorly routed harness repairs can interfere with HVAC commands, power feeds, grounds, or serial data communication.
- Inspect the easily accessible or visible system components for obvious damage or conditions that could cause the symptom. Look for disconnected ducts, damaged connectors, loose grounds, missing seals, broken retainers, restricted air inlets, signs of moisture, and wiring that may be rubbing against sharp edges.
- Verify that the A/C compressor clutch turns freely and is not seized. A seized clutch or compressor can prevent engagement, damage the belt drive, open a fuse, or create a misleading electrical complaint.
- The A/C compressor will not operate in cold outside air temperatures. Refer to Air Temperature Description and Operation. This is a normal protection strategy, not necessarily a failure of the Buick Enclave HVAC system.
- The following could cause window fogging:
- Wet carpet or mats, especially after rain, snow, washing, or water intrusion.
- High humidity inside the passenger compartment.
- Interior water leak from body seams, glass seals, HVAC drain routing, or door weatherstrips.
- Blocked A/C evaporator drain tube, which can allow moisture to remain inside the HVAC case.
- Maximum passenger capacity, which increases interior moisture load quickly.
- Blocked body pressure relief valves, which can reduce cabin air exchange and slow defogging.
- Inspect the air distribution system for causes of reduced air flow:
- Obstructed or dirty passenger compartment air filter, if equipped.
- Blocked or damaged air inlet or outlet vents, including vents closed by trim panels, debris, floor mats, cargo, or damaged ducting.
Intermittent
Faulty electrical connections or wiring may be the cause of intermittent conditions. Refer to Testing for Intermittent Conditions and Poor Connections. Intermittent HVAC complaints often appear only during vibration, temperature change, moisture exposure, or harness movement, so inspect connector tension, terminal fit, wiring strain, and signs of previous repair before replacing modules or actuators.
Symptom List
Refer to a symptom diagnostic procedure from the following list in order to diagnose the symptom. Choosing the correct symptom path helps prevent unnecessary part replacement and keeps the diagnosis focused on the system behavior reported by the customer.
- Blower Motor Malfunction
- Auxiliary Blower Motor Malfunction
- Air Conditioning Compressor Malfunction
- Air Temperature Malfunction
- Leak Testing
- Noise Diagnosis - HVAC Module
- Noise Diagnosis - Air Conditioning (A/C) System
- Noise Diagnosis - Blower Motor
- Odor Diagnosis
AIR CONDITIONING COMPRESSOR MALFUNCTION
Diagnostic Instructions
- Perform the Diagnostic System Check - Vehicle prior to using this diagnostic procedure. This confirms that the vehicle communication network, module power supplies, grounds, and related systems are functioning before detailed A/C compressor testing begins.
- Review Strategy Based Diagnosis for an overview of the diagnostic approach. This helps separate a compressor clutch concern from an A/C request issue, refrigerant pressure problem, relay fault, ECM decision, wiring concern, or system protection condition.
- Diagnostic Procedure Instructions provides an overview of each diagnostic category and explains how the test sequence should be followed.
Diagnostic Fault Information
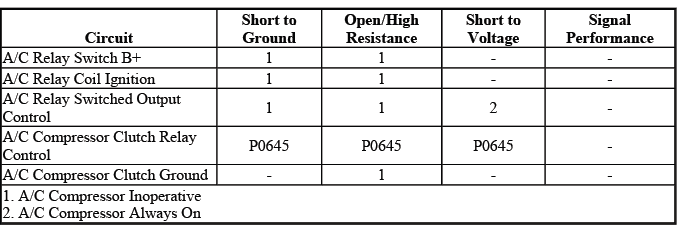
Circuit System Description
When the A/C switch is pressed, the HVAC control module sends a serial data message to the engine control module (ECM). This message requests compressor operation. If the operating conditions are acceptable, the ECM grounds the A/C compressor clutch relay control circuit, which energizes the A/C CMPRSR CLUTCH relay. When the relay contacts close, battery voltage is supplied to the A/C compressor clutch assembly.
The compressor clutch circuit does not operate as a stand-alone circuit. The ECM must see the correct A/C request, acceptable refrigerant pressure, proper engine speed, suitable coolant temperature, acceptable evaporator temperature, and no engine protection condition before it allows clutch engagement. On the Buick Enclave, a compressor that does not engage may be caused by an electrical fault, refrigerant system condition, control module decision, or a normal protection strategy.
Diagnostic Aids
The following conditions must be met in order for the ECM to turn on the compressor clutch:
- Battery voltage is between 9-18 volts.
- Engine coolant temperature (ECT) is less than 123ºC (253ºF).
- Engine speed is greater than 600 RPM.
- Engine speed is less than 4,760 RPM.
- A/C high side pressure is between 269-2929 kPa (39-425 psi). Refer to Air Conditioning (A/C) System Performance Test.
- Throttle position is less than 100 percent.
- Evaporator temperature is greater than 0ºC (32ºF).
- ECM does not detect excessive torque load.
- ECM does not detect insufficient idle quality.
- The ambient temperature is above 1ºC (34ºF).
If one of these enabling conditions is not met, the ECM may deny compressor clutch engagement even though the relay, clutch, and wiring are functional. For an accurate Buick Enclave A/C diagnosis, compare scan tool data with actual system pressure, compressor command status, clutch response, ambient temperature, and cooling fan operation before replacing components.
Reference Information
Schematic Reference
HVAC Schematics
Connector End View Reference
COMPONENT CONNECTOR END VIEWS - INDEX
Description and Operation
- Air Temperature Description and Operation
- Air Delivery Description and Operation
Electrical Information Reference
- Circuit Testing
- Connector Repairs
- Testing for Intermittent Conditions and Poor Connections
- Wiring Repairs
Scan Tool Reference
Control Module References for scan tool information
Circuit/System Verification
With the engine running, place the mode switch in the defrost position. The A/C compressor clutch should engage when the system requests compressor operation and all enabling conditions are satisfied. Defrost mode commonly requests A/C operation to remove moisture from the air and improve windshield clearing.
- If the clutch does not engage, refer to Air Conditioning (A/C) System Performance Test. Also review scan tool A/C request, A/C relay command, pressure sensor data, evaporator temperature, and engine operating conditions before replacing the compressor clutch.
Circuit/System Testing
1. With the ignition OFF, disconnect the A/C relay. This isolates the relay socket so the feed, ignition, and control circuits can be checked directly.
2. With the ignition ON, verify that a test lamp does not illuminate between the control circuit terminal 86 and ground. The control circuit should not show unwanted voltage when the relay is removed and the circuit is not being commanded in a way that would energize the lamp.
- If the test lamp illuminates, test the control circuit for a short to voltage. Repair the circuit as needed before continuing.
3. Verify that a test lamp illuminates between the ignition circuit terminal 85 and ground. A lit lamp confirms that the relay coil ignition feed is present.
- If the test lamp does not illuminate, test the ignition circuit for a short to ground, an open circuit, or high resistance. If the circuit tests normal and the ignition circuit fuse is open, test all components connected to the ignition circuit and replace as necessary.
4. Verify that a test lamp illuminates between the relay B+ circuit terminal 30 and ground. This confirms that battery voltage is available at the relay feed circuit for compressor clutch operation.
- If the test lamp does not illuminate, test the B+ circuit for a short to ground, an open circuit, or high resistance. If the circuit tests normal and the B+ circuit fuse is open, inspect the related load side of the circuit for a shorted component or wiring fault before replacing the fuse.
When testing the Buick Enclave automatic HVAC compressor circuit, use fused jumpers only where specified and avoid bypassing protection circuits unnecessarily. The A/C clutch, relay, ECM command, refrigerant pressure input, and system enabling conditions must all agree before normal compressor operation can occur.
