Buick Enclave: Specifications, Diagnostic Information and Procedures
SPECIFICATIONS
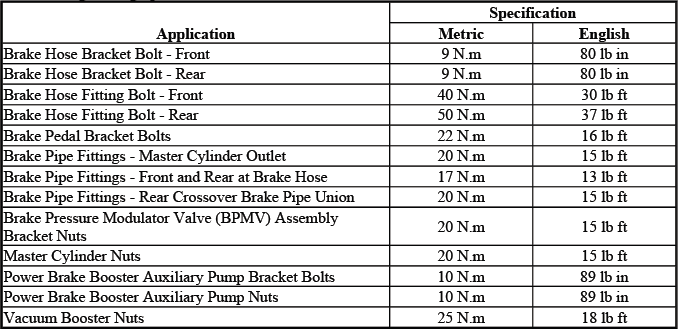
FASTENER TIGHTENING SPECIFICATIONS
Fastener Tightening Specifications
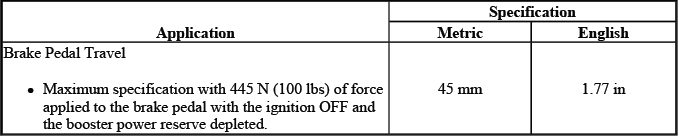
BRAKE SYSTEM SPECIFICATIONS
Brake System Specifications
SCHEMATIC WIRING DIAGRAMS
HYDRAULIC BRAKE WIRING SCHEMATICS
Hydraulic Brake System
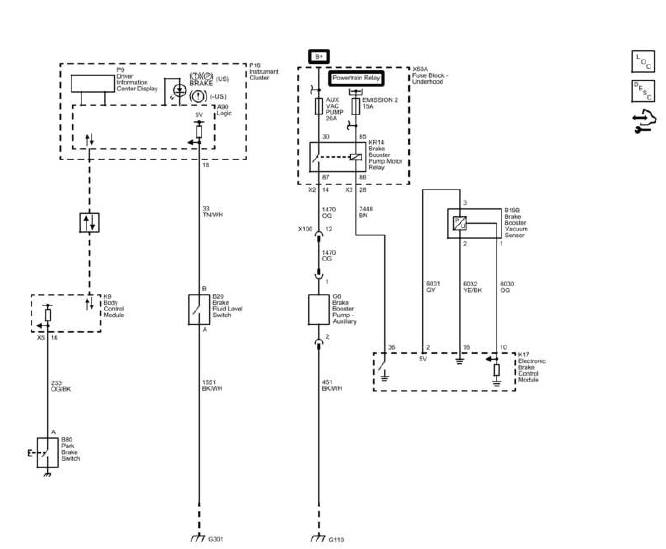
Fig. 1: Hydraulic Brake System Wiring Schematics
DIAGNOSTIC INFORMATION AND PROCEDURES
DIAGNOSTIC CODE INDEX
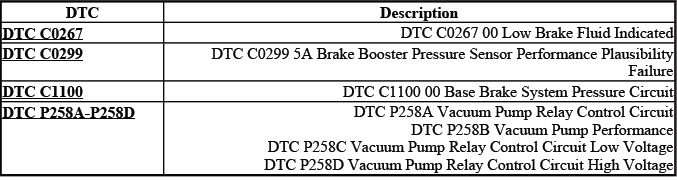
DTC C0267: LOW BRAKE FLUID INDICATED
Diagnostic Instructions
- Perform the Diagnostic System Check - Vehicle before using this diagnostic procedure. This confirms that the vehicle network, warning indicators, related modules, and scan tool communication are ready for accurate diagnosis.
- Review Strategy Based Diagnosis for an overview of the diagnostic approach. The low brake fluid warning should be verified as an actual fluid condition, circuit concern, or module input issue before parts are replaced.
- Diagnostic Procedure Instructions provides an overview of each diagnostic category and helps keep testing in the correct order, especially when warning indicators and serial data messages are involved.
DTC Descriptor
DTC C0267 00
- Low Brake Fluid Indicated
Diagnostic Fault Information

Circuit/System Description
The brake fluid level switch monitors the amount of brake fluid in the master cylinder reservoir. When the instrument panel cluster (IPC) detects that the brake fluid level switch input is closed, it turns ON the red Brake Warning indicator and sends a serial data message to the electronic brake control module (EBCM) indicating that the brake fluid level is low.
On the Buick Enclave, this warning should not be ignored or treated only as an electrical code. Low brake fluid may be caused by worn brake pads, an external hydraulic leak, improper service filling, or a fault in the level switch circuit. A visual inspection of the reservoir and hydraulic brake system should be performed before electrical testing is considered complete.
Conditions for Running the DTC
The ignition is ON, the IPC is awake, and the brake fluid level switch input can be monitored by the control system.
Conditions for Setting the DTC
- Low brake fluid is detected in the master cylinder reservoir.
- A short to ground exists on the brake fluid level switch signal circuit, causing the system to interpret the input as a low-fluid condition.
Action Taken When the DTC Sets
- The EBCM disables the antilock brake system (ABS), traction control system (TCS), dynamic rear proportion (DRP), and vehicle stability enhancement system (VSES). These functions may be disabled because accurate hydraulic brake system status is required for safe electronic brake control operation.
- A DIC message and/or a warning indicator may be displayed to alert the driver that the brake system requires attention.
Conditions for Clearing the DTC
- The condition responsible for the DTC is no longer present. This may occur after the brake fluid level is corrected, a leak is repaired, or the switch/circuit concern is resolved.
- The EBCM clears the history DTC when a current DTC is not detected in 100 consecutive drive cycles.
Reference Information
Schematic Reference
Hydraulic Brake Schematics
Connector End View Reference
COMPONENT CONNECTOR END VIEWS - INDEX
Description and Operation
Brake Warning System Description and Operation
Electrical Information Reference
- Circuit Testing
- Connector Repairs
- Testing for Intermittent Conditions and Poor Connections
- Wiring Repairs
Scan Tool Reference
Control Module References for scan tool information, module replacement, setup, and programming guidance.
Circuit/System Verification
1. Inspect for proper brake fluid level. The fluid level should be at or above the specified proper level in the master cylinder reservoir. Also inspect for signs of external leakage around brake lines, hoses, calipers, the master cylinder, and the hydraulic control unit area.
- If low, refer to Brake Fluid Loss. Do not simply add fluid and clear the code until the reason for the low level has been identified.
2. With the ignition ON, observe the scan tool IPC Brake Fluid parameter. The reading should be OK. If the scan tool does not match the actual reservoir condition, continue with circuit testing before replacing the switch or IPC.
Circuit/System Testing
1. With the ignition OFF, disconnect the harness connector at the brake fluid level switch. Inspect the connector for corrosion, loose terminals, moisture intrusion, or damaged locking tabs before using electrical test equipment.
2. Test for less than 10 ohm between the ground circuit terminal A and ground. A good ground is required for the brake fluid switch input to be interpreted correctly.
- If greater than the specified range, test the ground circuit for an open/high resistance. Repair wiring, connector, or ground path concerns as needed.
3. With the ignition ON, verify the scan tool IPC Brake Fluid parameter is OK.
- If not the specified value, test the signal circuit for a short to ground. If the circuit tests normal, replace the IPC.
4. Install a 3A fused jumper wire between the signal circuit terminal B and ground. Verify the scan tool IPC Brake Fluid parameter is Low. This confirms that the IPC can recognize the low-fluid input when the circuit is intentionally grounded.
- If not the specified value, test the signal circuit for a short to voltage or an open/high resistance. If the circuit tests normal, replace the IPC.
5. If all circuits test normal, test or replace the brake fluid level switch. For the Buick Enclave, confirm proper reservoir fluid level and switch operation before returning the vehicle to service, because brake warning messages can disable multiple chassis control functions.
Repair Instructions
Perform the Diagnostic Repair Verification after completing the diagnostic procedure. Verification should include confirming the brake fluid level, clearing DTCs, checking scan tool data, and making sure the red brake warning indicator does not return.
- Brake Fluid Level Indicator Switch Replacement
- Control Module References for IPC replacement, setup and programming
DTC C0299: BRAKE BOOSTER PRESSURE SENSOR PERFORMANCE PLAUSIBILITY FAILURE
Diagnostic Instructions
- Perform the Diagnostic System Check - Vehicle before using this diagnostic procedure. This helps identify related power, ground, communication, or brake system concerns that may affect booster pressure sensor diagnosis.
- Review Strategy Based Diagnosis for an overview of the diagnostic approach. A plausibility failure means the signal does not match what the system expects under the current operating conditions, so vacuum supply, sensor data, and related brake assist behavior should all be considered.
- Diagnostic Procedure Instructions provides an overview of each diagnostic category and explains how to evaluate sensor performance without overlooking mechanical brake booster or vacuum supply concerns.
DTC Descriptors
DTC C0299 5A
- Brake Booster Pressure Sensor Performance Plausibility Failure
Circuit/System Description
The power brake booster vacuum sensor monitors the vacuum level in the power brake booster. The EBCM uses this input to determine whether adequate brake assist vacuum is available. When the electronic brake control module detects that the vacuum level is too low, not plausible, or not responding as expected after start-up, a DTC is set.
For the Buick Enclave, proper brake booster vacuum is important because it directly affects pedal effort and driver confidence during braking. A low-vacuum condition may be caused by a sensor issue, vacuum supply problem, leaking hose, booster concern, engine vacuum condition, or an electrical fault in the sensor circuit.
Conditions for Running the DTC
The engine is running and the brake control system is monitoring the brake booster vacuum sensor input under conditions where a valid vacuum reading should be available.
Conditions for Setting the DTC
Low or no vacuum is detected in the power brake booster after start-up. The EBCM interprets this as a performance plausibility concern because the booster vacuum signal does not match the expected operating state.
Conditions for Clearing the DTC
- The condition responsible for the DTC is no longer present. This may occur after vacuum supply is restored, a leak is repaired, or the sensor/circuit concern is corrected.
- The EBCM clears the history DTC when a current DTC is not detected in 100 consecutive drive cycles.
Reference Information
Schematic Reference
Use the appropriate hydraulic brake and brake booster vacuum sensor schematic information when diagnosing this fault. The diagnosis should include scan tool data review, circuit testing, connector inspection, and a physical check of the vacuum supply path before replacing the sensor or brake booster components.
Hydraulic Brake Schematics
Connector End View Reference
COMPONENT CONNECTOR END VIEWS - INDEX
Description and Operation
Brake Assist System Description and Operation
Electrical Information Reference
- Circuit Testing
- Connector Repairs
- Testing for Intermittent Conditions and Poor Connections
- Wiring Repairs
Scan Tool Reference
Control Module References for scan tool information
Circuit/System Verification
1. Verify that a vacuum leak is not present. Refer to Brake Assist System Diagnosis. A vacuum leak can reduce brake booster assist and may cause the sensor reading to appear incorrect even when the electrical circuit is operating normally.
2. Verify that DTC C1100 is not set. This code should be addressed first because it relates directly to the brake booster pressure sensor circuit used by the brake assist system.
- If DTC is set, refer to DTC C1100.
DTC C1100: BASE BRAKE SYSTEM PRESSURE CIRCUIT
Diagnostic Instructions
- Perform the Diagnostic System Check - Vehicle before using this diagnostic procedure. This confirms that the related modules, power feeds, grounds, and communication circuits are ready for accurate testing.
- Review Strategy Based Diagnosis for an overview of the diagnostic approach. The pressure circuit should be diagnosed as both an electrical input and a brake assist performance signal, not only as a sensor code.
- Diagnostic Procedure Instructions provides an overview of each diagnostic category and helps keep circuit testing, scan tool review, and component replacement in the correct order.
DTC Descriptor
DTC C1100 00
- Base Brake System Pressure Circuit
Diagnostic Fault Information

Circuit/System Description
The electronic brake control module (EBCM) provides a 5-volt reference to the brake booster vacuum sensor. This reference voltage allows the sensor to report booster vacuum changes back to the module as a measurable signal.
The brake booster vacuum sensor converts changes in brake booster vacuum into a signal voltage ranging from 0.13-3.30 volts, and this signal is monitored by the EBCM. If the signal falls outside the expected range, the module interprets the reading as a circuit or sensor performance concern.
On the Buick Enclave, this input is important because brake booster vacuum affects pedal effort and brake assist feel. A fault in this circuit may be caused by the sensor, the 5-volt reference, the low reference circuit, the signal circuit, connector condition, or a related module concern.
Conditions for Running the DTC
The ignition is ON and the EBCM is able to monitor the brake booster vacuum sensor circuit.
Conditions for Setting the DTC
The brake booster sensor signal voltage is not within 0.13-3.30 volts for more than 1 second. This means the module is seeing a signal that is too low, too high, or otherwise outside the normal operating range for the circuit.
Conditions for Clearing the DTC
- The condition responsible for the DTC is no longer present after the sensor, wiring, connector, or module-related concern has been corrected.
- The EBCM clears the history DTC when a current DTC is not detected in 100 consecutive drive cycles.
Reference Information
Schematic Reference
Hydraulic Brake Schematics
Connector End View Reference
COMPONENT CONNECTOR END VIEWS - INDEX
Description and Operation
Brake Assist System Description and Operation
Electrical Information Reference
- Circuit Testing
- Connector Repairs
- Testing for Intermittent Conditions and Poor Connections
- Wiring Repairs
Scan Tool Reference
Control Module References for scan tool information, module setup, programming, and replacement guidance.
Circuit/System Testing
1. With the ignition OFF, disconnect the harness connector at the brake booster vacuum sensor. Inspect the connector for corrosion, moisture, loose terminals, damaged locks, or backed-out pins before beginning electrical checks.
2. Wait for 60 seconds, then test for less than 11 ohms between the low reference circuit terminal 2 and ground. This confirms that the sensor has a reliable low reference path.
- If greater than the specified range, test the low reference circuit for an open/high resistance. If the circuit tests normal, replace the EBCM.
3. With the ignition ON, test for 4.8-5.2 V between the 5 V reference circuit terminal 3 and ground. A correct 5-volt reference is required for the sensor to generate an accurate signal.
- If less than the specified range, test the 5 V reference circuit for an open/high resistance. If the circuit tests normal, replace the EBCM.
- If greater than the specified range, test the 5 V reference circuit for a short to B+. If the circuit tests normal, replace the EBCM.
4. With the ignition ON, test for 4.8-5.2 V between the 5 V reference circuit terminal 3 and the signal circuit terminal 1. This check helps confirm that the signal circuit is not pulling the reference circuit outside the expected range.
- If less than the specified range, test the signal circuit for an open/high resistance. If the circuit tests normal, replace the EBCM.
- If greater than the specified range, test the signal circuit for a short to B+. If the circuit tests normal, replace the EBCM.
5. With the ignition OFF, disconnect the harness connector at the EBCM. This isolates the circuit so the signal wire can be checked for unwanted continuity to ground.
6. Test for infinite resistance between the signal circuit terminal 1 and ground.
- If not the specified value, test the signal circuit for a short to ground.
7. If all circuits test normal, test or replace the brake booster vacuum sensor. For the Buick Enclave, confirm both the electrical circuit and the actual brake assist behavior before completing the repair, because a booster vacuum issue can affect pedal effort even when the warning is first seen as a circuit DTC.
Repair Instructions
Perform the Diagnostic Repair Verification after completing the diagnostic procedure. Verification should include clearing DTCs, reviewing scan tool data, checking for returned codes, and confirming normal brake pedal feel.
- Power Brake Booster Vacuum Sensor Replacement
- Control Module References for EBCM replacement, setup and programming
DTC P258A-P258D: VACUUM PUMP/VACUUM PUMP RELAY
Diagnostic Instructions
- Perform the Diagnostic System Check - Vehicle before using this diagnostic procedure. This helps identify related module, relay, power supply, ground, or communication concerns before focused vacuum pump testing begins.
- Review Strategy Based Diagnosis for an overview of the diagnostic approach. Vacuum pump and relay codes should be diagnosed by checking both electrical control and actual vacuum performance.
- Diagnostic Procedure Instructions provides an overview of each diagnostic category and explains how to separate relay control faults from vacuum pump performance concerns.
DTC Descriptors
DTC P258A
- Vacuum Pump Relay Control Circuit
DTC P258B
- Vacuum Pump Performance
DTC P258C
- Vacuum Pump Relay Control Circuit Low Voltage
DTC P258D
- Vacuum Pump Relay Control Circuit High Voltage
Diagnostic Fault Information
Circuit/System Description
The engine control module (ECM) monitors the control circuit of the brake booster pump relay. The ECM supplies ground through the pump relay control circuit, which allows B+ voltage to actuate the brake booster pump. B+ voltage is supplied at all times to the coil side of the pump relay.
The vacuum pump helps support brake booster vacuum when engine vacuum is not sufficient for the expected brake assist demand. On the Buick Enclave, this system must operate correctly so the brake pedal remains consistent and the driver receives proper assist during conditions where additional vacuum support is needed.
Conditions for Running the DTC
P258A, P258C, P258D
The ignition is ON and the ECM is monitoring the vacuum pump relay control circuit for proper voltage and control response.
P258B
- The engine is running.
- The vacuum pump is activated for greater than 1.6 seconds.
Conditions for Setting the DTC
P258A, P258C
The ECM detects an open/high resistance condition on the relay coil control circuit. This may prevent the relay from operating correctly and can stop the vacuum pump from being commanded when additional brake booster vacuum is needed.
P258B
The ECM detects an excessive difference in vacuum levels between the power brake booster and the manifold absolute pressure (MAP). This indicates that the vacuum pump, vacuum plumbing, relay operation, or brake booster vacuum response may not be matching expected system behavior.
P258D
The ECM detects a high voltage condition on the vacuum pump relay control circuit. This may be caused by a short to voltage, relay control wiring fault, connector issue, or another electrical condition that prevents proper relay control.
When diagnosing these vacuum pump and relay concerns, inspect the relay, pump power and ground circuits, vacuum hoses, electrical connectors, and related scan tool data before replacing the pump. A careful diagnosis helps avoid unnecessary parts replacement and ensures the brake assist system on the Buick Enclave remains reliable under normal driving conditions.
P258D
The ECM detects a short to voltage on the vacuum pump relay control circuit. This indicates that the relay control side may be receiving unwanted voltage when the ECM is expecting to control the circuit normally.
Action Taken When the DTC Sets
DTC P258A, P258B, P258C, and P258D are Type B DTCs. When one of these faults is active, the brake assist system may not be able to rely on normal vacuum pump operation, which can affect brake booster support under certain driving conditions.
Conditions for Clearing the DTC
DTC P258A, P258B, P258C, and P258D are Type B DTCs. The DTC will clear according to Type B diagnostic logic after the fault is no longer present and the control system confirms normal circuit or system operation.
Reference Information
Schematic Reference
Hydraulic Brake Schematics
Connector End View Reference
COMPONENT CONNECTOR END VIEWS - INDEX
Description and Operation
Brake Assist System Description and Operation
Electrical Information Reference
- Circuit Testing
- Connector Repairs
- Testing for Intermittent Conditions and Poor Connections
- Wiring Repairs
DTC Type Reference
Powertrain Diagnostic Trouble Code (DTC) Type Definitions
Scan Tool Reference
Control Module References for scan tool information, module setup, replacement, and programming guidance.
Circuit/System Verification
1. Verify that a vacuum leak is not present. Refer to Brake System Vacuum Source Test. A vacuum leak can cause the vacuum pump to run longer than expected or create a performance fault even when the electrical side of the relay circuit is working correctly.
2. With the ignition ON, command the relay ON and OFF with a scan tool. Observe whether the vacuum relay and motor turn ON and OFF with each command. On the Buick Enclave, this verification helps separate a relay control concern from a pump, vacuum hose, or brake booster performance issue.
Circuit/System Testing
1. With the ignition OFF, disconnect the vacuum pump relay. Inspect the relay terminals and the electrical center cavity for corrosion, heat damage, spread terminals, loose fit, or signs of moisture before beginning electrical tests.
2. With the ignition ON, verify that a test lamp does not illuminate between the control circuit terminal 87 and ground.
- If the test lamp illuminates, test the control circuit for a short to voltage. A voltage feed on this circuit when it should not be present can cause incorrect relay or pump operation.
3. Verify that a test lamp illuminates between the B+ circuit terminals listed below and ground. This confirms that battery voltage is available to the relay feed and coil supply circuits.
- Terminal 30
- Terminal 86
- If the test lamp does not illuminate, test the B+ circuit for a short to ground or an open/high resistance. If the circuit tests normal and the B+ circuit fuse is open, test or replace the relay.
4. Verify that a test lamp does not illuminate between the control circuit terminal 85 and ground.
- If the test lamp illuminates, test the control circuit for a short to voltage. This condition can prevent the ECM from controlling the relay properly.
5. Disconnect the harness connector at the vacuum pump. Check the connector body, terminal tension, and wiring near the pump because vibration, heat, and road splash can contribute to intermittent brake assist faults.
6. Test for less than 2 ohms between the vacuum pump ground circuit terminal 2 and ground. A weak ground can cause slow pump operation, no pump operation, or an incorrect performance fault.
- If greater than the specified range, test the ground circuit for an open/high resistance.
7. Connect the harness connector at the vacuum pump. Make sure the connector locks fully and that the wiring is routed away from moving or hot components.
8. Connect a 20A fused jumper wire between the B+ circuit terminal 30 and the control circuit terminal 87.
Verify the vacuum pump is activated. The pump should run when power is applied through the fused jumper, confirming that the pump and load side of the circuit can operate.
- If the vacuum pump does not activate, test the control circuit for a short to ground or an open/high resistance. If the circuit tests normal, test or replace the vacuum pump.
9. With the ignition OFF, test for infinite resistance between the control circuit terminal 85 and ground.
- If less than the specified value, test the control circuit for a short to ground. If the circuit tests normal, replace the ECM.
10. Disconnect the X1 harness connector at the ECM. This allows the relay control circuit to be checked for continuity between the relay cavity and the ECM connector without the module connected.
11. Test for less than 2 ohms between the control circuit terminal 85 at the relay cavity and terminal 18 at the ECM harness connector.
- If greater than the specified range, test the control circuit for an open/high resistance.
12. If all circuits test normal, replace the brake booster pump relay. If the DTC resets, replace the power brake booster vacuum pump. For the Buick Enclave, confirm vacuum pump command, relay response, and actual brake booster assist before considering the diagnosis complete.
Component Testing
1. With the ignition OFF, disconnect the vacuum pump relay. Test the relay away from the circuit so relay coil resistance and contact operation can be evaluated separately from the vehicle wiring.
2. Test for 60-180 ohms between terminals 85 and 86. This checks the relay coil resistance.
- If the resistance is not within the specified range, replace the relay.
3. Test for infinite resistance between the following terminals. These checks confirm that the relay contacts are not shorted internally when the relay is not energized.
- 30 and 85
- 30 and 87
- 30 and 86
- 86 and 87
- If not the specified value, replace the relay.
4. Install a 30A fused jumper wire between relay terminal 86 and B+. Install a jumper wire between relay terminal 85 and ground. This energizes the relay coil so the switched contacts can be tested.
5. Test for less than 2 ohms between terminals 30 and 87. Low resistance across the switched contacts indicates that the relay can close properly when energized.
- If greater than the specified range, replace the relay.
Repair Instructions
Perform the Diagnostic Repair Verification after completing the diagnostic procedure. Verification should include clearing DTCs, commanding the vacuum pump relay with a scan tool, confirming pump operation, and checking that the brake assist concern does not return.
- Relay Replacement (Within an Electrical Center) , Relay Replacement (Attached to Wire Harness)
- Power Brake Booster Auxiliary Pump Replacement
- Control Module References for ECM replacement, setup and programming
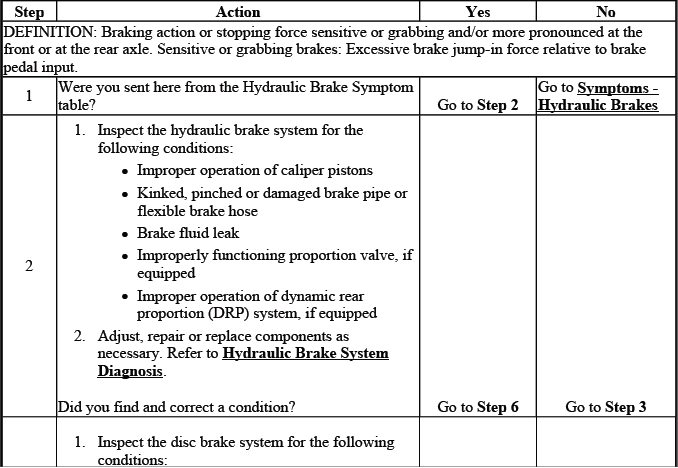
SYMPTOMS - HYDRAULIC BRAKES
IMPORTANT: The following steps must be completed before using the symptom tables.
- Perform the Brake System Vehicle Road Test before using the hydraulic brake symptom tables in order to duplicate the customer's concern. A road test helps confirm whether the complaint is related to pedal feel, warning indicators, brake noise, brake pull, brake drag, or stopping performance.
- Review the system operation in order to familiarize yourself with the system functions. Refer to the following:
- Brake Warning System Description and Operation
- Hydraulic Brake System Description and Operation
- Brake Assist System Description and Operation
- Hydraulic Brake Component Operation Visual Inspection
Visual/Physical Inspection
- Inspect for aftermarket devices which could affect the operation of the Hydraulic Brake System. Refer to Checking Aftermarket Accessories. Added equipment, incorrect wiring repairs, or non-factory electrical loads can create warning indicators or intermittent brake system behavior.
- Inspect the easily accessible or visible system components for obvious damage or conditions which could cause the symptom. Check the brake fluid level, visible hydraulic lines, hoses, calipers, master cylinder area, vacuum hoses, wiring connectors, and brake pedal feel before moving into deeper diagnostics.
Intermittent
Faulty electrical connections or wiring may be the cause of intermittent conditions. Refer to Testing for Intermittent Conditions and Poor Connections. Intermittent brake concerns may appear only during vibration, temperature changes, moisture exposure, or specific driving conditions, so connector fit and harness routing should be inspected carefully.
Symptom List
Refer to a symptom diagnostic procedure from the following list in order to diagnose the symptom. Choosing the correct symptom path helps avoid unnecessary parts replacement and keeps the diagnosis focused on the actual hydraulic brake concern.
- Brake Warning Indicator Malfunction
- Brake Pulsation
- Brake System Noise
- Braking Action Uneven - Pulls to One Side
- Braking Action Uneven - Front to Rear
- Brake Pedal Excessive Travel
- Brake Pedal Excessive Effort
- Brakes Drag
- Brake Fluid Loss
- Hydraulic Brake System Diagnosis
- Brake Assist System Diagnosis
On the Buick Enclave, hydraulic brake symptoms should be diagnosed by combining the driver's complaint, road test results, visual inspection, scan tool data, and mechanical checks. Brake warning messages, pedal feel changes, brake pull, drag, or noise can come from more than one area of the system, so confirming the symptom before repair is essential.
BRAKE WARNING INDICATOR MALFUNCTION
Diagnostic Instructions
- Perform the Diagnostic System Check - Vehicle before using this diagnostic procedure. This confirms that the warning indicator, related modules, scan tool communication, and basic vehicle electrical conditions are ready for accurate diagnosis.
- Review Strategy Based Diagnosis for an overview of the diagnostic approach. The red brake warning indicator can be commanded by more than one input, so the park brake switch, brake fluid level switch, IPC, BCM, wiring, and serial data messages must be considered before replacing parts.
- Diagnostic Procedure Instructions provides an overview of each diagnostic category and helps keep verification, circuit testing, component testing, and repair validation in the correct order.
Diagnostic Fault Information
Circuit/System Description
The instrument panel cluster (IPC) monitors the brake fluid level switch input and illuminates the red Brake Warning indicator when the circuit state indicates a low brake fluid condition. The body control module (BCM) monitors the park brake switch input; when the park brake switch input is grounded, the BCM sends a serial data message to the IPC requesting illumination of the red Brake Warning indicator.
On the Buick Enclave, the red brake warning indicator should be diagnosed as a system message, not just a bulb or display issue. The warning may be caused by an applied park brake, low brake fluid, a switch fault, a grounded signal circuit, poor connector contact, or a module input concern.
Reference Information
Schematic Reference
Hydraulic Brake Schematics
Connector End View Reference
COMPONENT CONNECTOR END VIEWS - INDEX
Description and Operation
Brake Warning System Description and Operation
Electrical Information Reference
- Circuit Testing
- Connector Repairs
- Testing for Intermittent Conditions and Poor Connections
- Wiring Repairs
Scan Tool Reference
Control Module References for scan tool information, module replacement, setup, and programming guidance.
Circuit/System Verification
1. Verify the park brake is released and the brake fluid is at or above the proper level. This first check prevents unnecessary electrical diagnosis when the warning indicator is responding to an actual brake system condition.
- If low, refer to Brake Fluid Loss. Do not simply add fluid without checking for worn brake pads, hydraulic leaks, or previous service errors that may have caused the fluid level to drop.
2. Command the IPC display test with a scan tool. The warning indicator should turn ON. This verifies that the IPC can illuminate the red brake warning indicator when commanded.
- If the red brake warning indicator does not illuminate, replace the IPC.
3. With the ignition ON, observe the scan tool BCM Park Brake Switch parameter while applying and releasing the park brake. The parameter should cycle between Applied and Released. A correct scan tool response confirms that the BCM is receiving the park brake switch input properly.
- If the parameter does not cycle between the specified values, refer to Circuit/System Testing - Park Brake Switch Malfunction.
4. Observe the scan tool IPC Brake Fluid parameter. The reading should be OK when the brake fluid level is correct and the switch circuit is operating normally.
- If not the specified value, refer to Circuit/System Testing - Brake Fluid Level Switch Malfunction.
Circuit/System Testing
Park Brake Switch Malfunction
1. With the ignition OFF, disconnect the harness connector at the park brake switch. Inspect the connector for corrosion, loose terminals, damaged locking tabs, or signs of moisture before testing the circuit.
2. With the ignition ON, verify the scan tool BCM Park Brake Switch parameter is Released. With the switch disconnected, the BCM should not see a grounded park brake input.
- If not the specified value, test the signal circuit terminal A for a short to ground. If the circuit tests normal, replace the BCM.
3. Install a 3A fused jumper wire between the signal circuit terminal A and ground. Verify the scan tool BCM Park Brake Switch parameter is Applied. This confirms that the BCM can recognize the park brake input when the signal circuit is intentionally grounded.
- If not the specified value, test the signal circuit for a short to voltage or an open/high resistance.
4. If all circuits test normal, test or replace the park brake switch. A switch that does not open and close cleanly can cause the brake warning indicator to stay on, fail to illuminate, or operate intermittently.
Brake Fluid Level Switch Malfunction
1. With the ignition OFF, disconnect the harness connector at the brake fluid level switch. Before using a meter, inspect the switch connector and reservoir area for fluid contamination, corrosion, loose terminals, or damaged wiring.
2. Test for less than 1 ohm between the ground circuit terminal A and ground. A low-resistance ground path is required for the brake fluid level switch to report correctly.
- If greater than the specified range, test the ground circuit for an open/high resistance.
3. With the ignition ON, verify the scan tool IPC Brake Fluid parameter is OK. This checks whether the IPC sees a normal brake fluid input with the switch disconnected.
- If not the specified value, test the signal circuit for a short to ground. If the circuit tests normal, replace the IPC.
4. Install a 3A fused jumper wire between the signal circuit terminal B and ground. Verify the scan tool IPC Brake Fluid parameter is Low. This step confirms that the IPC can detect a low-fluid condition when the signal circuit is grounded.
- If not the specified value, test the signal circuit for a short to voltage or an open/high resistance. If the circuit tests normal, replace the IPC.
5. If all circuits test normal, test or replace the brake fluid level switch. For the Buick Enclave, always confirm the actual reservoir level and brake hydraulic condition before concluding that the fault is only electrical.
Component Testing
Park Brake Switch Malfunction
1. With the ignition OFF, disconnect the harness connector at the park brake switch. Testing the switch separately helps confirm whether the fault is inside the switch or in the vehicle wiring.
2. Test for infinite resistance between the signal terminal A and ground with the park brake released. The switch should be open when the park brake is fully released.
- If less than the specified value, replace the park brake switch.
3. Test for less than 1 ohm between the signal terminal A and ground with the park brake applied. The switch should close cleanly when the park brake is applied.
- If greater than the specified range, replace the park brake switch.
Brake Fluid Level Switch Malfunction
1. With the ignition OFF, disconnect the harness connector at the brake fluid level switch. Make sure the fluid level is correct before judging switch operation.
2. Test for infinite resistance between the ground terminal A and the signal terminal B. The switch should not show unwanted continuity when the brake fluid level and switch state are normal.
- If less than the specified value, replace the brake fluid level switch.
Repair Instructions
Perform the Diagnostic Repair Verification after completing the diagnostic procedure. Verification should include clearing any related DTCs, checking scan tool parameters, confirming the park brake switch state, verifying brake fluid level, and making sure the red brake warning indicator operates only when commanded or when a real warning condition exists.
- Brake Fluid Level Indicator Switch Replacement
- Parking Brake Indicator Switch Replacement
- Control Module References for BCM and IPC replacement, setup and programming
BRAKE PULSATION
Brake Pulsation
Brake pulsation is commonly felt through the brake pedal, steering wheel, seat, or body of the vehicle during braking. It may be caused by rotor thickness variation, assembled lateral runout, uneven pad material transfer, hub mounting surface corrosion, loose wheel bearings, or suspension and steering conditions that become noticeable only when the brakes are applied.
When diagnosing brake pulsation on the Buick Enclave, confirm the speed range, brake pressure, road surface, and whether the vibration is felt more strongly in the steering wheel or through the body. This helps separate front brake concerns from rear brake concerns and prevents replacing rotors without correcting the root cause.
BRAKE SYSTEM NOISE
Brake System Noise
Brake system noise can include squeal, groan, grind, click, rattle, scrape, or vibration-related sounds. Noise diagnosis should include pad condition, rotor surface finish, hardware fit, caliper slide movement, shield clearance, wheel bearing condition, and the possibility of road debris trapped near the rotor.
Some light brake noise can occur because of temperature, humidity, pad material, or surface rust after the vehicle has been parked. However, repeated noise, metal-to-metal contact, heavy scraping, or noise that changes with brake pedal pressure should be inspected carefully before the vehicle is returned to service.
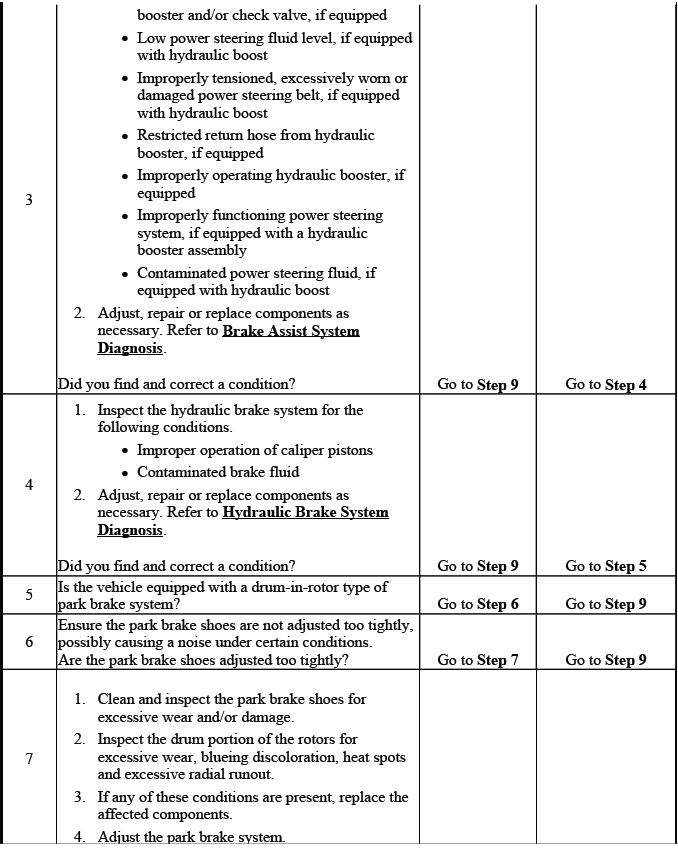
BRAKING ACTION UNEVEN - PULLS TO ONE SIDE
Test Description
The numbers below refer to the step numbers on the diagnostic table. A vehicle that pulls during braking should be diagnosed by checking both brake system operation and chassis condition, because the source may be hydraulic, mechanical, tire-related, steering-related, or suspension-related.
4
Suspension components that are not operating properly may cause a disturbance to the vehicle during application of the brake system. Worn control arm bushings, loose ball joints, damaged struts, weak rear suspension components, or shifted alignment angles can make the vehicle move to one side when braking force is applied.
5
Steering components that are not operating properly may cause a disturbance to the vehicle during application of the brake system. Loose tie rod ends, steering gear movement, worn steering linkage, or uneven tire response can be mistaken for a brake pull. A complete inspection helps confirm whether the pull is caused by the hydraulic brakes or by another vehicle system.
Braking Action Uneven - Pulls to One Side
Uneven braking that pulls the vehicle to one side should be diagnosed by looking at the brake system and the chassis together. A pull during braking may come from uneven hydraulic pressure, a sticking caliper, contaminated pads, rotor surface differences, restricted brake hoses, tire condition, wheel alignment, worn steering parts, or suspension movement under braking load.
On the Buick Enclave, the direction of the pull, the speed at which it occurs, and whether it appears only during light or firm braking can help separate a hydraulic brake concern from a steering or suspension issue. A road test should be followed by a careful inspection of the front and rear brake assemblies on both sides.
BRAKING ACTION UNEVEN - FRONT TO REAR
Test Descriptions
The number below refers to the step number on the diagnostic table. Uneven front-to-rear braking can create instability, longer stopping distance, abnormal nose dive, rear brake lockup sensation, or a brake feel that does not match pedal input.
4
Suspension components that are not operating properly may cause a disturbance to the vehicle during application of the brake system. Worn bushings, weak dampers, loose control arms, shifted alignment, or abnormal rear suspension movement can change how braking force is felt between the front and rear of the vehicle.
Braking Action Uneven - Front to Rear
Front-to-rear brake balance should be diagnosed by comparing brake pad wear, rotor condition, caliper movement, hydraulic pressure response, brake hose condition, and suspension behavior. If one axle is doing too much or too little braking, the vehicle may feel unstable during stops even when the pedal feels normal.


BRAKE PEDAL EXCESSIVE TRAVEL
Brake Pedal Excessive Travel
Excessive brake pedal travel means the pedal moves farther than expected before the brakes apply firmly. This condition may be caused by air in the hydraulic system, external brake fluid leakage, low fluid level, worn pads, rear brake adjustment concerns where applicable, flexible hose expansion, master cylinder internal bypass, or caliper piston movement that is greater than normal.
For the Buick Enclave, excessive pedal travel should be treated as a hydraulic brake concern until proven otherwise. The inspection should include fluid level, visible leaks, pedal feel with the engine off and running, caliper and hose condition, brake pad thickness, and any recent repair work that may have introduced air into the system.

BRAKE PEDAL EXCESSIVE EFFORT
Brake Pedal Excessive Effort
Excessive brake pedal effort occurs when the driver must press harder than normal to slow or stop the vehicle. Possible causes include poor brake booster vacuum, vacuum pump or relay concerns, a restricted vacuum hose, brake booster failure, contaminated friction material, seized caliper hardware, glazed pads, incorrect parts, or hydraulic restrictions.
When diagnosing high pedal effort, check whether the condition is present all the time or only after start-up, during repeated stops, or under certain engine operating conditions. Brake assist operation should be verified before assuming the issue is caused only by pads or rotors.

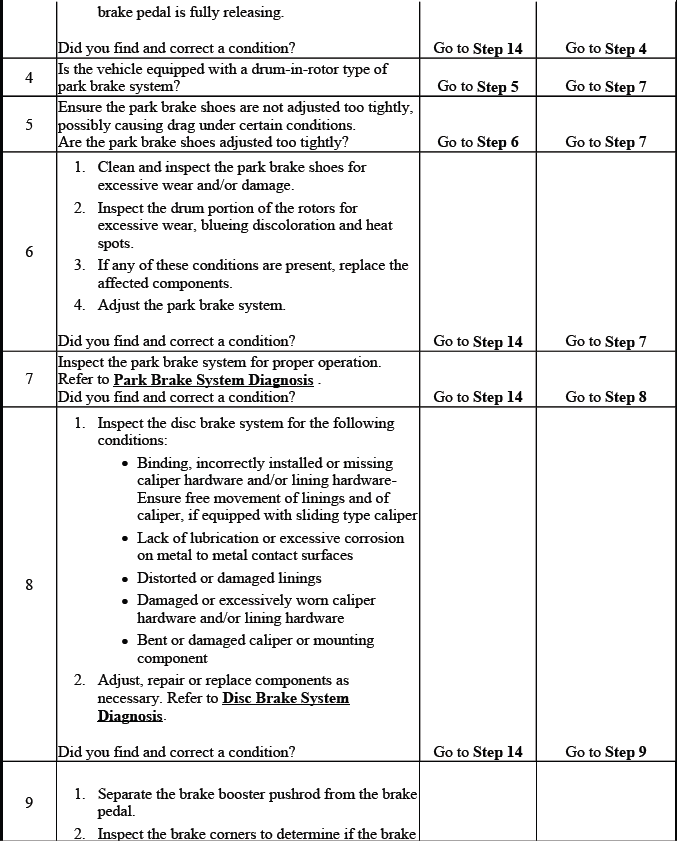
BRAKES DRAG
Brakes Drag
Brake drag occurs when one or more brakes fail to release fully after the pedal is released. This may create heat, odor, reduced fuel economy, premature pad wear, rotor discoloration, wheel pull, or a vehicle that feels held back during light acceleration.
Common causes include seized caliper guide pins, a sticking caliper piston, restricted brake hose, contaminated or swollen seals, mispositioned pads, corroded pad hardware, master cylinder compensation port concerns, parking brake issues, or incorrect pedal linkage operation. Drag should be diagnosed before replacing pads, because new pads installed into a binding system can overheat quickly.


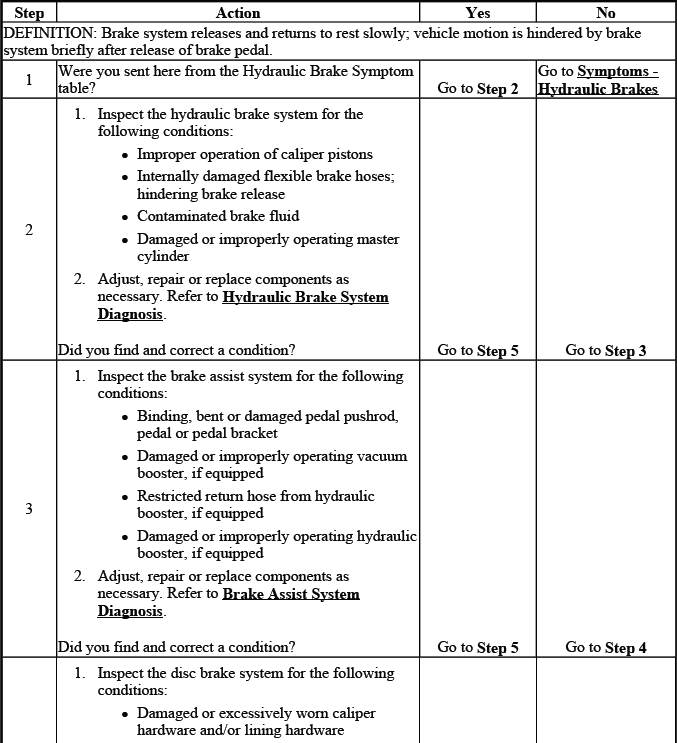
BRAKE SYSTEM SLOW RELEASE
Brake System Slow Release
A slow brake release concern is different from a brake that is fully locked. The brakes may apply normally, but the pressure or mechanical movement may not release quickly enough after the pedal is released. This can cause delayed vehicle movement, light drag, brake heat, or a pedal that feels slow to return.
Slow release may be related to brake hose restriction, master cylinder return issues, booster or pedal linkage binding, caliper piston seal problems, swollen rubber components, contaminated brake fluid, or corroded sliding hardware. The condition should be checked soon after a road test while the affected components are still warm.
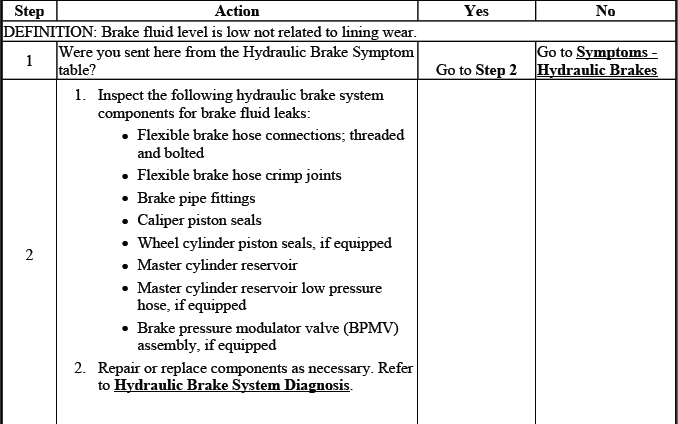
BRAKE FLUID LOSS
Brake Fluid Loss
Brake fluid loss must be inspected carefully because it can affect pedal travel, brake warning indicators, ABS and stability control operation, and overall stopping performance. Low fluid should never be dismissed as normal unless pad wear and the entire hydraulic system have been checked.
Inspect the master cylinder, brake lines, flexible hoses, calipers, bleeder screws, hydraulic control unit area, and all visible connections for wetness, staining, corrosion, or fluid trails. On the Buick Enclave, a brake warning indicator combined with low fluid level should be treated as a possible leak until the source is found or the system is proven sealed.
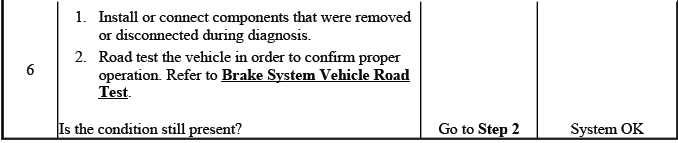
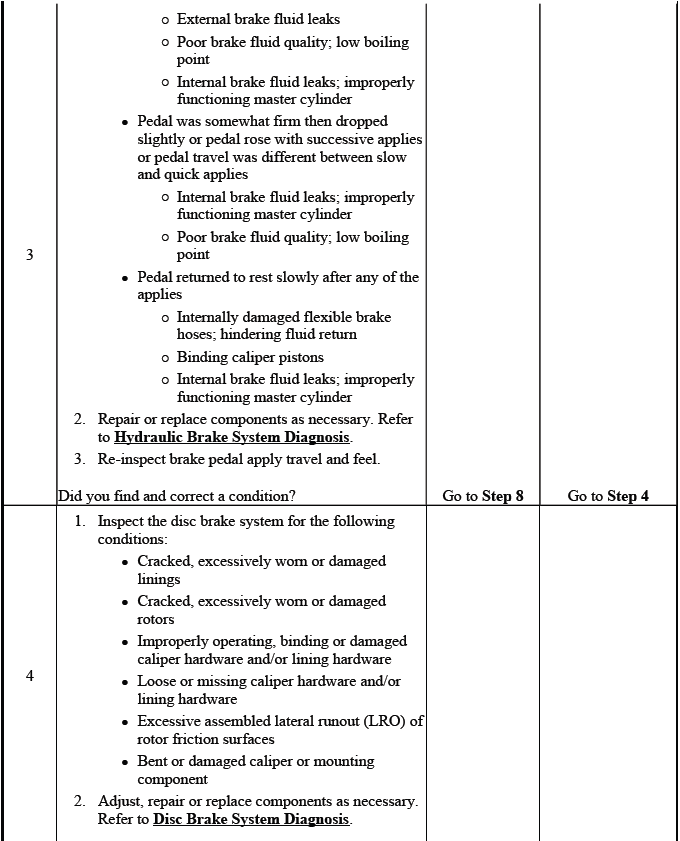
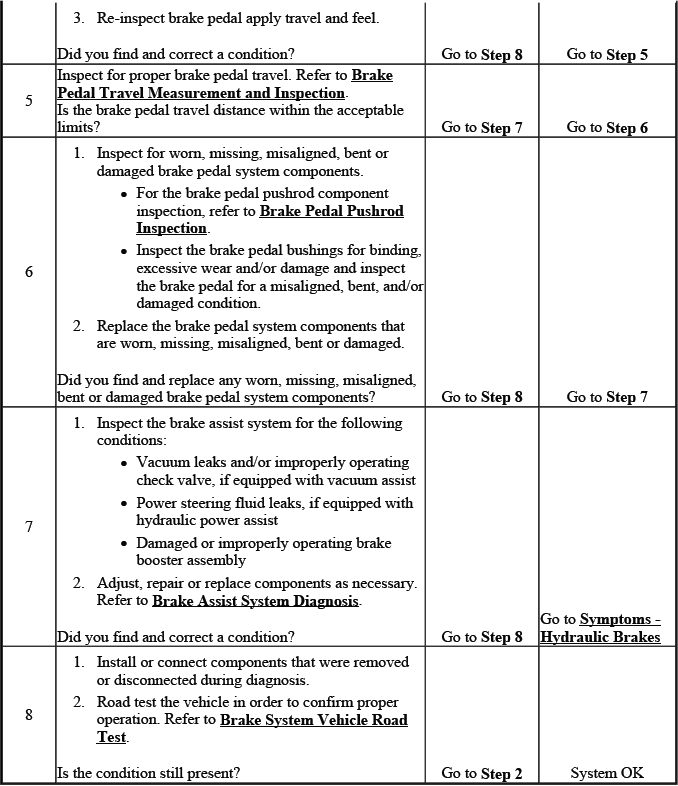
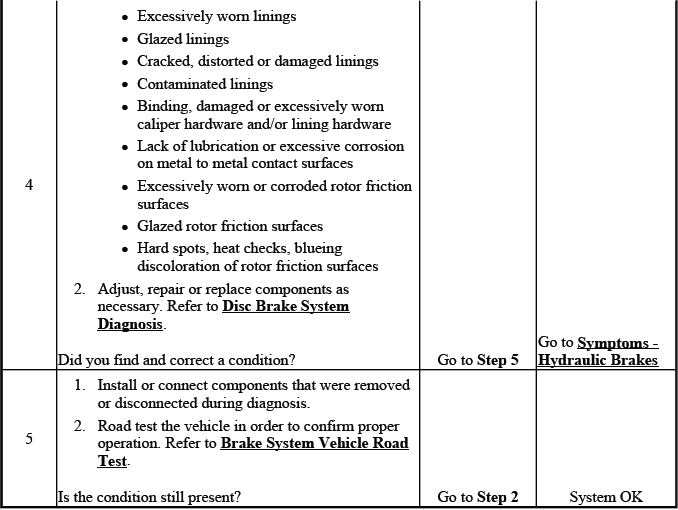
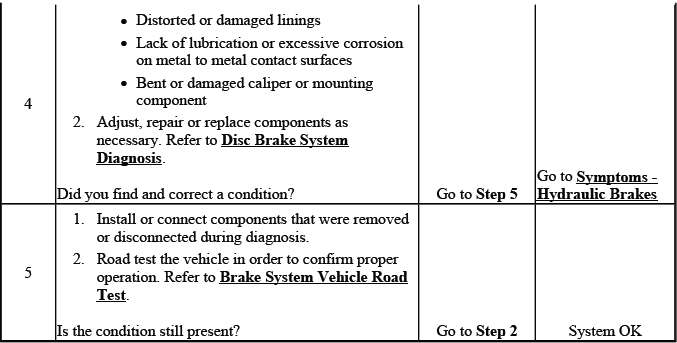
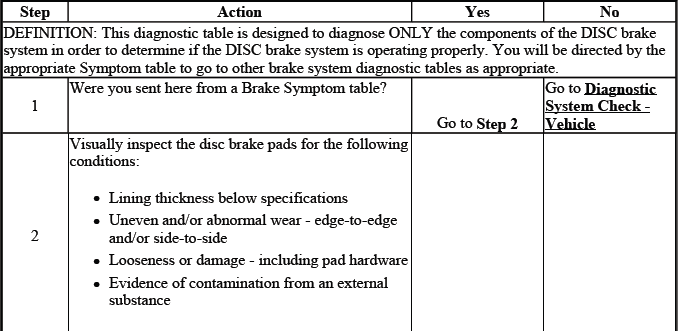
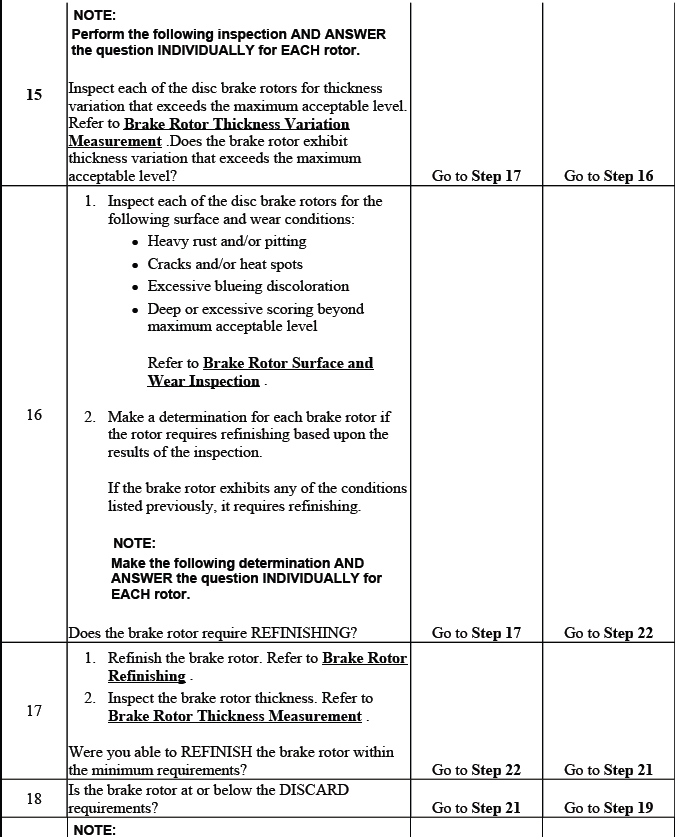
DISC BRAKE SYSTEM DIAGNOSIS
Test Description
The numbers below refer to the step numbers on the diagnostic table. Disc brake diagnosis should combine a road test, visual inspection, component measurement, and confirmation of caliper and pad movement. Noise, vibration, drag, pull, and uneven wear often come from more than one small issue rather than a single failed part.
9
Lubricant leaks from non-brake system components may come in contact with and contaminate brake system components. Grease, oil, gear lubricant, or other fluids on brake pads or rotors can reduce friction, cause noise, create uneven braking, and require replacement of contaminated friction material.
10
Lubricant leaks from non-brake system components may come in contact with and contaminate brake system components. Inspect nearby axle seals, hub areas, suspension components, and engine or drivetrain leak paths when contamination appears on only one side of the vehicle.
12
Disc brake rotor shields/backing plates that come in contact with disc brake rotors may cause brake system noise. A bent shield can produce a scrape, chirp, or grinding sound that changes with wheel speed and may be mistaken for pad or rotor failure.
15
Disc brake rotor thickness variation that exceeds the maximum acceptable level can cause brake pulsation. This variation may develop from lateral runout, uneven pad transfer, heat cycles, or improper rotor installation on a contaminated hub surface.
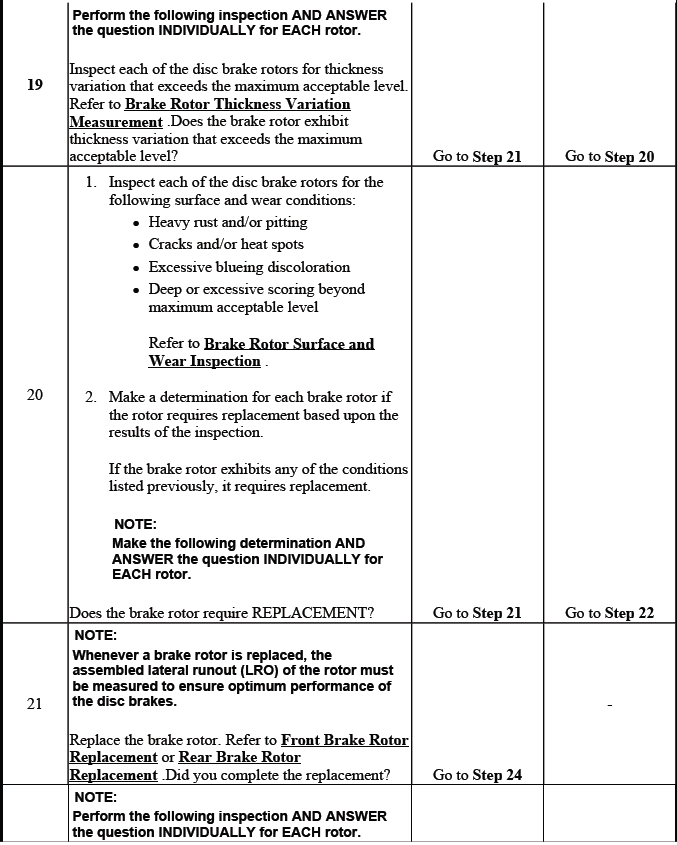
19
Disc brake rotor thickness variation that exceeds the maximum acceptable level can cause brake pulsation. The rotor should be measured at multiple points around the friction surface, not judged only by appearance.
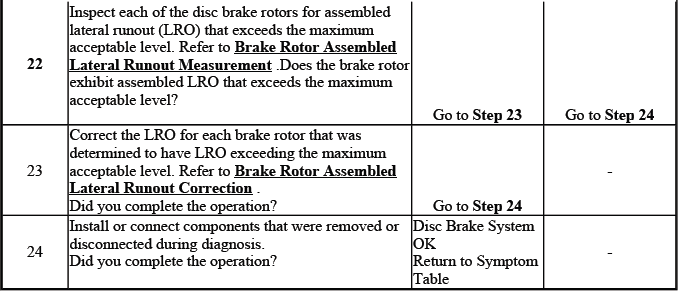
22
Disc brake rotor assembled lateral runout (LRO) that exceeds the maximum acceptable level can lead to thickness variation. Correcting runout at installation is important because the pulsation may not appear immediately, but can develop after several thousand miles of driving.
Disc Brake System Diagnosis
Disc brake system diagnosis should verify the condition of the pads, rotors, calipers, brackets, shields, hoses, and hub mounting surfaces. For the Buick Enclave, this is especially useful when a customer reports a recurring pulsation or noise after previous brake service, because the root cause may be rotor runout, hardware binding, or contamination rather than the pads alone.
HYDRAULIC BRAKE SYSTEM DIAGNOSIS
Hydraulic Brake System Diagnosis
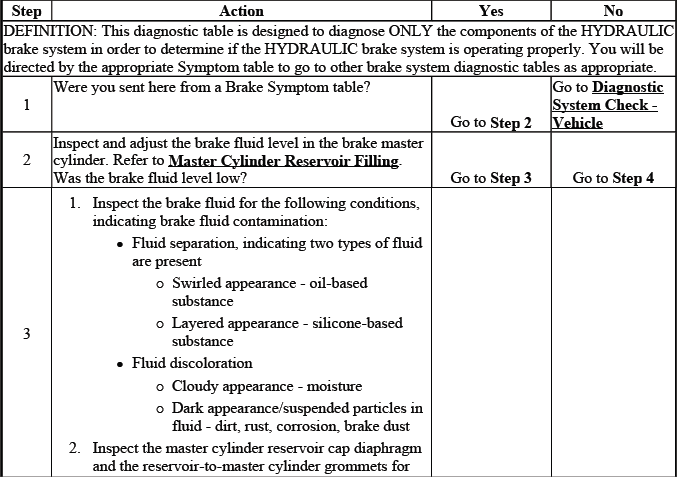
The hydraulic brake system diagnosis is intended to confirm that the service brake system can build, hold, and release hydraulic pressure in a predictable manner. On the Buick Enclave, this inspection should not be treated as a quick visual check only. Brake pedal feel, fluid level, possible external leaks, wheel-end condition, brake drag, uneven stopping, and warning lamp status all need to be considered together before any road test is performed.
A proper diagnostic approach begins with the items that can make the vehicle unsafe before it ever leaves the service area. The technician should look for wetness around hydraulic connections, damaged flexible brake hoses, corroded or kinked lines, loose caliper hardware, contaminated brake fluid, abnormal pedal travel, and any condition that suggests the system may not maintain braking force. If any of these conditions are present, the vehicle should remain parked until the fault is isolated and repaired.
Brake pedal behavior provides important early information. A low pedal may point toward air in the hydraulic circuit, excessive lining clearance, fluid loss, or internal bypassing. A firm but high-effort pedal can indicate a brake assist concern, restricted movement at a brake component, or a problem that prevents normal pressure multiplication. A spongy pedal should never be ignored because it may change rapidly under heat, repeated stops, or emergency braking.
BRAKE ASSIST SYSTEM DIAGNOSIS
Brake Assist System Diagnosis
The brake assist system must be evaluated whenever the driver reports excessive pedal effort, a hard brake pedal, reduced stopping response, or an unusual change in brake feel. Brake assist does not replace the hydraulic brake system; it helps the driver apply adequate force with reasonable pedal effort. When assist is weak or inconsistent, the brakes may still operate, but the vehicle may require significantly more force to stop.
During diagnosis, the technician should pay close attention to vacuum supply, booster operation, check valve function, hose condition, and any related engine operating issue that could reduce available assist. A cracked vacuum hose, loose connection, collapsed hose section, or leaking booster can create symptoms that feel like a brake hydraulic fault. For that reason, brake assist diagnosis should be separated from hydraulic diagnosis, then the results should be compared before a final repair decision is made.
When inspecting the brake assist system on a Buick Enclave, the engine should be allowed to idle normally and the pedal should be applied several times to evaluate how the booster responds. The pedal should not suddenly become excessively hard during normal low-speed testing. Any abnormal hiss, delayed assist, rapid loss of reserve assist, or change in idle quality while the brake pedal is applied should be investigated before the vehicle is returned to service.
BRAKE SYSTEM VEHICLE ROAD TEST
Preliminary Inspections
1. Visually inspect all easily accessible brake system components for obvious damage, fluid leakage, loose hardware, distorted lines, damaged hoses, or signs of overheating. Any condition that could affect stopping ability may indicate that the vehicle should not be driven until a more complete inspection has been performed.
2. Inspect the brake master cylinder reservoir fluid level and adjust only if necessary for brake system road testing. Use the specified brake fluid and avoid overfilling the reservoir. Refer to Master Cylinder Reservoir Filling for the correct service procedure.
3. Inspect the tire inflation pressures and adjust as necessary. Incorrect tire pressure can cause a pull, unstable tracking, increased stopping distance, or a false impression of uneven brake performance.
4. Inspect the tire tread patterns to ensure that they are the same or very similar, especially per axle. A mismatch in tread design, size, wear pattern, or construction can influence braking stability and should be corrected before judging the brake system.
5. Ensure that the vehicle is not loaded unevenly prior to brake system road testing. Heavy cargo on one side, towing equipment, or an uneven passenger/cargo load can change how the vehicle reacts during brake application.
Before beginning the road test, confirm that the wheels, tires, steering, suspension, and basic vehicle condition will not interfere with the diagnosis. A brake road test should evaluate the brake system, not mask problems caused by alignment, tire pull, loose suspension parts, or abnormal wheel bearing drag.
Road Testing Procedure
WARNING: Road test a vehicle under safe conditions and while obeying all traffic laws. Do not attempt any maneuvers that could jeopardize vehicle control.
Failure to adhere to these precautions could lead to serious personal injury and vehicle damage.
1. Start the engine and allow it to idle. Listen for abnormal noises and allow the power brake assist system to stabilize before evaluating pedal feel.
2. Check to see if the brake system warning lamp remains illuminated. The warning lamp must be treated as a serious condition, not as a minor indicator.
3. If the brake system warning lamp remains illuminated, DO NOT proceed to test drive the vehicle until it is diagnosed and repaired. Refer to Symptoms - Hydraulic Brakes.
4. Select a smooth, dry, clean and level road or large lot that is as free of traffic and obstacles as possible for brake system low speed road testing. The test area should provide enough room to stop safely without sudden steering input.
5. With the transmission in PARK, lightly apply the brake pedal. Observe both the pedal feel and the pedal travel. The pedal should respond smoothly without sinking, excessive free play, or a delayed pressure build-up.
6. If the brake pedal apply felt spongy or the pedal travel was excessive, DO NOT drive the vehicle until it is repaired. A soft or long pedal can indicate air in the system, fluid leakage, or another hydraulic fault that may become worse during driving.
7. If the brake pedal apply did not feel spongy and the pedal travel was not excessive, proceed to step 8.
8. Release and apply the brakes. Confirm that the pedal returns normally and that there is no sticking, delayed release, or unusual noise from the pedal area.
9. While continuing to apply the brakes, shift the transmission into DRIVE, release the brakes and allow the engine to idle the vehicle away from the stopped position. Observe for a slow release of the brake system. A delayed release may suggest brake drag, restricted hydraulic flow, sticking caliper hardware, or another wheel-end concern.
10. With the aid of an assistant to observe the vehicle's performance from outside of the vehicle, drive the vehicle at a low speed and lightly apply the brakes while driving past the assistant. Have the assistant observe for brake system noise from the side of the vehicle closest to them, while you observe both the pedal effort and the pedal travel.
The assistant should listen for scraping, grinding, clicking, groaning, or a repeating rotational noise. These sounds can help identify whether the concern is more noticeable at one wheel, on one axle, or only during brake application.
11. If the brake pedal apply effort was excessive or the pedal travel was excessive, DO NOT continue to test drive the vehicle until it is repaired. Excessive effort may indicate a brake assist problem, while excessive travel may indicate a hydraulic or mechanical clearance concern.
12. If the brake pedal apply effort was not excessive and the pedal travel was not excessive, proceed to step 13.
13. Drive the vehicle in the opposite direction, at the same low speed and lightly apply the brakes while driving past the assistant. Have the assistant observe for brake system noise from the side of the vehicle closest to him.
Testing in both directions helps separate brake noise from road surface noise and makes it easier to compare the left and right sides of the vehicle. If the noise changes with direction, vehicle load shift, or steering input, inspect related suspension and wheel-end components as well.
14. Drive the vehicle at a low speed and shift the transmission into NEUTRAL without applying the brakes.
Observe for a rapid deceleration in vehicle speed, indicating possible brake drag. Brake drag can be caused by restricted brake hoses, sticking caliper slides, seized caliper pistons, incorrectly adjusted parking brake components, or residual hydraulic pressure that does not release normally.
15. Select a smooth, dry, clean and level road that is as free of heavy traffic as possible for brake system moderate speed road testing.
16. Drive the vehicle at a moderate speed. Observe for a pull and/or incorrect tracking of the vehicle without the brakes applied. If the Buick Enclave pulls before the brakes are applied, inspect tires, alignment, suspension, road crown influence, and wheel bearing condition before blaming the brake system.
17. While continuing to drive the vehicle at a moderate speed, perform several light applies of the brakes.
Observe the pedal effort and the pedal travel, observe for brake system noise, pulsation and/or brake drag. Light brake applications are useful because they can reveal early rotor variation, pad movement noise, or a caliper that does not release fully.
18. If the brake pedal apply effort was excessive or the pedal travel was excessive, DO NOT continue to test drive the vehicle until it is repaired.
19. If the brake pedal apply effort was not excessive and the pedal travel was not excessive, proceed to step 20.
20. While continuing to drive the vehicle at a moderate speed, perform several moderate applies of the brakes. Observe the pedal effort and the pedal travel, observe for brake system pulsation and/or uneven braking action - either side to side or front to rear.
A small amount of vehicle front end dip is expected during a moderate apply of the brakes. However, the vehicle should remain stable and predictable. A strong pull, steering wheel shake, rear-end instability, uneven stopping force, or repeated pedal pulsation should be investigated before the Buick Enclave is considered repaired.
21. If the brake pedal apply effort was excessive or the pedal travel was excessive, DO NOT continue to test drive the vehicle until it is repaired.
After the road test, recheck the brake components that were most likely involved in any symptom observed during driving. Look for abnormal heat at one wheel, fluid seepage, pad taper, rotor scoring, loose caliper hardware, damaged dust boots, and evidence of restricted movement. Compare the road test notes with the hydraulic and brake assist diagnostic results so the repair is based on confirmed behavior rather than assumption.
A final verification drive should only be performed after the identified concern has been corrected and the brake system has been inspected again. The repaired system should provide consistent pedal height, reasonable pedal effort, clean release, stable tracking, and no abnormal noise or warning lamp condition. This careful step-by-step process helps ensure that the Buick Enclave brake system is evaluated safely and accurately before the vehicle is returned to normal operation.
BRAKE PEDAL TRAVEL MEASUREMENT AND INSPECTION
Special Tools
- J 28662 Brake Pedal Effort Gauge
This procedure is used to measure brake pedal travel under a controlled pedal load. Accurate brake pedal travel measurement helps determine whether the hydraulic brake system is operating within the required range or whether excessive movement may be caused by air in the system, internal leakage, worn brake components, incorrect adjustment, or another condition affecting brake response.
For the Buick Enclave, the measurement should be performed with the ignition OFF, the brake booster reserve depleted, and the brakes cool. These conditions are important because brake assist, heat expansion, or repeated brake operation can change pedal feel and lead to an inaccurate reading.
1. With the ignition OFF and the brakes cool, apply the brakes 3-5 times or until the brake pedal becomes firm, in order to deplete the brake booster power reserve.
This step removes stored brake assist from the booster so that the pedal travel measurement reflects the mechanical and hydraulic condition of the brake system, not the effect of remaining vacuum assist. The pedal should become noticeably firmer after several applications.
2. Install the J 28662 brake pedal effort gauge to the brake pedal.
Make sure the gauge is positioned securely and aligned so the applied force is measured consistently. An unstable gauge position can cause an incorrect reading and may make it difficult to repeat the measurement accurately.
3. Measure and record the distance (1) from the brake pedal to the rim of the steering wheel; note the points of measurement.
Use the same reference points throughout the entire procedure. The first measurement is the unapplied pedal position, so it becomes the baseline for calculating brake pedal travel after force is applied.
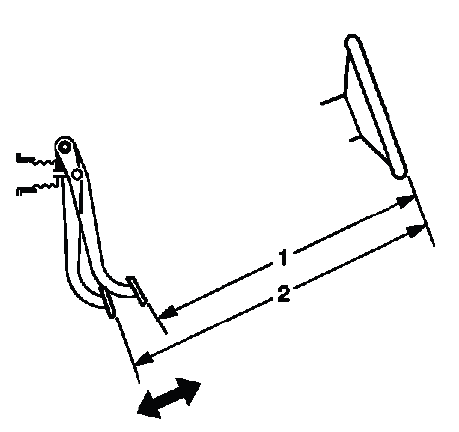
Fig. 2: Measuring Brake Pedal Travel
4. Apply and maintain the brakes with 445 N (100 lb) of force to the brake pedal, as indicated on the J 28662 brake pedal effort gauge.
The force should be applied smoothly and held steady. Do not pump the pedal during this step, because repeated pedal movement can change hydraulic pressure and affect the final measurement.
5. While maintaining 445 N (100 lb) of force to the brake pedal, measure and record the distance (2) from the same point on the brake pedal to the same point on the rim of the steering wheel.
This second measurement represents the applied pedal position. Accuracy depends on using the exact same points that were used for the initial measurement. Even a small change in reference point can create a misleading travel calculation.
6. Release the brakes and repeat steps 4 and 5 to obtain a second measurement. After obtaining a second measurement, proceed to step 7.
Repeating the measurement helps confirm that the pedal movement is consistent. If the two readings differ greatly, check the gauge position, pedal application force, and the selected measuring points before continuing.
7. Average the first and second measurements recorded during the two applies of the brakes.
An average value reduces the effect of small variations in pedal force or measuring technique and gives a more reliable indication of actual brake pedal travel.
8. Subtract the initial measurement, unapplied (1), from the averaged, applied measurement (2) to obtain the brake pedal travel distance.
If the calculated brake pedal travel exceeds the specification, do not assume one single cause. Excessive travel may be related to air in the hydraulic system, brake fluid leakage, excessive lining clearance, worn brake pads, caliper movement problems, master cylinder concerns, or internal hydraulic bypassing. The result should be compared with the vehicle symptoms before deciding on the next diagnostic step.
Specification
- Maximum brake pedal travel (measured with the ignition OFF, brake booster power assist depleted and the brakes cool): 45 mm (1.77 in)
If the measured travel is within specification, the brake pedal movement is acceptable under this test condition. If the travel is greater than 45 mm (1.77 in), the Buick Enclave brake system should be inspected further before the vehicle is returned to service.
BRAKE SYSTEM VACUUM SOURCE TEST
The brake system vacuum source test checks whether the engine can supply the vacuum needed for normal power brake assist. A weak or unstable vacuum supply can cause a hard brake pedal, increased pedal effort, reduced assist, or inconsistent brake feel, even when the hydraulic portion of the brake system is in good condition.
1. Disconnect the engine vacuum hose from the vacuum brake booster check valve.
Inspect the hose connection as it is removed. A loose connection, hardened hose end, or damaged sealing surface can allow a vacuum leak that may not be obvious during a quick visual inspection.
NOTE:
- Engine temperature, accessory load and elevation level will affect engine vacuum.
- Vacuum readings will decrease by approximately 2.7 kPa (0.8 in Hg) for every 305 m (1000 ft) of elevation above sea level.
2. Install a vacuum gauge to the engine vacuum hose.
Make sure the gauge connection is tight and that the hose is not kinked during testing. A poor gauge connection can create a false low reading and lead to unnecessary part replacement.
3. Start the engine and allow the engine to idle until normal operating temperatures are reached.
The engine should be warm and idling normally before the reading is evaluated. Cold idle speed, fuel enrichment, or unstable engine operation can affect vacuum output and make the test result less reliable.
4. With the vehicle in PARK, the engine idling and the air conditioning (A/C) system OFF, check to see if the engine vacuum reading is within the specified normal engine vacuum range.
Turning the A/C system OFF removes accessory load from the test condition and helps produce a more stable vacuum reading. The vehicle should remain stationary in PARK throughout this part of the procedure.
Specification
- 47-68 kPa (14-20 in Hg)
5. Turn the ignition OFF.
Allow the engine to stop completely before disconnecting or repositioning the vacuum gauge. This helps avoid inaccurate readings and prevents damage to test equipment.
6. If the engine vacuum reading was within the specified normal range, proceed to step 10.
A reading within the normal range indicates that the engine vacuum source is capable of supplying the brake assist system under the tested conditions.
7. If the engine vacuum reading was NOT within the specified normal range, inspect the engine vacuum hose for the following conditions:
- Loose connection to the engine
- Collapse, deformation or contamination
- Cracks, cuts, dry-rot
Pay close attention to areas near bends, clamps, and heat exposure points. Vacuum hoses can look acceptable from one angle while still being cracked, softened, oil-soaked, or partially collapsed on the underside.
8. If any of these conditions were found with the engine vacuum hose, replace the hose, then repeat steps 2-4.
After replacing the hose, the vacuum reading must be checked again. Do not continue diagnosis based on the original reading if a damaged hose has been corrected.
9. If none of these conditions were found with the engine vacuum hose, then there is an engine vacuum source problem, check the engine vacuum system.
An engine vacuum source problem may be related to engine mechanical condition, air leaks, intake system faults, valve timing concerns, or other engine performance issues. These problems must be corrected before brake assist diagnosis can be completed accurately.
10. Remove the vacuum brake booster check valve from the booster.
Remove the check valve carefully to avoid damaging the valve body or the grommet. A damaged sealing surface can create a leak after reinstallation.
11. Install the check valve to the engine vacuum hose.
The check valve should fit securely into the hose. If the connection feels loose or the valve does not seat correctly, inspect the hose and valve before continuing.
12. Install the vacuum gauge to the check valve.
This part of the test checks whether vacuum can be held through the check valve. The check valve is designed to help retain vacuum for brake assist when engine vacuum drops or when the engine is shut off.
13. Start the engine and allow the engine to idle in PARK with the A/C system OFF, until normal operating temperatures are reached.
Observe the gauge reading while the engine idles. The reading should stabilize within the expected range before the ignition is turned OFF.
14. Turn the ignition OFF.
After the engine is shut off, the vacuum reading should not immediately fall out of range. A rapid loss of vacuum can indicate leakage through the check valve, grommet, hose connection, or another sealing point.
15. Check to see if the engine vacuum reading is maintained within the specified normal engine vacuum range.
Specification
- 47-68 kPa (14-20 in Hg)
16. If the engine vacuum reading is maintained within the specified normal range, proceed to step 18.
If vacuum is maintained properly, the check valve is holding vacuum under the tested condition and diagnosis can continue with the grommet inspection.
17. If the engine vacuum reading is NOT maintained within the specified normal range, replace the brake booster check valve, then repeat steps 11-15.
A check valve that cannot hold vacuum may cause reduced brake assist after startup, during repeated brake applications, or after the engine has been shut off. Repeating the test after replacement confirms that the new valve corrects the loss of vacuum.
18. Inspect the brake booster check valve grommet for the following conditions:
- Loose connection to the vacuum brake booster
- Deformation or contamination
- Cracks, cuts, dry-rot
The grommet is a small part, but it is critical for sealing the check valve to the booster. A hardened, cracked, or distorted grommet can leak vacuum and produce brake assist symptoms that may be mistaken for a booster failure.
19. If any of these conditions were found with the check valve grommet, replace the grommet.
After replacing the grommet, confirm that the check valve seats firmly and that the vacuum connection remains stable. On the Buick Enclave, a proper vacuum seal is necessary for predictable brake pedal effort and safe brake assist operation.
BRAKE SYSTEM EXTERNAL LEAK INSPECTION
WARNING: Refer to Brake Fluid Irritant Warning.
CAUTION: Refer to Brake Fluid Effects on Paint and Electrical Components Caution.
External brake fluid leak inspection is used to locate visible fluid loss from the hydraulic brake system. Brake fluid leaks require immediate attention because the system depends on sealed hydraulic pressure to transfer pedal force to the wheel brakes. Even a small leak can become more serious under repeated brake application or high pressure.
Brake fluid can irritate skin and damage painted surfaces or electrical components. Clean any spilled fluid immediately using the correct service procedure, and do not allow brake fluid to remain on body panels, connectors, wiring, or rubber parts not designed for brake fluid exposure.
1. In order to inspect for external brake fluid leaks, first check the fluid level in the master cylinder.
While a slight brake fluid level drop can be considered a normal condition due to brake lining wear, a very low level may indicate a brake fluid leak in the hydraulic system.
Compare the fluid level with the condition of the brake pads and linings. If the linings are heavily worn, some fluid level drop may be expected. If the linings are not excessively worn and the level is very low, suspect leakage or another hydraulic system concern.
2. If the fluid level is abnormally low, adjust the brake fluid level. Refer to Master Cylinder Reservoir Filling.
Use only the correct brake fluid type and keep the reservoir area clean. Dirt, moisture, or incorrect fluid can contaminate the hydraulic system and lead to poor brake performance or component damage.
3. Start the engine and allow it to idle.
With the engine running, the brake assist system is active, allowing the brake pedal to be applied with normal assisted force during the leak check.
4. Apply constant, moderate foot pressure to the brake pedal.
If the brake pedal gradually falls away while under foot pressure, there may be a brake fluid leak.
A sinking pedal can also indicate internal hydraulic bypassing, but external leakage should be inspected first because visible fluid loss can usually be confirmed at the master cylinder, brake lines, hoses, calipers, or wheel-end components.
5. Turn OFF the ignition.
After shutting the engine OFF, continue the inspection with adequate lighting. A clean, dry surface makes it easier to see fresh brake fluid seepage.
6. Visually inspect the following brake system components for brake fluid leaks, excessive corrosion and damage. Give particular attention to all brake pipe and flexible hose connections to ensure that there are not any slight brake fluid leaks - even though the brake pedal may feel firm and hold steady:
- Master cylinder brake pipe fittings
- All brake pipe connections
- Brake pipes
- Brake hoses and connections
- Brake calipers and/or wheel cylinders, if equipped
Look for wet areas, dark stains, fluid trails, swollen hose sections, corrosion around fittings, and residue on the inside of wheels or backing areas. Brake fluid leaks can sometimes be hidden by road dirt, so suspicious areas should be cleaned and rechecked if the source is not obvious.
7. While slight dampness around the master cylinder reservoir can be considered acceptable, brake fluid leaking from any of the brake system components requires immediate attention. If any of these components exhibit signs of brake fluid leakage, repair or replace those components. After the repair or replacement, reinspect the hydraulic brake system to assure proper function.
Do not return the vehicle to service until the hydraulic system has been confirmed leak-free and pedal feel is stable. If a hydraulic component has been opened or replaced, bleed the brake system as required and verify brake operation before road testing the Buick Enclave.
BRAKE SYSTEM INTERNAL LEAK TEST
WARNING: Refer to Brake Fluid Irritant Warning.
CAUTION: Refer to Brake Fluid Effects on Paint and Electrical Components Caution.
The internal leak test helps identify a hydraulic pressure loss that may occur inside a component even when no external fluid leak is visible. Internal bypassing can cause a low, sinking, or inconsistent brake pedal and may be related to the master cylinder or other hydraulic components.
1. Start the engine and allow it to idle.
Allowing the engine to idle provides normal brake assist during the test. The vehicle should remain stationary, and the brake system should be observed carefully for changes in pedal feel.
2. Apply light, steady pressure to the brake pedal. Observe both the brake pedal feel and travel.
The brake pedal should hold its position with steady pressure. If the pedal slowly moves downward without an external leak, suspect an internal hydraulic leak or pressure bypass. A pedal that feels inconsistent, changes height, or slowly fades under pressure should not be ignored.
3. Release the brakes and turn OFF the ignition.
After the test, compare the pedal behavior with the earlier travel measurement, vacuum source test, and external leak inspection. A complete diagnosis should consider all results together rather than relying on one symptom alone.
If no external leak is found but pedal travel remains excessive or the pedal continues to sink, inspect the master cylinder and related hydraulic components according to the appropriate service procedure. The goal is to confirm that the Buick Enclave brake system can build pressure, hold pressure, and release normally before the vehicle is operated on the road.
4. If the brake pedal apply felt spongy, but the brake pedal travel was not excessive, perform the following steps:
A spongy brake pedal usually points to compressibility somewhere in the hydraulic circuit. In most cases, this is caused by air trapped in the brake fluid, but the condition should not be diagnosed by pedal feel alone. Before bleeding the system, inspect for any sign of fluid loss, because air may be entering the system through the same area where fluid is escaping.
- Inspect the brake system for external leaks. Refer to Brake System External Leak Inspection.
- Pressure bleed the brake system in order to purge any air that may be trapped in the system. Refer to Hydraulic Brake System Bleeding (Manual), Hydraulic Brake System Bleeding (Pressure).
After bleeding, recheck the pedal feel under the same conditions. The brake pedal should become firm and consistent. If the pedal remains spongy, continue diagnosis instead of repeating the same bleeding procedure without identifying the reason air or pressure loss is still present.
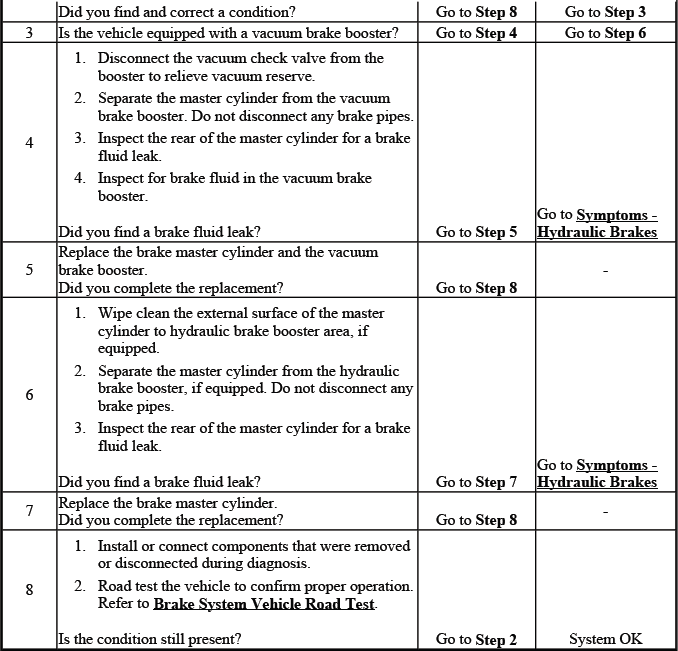
5. If the brake pedal apply did not feel spongy, but the brake pedal travel was excessive, perform the following steps:
Excessive pedal travel with a firm pedal feel can indicate movement or leakage inside a hydraulic component rather than simple air in the system. On the Buick Enclave, this condition should be checked carefully because it can affect stopping confidence even when the pedal does not feel soft.
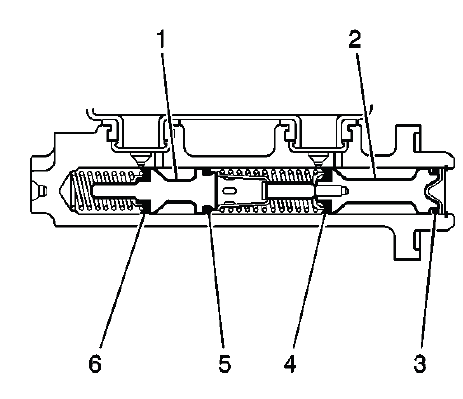
Fig. 3: Identifying Brake Master Cylinder (Cross Sectional View)
- Loosen the master cylinder-to-brake power booster mounting nuts.
- Carefully pull the master cylinder away from the brake power booster just enough to inspect the mounting surface of the master cylinder.
- Inspect the master cylinder mounting surface at the primary piston (2) for brake fluid leaks.
Move the master cylinder only as far as needed for inspection. Avoid bending, twisting, or placing unnecessary stress on the brake pipes. The goal is to view the mounting area and check for fluid at the primary piston area without creating additional damage.
6. If the master cylinder exhibits any leakage around the primary piston (2), then the primary piston primary seal (4) and/or secondary seal (3) is leaking and the master cylinder requires overhaul or replacement.
Brake fluid at this location is a strong indication that the master cylinder is no longer sealing correctly. Even a small amount of leakage should be taken seriously because the master cylinder is responsible for building and maintaining hydraulic pressure during every brake application.
7. If the master cylinder primary piston (2) does not exhibit any leakage, pressure bleed the brake system.
Refer to Hydraulic Brake System Bleeding (Manual), Hydraulic Brake System Bleeding (Pressure).
Pressure bleeding helps remove air that may not be obvious during a static pedal check. Use the correct bleeding sequence and maintain clean brake fluid throughout the procedure. Contaminated fluid, low reservoir level during bleeding, or a loose bleeder connection can introduce new air into the system and create misleading results.
8. If the brake pedal apply did not feel spongy and the brake pedal travel was initially steady and not excessive, but then gradually fell, then the master cylinder requires overhaul or replacement due to an internal leak past the secondary piston (1) from the secondary piston primary seal (6) or secondary seal (5).
A brake pedal that slowly drops under steady pressure often indicates internal bypassing. In this condition, hydraulic pressure can pass around a seal inside the master cylinder instead of remaining trapped in the pressure circuit. No external fluid leak may be visible, but the pedal behavior shows that pressure is not being held correctly.
9. If the brake pedal apply did not feel spongy and the brake pedal travel was initially steady and not excessive, then fell slightly, then became steady again, then the brake pressure modulator valve (BPMV) may be leaking internally and may require replacement.
This type of pedal movement should be evaluated with care. A slight drop followed by a stable pedal can point toward internal leakage or pressure transfer within the BPMV. Before replacing the BPMV, confirm that the master cylinder, brake lines, hoses, calipers, and bleeding procedure have already been inspected properly.
HYDRAULIC BRAKE COMPONENT OPERATION VISUAL INSPECTION
1. With the tire and wheel assemblies removed and the brake rotors retained by wheel lug nuts, visually inspect the caliper piston dust boot (2) sealing area to ensure that there are no brake fluid leaks.
Retaining the brake rotors with wheel lug nuts keeps the rotor seated in the correct position while the caliper operation is observed. This helps prevent misleading movement and allows the technician to evaluate the piston and pad area more accurately.
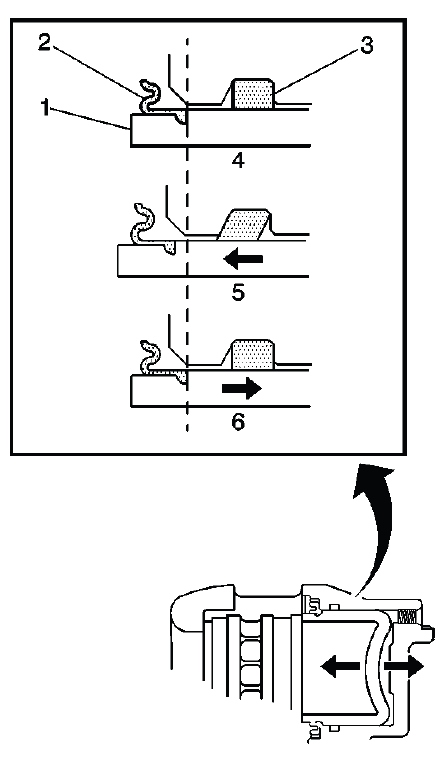
Fig. 4: Identifying Brake Caliper/Pad Inspection Areas
WARNING: Refer to Brake Fluid Irritant Warning.
CAUTION: Refer to Brake Fluid Effects on Paint and Electrical Components Caution.
2. If any evidence of a brake fluid leak is present, the brake caliper requires overhaul or replacement.
Fluid around the caliper piston, dust boot, bleeder screw, or hose connection should not be ignored. Brake fluid leakage at the caliper can reduce hydraulic pressure, contaminate friction material, and create uneven braking from side to side.
3. While the brake system is at rest (4), observe the position of the caliper piston (1) in relation to the caliper housing.
The piston should sit squarely in the caliper bore. A piston that appears cocked, uneven, corroded, or slow to return may indicate seal damage, contamination, or binding inside the caliper assembly.
4. Have an assistant apply and release the brake pedal several times while you observe the operation of the hydraulic brake caliper.
- Observe the caliper piston (1) for unrestricted and even movement during each apply of the brake system (5).
- Observe the caliper piston (1) for an unrestricted and even return motion during each release of the brake system (6).
The piston should move outward smoothly when the brake pedal is applied and retract slightly when the pedal is released. Movement that is jerky, delayed, uneven, or incomplete may cause drag, noise, overheating, accelerated pad wear, or a pull during braking.
5. If the caliper piston (1) did not exhibit unrestricted and even movement during brake system apply and/or release, the piston square seal (3) may be worn or damaged and the caliper may require overhaul or replacement.
The square-cut piston seal is responsible not only for sealing hydraulic pressure, but also for helping retract the piston slightly after brake release. If the seal is hardened, twisted, swollen, or damaged, the caliper may not release cleanly. This can be especially noticeable after repeated stops or when the brake components become warm.
BRAKE PIPE AND HOSE INSPECTION
WARNING: Refer to Brake Fluid Irritant Warning.
CAUTION: Refer to Brake Fluid Effects on Paint and Electrical Components Caution.
Brake pipes and flexible brake hoses must be inspected as part of any hydraulic brake diagnosis. These parts carry pressure between the master cylinder, BPMV, and wheel brake components. Damage, corrosion, internal restriction, or improper routing can change pedal feel and may also cause delayed brake release.
1. Visually inspect all of the brake pipes for the following conditions:
- Kinks, improper routing, missing or damaged retainers
- Leaking fittings, excessive corrosion
Inspect the full visible length of each pipe, especially near bends, clips, underbody mounting points, and areas exposed to road debris or moisture. Corrosion near fittings is particularly important because a weakened pipe can fail under high braking pressure.
2. If any of the brake pipes exhibited any of the conditions listed, then the identified pipe or pipes, require replacement.
Brake pipes should not be straightened, patched, or reused if their structural condition is questionable. A damaged pipe must be replaced using the correct service method so the hydraulic system can safely hold pressure.
3. Ensure that the vehicle axles are properly supported at ride height in order to maintain the proper relationship of the flexible brake hoses to the chassis.
This step is important because flexible hoses change position as the suspension moves. Inspecting the hoses with the suspension hanging incorrectly may hide twisting, stretching, or contact that occurs when the vehicle is at normal ride height.
4. Visually inspect all of the flexible brake hoses for the following conditions:
Fig. 5: Identifying Flexible Brake Hose Failure Conditions
- Kinks (1), improper routing, twists, chafing, missing or damaged retainers
- Leaking connections, cracking, dry-rot, blisters, bulges
Flexible brake hoses should follow their intended path without rubbing against suspension parts, wheels, tires, or body edges. A hose that is twisted during installation may look acceptable at rest, but it can restrict fluid flow or become stressed during steering and suspension movement.
5. If any of the flexible brake hoses exhibited any of the conditions listed, then the identified flexible brake hose or hoses require replacement.
Replace the hose if there is any sign of structural damage, swelling, cracking, or leakage. A damaged hose can expand under pressure, restrict fluid return, or fail suddenly during a brake application.
6. Squeeze the flexible brake hoses with firm finger pressure to check for soft spots (2), indicating an internal restriction. Check the entire length of each flexible brake hose.
A hose can fail internally even when the outside surface appears acceptable. Soft spots, uneven firmness, or a section that feels swollen may indicate separation inside the hose. Internal hose restriction can act like a one-way valve, allowing pressure to apply the brake but preventing full pressure release.
7. If any of the flexible brake hoses were found to have soft spots (2), then the identified flexible brake hose or hoses require replacement.
After replacing any brake pipe or hose, bleed the hydraulic brake system as required and verify pedal feel. For the Buick Enclave, brake hose condition should always be confirmed when diagnosing brake drag, uneven brake release, or excessive pedal travel.
BRAKE PEDAL PUSHROD INSPECTION
1. Disconnect the brake pedal pushrod (1) from the brake pedal.
The brake pedal pushrod transfers pedal movement into the brake booster and master cylinder assembly. Any looseness, wear, bending, or binding in this area can change brake pedal height, pedal travel, and driver feel.
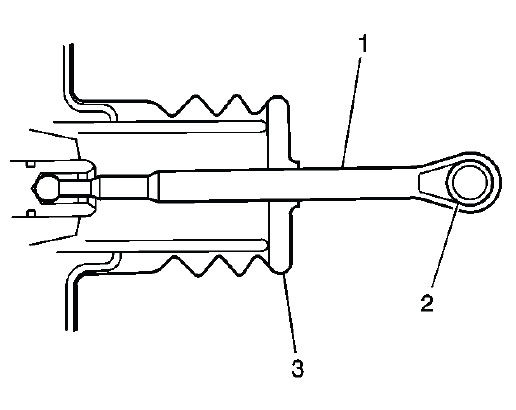
Fig. 6: View of Brake Pedal Pushrod
2. Inspect the brake pedal pushrod eyelet bushing (2), if equipped, for cracks and/or excessive wear.
A worn bushing can create looseness at the pedal connection. This may be felt as extra free play before the brakes begin to apply, or as a clicking movement during pedal operation.
3. Reposition the pedal pushrod boot (3) toward the front of the vehicle to expose as much of the pedal pushrod (1) as possible.
Move the boot carefully so it can be returned to its original position after inspection. The boot helps protect the pushrod area from contamination and should not be torn or left out of place.
4. Inspect the brake pedal pushrod (1) for straightness.
The pushrod should be straight and free from bends, damage, corrosion, or abnormal wear marks. A bent pushrod can cause poor alignment, uneven movement, or binding during brake pedal application and release.
5. If the brake pedal pushrod eyelet bushing (2) exhibited cracks and/or excessive wear, then the bushing requires replacement.
Replacing a worn bushing restores a tighter pedal connection and helps remove unnecessary pedal movement that can feel like excessive travel.
6. If the brake pedal pushrod (1) is not straight, then the pushrod requires replacement.
A distorted pushrod should not be bent back into shape. Replacement is required because the part must maintain correct geometry and movement under repeated brake pedal force.
7. Return the pedal pushrod boot (3) to its original position on the pedal pushrod (1).
Confirm that the boot is seated correctly and does not interfere with pushrod movement. The pedal should move freely after the boot is returned to position.
8. Connect the brake pedal pushrod (1) to the brake pedal.
After reconnecting the pushrod, check the pedal movement by hand before operating the vehicle. The pedal should move smoothly, return fully, and show no abnormal looseness at the connection. A final brake pedal feel check should be performed before the Buick Enclave is road tested or returned to service.
