Buick Enclave: Repair Instructions
MASTER CYLINDER RESERVOIR FILLING
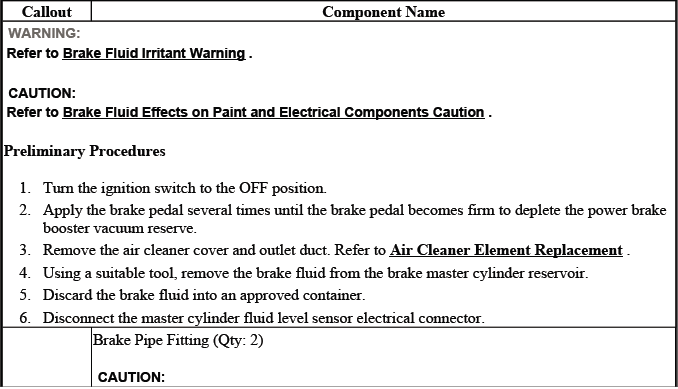
WARNING: Refer to Brake Fluid Irritant Warning.
CAUTION: Refer to Brake Fluid Effects on Paint and Electrical Components Caution.
Correct brake fluid level is important for safe hydraulic brake operation. The brake master cylinder reservoir should be checked with care, because both low fluid level and improper topping-off can hide brake wear, leaks, or previous service mistakes. On the Buick Enclave, the reservoir level should be evaluated together with brake pad condition, visible hydraulic components, and any warning lamp or pedal feel concern.
1. Visually inspect the brake fluid level through the brake master cylinder reservoir.
Use the molded level marks on the reservoir as the primary reference. The outside of the reservoir should be clean enough to read the fluid level clearly. If the reservoir is dirty, clean the exterior before making a final judgment so dirt, staining, or old residue does not create a false reading.
2. If the brake fluid level is at or below the half-full point during routine fluid checks, the brake system should be inspected for wear and possible brake fluid leaks.
A lower fluid level can occur gradually as the brake linings wear and the caliper pistons move farther outward. However, fluid at or below the half-full point should not be treated as normal until the system has been inspected. Check the brake pads, calipers, hoses, pipes, master cylinder area, and all accessible fittings for signs of leakage or abnormal wear.
3. If the brake fluid level is at or below the half-full point during routine fluid checks and an inspection of the brake system did not reveal wear or brake fluid leaks, the brake fluid may be topped-off up to the maximum-fill level.
Only add fluid after confirming that the low level is not being caused by worn components or hydraulic leakage. Adding fluid without inspection can temporarily hide a problem and may delay needed brake service.
4. If brake system service was just completed, the brake fluid may be topped-off up to the maximum-fill level.
After service work, fluid level should be corrected before the vehicle is operated. This is especially important if the hydraulic system was opened, a component was replaced, or bleeding was performed.
5. If the brake fluid level is above the half-full point, adding brake fluid is not recommended under normal conditions.
Overfilling the reservoir can create overflow when brake components are serviced later or when caliper pistons are pushed back into their bores. Unnecessary topping-off may also make it harder to judge lining wear during later inspections.
6. If brake fluid is to be added to the master cylinder reservoir, clean the outside of the reservoir on and around the reservoir cap prior to removing the cap and diaphragm. Use only GM approved brake fluid from a clean, sealed brake fluid container.
Brake fluid absorbs moisture and can be contaminated easily. Never use fluid from an open, dirty, or unmarked container. Before removing the cap, clean the area around the reservoir so dirt cannot fall into the hydraulic system. After filling, reinstall the diaphragm and cap correctly, then wipe away any spilled fluid immediately to protect painted and electrical surfaces.
MASTER CYLINDER RESERVOIR REPLACEMENT
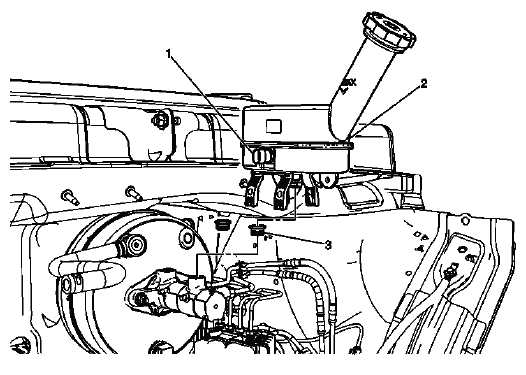
Fig. 7: Identifying Master Cylinder Reservoir
Master Cylinder Reservoir Replacement
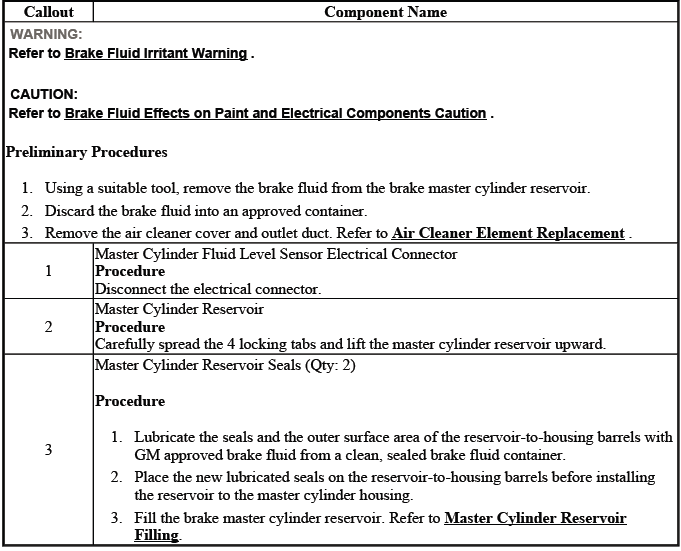
The master cylinder reservoir stores brake fluid for the hydraulic system and must remain sealed, clean, and properly mounted. Reservoir replacement may be required if the reservoir is cracked, leaking, contaminated, damaged at the cap sealing area, or unable to retain the fluid level sensor or related components correctly.
Before removing the reservoir, protect nearby painted surfaces and electrical connectors from brake fluid exposure. Brake fluid can damage finishes quickly, so absorbent shop cloths should be positioned below the service area. Any spilled fluid should be cleaned immediately according to the approved procedure.
During replacement, avoid forcing the reservoir sideways or prying against sealing areas. The reservoir and its seals must sit squarely on the master cylinder body. If the reservoir is installed unevenly or if a seal is damaged during installation, a leak may appear after the system is filled and the brakes are applied.
After replacement, refill the reservoir only with the specified GM approved brake fluid from a clean, sealed container. Inspect for leaks around the reservoir-to-master-cylinder connection, verify that the cap and diaphragm are seated correctly, and confirm that the brake fluid level remains stable after the brake pedal is applied.
MASTER CYLINDER REPLACEMENT
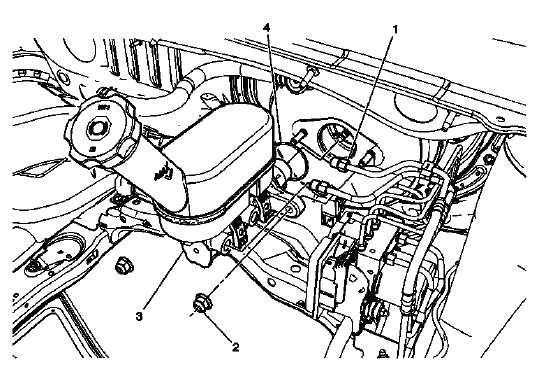
Fig. 8: View Of Master Cylinder
Master Cylinder Replacement
The master cylinder converts brake pedal input into hydraulic pressure. If it leaks externally, bypasses internally, has damaged ports, or cannot maintain pressure, replacement or overhaul may be required. A failing master cylinder can cause a sinking pedal, excessive pedal travel, uneven hydraulic response, or loss of braking confidence even when no external leak is obvious.
When replacing the master cylinder, keep the brake pipe openings and master cylinder ports protected from dirt. Hydraulic brake components require clean working conditions because even small debris can damage seals or restrict passages. Brake pipes should be handled carefully and should not be bent or twisted out of position.
Before installation, the replacement master cylinder should be inspected for shipping damage, correct port configuration, clean sealing surfaces, and proper reservoir attachment. If the master cylinder is supplied without a reservoir or sensor, transfer only clean and serviceable parts according to the repair procedure.
After installation, the hydraulic brake system must be bled as required. On the Buick Enclave, final service verification should include brake fluid level inspection, leak inspection at all disturbed connections, pedal feel evaluation, and a controlled brake operation check before the vehicle is returned to normal use.
MASTER CYLINDER BENCH BLEEDING
Bench bleeding removes trapped air from the master cylinder before it is installed or before the hydraulic system is fully connected. This step improves the chance of obtaining a firm pedal during final bleeding and prevents large air pockets from being pushed into the brake lines.
1. Secure the mounting flange of the brake master cylinder in a bench vise so that the rear of the primary piston is accessible.
Clamp only the mounting flange. Do not clamp the reservoir, cylinder body, ports, or machined sealing areas. The master cylinder should be held firmly enough to allow controlled piston movement without damaging the casting.
Fig. 9: Bleeding Master Cylinder
WARNING: Refer to Brake Fluid Irritant Warning.
CAUTION: Refer to Brake Fluid Effects on Paint and Electrical Components Caution.
2. Remove the master cylinder reservoir cap and diaphragm.
Place the cap and diaphragm on a clean surface where they will not collect dirt, dust, or metal particles. Contamination introduced during bench bleeding can later circulate through the brake hydraulic system.
3. Install suitable fittings to the master cylinder ports that match the type of flare seat required and also provide for hose attachment.
The fittings must match the port design and seal correctly. Do not force an incorrect fitting into the master cylinder port, because damaged threads or flare seats can cause leakage after installation.
4. Install transparent hoses to the fittings installed to the master cylinder ports, then route the hoses into the master cylinder reservoir.
Transparent hoses make it easier to see air bubbles leaving the master cylinder. Route the hoses so they remain secure and do not pull out of the reservoir during piston movement.
5. Fill the master cylinder reservoir to at least the half-way point with GM approved brake fluid from a clean, sealed brake fluid container. Refer to Master Cylinder Reservoir Filling.
Maintain the fluid level during the entire bleeding process. If the hose ends become uncovered or the fluid level drops too low, air can be drawn back into the master cylinder and the procedure will need to be repeated.
6. Ensure that the ends of the transparent hoses running into the master cylinder reservoir are fully submerged in the brake fluid.
The submerged hose ends allow fluid and air to circulate back into the reservoir while preventing air from being pulled back into the ports during release of the piston.
7. Using a smooth, round-ended tool, depress and release the primary piston as far as it will travel, a depth of about 25 mm (1 in), several times. Observe the flow of fluid coming from the ports.
Move the piston slowly and evenly. A sharp or aggressive stroke can aerate the fluid, splash brake fluid from the reservoir, or damage the internal piston surface. The tool must have a smooth rounded end so it does not gouge or distort the piston contact area.
As air is bled from the primary and secondary pistons, the effort required to depress the primary piston will increase and the amount of travel will decrease.
This change in effort is normal and indicates that air is being removed from the internal chambers. The fluid flow should become smoother as the trapped air is purged.
8. Continue to depress and release the primary piston until fluid flows freely from the ports with no evidence of air bubbles.
Do not stop the process while small bubbles are still visible in the transparent hoses. A master cylinder that is not fully bench bled can make the final vehicle bleeding procedure longer and may leave the brake pedal feeling soft.
9. Remove the transparent hoses from the master cylinder reservoir.
Lift the hoses carefully and keep a shop cloth nearby to catch brake fluid. Avoid dripping brake fluid onto the exterior of the master cylinder, painted panels, or nearby electrical parts.
10. Install the master cylinder reservoir cap and diaphragm.
Make sure the diaphragm is seated flat and the cap is installed securely. A displaced diaphragm can allow fluid seepage or moisture entry.
11. Remove the fittings with the transparent hoses from the master cylinder ports. Wrap the master cylinder with a clean shop cloth to prevent brake fluid spills.
After the fittings are removed, keep the ports protected from contamination. If the master cylinder will not be installed immediately, cover the ports with clean protective caps.
12. Remove the master cylinder from the vise.
Handle the master cylinder level and carefully to avoid spilling fluid. Once bench bleeding is complete, install the component without unnecessary delay so the internal passages remain filled and clean.
BRAKE FLUID LEVEL INDICATOR SWITCH REPLACEMENT
Fig. 10: Identifying Brake Fluid Level Sensor
Brake Fluid Level Indicator Switch Replacement

The brake fluid level indicator switch monitors the reservoir level and helps warn the driver when the fluid level becomes too low. If the switch, float, connector, or wiring does not operate correctly, the warning system may fail to alert the driver or may display a warning when the fluid level is actually correct.
Before replacing the switch, inspect the electrical connector for corrosion, loose terminals, fluid intrusion, damaged locking tabs, or wiring strain. A connector problem can mimic a failed switch. If brake fluid is present around the sensor area, inspect the reservoir for cracks or sealing damage before installing a new component.
During installation, make sure the switch seats correctly in the reservoir and that the connector is fully locked. After service, verify that the brake fluid warning indicator responds correctly and that there is no seepage around the reservoir or sensor area.
BRAKE PEDAL ASSEMBLY REPLACEMENT
Removal Procedure
The brake pedal assembly must be removed carefully because it is connected to the pedal position sensor, pushrod linkage, interior trim, and driver footwell components. Any damage or misalignment in this area can affect brake pedal feel, brake lamp operation, cruise control cancel function, and overall driver control.
1. Remove the left side instrument panel (I/P) insulator panel. Refer to Instrument Panel Insulator Panel Replacement - Left Side.
Remove the panel carefully to avoid breaking retainers or damaging nearby trim. Keep fasteners organized so the panel can be reinstalled securely after the repair.
2. Remove the driver knee bolster. Refer to Driver Knee Bolster Replacement (Acadia) , Driver Knee Bolster Replacement (Enclave) , Driver Knee Bolster Replacement (Traverse).
Removing the knee bolster provides access to the pedal bracket and related components. Use care around trim edges, wiring, and mounting tabs, especially if the interior panels have become brittle with age.
3. Remove the accelerator pedal position sensor. Refer to Accelerator Pedal Position Sensor Replacement.
This creates additional working space near the brake pedal assembly. The accelerator pedal position sensor and its connector should be handled carefully because damage to this component can affect throttle response and may set diagnostic trouble codes.
4. Disconnect the brake pedal position sensor electrical connector (1).
Release the connector lock before pulling on the connector body. Do not pull on the wires. After the connector is disconnected, inspect it for bent terminals, corrosion, or signs of previous damage.
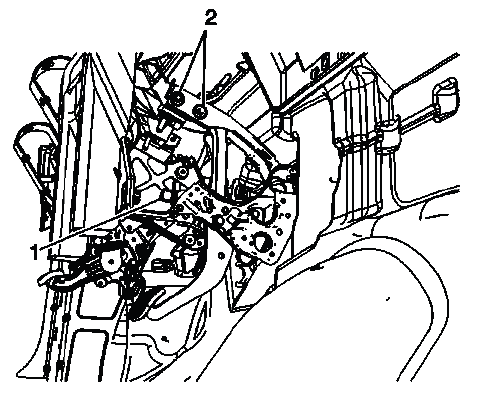
Fig. 11: View Of Brake Pedal Bracket Bolts
Before removing the pedal bracket bolts, note the position of the pedal assembly and surrounding wiring. The replacement assembly should be installed without pinching harnesses or changing the routing of nearby components. After installation, verify that the brake pedal moves smoothly, returns fully, and that the brake pedal position sensor operates correctly on the Buick Enclave.
5. Remove the 2 brake pedal bracket bolts (2).
Support the brake pedal and bracket area while the bolts are being removed. This prevents the assembly from shifting unexpectedly and helps avoid stress on the surrounding wiring, pedal position sensor, and dash panel mounting points.
6. Remove the brake pedal pushrod retainer (1).
The retainer secures the pushrod connection and must be removed carefully so it is not bent, distorted, or lost during service. If the retainer shows signs of damage or weak tension, it should not be reused.
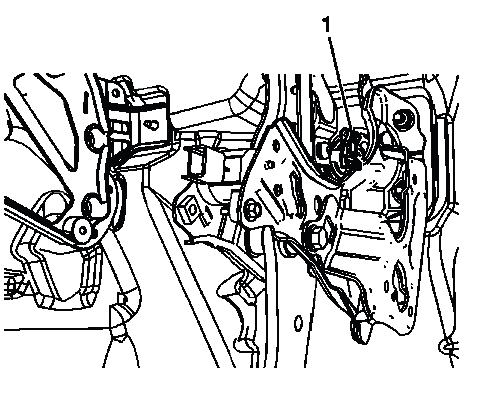
Fig. 12: View Of Brake Pedal Pushrod Retainer
7. Remove the brake pedal pushrod clevis pin.
Once the clevis pin is removed, the pushrod can separate from the brake pedal. Keep the pin and related hardware organized, and inspect the pin for grooves, scoring, or abnormal wear before reuse.
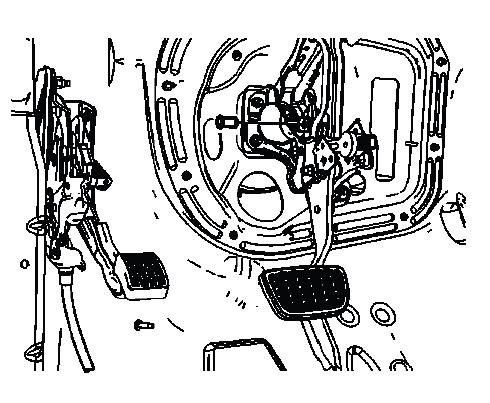
Fig. 13: Identifying Brake Pedal Pushrod Clevis Pin
8. Remove the intermediate steering shaft. Refer to Intermediate Steering Shaft Replacement.
Removing the intermediate steering shaft creates the clearance needed to move the brake pedal assembly safely. Mark or note the shaft orientation if required by the service procedure, and avoid rotating steering components unnecessarily while the shaft is disconnected.
9. Remove the 4 vacuum booster nuts.
Loosen the nuts evenly and keep control of the booster and pedal bracket relationship. These fasteners secure the vacuum brake booster through the dash panel area, so the assembly should not be forced or allowed to hang under its own weight.
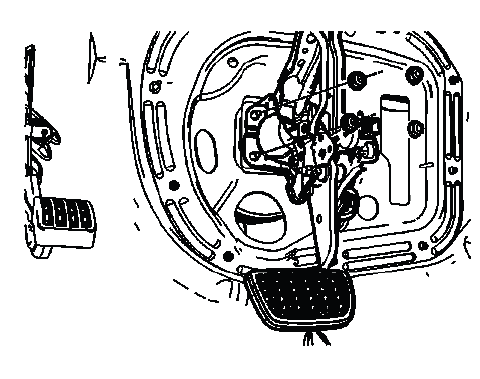
Fig. 14: Locating Vacuum Booster Nuts
10. Position the vacuum brake booster and master cylinder assembly forward slightly to allow the brake pedal and bracket assembly to clear the booster studs.
Move the booster and master cylinder assembly only as much as needed for clearance. Do not pull sharply on the master cylinder or brake pipes. Excessive movement can stress hydraulic lines, wiring, vacuum connections, or sealing surfaces.
11. Remove the brake pedal assembly.
Guide the brake pedal assembly out of position carefully. Watch for harnesses, brackets, insulation, and trim edges that may catch on the pedal arm or bracket. On the Buick Enclave, the pedal assembly should be removed without prying against the dash panel or bending nearby components.
Installation Procedure
1. Position the brake pedal assembly to the dash panel.
Align the pedal bracket with the mounting points before installing fasteners. The bracket should sit flat against the dash panel without being forced into place. If it does not align naturally, inspect for trapped wiring, incorrect booster position, or interference from surrounding trim.
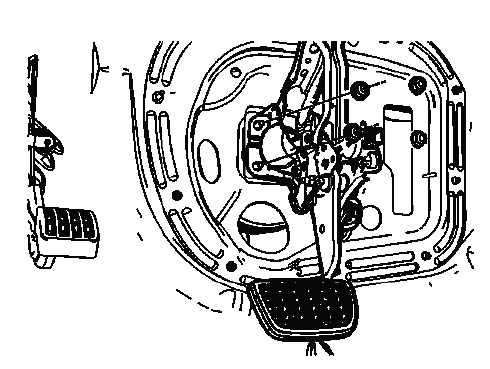
Fig. 15: Locating Vacuum Booster Nuts
2. Position the vacuum brake booster and master cylinder assembly to the dash panel.
Bring the booster studs through the dash panel and pedal bracket area evenly. Confirm that the booster is seated squarely and that the master cylinder and brake pipes are not under tension.
3. Install the 4 vacuum booster nuts.
CAUTION: Refer to Fastener Caution.
Start all nuts by hand before tightening. This helps prevent cross-threading and ensures the booster seats evenly against the mounting surface.
Tighten
- Tighten the nuts to 25 N.m (18 lb ft).
Use the specified torque value. Over-tightening can damage mounting studs or distort the mounting area, while under-tightening may allow movement that affects pedal feel and booster alignment.
4. Position the brake pedal pushrod to the brake pedal.
The pushrod must align naturally with the pedal connection point. Do not force the pushrod sideways to fit the pedal, because misalignment can create binding, uneven pedal return, or premature bushing wear.

Fig. 16: Identifying Brake Pedal Pushrod Clevis Pin
5. Install the brake pedal pushrod clevis pin.
Insert the clevis pin fully through the aligned pushrod and pedal connection. The pin should move into place smoothly without hammering or forcing. If resistance is present, recheck alignment before continuing.
6. Install the brake pedal pushrod retainer (1).
Make sure the retainer locks securely onto the clevis pin. A loose or incorrectly seated retainer can allow the pushrod connection to become unsafe during brake pedal operation.
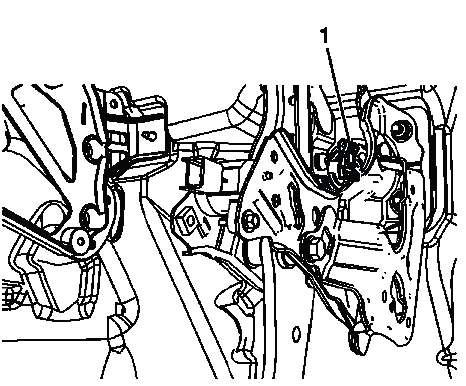
Fig. 17: View Of Brake Pedal Pushrod Retainer
7. Install the intermediate steering shaft. Refer to Intermediate Steering Shaft Replacement.
Install the steering shaft according to the referenced procedure and confirm that the shaft is properly seated. After installation, verify that steering movement is smooth and that no wiring or brake pedal components interfere with shaft operation.
8. Connect the brake pedal position sensor electrical connector (1).
Push the connector into place until the locking tab is fully engaged. A loose connection can cause brake lamp concerns, brake pedal position sensor faults, cruise control cancel issues, or diagnostic trouble codes.
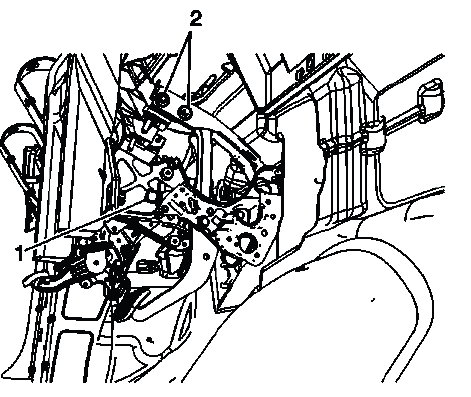
Fig. 18: View Of Brake Pedal Bracket Bolts
9. Install the 2 brake pedal bracket bolts (2).
Start both bolts before tightening either one fully. This allows the bracket to settle into the correct position and helps prevent uneven loading of the pedal support structure.
Tighten
- Tighten the bolts to 22 N.m (16 lb ft).
After tightening, move the brake pedal by hand and confirm that it travels smoothly, returns fully, and does not contact trim, wiring, or the steering shaft.
10. Install the accelerator pedal position sensor. Refer to Accelerator Pedal Position Sensor Replacement.
Confirm that the accelerator pedal position sensor is mounted securely and that its wiring is routed away from the brake pedal arm. The driver footwell should be free of loose harnesses or panels before final assembly.
11. Install the driver knee bolster. Refer to Driver Knee Bolster Replacement (Acadia) , Driver Knee Bolster Replacement (Enclave) , Driver Knee Bolster Replacement (Traverse).
Reinstall the knee bolster without forcing the trim into position. Check that all retaining points are seated and that the panel does not interfere with pedal movement.
12. Install the left side I/P insulator panel. Refer to Instrument Panel Insulator Panel Replacement - Left Side.
The insulator panel should be secured correctly to prevent rattles and to keep the footwell area properly finished. Make sure no fasteners, clips, or tools remain near the pedal assembly.
13. Calibrate the brake pedal position sensor. Refer to Brake Pedal Position Sensor Calibration.
Calibration is required so the control modules read the brake pedal position correctly. After calibration, verify brake lamp operation, pedal return, and brake pedal feel. Before the Buick Enclave is returned to service, confirm that no warning indicators or diagnostic trouble codes are present.
BRAKE PIPE REPLACEMENT
Special Tools
- CH-45405 Brake Pipe Flaring Kit
For equivalent regional tools, refer to Special Tools.
Brake pipe replacement must be performed with clean materials, correct pipe type, correct flare design, and careful routing. Brake pipes carry hydraulic pressure, so shortcuts such as improper tubing, incorrect fittings, poor flare quality, or weak retention can result in brake fluid leakage or brake system failure.
1. Inspect the area of brake pipe to be repaired or replaced.
Before cutting or removing any pipe section, identify the full damaged area and inspect beyond the visible defect. Corrosion, kinks, flattened areas, or previous repairs may extend farther than expected. On the Buick Enclave, underbody brake pipes should also be checked near clips, bends, and moisture-trapping locations.
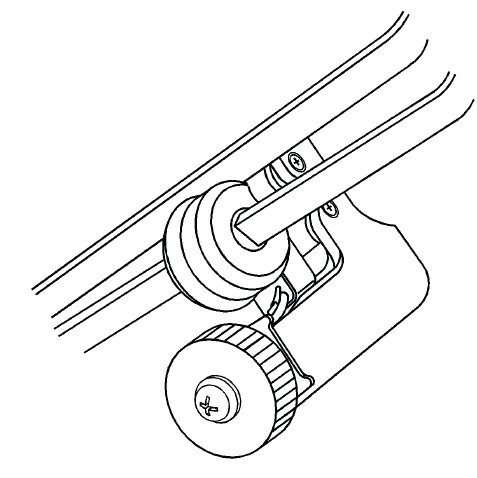
Fig. 19: Sectioning Brake Pipe Using Pipe Cutter
WARNING: Refer to Brake Fluid Irritant Warning.
WARNING: Always use double walled steel brake pipe when replacing brake pipes. The use of any other pipe is not recommended and may cause brake system failure. Carefully route and retain replacement brake pipes. Always use the correct fasteners and the original location for replacement brake pipes. Failure to properly route and retain brake pipes may cause damage to the brake pipes and cause brake system failure.
CAUTION: Refer to Brake Fluid Effects on Paint and Electrical Components Caution.
NOTE: When servicing the brake pipes, note the following:
- If sectioning the brake pipe, use replacement pipe of the same type and outside diameter.
- Use fittings of the appropriate size and type.
- Only create flares of the same type or design as originally equipped on the vehicle.
Using the correct brake pipe material and flare design is essential. A fitting may appear to tighten even when the flare is incorrect, but it may not seal under pressure. Always match the original pipe outside diameter, flare style, and fitting type before assembling the repair.
2. Release the brake pipe to be replaced from the retainers, as required.
Open the retainers carefully so nearby pipes, wiring, fuel lines, and underbody components are not damaged. If any retainer is broken, loose, or corroded, it should be replaced to keep the new brake pipe in the proper location.
3. Select an appropriate location to section the brake pipe, if necessary.
- Allow adequate clearance in order to maneuver the CH-45405 Brake Pipe Flaring Kit.
- Avoid sectioning the brake pipe at bends or mounting points.
Choose a straight, accessible section of pipe where the flaring tool can sit squarely. Avoid cutting too close to a bend, clip, fitting, or area with corrosion. A poor sectioning location can make it difficult to create a clean flare and may reduce the reliability of the repair.
4. Using a string or wire, measure the length of the pipe to be replaced including all pipe bends.
Follow the original routing as closely as possible while measuring. The replacement pipe must have enough length to duplicate bends without being stretched, twisted, or pulled tight against the chassis.
5. Add to the measurement taken the appropriate additional length required for each flare to be created.
The added length compensates for the tubing that will be used to form the flare. Without this allowance, the finished pipe may be too short after the flare is created and may not reach the fitting correctly.
Specification
- 6.35 mm (0.250 in) for 4.76 mm (3/16 in) diameter pipe
- 9.50 mm (0.374 in) for 6.35 mm (1/4 in) diameter pipe
- 12.67 mm (0.499 in) for 7.94 mm (5/16 in) diameter pipe
Measure carefully and confirm the brake pipe diameter before cutting. Using the wrong added length can affect flare shape, fitting engagement, and final pipe alignment.
6. Using the pipe cutter included in the CH-45405 Brake Pipe Flaring Kit, carefully cut the brake pipe squarely to the measured length.
Make the cut slowly and evenly so the pipe end remains round and clean. Do not crush the pipe with excessive cutter pressure. A distorted end can prevent the flare from forming correctly and may create a leak path after assembly.
NOTE: Ensure that the brake pipe end to be flared is cut at a square, 90º angle to the pipe length.
A square 90-degree cut is the foundation for a reliable flare. After cutting, inspect the pipe end for burrs, uneven edges, or deformation. The pipe should be cleaned and prepared according to the flaring kit procedure before the flare is formed, and the finished repair should be inspected for correct routing, secure retention, and leak-free operation before the brake system on the Buick Enclave is placed back into service.
7. Remove the sectioned brake pipe from the vehicle.
Remove the cut section carefully so the surrounding brake pipes, retainers, wiring, and nearby underbody components are not disturbed. If the old pipe is corroded or stuck in a retainer, work slowly rather than forcing it out, because additional damage can create extra repair work.
8. Select the appropriate size of brake pipe and tube nuts, as necessary. The brake pipe outside diameter determines brake pipe size.
Before forming the replacement section, confirm the outside diameter of the original brake pipe and match it exactly. The tube nuts must also match the thread size, seat design, and flare style used on the vehicle. A fitting that looks similar but does not match correctly may tighten at first, yet fail to seal under hydraulic pressure.
9. Strip the nylon coating from the brake pipe end to be flared, if necessary.
The coating must be removed only from the area required for proper flare formation. Removing too little coating can prevent the flare from seating correctly in the tool, while removing too much coating can leave unnecessary bare steel exposed to corrosion. On the Buick Enclave, careful preparation of the brake pipe end is important for both sealing quality and long-term durability.
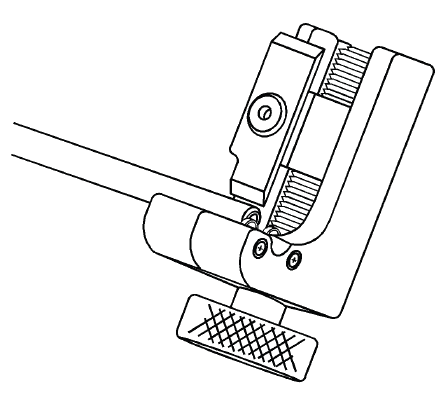
Fig. 20: Stripping Nylon Coating From Brake Pipe Ends
- Select the appropriate blade on the coating stripping tool included in the CH-45405 Brake Pipe Flaring Kit, by unthreading the blade block from the stripping tool and installing the block with the desired blade facing the tool rollers.
Selecting the correct blade prevents the tool from cutting too deeply into the brake pipe. The blade should remove the protective coating cleanly without scoring the metal surface underneath.
Specification
- 6.35 mm (0.250 in) blade for 4.76 mm (3/16 in) diameter pipe
- 9.50 mm (0.374 in) blade for 6.35 mm (1/4 in) and 7.94 mm (5/16 in) diameter pipe
- Insert the brake pipe end to be flared into the stripping tool to the depth of the ledge on the tool rollers.
- While holding the brake pipe firmly against the stripping tool roller ledges, rotate the thumbwheel of the tool until the blade contacts the brake pipe coated surface.
The pipe must remain squarely positioned against the roller ledges. If the pipe shifts during stripping, the exposed section may become uneven and the flare tool may not clamp the pipe correctly.
NOTE: Do not gouge the metal surface of the brake pipe.
Any gouge, nick, or deep scratch in the metal surface can weaken the pipe or create a sealing problem at the flare. If the pipe end is damaged during stripping, cut the end again and prepare a fresh section.
- Rotate the stripping tool in a clockwise direction, ensuring that the brake pipe end remains against the tool roller ledges.
- After each successive revolution of the stripping tool, carefully rotate the thumbwheel of the tool clockwise, in order to continue stripping the coating from the brake pipe until the metal pipe surface is exposed.
- Loosen the thumbwheel of the tool and remove the brake pipe.
Work gradually. The coating should be removed in a controlled way instead of being cut aggressively in one pass. A smooth exposed surface gives the flaring dies a clean area to clamp and helps produce a more accurate flare.
NOTE: Ensure that all loose remnants of the nylon coating have been removed from the brake pipe.
- Inspect the stripped end of the brake pipe to ensure that the proper amount of coating has been removed.
Loose coating fragments can interfere with clamping, contaminate the flare area, or prevent the tube nut from seating correctly. The prepared area should be clean, even, and free from debris before moving to the next step.
Specification
- 6.35 mm (0.250 in) for 4.76 mm (3/16 in) diameter pipe
- 9.50 mm (0.374 in) for 6.35 mm (1/4 in) and 7.94 mm (5/16 in) diameter pipe
10. Chamfer the inside and outside diameter of the pipe with the de-burring tool included in the CH-45405 Brake Pipe Flaring Kit.
Deburring is not just a finishing step. A clean chamfer removes sharp edges, allows the forming mandrel to enter the pipe smoothly, and helps the flare form evenly. Metal burrs left inside the pipe can break loose and contaminate the hydraulic brake system.
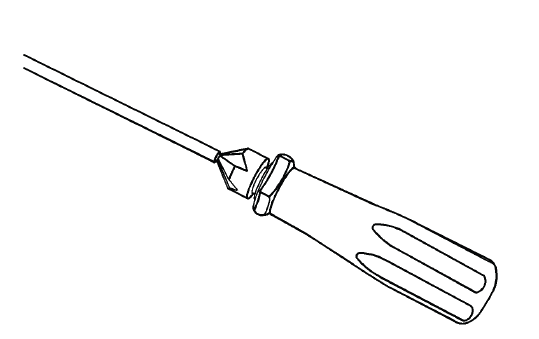
Fig. 21: Chamfering Pipe Using De-Burring Tool
11. Install the tube nuts on the brake pipe, noting their orientation.
Install the tube nuts before the flare is made. Once the flare is formed, the nut cannot be added without cutting the pipe and starting over. Confirm that each tube nut faces the correct direction and that the threaded end will align with the proper fitting during installation.
12. Clean the brake pipe and the CH-45405 Brake Pipe Flaring Kit of lubricant, contaminants and debris.
The pipe and tool must be clean before clamping and forming. Dirt, metal shavings, old coating, or excessive lubricant can allow the pipe to slip in the dies or affect the shape of the flare. Clean tooling also makes it easier to inspect the finished flare for defects.
13. Loosen the die clamping screw of the CH-45405 Brake Pipe Flaring Kit.
Loosening the clamping screw allows the correct die halves to be installed without damaging the die cage or clamping surfaces. Make sure the tool is stable and clean before installing the dies.
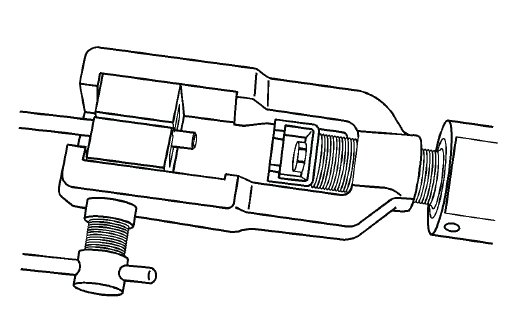
Fig. 22: Installing Die Halves Into Die Cage
14. Select the corresponding die set and install the die halves into the die cage with the full, flat face of one die facing the clamping screw and the counterbores of both dies facing the forming ram.
The die set must match the brake pipe diameter. Incorrect dies can crush the pipe, allow the pipe to slip, or form a flare that does not match the fitting seat. Pay attention to the direction of the counterbores, because they guide the flare shape during forming.
15. Place the flat face of an unused die (1) against the die halves in the clamping cage and hold firmly against the counterbored face of the dies.
The unused die works as a depth-setting reference. Holding it squarely against the installed die halves helps position the pipe at the correct protrusion length before clamping.
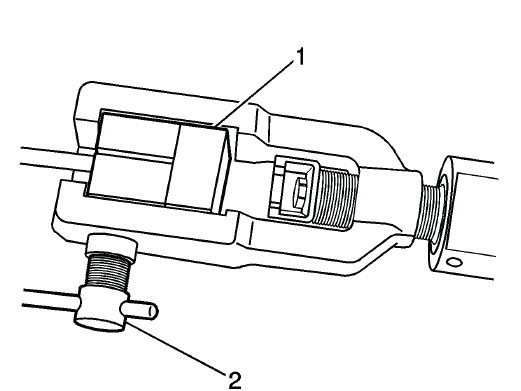
Fig. 23: View Of Clamping Screw & Unused Die
16. Insert the prepared end of the pipe to be flared through the back of the dies until the pipe is seated against the flat surface of the unused die (1).
Keep the pipe straight as it is inserted through the dies. The pipe end should contact the unused die evenly. If it sits at an angle, the finished flare may be uneven and may not seal correctly.
17. Remove the unused die (1).
Remove the depth guide without moving the brake pipe. If the pipe shifts after the unused die is removed, repeat the setup so the flare is formed at the correct length.
18. Ensure that the rear of both dies are seated firmly against the enclosed end of the die cage.
Both die halves must sit fully in the cage before clamping. If one die is not seated, the pipe may clamp unevenly and the flare can form off-center.
19. Firmly hand tighten the clamping screw (2) against the dies.
Hand-tighten the clamping screw firmly enough to hold the pipe securely. Do not use excessive force unless instructed by the tool procedure, because overloading the clamping mechanism can damage the dies or distort the pipe.
20. Select the appropriate forming mandrel and place into the forming ram.
The forming mandrel must match the pipe size and flare design. Before placing it in the ram, inspect the mandrel for dirt, wear, or damage that could mark the inside of the brake pipe or deform the flare.
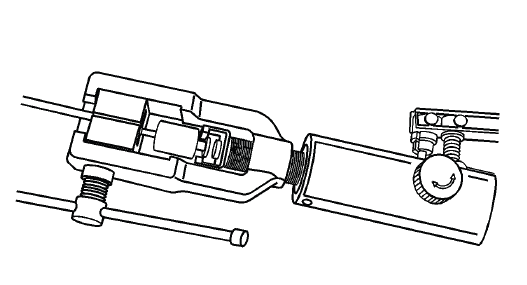
Fig. 24: Rotating J 45405 To Bottom Against Die Cage
21. Rotate the hydraulic fluid control valve clockwise to the closed position.
Closing the valve allows the hydraulic forming ram to build pressure during tool operation. Verify that the valve is fully closed before applying force with the lever.
22. Rotate the body of the CH-45405 Brake Pipe Flaring Kit until it bottoms against the die cage.
The tool body must be seated against the die cage so the forming force is applied straight into the pipe end. If the body is not fully seated, the mandrel may enter at an angle and produce a distorted flare.
23. While guiding the forming mandrel into the exposed end of pipe to be flared, operate the lever of the CH-45405 Brake Pipe Flaring Kit until the forming mandrel bottoms against the clamping dies.
Guide the mandrel carefully as it enters the pipe. The lever should be operated smoothly, not aggressively. A controlled stroke helps the pipe material fold evenly and reduces the chance of splitting, cocking, or crushing the flare. For a Buick Enclave brake pipe repair, this forming step must be done accurately because the flare is what seals hydraulic pressure at the fitting.
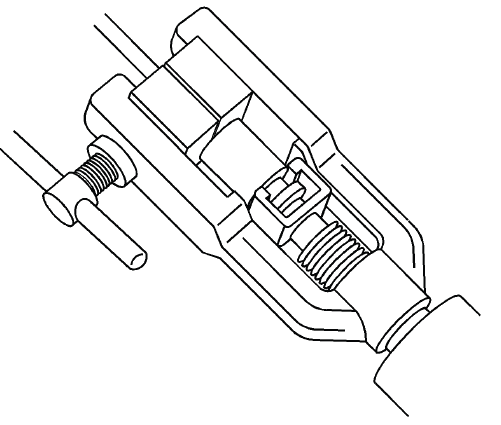
Fig. 25: Bottoming Forming Mandrel Against Clamping Dies Using Pipe Flaring Tool
24. Rotate the hydraulic fluid control valve counterclockwise to the open position to allow the hydraulic forming ram to retract.
Open the valve slowly and allow the ram to retract fully. Do not pull the tool away from the pipe until pressure has been released and the forming ram is clear.
25. Insert the finishing cone into the forming ram.
The finishing cone completes the flare profile after the mandrel has formed the first stage. Inspect the cone before use and make sure it is clean, properly seated, and aligned with the pipe end.
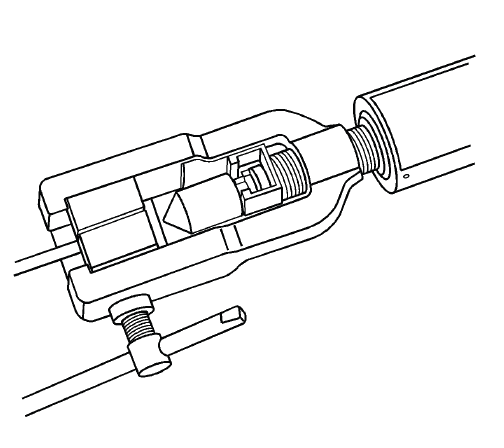
Fig. 26: Using Pipe Flaring Tool
26. Rotate the hydraulic fluid control valve clockwise to the closed position.
Closing the valve prepares the flaring tool for the finishing operation. The tool should remain square to the die cage before pressure is applied.
27. Rotate the body of the CH-45405 Brake Pipe Flaring Kit until it bottoms against the die cage.
Confirm that the tool body is fully seated again. Consistent alignment between the ram, finishing cone, dies, and pipe end is necessary to form a flare that is smooth, centered, and capable of sealing.
28. While guiding the finishing cone into the exposed end of pipe to be flared, operate the lever of the CH-45405 Brake Pipe Flaring Kit until the finishing cone bottoms against the dies.
Apply force steadily until the finishing cone reaches its stop. The final shape should be formed by the tool, not by extra force after the cone has bottomed. Excessive pressure after bottoming can distort the flare or thin the pipe edge.
29. Rotate the hydraulic fluid control valve counterclockwise to the open position to allow the hydraulic forming ram to retract.
After the ram retracts, loosen the clamping screw and remove the pipe carefully. Inspect the completed flare before installing it on the vehicle. The flare should be even, smooth, centered, free of cracks, and shaped to match the original design. If the flare is uneven, split, folded incorrectly, or damaged, cut the pipe end and repeat the preparation and flaring process before installing the brake pipe on the Buick Enclave.
30. Loosen the die clamping screw and remove the dies and pipe.
Release the clamping screw gradually so the pipe and die halves come out without being twisted or scratched. The newly formed flare should not be dragged across the tool surfaces, because even a small mark on the sealing face can affect the final connection.
31. If necessary, lightly tap the dies until the die halves separate.
Use only light, controlled taps if the die halves are tight around the brake pipe. Do not strike the flare itself. The purpose is to separate the tooling, not to reshape or loosen the finished flare by force.
32. Inspect the brake pipe flare for correct shape and diameter (a).
The flare must be smooth, centered, evenly formed, and free from cracks, splits, folding, or thin edges. A flare that looks slightly uneven should not be installed simply because the fitting threads into place. Hydraulic brake pressure requires a clean metal-to-metal seal, so the flare face and diameter must match specification before the pipe is fitted to the Buick Enclave.
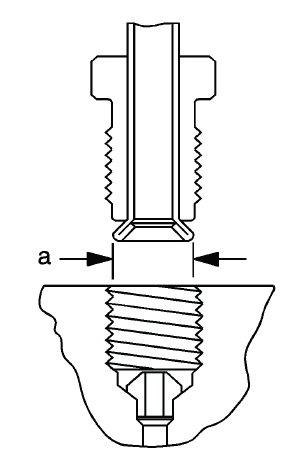
Fig. 27: Identifying Correct Brake Pipe Flare Shape & Diameter
Specification
- 6.74-7.10 mm (0.265-0.279 in) flare diameter for 4.76 mm (3/16 in) diameter pipe
- 8.57-9.27 mm (0.344-0.358 in) flare diameter for 6.35 mm (1/4 in) diameter pipe
- 10.42-10.79 mm (0.410-0.425 in) flare diameter for 7.94 mm (5/16 in) diameter pipe
Measure the finished flare carefully and compare it with the correct diameter range for the pipe size being used. If the flare is undersized, oversized, cracked, off-center, or visibly distorted, cut the pipe end back and repeat the preparation and flaring process. Reworking a damaged flare by tightening the fitting harder is not acceptable.
33. If necessary, using the removed section of brake pipe as a template, shape the new pipe with a suitable brake pipe bending tool.
Follow the original pipe shape as closely as possible. Smooth bends help maintain fluid flow and prevent stress at the fittings. Avoid sharp bends, flattened areas, or hand-bent sections that could weaken the pipe. The replacement pipe should sit naturally in the original routing without being forced into retainers.
34. Install the pipe to the vehicle with the appropriate brake pipe unions, as required.
Start all fittings by hand to avoid cross-threading. The pipe ends should align squarely with the unions or component ports before tightening. If a fitting does not start easily, stop and correct the alignment rather than pulling the pipe into position with the tube nut.
NOTE: When installing the pipe, maintain a clearance of 19 mm (3/4 in) from all moving or vibrating components.
This clearance is important around suspension links, steering components, exhaust shields, drivetrain parts, and any area where the body or chassis may flex. A brake pipe that touches a vibrating or moving component can wear through over time and cause hydraulic fluid loss.
35. If previously released, secure the brake pipe to the retainers.
Make sure every retainer is fully seated and holding the pipe firmly without crushing it. Retainers are not just for appearance; they prevent movement, vibration fatigue, and contact with nearby components. Replace any broken or loose retainer before the vehicle is returned to service.
36. Bleed the hydraulic brake system. Refer to Hydraulic Brake System Bleeding (Manual), Hydraulic Brake System Bleeding (Pressure).
Any time a brake pipe is opened or replaced, air can enter the hydraulic circuit. Bleeding removes trapped air and restores a firm, predictable pedal. Use only the specified brake fluid and keep the master cylinder reservoir from running low during the bleeding procedure.
37. With the aid of an assistant, inspect the brake pipe flares for leaks by starting the engine and applying the brakes.
Have the assistant apply steady brake pedal pressure while each repaired connection is inspected. Look for wetness, seepage, bubbles, or a slowly forming fluid ring around the flare nut. After the first check, release and reapply the brakes several times, then inspect again. On the Buick Enclave, the repaired brake pipe area must remain completely dry before the hydraulic brake system is considered safe.
FRONT BRAKE HOSE REPLACEMENT
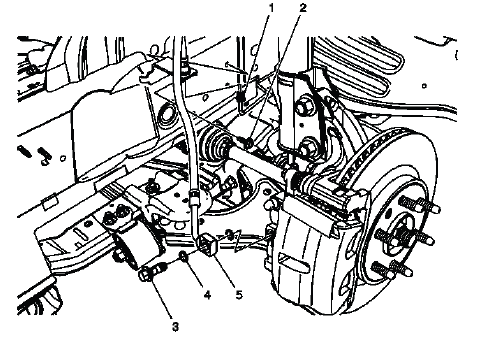
Fig. 28: Identifying Front Brake Hose
Front Brake Hose Replacement
The front brake hoses allow hydraulic pressure to reach the calipers while still permitting steering and suspension movement. A front hose should be replaced if it is cracked, swollen, leaking, twisted, chafed, internally restricted, or damaged at the fitting area. Because the front wheels turn and move through suspension travel, hose routing must be checked carefully after installation.
When servicing a front brake hose, avoid allowing the caliper to hang by the hose and do not twist the hose during connection. The hose should follow its designed path and must not rub against the tire, wheel, strut, control arm, or body structure. After replacement, the brake system must be bled and the steering should be turned from lock to lock while checking for hose clearance.
REAR BRAKE HOSE REPLACEMENT
Removal Procedure
WARNING: Refer to Brake Dust Warning.
WARNING: Refer to Brake Fluid Irritant Warning.
Rear brake hose replacement should be performed with the vehicle properly supported and with the work area clean. Brake dust should not be blown into the air, and brake fluid should be kept away from painted surfaces, wiring, rubber components not designed for brake fluid contact, and the technician's skin.
1. Raise and support the vehicle. Refer to Lifting and Jacking the Vehicle.
Support the vehicle on approved lifting points before working near the brake hose or wheel-end components. The suspension and brake hose area should be stable enough to inspect and service without unexpected movement.
2. Remove the tire and wheel assembly. Refer to Tire and Wheel Removal and Installation.
Removing the wheel provides access to the brake hose, bracket, caliper connection, and brake pipe fitting. Place the wheel aside safely so it does not obstruct the work area.
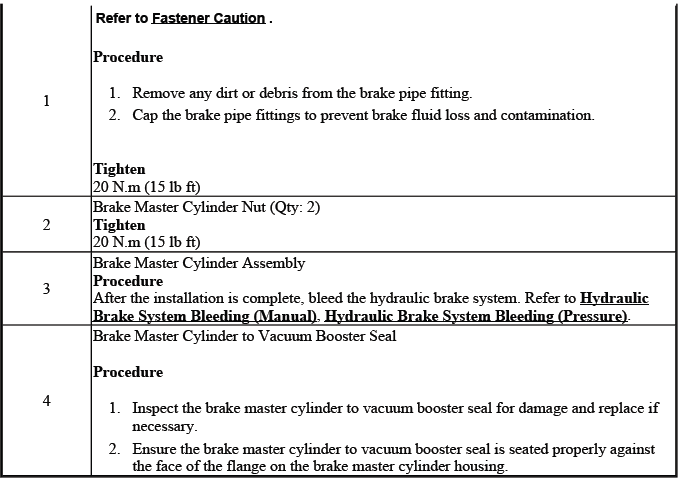
3. Remove any dirt or debris from the brake pipe fitting (1).
Clean the fitting area before loosening the connection. Dirt around the brake pipe fitting can enter the hydraulic system when the line is opened, and corrosion or debris can also prevent the wrench from seating fully on the fitting.
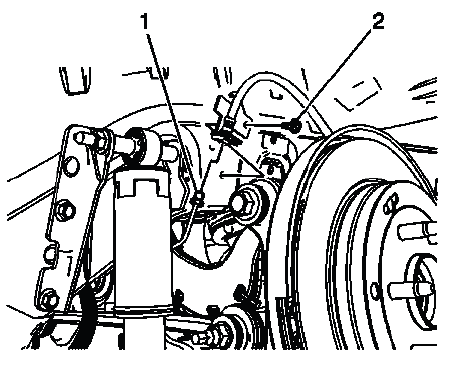
Fig. 29: View Of Brake Hose Bracket Bolt
4. Using a backup wrench on the brake hose fitting, disconnect the brake pipe fitting.
Use the backup wrench to prevent the hose fitting from twisting while the brake pipe fitting is loosened. Twisting the hose or pipe can damage the connection, distort the pipe, or create stress that may lead to a leak after installation.
Cap the brake pipe fitting to prevent brake fluid loss and contamination.
Capping the fitting also reduces moisture entry into the brake fluid. Keep the cap clean and avoid touching the open brake pipe end with dirty tools or gloves.
5. Remove the brake hose bracket bolt (2).
Once the bracket bolt is removed, support the hose so it does not pull on the caliper connection or nearby components.
6. Remove the brake hose fitting bolt (1).
Fig. 30: Identifying Brake Hose Fitting Bolt
7. Remove and discard the 2 brake hose fitting gaskets (2).
These sealing gaskets must not be reused. Old gaskets may be compressed, grooved, or contaminated, and they may not seal correctly if installed again.
8. Remove the brake hose (3).
Remove the hose from the vehicle and compare it with the replacement part before installation. Confirm the hose length, fitting type, bracket orientation, and routing features. For the Buick Enclave, the replacement hose must match the original layout so it clears the suspension and wheel area correctly.
Installation Procedure
1. Assemble the brake hose fitting bolt (1) and 2 new brake hose fitting gaskets (2) to the brake hose (3).
Place one new gasket on each side of the hose fitting as required. The sealing surfaces must be clean and flat. Do not apply sealant to the gaskets or fitting surfaces.
Fig. 31: Identifying Brake Hose Fitting Bolt
2. Install the brake hose assembly to the caliper and tighten the brake hose fitting bolt to 50 N.m (37 lb ft).
Align the hose fitting squarely against the caliper before tightening. If the fitting is cocked or the gaskets shift out of place, the joint may leak even when the bolt is tightened to specification.
CAUTION: Refer to Fastener Caution.
Use the specified torque value and do not overtighten the fitting bolt. Excessive torque can damage threads, distort the fitting, or crush the sealing gaskets incorrectly.
3. Install the brake hose bracket bolt (2) and tighten to 9 N.m (80 lb in).
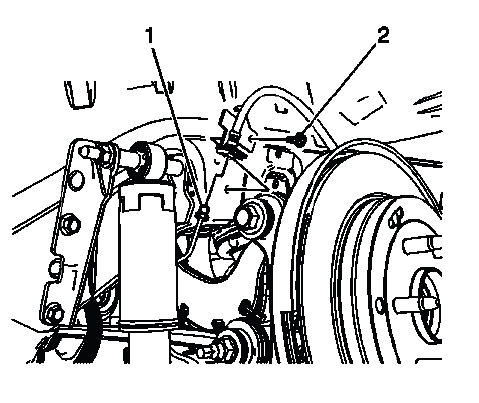
Fig. 32: View Of Brake Hose Bracket Bolt
The hose bracket must hold the hose in its intended position. Before tightening, confirm that the hose is not twisted and that it has enough clearance through normal suspension movement.
4. Using a backup wrench on the brake hose fitting, connect the brake pipe fitting (1) and tighten to 17 N.m (13 lb ft).
Start the brake pipe fitting by hand to avoid cross-threading. Hold the hose fitting steady with the backup wrench while tightening the pipe fitting. This prevents the hose from twisting and protects the brake pipe from bending at the flare.
5. Bleed the hydraulic brake system. Refer to Hydraulic Brake System Bleeding (Manual), Hydraulic Brake System Bleeding (Pressure).
Because the hose connection has been opened, air must be removed from the hydraulic circuit. Bleeding should continue until clean fluid flows without air bubbles and the brake pedal feels firm and consistent.
6. Install the tire and wheel assembly. Refer to Tire and Wheel Removal and Installation.
After the wheel is installed, check brake hose clearance again. Turn or move the suspension as required by the service procedure and confirm that the hose does not stretch, kink, rub, or contact the wheel or tire. Inspect the hose connections for leaks after the brake pedal is applied.
HYDRAULIC BRAKE SYSTEM BLEEDING (MANUAL)
WARNING: Refer to Brake Fluid Irritant Warning.
CAUTION: Refer to Brake Fluid Effects on Paint and Electrical Components Caution.
CAUTION: Only use products that comply with GM specifications and check manufacturer information respectively. We recommend the use of GM genuine products. Instructions must be followed at all times. The use of any type of fluid other than the recommended type of brake fluid, may cause contamination which could result in damage to the internal rubber seals and/or rubber linings of hydraulic brake system components.
Manual bleeding is used to remove air from the hydraulic brake system after a line, hose, caliper, wheel circuit, or other hydraulic component has been opened. Air in the brake system compresses under pedal pressure and can cause a soft, spongy, or low brake pedal. Clean fluid, correct sequence, and careful reservoir monitoring are essential for a proper result.
If hydraulic components were serviced on only one wheel hydraulic circuit, perform the following procedure.
Bleeding a Single Hydraulic Brake Circuit
1. With the ignition OFF and the brakes cool, apply the brakes 3-5 times or until the brake pedal effort increases significantly, in order to deplete the brake booster power reserve.
Removing the brake booster reserve gives a more consistent manual bleeding feel and prevents assisted pedal movement from masking air in the circuit. The pedal should become firmer after several applications.
2. Place a clean shop cloth beneath the brake master cylinder to catch brake fluid spills.
Protect painted and electrical surfaces before opening the reservoir. Brake fluid can damage finishes quickly, so spills should be absorbed immediately and cleaned according to the recommended procedure.
3. Clean the outside of the reservoir on and around the reservoir cap prior to removing the cap and diaphragm.
Cleaning the reservoir area helps prevent dirt from entering the hydraulic system. Once the cap and diaphragm are removed, use only clean, approved brake fluid and keep the reservoir from running low during the bleeding process. Before the Buick Enclave is returned to service, verify pedal feel, brake fluid level, and all serviced connections for leakage.
4. Fill the brake master cylinder reservoir to the maximum-full level with GM approved brake fluid from a clean, sealed brake fluid container. Add brake fluid as needed to ensure that the brake master cylinder reservoir remains at least half-full throughout the bleed procedure. The reservoir cap must be installed at all times except when filling the reservoir. Refer to Fluid and Lubricant Recommendations.
Maintaining the correct fluid level is critical during bleeding. If the reservoir level drops too low, air can be drawn into the master cylinder and the entire procedure may need to be repeated. Use only clean, approved brake fluid and avoid leaving the reservoir open longer than necessary, because brake fluid can absorb moisture and become contaminated quickly.
5. Install a proper box-end wrench onto the wheel hydraulic circuit bleeder valve which has been serviced.
A box-end wrench gives better contact around the bleeder valve and helps reduce the chance of rounding the fitting. Before loosening the valve, make sure the area around it is clean so dirt does not enter the hydraulic circuit.
6. Install a transparent hose over the end of the bleeder valve.
The hose should fit securely over the valve so air and fluid can be directed into the container without splashing. A transparent hose also allows the technician to see air bubbles leaving the wheel circuit.
7. Submerge the open end of the transparent hose into a transparent container partially filled with brake fluid from a clean, sealed brake fluid container.
Keeping the hose end submerged helps prevent air from being drawn back toward the bleeder valve during pedal release. The container should be stable, clean, and positioned where the hose will not pull free while the assistant operates the brake pedal.
8. Have an assistant slowly press the brake pedal fully and maintain steady pressure on the pedal.
The brake pedal should be pressed slowly and smoothly. Rapid pedal movement can aerate the fluid or create an uneven flow through the bleeder hose. The assistant must hold pressure until the bleeder valve is tightened again.
9. Loosen the bleeder valve to purge air from the wheel hydraulic circuit.
Open the valve only enough to allow fluid and trapped air to flow. Watch the transparent hose for bubbles, discoloration, or interrupted fluid movement. On the Buick Enclave, a clean and controlled bleeding process helps restore a firm pedal after hydraulic service.
10. Tighten the bleeder valve, then have the assistant slowly release the brake pedal.
The bleeder valve must be closed before the pedal is released. If the pedal is released while the valve is still open, air may be pulled back into the circuit and the bleeding process will become less effective.
11. Wait 15 seconds, then repeat steps 8-10 until all air is purged from the wheel hydraulic circuit.
The pause between pedal strokes allows the hydraulic system to stabilize and reduces fluid aeration. Continue the process until the fluid stream is clean and free of bubbles. Do not rush this step, because a small amount of trapped air can still cause a soft or inconsistent brake pedal.
12. After all air has been purged from the hydraulic circuit, tighten the bleeder valve and install the dust cap.
The dust cap helps protect the bleeder valve from road debris, corrosion, and moisture. If the cap is missing or damaged, replace it so the bleeder valve remains serviceable for future brake work.
13. Fill the brake master cylinder reservoir to the maximum-fill level with GM approved brake fluid from a clean, sealed brake fluid container.
After bleeding, confirm that the fluid level is correct and that the cap and diaphragm are properly installed. Wipe away any spilled brake fluid immediately to protect painted and electrical components.
14. Slowly press and release the brake pedal. Observe the brake pedal feel.
The pedal should feel firm, smooth, and consistent. A pedal that remains soft, travels too far, or changes height under steady pressure indicates that additional inspection or bleeding is required before the vehicle is driven.
15. If the brake pedal feels spongy, perform Bleeding the Complete Brake Hydraulic System procedure:
A spongy pedal after single-circuit bleeding usually means air remains somewhere in the hydraulic system. Do not assume the serviced wheel circuit is the only area affected, especially if the fluid level was low or the system was open for an extended period.
16. Turn the ignition key ON, with the engine OFF. Check to see if the brake system warning lamp remains illuminated.
The warning lamp check confirms whether the brake system is reporting an active concern. This step should be completed before road testing or returning the Buick Enclave to normal operation.
17. If the brake system warning lamp remains illuminated, refer to Diagnostic Starting Point - Vehicle.
NOTE: DO NOT allow the vehicle to be driven until it is diagnosed and repaired.
A brake warning indicator must be treated as a safety-related condition. The vehicle should remain parked until the cause is identified, corrected, and verified.
Bleeding the Complete Brake Hydraulic System
Complete system bleeding is required when air may have entered more than one hydraulic circuit, when major brake components have been replaced, or when single-circuit bleeding does not restore proper pedal feel. The procedure must be performed carefully, with the reservoir monitored throughout the entire process.
1. With the ignition OFF and the brakes cool, apply the brakes 3-5 times or until the brake pedal effort increases significantly, in order to deplete the brake booster power reserve.
Depleting the booster reserve helps create a more consistent pedal feel during the bleeding process. The pedal should become firmer after repeated applications, confirming that stored assist has been reduced.
2. Place a clean shop cloth beneath the brake master cylinder to catch brake fluid spills.
Brake fluid can damage painted surfaces and certain electrical components. A clean shop cloth helps contain spills and keeps the service area controlled while the reservoir cap is removed.
3. Clean the outside of the reservoir on and around the reservoir cap prior to removing the cap and diaphragm.
Cleaning the reservoir area prevents dirt, dust, and grit from falling into the brake fluid. Even small debris can damage seals or interfere with hydraulic brake operation.
4. Fill the brake master cylinder reservoir to the maximum-full level with GM approved brake fluid from a clean, sealed brake fluid container. Add brake fluid as needed to ensure that the brake master cylinder reservoir remains at least half-full throughout the bleed procedure. The reservoir cap must be installed at all times except when filling the reservoir. Refer to Fluid and Lubricant Recommendations.
During complete bleeding, check the reservoir level frequently. If the level falls below the safe range, air can enter the master cylinder and extend the procedure. Keeping the cap installed between fills reduces contamination and helps protect the brake fluid from moisture exposure.
5. If the master cylinder was replaced, the master cylinder must be bench bled. Refer to Master Cylinder Bench Bleeding.
Bench bleeding removes air from inside the master cylinder before the rest of the hydraulic system is bled. Skipping this step can leave trapped air in the master cylinder and make it difficult to obtain a firm pedal, even after repeated wheel circuit bleeding.
6. If the brake pipes have been removed from the master cylinder, the following steps must be performed.
When brake pipes are disconnected from the master cylinder, air can remain trapped at the ports. Purging these ports first helps prevent air from being pushed farther into the hydraulic circuits during the rest of the bleeding procedure.
- With the rear brake pipe installed securely to the master cylinder, loosen and separate the front brake pipe fitting from the front port of the brake master cylinder.
- Allow a small amount of brake fluid to gravity bleed from the open port of the master cylinder.
Capture and properly dispose of the brake fluid in an approved container.
- Install the front brake pipe fitting to the front port of the brake master cylinder and tighten the fitting. Refer to Fastener Tightening Specifications.
- Have an assistant slowly press the brake pedal fully and maintain steady pressure on the pedal.
- Loosen the front brake pipe fitting from the front port of the brake master cylinder to purge air from the master cylinder port.
- Tighten the front brake pipe fitting, then have the assistant slowly release the brake pedal.
- Wait 15 seconds, then repeat steps 6.4-6.6 until all air is purged from the front brake pipe fitting of the front port of the master cylinder.
- After all air is purged from the front port of the brake master cylinder, tighten the front master cylinder brake pipe fitting. Refer to Fastener Tightening Specifications.
- With the front brake pipe fitting installed securely to the front port of the brake master cylinder, loosen and separate the rear brake pipe fitting from the rear port of the brake master cylinder.
- Repeat steps 6.2-6.7 for the rear port of the brake master cylinder.
- After all air is purged from the rear port of the brake master cylinder, tighten the rear master cylinder brake pipe fitting. Refer to Fastener Tightening Specifications.
- Slowly press and release the brake pedal. Observe the brake pedal feel.
- If the brake pedal feels spongy, proceed to step 7.
- If the brake pedal feels firm, proceed to step 24.
During master cylinder port bleeding, all fittings should be handled carefully to avoid cross-threading or damaging the flare seats. The assistant should not release the pedal until the fitting being bled has been tightened. This prevents air from being drawn back into the port.
After both ports are purged, evaluate the pedal with slow, controlled pedal movement. A firm pedal suggests that the air was limited to the master cylinder port area. A spongy pedal means air is likely still present farther downstream in the system and additional bleeding is required.
7. If the brake pipes have been removed from the brake pressure modulator valve (BPMV) assembly, if equipped or the brake proportion valve assembly, if equipped, air must be purged from each port of the respective assembly beginning with the feed pipes from the master cylinder.
The BPMV and related hydraulic control assemblies can trap air inside their ports and internal passages. If the lines have been disconnected, bleeding only at the wheels may not remove all air. The feed pipes from the master cylinder should be handled first so air is not pushed through the rest of the hydraulic system.
- Loosen and separate one of the master cylinder brake pipe fittings from the inlet port of the assembly to be bled.
- Allow a small amount of brake fluid to gravity bleed from the open port of the assembly. Capture and properly dispose of the brake fluid in an approved container.
- Install the brake pipe fitting and to the inlet port of the assembly and tighten securely.
- Have an assistant slowly press the brake pedal fully and maintain steady pressure on the pedal.
- Loosen the same brake pipe fitting to purge air from the open port of the assembly.
- Tighten the brake pipe fitting, then have the assistant slowly release the brake pedal.
- Wait 15 seconds, then repeat steps 7.4-7.6 until all air is purged from the brake pipe fitting of the assembly.
- Repeat steps 7.1-7.7 for all of the remaining ports of the assembly.
- After bleeding each port of the assembly, tighten all of the brake pipe fittings on the assembly.
Each port should be bled in a controlled sequence so air is removed from the assembly rather than moved from one passage to another. Keep the reservoir level under close watch during this process. After all ports are tightened, inspect the fittings for seepage and confirm that the brake pedal on the Buick Enclave feels stable before continuing with the remaining hydraulic bleeding steps.
Refer to Fastener Tightening Specifications.
After the fittings have been tightened, the brake pedal check helps confirm whether the air was removed from the master cylinder and related hydraulic passages. A firm pedal usually indicates that the circuit is responding correctly, while a spongy pedal means air is still present and the wheel circuits must be bled in the proper sequence.
8. Install a proper box-end wrench onto the RIGHT REAR wheel hydraulic circuit bleeder valve.
Use a wrench that fits the bleeder valve correctly. A poor-fitting tool can round the bleeder and make future service difficult. On the Buick Enclave, the right rear circuit is handled first during this part of the complete hydraulic bleeding sequence.
9. Install a transparent hose over the end of the bleeder valve.
The hose should fit tightly over the bleeder nipple so fluid and air can travel directly into the container without splashing or drawing air back toward the valve.
10. Submerge the open end of the transparent hose into a transparent container partially filled with GM approved brake fluid from a clean, sealed brake fluid container.
Keeping the hose end below the fluid level allows bubbles to be seen clearly and helps prevent air from being pulled back into the circuit during pedal release. The container should be clean, stable, and positioned so the hose remains submerged throughout the procedure.
11. Have an assistant slowly press the brake pedal fully and maintain steady pressure on the brake pedal.
The assistant should press the pedal slowly and hold it down until instructed to release it. Fast pedal movement can aerate the fluid, disturb the bleeding process, or make it harder to judge when air has been removed.
12. Loosen the bleeder valve to purge air from the wheel hydraulic circuit.
Open the valve only enough to allow fluid and trapped air to escape. Watch the transparent hose for bubbles, cloudy fluid, or interruptions in flow. If the stream contains air, continue the bleeding sequence until the fluid appears clear and consistent.
13. Tighten the bleeder valve, then have the assistant slowly release the brake pedal.
The bleeder valve must be closed before the pedal is released. Releasing the pedal while the valve is open can pull air back into the wheel circuit and undo the progress already made.
14. Wait 15 seconds, then repeat steps 11-13 until all air is purged from the wheel hydraulic circuit.
The waiting period allows the hydraulic fluid to settle and helps reduce aeration. Repeat the cycle patiently. A small amount of remaining air can still cause a soft pedal, especially after brake lines, hoses, or hydraulic control components have been opened.
15. Tighten the RIGHT REAR hydraulic wheel circuit bleeder valve securely.
After the right rear circuit is free of air, tighten the bleeder valve securely and check for seepage around the bleeder seat. Do not overtighten the valve, because damage to the seat or threads can create a leak.
16. Install a proper box-end wrench onto the LEFT REAR wheel hydraulic circuit bleeder valve, then repeat steps 9-14.
Bleed the left rear circuit using the same controlled pedal movement and hose setup. Keep checking the master cylinder reservoir level during the process so it does not fall below the safe range.
17. Install a proper box-end wrench onto the RIGHT FRONT wheel hydraulic circuit bleeder valve, then repeat steps 9-14.
Continue with the right front circuit only after the rear circuits have been completed. The same rule applies: the pedal must be held down while the valve is open, and the valve must be tightened before the pedal is released.
18. Install a proper box-end wrench onto the LEFT FRONT wheel hydraulic circuit bleeder valve, then repeat steps 9-14.
The left front circuit completes the wheel bleeding sequence. Watch for a clean, bubble-free stream before finishing the procedure. If air continues to appear, recheck the fluid level, hose fit, bleeder threads, and any recently serviced connection.
19. After completing the final wheel hydraulic circuit bleeding procedure, tighten all of the wheel hydraulic circuit bleeder valves and install the bleeder valve dust caps.
The dust caps protect the bleeder valves from moisture, dirt, and corrosion. Replace missing or damaged caps so the bleeders remain serviceable. After all caps are installed, wipe the area clean and check for any sign of fresh brake fluid.
20. Fill the master cylinder reservoir to the maximum-full level with GM approved brake fluid from a clean, sealed brake fluid container.
The reservoir level should be corrected after bleeding because fluid has been discharged through each wheel circuit. Use only the approved fluid type and avoid mixing in any fluid from an unknown or previously opened container.
21. Slowly press and release the brake pedal. Observe the brake pedal feel.
The pedal should feel firm, smooth, and repeatable. A pedal that sinks, feels elastic, or changes height between applications indicates that further bleeding or inspection is needed before the vehicle is driven.
22. If the brake pedal feels spongy, perform the following procedure.
A spongy brake pedal after complete manual bleeding usually means air remains in the system, a hydraulic connection is leaking, or air is trapped inside a component that cannot be cleared by normal wheel bleeding alone.
- If equipped with antilock brakes, install a scan tool and perform the Anti-Lock Brake System Automated Bleed to remove air which may be trapped in the BPMV.
- Inspect the hydraulic brake system for external leaks. Refer to Brake System External Leak Inspection.
- Repeat the Bleeding the Complete Brake Hydraulic System procedure.
The BPMV can retain air in internal passages after the system has been opened. Automated bleeding uses the ABS hydraulic functions to move trapped air into areas where it can be removed through the normal bleed process. This step is especially important when the pedal remains soft even though the wheel circuits have been bled carefully.
23. If the brake pedal still feels spongy, pressure bleed the hydraulic brake system. Refer to Hydraulic Brake System Bleeding (Manual), Hydraulic Brake System Bleeding (Pressure)
If manual bleeding does not restore a firm pedal, pressure bleeding should be used to move fluid through the hydraulic system more consistently. Before repeating the procedure, verify that all bleeder valves, brake pipe fittings, hose connections, calipers, and master cylinder connections are dry and properly tightened.
24. Turn the ignition switch ON with the engine OFF. Check to see if the brake system warning lamp remains illuminated.
This warning lamp check is a final safety step. The lamp should not remain illuminated after the hydraulic brake system has been serviced and the fluid level has been corrected. If it stays on, do not assume the system is ready for road use.
25. If the brake system warning lamp remains illuminated, refer to Diagnostic Starting Point - Vehicle.
NOTE: DO NOT allow the vehicle to be driven until the brake system is diagnosed and repaired.
A brake warning indicator must be treated as a serious condition. Before the Buick Enclave is returned to service, the brake pedal should feel firm, the warning lamp should operate normally, the reservoir level should be correct, and all opened hydraulic connections should be verified leak-free.
HYDRAULIC BRAKE SYSTEM BLEEDING (PRESSURE)
WARNING: Refer to Brake Fluid Irritant Warning.
CAUTION: Refer to Brake Fluid Effects on Paint and Electrical Components Caution.
CAUTION: Only use products that comply with GM specifications and check manufacturer information respectively. We recommend the use of GM genuine products. Instructions must be followed at all times. The use of any type of fluid other than the recommended type of brake fluid, may cause contamination which could result in damage to the internal rubber seals and/or rubber linings of hydraulic brake system components.
Pressure bleeding uses controlled fluid pressure to push clean brake fluid through the hydraulic system. This method can be more consistent than manual bleeding, especially when air is difficult to remove or when a hydraulic circuit has been opened for an extended period. Clean equipment and the correct fluid are essential because any contamination can damage seals, hoses, and internal brake components.
If hydraulic components were serviced on only one wheel hydraulic circuit, perform the following procedure.
Bleeding a Single Hydraulic Brake Circuit
1. With the ignition OFF and the brakes cool, apply the brakes 3-5 times or until the brake pedal effort increases significantly, in order to deplete the brake booster power reserve.
Depleting the brake booster reserve provides a more consistent starting condition. The pedal effort should increase as stored assist is used up, allowing the pressure bleeding procedure to focus on hydraulic air removal rather than assisted pedal feel.
2. Place a clean shop cloth beneath the brake master cylinder to catch brake fluid spills.
Brake fluid can damage painted surfaces and may affect nearby electrical components. Protect the area before opening the reservoir or connecting pressure bleeding equipment.
3. Clean the outside of the reservoir on and around the reservoir cap prior to removing the cap and diaphragm.
Cleaning the reservoir area helps prevent dirt from entering the brake fluid. Any debris that enters the master cylinder reservoir can move through the system and create seal damage, valve problems, or poor hydraulic operation.
4. Fill the brake master cylinder reservoir to the maximum-full level with GM approved brake fluid from a clean, sealed brake fluid container. Refer to Fluid and Lubricant Recommendations.
Use only the specified brake fluid and keep the container sealed until use. Old, contaminated, or incorrect fluid can damage the internal rubber parts of the brake system and may create brake performance problems after service.
5. Following the brake pressure bleeder manufacturer's instructions, fill the brake pressure bleeder with GM approved brake fluid from a clean, sealed brake fluid container.
The pressure bleeder must be clean inside before it is filled. Do not use equipment that has been used with unknown fluid or stored with contamination inside the tank. For the Buick Enclave brake hydraulic system, clean pressure bleeding equipment is just as important as the correct bleeding sequence.
NOTE: The pressure bleeding equipment must be the diaphragm type. The rubber diaphragm between the air supply and the brake fluid prevents air, moisture, oil and other contaminants from entering the hydraulic system.
The diaphragm design separates the air pressure source from the brake fluid. This helps prevent moisture, compressor oil, and airborne contaminants from being forced into the hydraulic brake system during the bleeding procedure.
6. Install the appropriate master cylinder reservoir adapter and connect the brake pressure bleeder.
The adapter must seal securely to the master cylinder reservoir. A poor adapter seal can leak fluid, lose pressure, or introduce air into the system. Confirm that the adapter is correctly seated before charging the pressure bleeder.
7. Charge the brake pressure bleeder air tank to 170-200 kPa/1.7-2.0 bar (25-30 psi) or as recommended by the brake pressure bleeder manufacturer's instructions.
Use the recommended pressure range and follow the pressure bleeder manufacturer's limits. Excessive pressure can cause leaks at the adapter or force fluid past areas that are not intended to handle that load during service.
8. Open the brake pressure bleeder fluid tank valve to allow pressurized brake fluid to enter the brake hydraulic system.
Open the valve slowly and watch the adapter, reservoir, and hose connections for leaks. The system should become pressurized without sudden fluid loss or visible seepage.
9. Wait approximately 30 seconds, then inspect the entire hydraulic brake system for external brake fluid leaks.
This pause allows pressure to stabilize and gives small leaks time to appear. Inspect all recently serviced areas, including bleeder valves, hose connections, pipe fittings, master cylinder ports, and any component that was opened during repair.
NOTE: Any brake fluid leaks identified require repair prior to completing this procedure.
If a leak is found, stop the pressure bleeding process and repair the concern before continuing. Bleeding a system that is leaking will not produce a reliable pedal and may allow more air to enter the hydraulic circuit.
10. Install a proper box-end wrench onto the wheel hydraulic circuit bleeder valve which has been serviced.
A box-end wrench helps prevent bleeder valve damage during loosening and tightening. Make sure the wrench is seated fully before opening the valve.
11. Install a transparent hose over the end of the bleeder valve.
The hose should seal tightly on the bleeder nipple and route downward into the container without kinks. A clear hose makes it easier to confirm whether air remains in the serviced circuit.
12. Submerge the open end of the transparent hose into a transparent container partially filled with brake fluid from a clean, sealed brake fluid container.
Keep the hose end below the surface of the fluid in the container. During pressure bleeding, this setup helps show air bubbles clearly and keeps the discharge controlled. Continue monitoring fluid clarity, pressure bleeder level, and leak-free operation before completing service on the Buick Enclave.
13. Loosen the bleeder valve to purge air from the wheel hydraulic circuit.
Open the bleeder valve only enough to allow pressurized brake fluid and trapped air to move through the transparent hose. Do not open the valve excessively, because this can allow fluid to escape too quickly and may make it harder to control the bleed process.
14. Allow fluid to flow until air bubbles stop flowing from the bleeder.
Watch the transparent hose closely. At first, small bubbles, foamy fluid, or an uneven fluid stream may be visible. Continue bleeding until the fluid flows cleanly and consistently without visible air. A clear, steady stream indicates that the serviced wheel circuit is being purged correctly.
15. After all air has been purged from the hydraulic circuit, tighten the bleeder valve and install the dust cap.
The bleeder valve must be tightened securely, but not overtightened. After tightening, wipe the area clean and check for seepage. The dust cap should be installed to protect the bleeder from dirt, moisture, and corrosion during normal vehicle operation.
16. Close the brake pressure bleeder fluid tank valve then disconnect the brake pressure bleeder from the master cylinder reservoir bleeder adapter.
Close the pressure bleeder valve before disconnecting the equipment so pressure does not continue feeding fluid into the reservoir. Disconnect the pressure bleeder slowly and keep the hose ends controlled to prevent brake fluid from spilling onto painted surfaces, wiring, or nearby components.
NOTE: The brake reservoir may have residual pressure after the bleeding operation is complete. Wrap a clean shop towel around the bleeder adapter and all hose connections before disconnecting the pressure bleeding equipment to prevent brake fluid from contacting and damaging vehicle components and painted surfaces.
This precaution is especially important because residual pressure can release fluid suddenly when the adapter or hose connection is loosened. Brake fluid should be contained immediately and cleaned from any exposed surface without delay.
17. Remove the master cylinder reservoir bleeder adapter from the master cylinder reservoir.
Remove the adapter carefully and inspect the reservoir neck, cap sealing area, and surrounding surface. Make sure no dirt, tool marks, or spilled fluid remain around the reservoir opening before the final fluid level is adjusted.
18. Fill the brake master cylinder reservoir to the maximum-fill level with GM approved brake fluid from a clean, sealed brake fluid container.
Use only approved brake fluid from a sealed container. Fluid from an old or previously opened container may contain moisture or contamination that can damage internal rubber seals and reduce hydraulic brake performance. On the Buick Enclave, the reservoir level should be corrected before any final pedal feel or warning lamp check is performed.
19. Slowly press and release the brake pedal. Observe the brake pedal feel.
The pedal should feel firm, smooth, and repeatable. It should not sink slowly, feel elastic, or require excessive travel before resistance is felt. A consistent pedal response confirms that the hydraulic circuit is closer to normal operating condition.
20. If the brake pedal feels spongy, perform Bleeding the Complete Brake Hydraulic System procedure:
A spongy pedal after pressure bleeding usually means air remains in another part of the hydraulic system, the bleeding sequence was incomplete, or air is trapped in a component such as the master cylinder or brake pressure modulator valve. Do not road test the vehicle until the pedal feel is corrected.
21. Turn the ignition key ON, with the engine OFF. Check to see if the brake system warning lamp remains illuminated.
This check verifies whether the brake system is still reporting an active fault after bleeding and fluid level correction. The warning lamp should be evaluated before the vehicle is moved from the service area.
22. If the brake system warning lamp remains illuminated, refer to Diagnostic Starting Point - Vehicle.
NOTE: DO NOT allow the vehicle to be driven until it is diagnosed and repaired.
A remaining brake warning lamp must be treated as a safety-related condition. The vehicle should not be driven until the cause is found, repaired, and verified. For the Buick Enclave, final confirmation should include correct fluid level, firm pedal feel, no visible leaks, and normal warning lamp operation.
Bleeding the Complete Brake Hydraulic System
Complete hydraulic bleeding is required when air may be present in more than one circuit, when major hydraulic components have been replaced, or when single-circuit bleeding does not restore proper pedal feel. This procedure must be performed in a controlled order so air is removed from the master cylinder, hydraulic control components, and wheel circuits rather than being moved deeper into the system.
1. With the ignition OFF and the brakes cool, apply the brakes 3-5 times or until the brake pedal effort increases significantly, in order to deplete the brake booster power reserve.
Removing the brake booster reserve creates a more consistent starting condition for bleeding. As the stored assist is depleted, the pedal becomes firmer, allowing the technician to judge hydraulic pedal feel more accurately.
2. Place a clean shop cloth beneath the brake master cylinder to catch brake fluid spills.
Brake fluid can damage painted finishes and some electrical components. A clean shop cloth helps control small spills while the reservoir is opened, filled, or connected to service equipment.
3. Clean the outside of the reservoir on and around the reservoir cap prior to removing the cap and diaphragm.
Cleaning the reservoir area prevents dirt and debris from falling into the brake fluid. Even small particles can contaminate the hydraulic system and may damage seals or affect valve operation.
4. Fill the brake master cylinder reservoir to the maximum-full level with GM approved brake fluid from a clean, sealed brake fluid container. Refer to Fluid and Lubricant Recommendations.
The reservoir must be kept full enough throughout the entire procedure. If the level drops too low, air can enter the master cylinder and the bleeding process may need to be restarted. Keep the cap installed whenever possible to reduce moisture exposure and contamination.
5. If the master cylinder was replaced, the master cylinder must be bench bled. Refer to Master Cylinder Bench Bleeding.
Bench bleeding removes trapped air from the internal master cylinder chambers before the rest of the hydraulic system is bled. If this step is skipped after master cylinder replacement, a firm pedal may be difficult or impossible to obtain through wheel bleeding alone.
6. If the brake pipes have been removed from the master cylinder, the following steps must be performed.
When brake pipes are disconnected from the master cylinder, air can remain trapped at the front and rear ports. Purging these ports first helps prevent air from being pushed into the brake lines and wheel circuits during later bleeding steps.
- With the rear brake pipe installed securely to the master cylinder, loosen and separate the front brake pipe fitting from the front port of the brake master cylinder.
- Allow a small amount of brake fluid to gravity bleed from the open port of the master cylinder.
Capture and properly dispose of the brake fluid in an approved container.
- Install the front brake pipe fitting to the front port of the brake master cylinder and tighten the fitting.
- Have an assistant slowly press the brake pedal fully and maintain steady pressure on the pedal.
- Loosen the front brake pipe fitting from the front port of the brake master cylinder to purge air from the master cylinder port.
- Tighten the front brake pipe fitting, then have the assistant slowly release the brake pedal.
- Wait 15 seconds, then repeat steps 6.4-6.6 until all air is purged from the front brake pipe fitting of the front port of the master cylinder.
- After all air is purged from the front port of the brake master cylinder, tighten the front master cylinder brake pipe fitting. Refer to Fastener Tightening Specifications.
- With the front brake pipe fitting installed securely to the front port of the brake master cylinder, loosen and separate the rear brake pipe fitting from the rear port of the brake master cylinder.
- Repeat steps 6.2-6.7 for the rear port of the brake master cylinder.
- After all air is purged from the rear port of the brake master cylinder, tighten the rear master cylinder brake pipe fitting. Refer to Fastener Tightening Specifications.
- Slowly press and release the brake pedal. Observe the brake pedal feel.
- If the brake pedal feels spongy, proceed to step 7.
- If the brake pedal feels firm, proceed to step 24.
Each fitting should be tightened before the brake pedal is released. If the assistant releases the pedal while a fitting is still loose, air can be drawn back into the master cylinder port. Slow pedal movement, correct timing, and a clean work area are essential for an accurate bleed result.
If the pedal becomes firm after both master cylinder ports are bled, the trapped air was likely limited to the master cylinder connection area. If the pedal remains spongy, air is still present farther downstream and the procedure must continue.
7. If the brake pipes have been removed from the brake pressure modulator valve (BPMV) assembly, if equipped or the brake proportion valve assembly, if equipped, air must be purged from each port of the respective assembly beginning with the feed pipes from the master cylinder.
The BPMV and related hydraulic valve assemblies can trap air inside their ports and internal passages. Bleeding only at the wheel ends may not remove this air if the brake pipes have been disconnected from the assembly. On the Buick Enclave, the feed pipes from the master cylinder should be handled first so air is removed in the correct direction before the wheel circuits are bled.
- Loosen and separate one of the master cylinder brake pipe fittings from the inlet port of the assembly to be bled.
- Allow a small amount of brake fluid to gravity bleed from the open port of the assembly. Capture and properly dispose of the brake fluid in an approved container.
- Install the brake pipe fitting and to the inlet port of the assembly and tighten securely.
- Have an assistant slowly press the brake pedal fully and maintain steady pressure on the pedal.
- Loosen the same brake pipe fitting to purge air from the open port of the assembly.
- Tighten the brake pipe fitting, then have the assistant slowly release the pedal.
- Wait 15 seconds, then repeat steps 7.4-7.6 until all air is purged from the brake pipe fitting of the assembly.
- Repeat steps 7.1-7.7 for all of the remaining ports of the assembly.
- After bleeding each port of the assembly, tighten all of the brake pipe fittings on the assembly.
Refer to Fastener Tightening Specifications.
- Fill the master cylinder reservoir to the maximum-full level with GM approved brake fluid from a clean, sealed brake fluid container.
- Slowly press and release the brake pedal. Observe the brake pedal feel.
- If the brake pedal feels spongy, proceed to step 8.
- If the brake pedal feels firm, proceed to step 24.
Bleed each hydraulic control assembly port in a steady sequence, and avoid rushing the process. After every port has been tightened, inspect the fittings for seepage and correct the reservoir level before checking pedal feel. A firm pedal indicates that the hydraulic passages are responding correctly, while a soft pedal means additional bleeding is still required before the Buick Enclave can be safely returned to service.
8. Following the brake pressure bleeder manufacturer's instructions, fill the brake pressure bleeder with GM approved brake fluid from a clean, sealed brake fluid container.
The pressure bleeder must be filled only with clean, approved brake fluid. Do not use fluid from an old, unsealed, dirty, or unmarked container, because moisture or contamination can damage internal rubber seals and reduce hydraulic brake performance. For the Buick Enclave, clean fluid and clean equipment are essential before pressure bleeding begins.
NOTE: The pressure bleeding equipment must be the diaphragm type. The rubber diaphragm between the air supply and the brake fluid prevents air, moisture, oil and other contaminants from entering the hydraulic system.
A diaphragm-style pressure bleeder keeps the air supply separated from the brake fluid. This is important because compressed air can carry moisture, oil vapor, and other contaminants that should never enter the hydraulic brake system. If the pressure bleeder is not the correct type, do not use it for this procedure.
9. Install the appropriate master cylinder reservoir adapter and connect the brake pressure bleeder.
The adapter must fit the master cylinder reservoir securely and seal evenly. A poor seal can allow fluid leakage, pressure loss, or air entry during bleeding. Before pressurizing the system, confirm that the adapter is seated correctly and that the hose connection is stable.
10. Charge the brake pressure bleeder air tank to 170-200 kPa/1.7-2.0 bar (25-30 psi) or as recommended by the brake pressure bleeder manufacturer's instructions.
Use the specified pressure range unless the pressure bleeder manufacturer provides a different approved setting. Excessive pressure can cause leaks at the reservoir adapter or force fluid past weak connections, while insufficient pressure may not move fluid through the system effectively.
11. Open the brake pressure bleeder fluid tank valve to allow pressurized brake fluid to enter the brake hydraulic system.
Open the valve gradually and observe the reservoir adapter, pressure hose, and surrounding master cylinder area. The system should accept pressure smoothly without visible fluid seepage or sudden pressure drop.
12. Wait approximately 30 seconds, then inspect the entire hydraulic brake system for external brake fluid leaks.
This waiting period gives small leaks time to appear under pressure. Inspect the master cylinder, brake pipes, hose connections, calipers, bleeder valves, BPMV area, and any components that were recently serviced. Even a slight wet spot should be corrected before continuing.
NOTE: Any brake fluid leaks identified require repair prior to completing this procedure.
Pressure bleeding a leaking brake system will not restore a reliable pedal. A leak can allow air to enter the hydraulic circuit, reduce braking pressure, and create an unsafe condition. Repair any leak first, then restart the bleeding procedure with clean fluid and correct pressure.
13. Install a proper box-end wrench onto the RIGHT REAR wheel hydraulic circuit bleeder valve.
A correct box-end wrench helps protect the bleeder valve from rounding. Make sure the wrench sits fully on the bleeder before loosening it. On the Buick Enclave, beginning with the right rear circuit helps follow the intended complete-system bleeding sequence.
14. Install a transparent hose over the end of the bleeder valve.
The hose should fit tightly over the bleeder nipple and route cleanly into the container. A loose hose can allow air to appear around the connection and make it difficult to judge whether the air is actually coming from the hydraulic circuit.
15. Submerge the open end of the transparent hose into a transparent container partially filled with GM approved brake fluid from a clean, sealed brake fluid container.
The end of the hose must remain below the fluid level in the container. This allows air bubbles to be seen clearly while helping prevent air from being drawn back toward the bleeder valve if pressure changes during the procedure.
16. Have an assistant slowly press the brake pedal fully and maintain steady pressure on the brake pedal.
The assistant should press the pedal smoothly and hold it down until instructed to release it. Sudden pedal movement can aerate the fluid and make the bleeding process less accurate.
17. Loosen the bleeder valve to purge air from the wheel hydraulic circuit.
Open the valve only enough to allow fluid and trapped air to flow through the transparent hose. Watch for bubbles, cloudy fluid, or an uneven stream. If air is visible, continue bleeding until the fluid flow becomes clear and consistent.
18. Tighten the bleeder valve, then have the assistant slowly release the brake pedal.
The bleeder valve must be closed before the brake pedal is released. If the pedal is released while the valve is open, air may be drawn back into the wheel circuit and the bleeding process may need to be repeated.
19. Wait 15 seconds, then repeat steps 11-13 until all air is purged from the wheel hydraulic circuit.
Allowing a short pause between cycles helps the fluid settle and reduces aeration. Continue until no bubbles are visible in the hose and the fluid exits the bleeder in a steady stream. Do not rush this step, because a small amount of trapped air can still cause a spongy pedal.
20. Tighten the RIGHT REAR hydraulic wheel circuit bleeder valve securely.
After the right rear circuit is clear of air, tighten the bleeder valve securely and wipe the area clean. Check for seepage around the valve seat. The bleeder should be snug, but it should not be overtightened to the point of damaging the threads or sealing surface.
21. Install a proper box-end wrench onto the LEFT REAR wheel hydraulic circuit bleeder valve, then repeat steps 9-14.
Repeat the same pressure bleeding process at the left rear wheel. Keep monitoring the master cylinder reservoir and pressure bleeder equipment so clean brake fluid continues to feed the system without interruption.
22. Install a proper box-end wrench onto the RIGHT FRONT wheel hydraulic circuit bleeder valve, then repeat steps 9-14.
Move to the right front circuit only after the rear circuits have been completed. Use the same controlled sequence: hose installed, hose end submerged, pedal held steady, bleeder opened, bleeder tightened, then pedal released.
23. Install a proper box-end wrench onto the LEFT FRONT wheel hydraulic circuit bleeder valve, then repeat steps 9-14.
The left front circuit completes this wheel bleeding sequence. Continue bleeding until the discharged fluid is clean and free from air bubbles. If air continues to appear, inspect the bleeder connection, hose fit, fluid level, and recently opened hydraulic fittings.
24. After completing the final wheel hydraulic circuit bleeding procedure, tighten all of the wheel hydraulic circuit bleeder valves and install the bleeder valve dust caps.
Dust caps protect the bleeder valves from moisture, road debris, and corrosion. Replace any missing, cracked, or loose dust cap. After all caps are installed, wipe the bleeder areas dry and inspect them again for fresh fluid.
25. Close the brake pressure bleeder fluid tank valve.
Closing the valve stops pressurized brake fluid from continuing to enter the hydraulic system. Confirm that the valve is fully closed before disconnecting the pressure bleeding equipment.
26. Remove the brake pressure bleeding equipment from the vehicle.
Disconnect the equipment slowly and carefully. Keep shop cloths around the reservoir adapter and hose connections so residual pressure does not spray brake fluid onto the vehicle or surrounding components.
NOTE: The brake reservoir may have residual pressure after the bleeding operation is complete. Wrap a clean shop towel around the bleeder adapter and all hose connections before disconnecting the pressure bleeding equipment to prevent brake fluid from contacting and damaging vehicle components and painted surfaces.
Brake fluid can damage paint quickly, and residual pressure may release fluid unexpectedly. Contain any fluid immediately, clean the area after equipment removal, and inspect the reservoir neck and cap sealing surface before final filling.
27. Fill the brake master cylinder reservoir to the maximum-full level with GM approved brake fluid from a clean, sealed brake fluid container. Refer to Fluid and Lubricant Recommendations.
Set the final fluid level only after the pressure bleeder has been removed and the reservoir is no longer under pressure. Use clean approved fluid and reinstall the cap and diaphragm correctly. For the Buick Enclave, the reservoir level should be verified before pedal feel and warning lamp checks are performed.
28. Slowly press and release the brake pedal. Observe the brake pedal feel.
The brake pedal should feel firm, smooth, and repeatable. It should not sink slowly under pressure, feel elastic, or require excessive travel before resistance is felt. Any abnormal pedal feel means the hydraulic system still needs additional inspection or bleeding.
29. If the brake pedal feels spongy, perform the following procedure.
A spongy pedal after pressure bleeding may indicate trapped air in the BPMV, an external leak, an incomplete bleeding sequence, or air introduced during service. The vehicle should not be road tested until the cause is corrected and pedal feel is stable.
- If equipped with antilock brakes, install a scan tool and perform the Antilock Brake System Automated Bleed to remove air which may be trapped in the BPMV.
- Inspect the hydraulic brake system for external leaks. Refer to Brake System External Leak Inspection.
- Repeat the Bleeding the Complete Brake Hydraulic System procedure.
The automated bleed procedure is used when air may be trapped inside the ABS hydraulic control passages. Normal wheel bleeding may not move this air out of the BPMV. After automated bleeding, repeat the hydraulic bleeding process and recheck pedal feel.
30. If the brake pedal still feels spongy, pressure bleed the hydraulic brake system. Refer to Hydraulic Brake System Bleeding (Manual), Hydraulic Brake System Bleeding (Pressure).
If the pedal remains soft after the previous steps, do not assume the condition is normal. Recheck all opened fittings, bleeder valves, hose connections, master cylinder ports, calipers, and hydraulic control components. A firm pedal must be obtained before the brake system is considered ready for use.
31. Turn the ignition switch ON with the engine OFF. Check to see if the brake system warning lamp remains illuminated.
This warning lamp check confirms whether the brake system is still reporting a fault after service. The lamp should not remain illuminated once the system has been properly bled, filled, and inspected.
32. If the brake system warning lamp remains illuminated, refer to Diagnostic Starting Point - Vehicle.
NOTE: DO NOT allow the vehicle to be driven until the brake system is diagnosed and repaired.
If the brake warning lamp remains on, treat it as a safety issue. The Buick Enclave should not be returned to service until the warning condition is diagnosed, the repair is completed, and proper brake operation is verified.
HYDRAULIC BRAKE SYSTEM FLUSHING
WARNING: Refer to Brake Fluid Irritant Warning.
CAUTION: Refer to Brake Fluid Effects on Paint and Electrical Components Caution.
Hydraulic brake system flushing is performed when the brake fluid is contaminated, degraded, or suspected of containing moisture, dirt, oil, silicone-based fluid, corrosion particles, or other foreign material. Contaminated brake fluid can damage seals, affect brake pedal feel, reduce braking reliability, and shorten the life of hydraulic components.
1. Inspect the brake fluid for the following conditions, indicating brake fluid contamination:
- Fluid separation, indicating 2 types of fluid are present; a substance other than the recommended brake fluid has been introduced into the brake hydraulic system
- Swirled appearance - oil-based substance
- Layered appearance - silicone-based substance
- Fluid discoloration, indicating the presence of moisture or particles that have been introduced into the brake hydraulic system
- Cloudy appearance - moisture
- Dark appearance/suspended particles in fluid - dirt, rust, corrosion, brake dust
Fluid appearance can provide important clues. A swirl pattern may indicate oil contamination, while distinct layers may suggest silicone-based contamination. Cloudy fluid often points to moisture, and dark fluid with suspended particles may indicate corrosion, rust, dirt, or brake dust inside the hydraulic system.
2. Inspect the master cylinder reservoir cap diaphragm and the reservoir-to-master cylinder grommets for swelling, indicating brake fluid contamination.
Rubber components can swell when exposed to the wrong type of fluid or petroleum-based contamination. A swollen diaphragm or swollen reservoir grommets are serious indicators because the same contamination may have affected other rubber seals throughout the brake system.
3. If the brake fluid WAS contaminated with an oil-based or a silicone-based substance, indicated by fluid separation and/or a swollen master cylinder reservoir cap diaphragm and/or swollen reservoir-to-master cylinder grommets, perform the following:
Oil-based or silicone-based contamination must be handled as a major brake system concern. Flushing alone may not be enough because rubber seals and linings can absorb the contaminant and continue to fail later. On the Buick Enclave, contaminated hydraulic components should be evaluated carefully before any part of the brake system is reused.
- Remove ALL of the following components listed from the vehicle. Each component contains internal rubber seals/linings which have been contaminated by the contaminated brake fluid in the brake hydraulic system.
Any component containing rubber seals, hoses, or internal linings must be treated as suspect after this type of contamination. Reusing contaminated parts can cause repeat brake problems, seal swelling, internal leakage, poor pedal feel, or future hydraulic failure even after new fluid is installed.
Refer to the procedures indicated:
- Master Cylinder Reservoir Replacement
- Master Cylinder Replacement
- Front Brake Hose Replacement
- Rear Brake Hose Replacement
- Front Brake Caliper Replacement
- Rear Brake Caliper Replacement
- Brake Pressure Modulator Valve Replacement
Refer to the procedures indicated:
- Master Cylinder Replacement; also perform the following:
Clean the brake master cylinder reservoir using denatured alcohol or equivalent, then dry the reservoir using non-lubricated, filtered air. Inspect the reservoir for cracks and/or damage and replace if necessary. Refer to Master Cylinder Reservoir Replacement.
Replace the brake master cylinder reservoir cap diaphragm.
- Front Brake Hose Replacement
- Rear Brake Hose Replacement
- Front Brake Caliper Replacement
- Rear Brake Caliper Replacement
- Brake Pressure Modulator Valve Replacement
When brake fluid contamination has reached rubber-lined or seal-containing components, normal flushing is not enough. Brake hoses, calipers, the master cylinder, and hydraulic control components can absorb oil-based or silicone-based contamination into internal rubber parts. If those parts are reused, the contamination may continue damaging the brake system even after clean fluid is added.
All hydraulic brake pipes should be cleaned thoroughly before replacement components are installed. Denatured alcohol or an equivalent approved cleaner helps remove contaminated residue from the metal brake pipes. After cleaning, non-lubricated filtered air must be used so no oil, water, compressor residue, or airborne debris is forced into the hydraulic passages.
For the Buick Enclave, this step is especially important because the repaired brake system must be free from both the original contamination and any cleaning residue. The brake pipes should be dry, clean, and inspected before they are connected to new or serviced components. Do not use shop air that contains oil mist or moisture, because it can recontaminate the system and create repeat brake problems.
If the master cylinder reservoir is reused after cleaning, inspect it carefully under good lighting. Look for cracks, cloudy plastic, damaged sealing surfaces, swollen grommet areas, or any sign that the reservoir material was affected by contaminated brake fluid. If there is any doubt about the condition of the reservoir, replacement is the safer repair choice.
4. If the brake fluid was NOT contaminated with an oil-based or a silicone-based substance, but WAS contaminated with water or dirt, rust, corrosion and/or brake dust, replace the brake master cylinder reservoir cap diaphragm. The diaphragm may have allowed the moisture or particles to enter the hydraulic system.
Water, dirt, rust, corrosion particles, and brake dust can still affect brake performance, even when oil or silicone contamination is not present. Moisture can lower the boiling point of the brake fluid and may contribute to corrosion inside metal brake components. Dirt or rust particles can damage seals, restrict small passages, and create poor pedal feel. Replacing the reservoir cap diaphragm helps correct a possible entry point for contamination.
5. Fill the brake master cylinder reservoir to the maximum-fill level with approved brake fluid from a clean, sealed brake fluid container as specified in the owner's manual.
Use only the specified brake fluid and keep the container sealed until the moment it is needed. Fluid from an opened or unknown container may contain moisture or dirt. The reservoir should be filled carefully so no brake fluid spills onto painted surfaces, electrical connectors, wiring, or rubber parts not designed for brake fluid exposure.
6. Pressure bleed the hydraulic brake system. Begin the procedure with the pressure bleeder reservoir filled to the maximum-fill level with the correct brake fluid as indicated. Refer to Hydraulic Brake System Bleeding (Manual), Hydraulic Brake System Bleeding (Pressure).
Pressure bleeding helps move clean brake fluid through the repaired hydraulic system in a controlled way. During this process, continue watching the fluid level, fluid clarity, and all repaired connections. Before the Buick Enclave is returned to service, the brake pedal should feel firm, the reservoir level should remain stable, and every hydraulic connection must be inspected for leaks.
POWER VACUUM BRAKE BOOSTER REPLACEMENT
Removal Procedure
The power vacuum brake booster reduces the pedal effort required to apply the brakes. If the booster, check valve, vacuum sensor, or related sealing areas fail, the driver may notice a hard brake pedal, reduced assist, longer stopping effort, or inconsistent brake feel. Booster replacement requires careful handling of the master cylinder, BPMV, brake pipes, interior pedal linkage, and steering shaft components.
1. Place the vehicle on a level surface and apply the park brake.
Beginning on a level surface keeps the vehicle stable during service. The park brake should be applied before work starts so the vehicle does not move while components around the brake pedal, booster, and master cylinder are being disconnected.
2. With the engine OFF, apply and release the brake pedal several times until the brake pedal becomes firm to deplete the vacuum reserve in the vacuum brake booster.
This step removes stored vacuum assist from the booster. The pedal should become noticeably firmer after several applications. Depleting the vacuum reserve reduces the chance of unexpected booster movement and gives a safer starting condition for removal.
3. Remove the air cleaner housing cover and duct. Refer to Air Cleaner Element Replacement.
Removing the air cleaner housing cover and duct improves access to the brake booster area. Keep the duct and fasteners organized, and make sure no dirt enters the air intake path while the parts are removed.
4. Disconnect the brake fluid level indicator switch electrical connector.
Release the connector lock before pulling the connector away. Do not pull on the wiring. Inspect the connector for brake fluid residue, corrosion, loose terminals, or damaged locking tabs before reassembly.
5. Remove the power brake booster vacuum check valve and hose assembly (1) from the brake booster and position aside.
Remove the check valve and hose assembly carefully so the hose is not cracked, stretched, or kinked. The check valve helps retain vacuum inside the booster, so its condition should be inspected during service. If the hose is hardened, oil-soaked, split, or loose at the connection, it should be replaced.

Fig. 33: Power Brake Booster Vacuum Check Valve And Hose Assembly
6. Disconnect the power brake booster vacuum sensor electrical connector.
Handle the sensor connector gently. A damaged connector or loose terminal can cause incorrect vacuum sensor readings and may lead to brake assist warnings or diagnostic trouble codes after the repair.
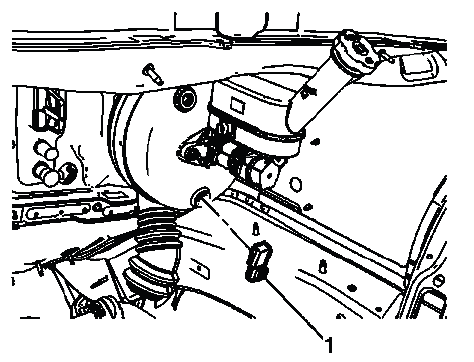
Fig. 34: Power Brake Booster Vacuum Sensor
7. Remove the power brake booster vacuum sensor (1).
Remove the sensor without prying against the booster shell or damaging the sealing area. If the sensor seal is hardened, torn, or contaminated, inspect it carefully before reuse or replacement. A poor seal can create a vacuum leak and reduce brake assist.
8. Release the front and rear brake pipes (1) from the routing clip on the frame rail.
Releasing the brake pipes from the routing clip provides movement clearance during booster removal. Do not bend the pipes sharply or pull them away from their natural routing. The goal is to create enough flexibility without stressing the brake pipe flares, fittings, or underbody mounting points.
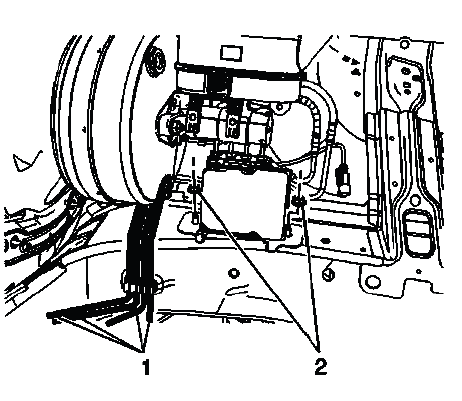
Fig. 35: View Of Front & Rear Brake Pipes
9. Remove the 2 nuts (2) from the brake pressure modulator valve (BPMV) assembly.
Keep the BPMV supported as the nuts are removed. The BPMV contains hydraulic passages and connected brake pipes, so it should not be allowed to hang or shift suddenly under its own weight.
10. Carefully lift the BPMV assembly over the studs and position forward slightly.
NOTE: It is not necessary to disconnect the brake pipes from the BPMV assembly.
Move the BPMV only as far as needed for booster access. Leaving the brake pipes connected helps avoid unnecessary hydraulic system opening and reduces the amount of bleeding required later. Avoid twisting or loading the attached pipes while positioning the assembly forward.
11. Remove the master cylinder nuts (1).
Loosen the master cylinder nuts evenly and keep the master cylinder supported. The master cylinder should be moved with care because the connected brake pipes can be damaged if the assembly is forced out of position.

Fig. 36: Power Brake Booster Check Valve And Hose Assembly
12. Without disconnecting the brake pipes from the master cylinder, remove the master cylinder assembly and position aside.
NOTE: It is not necessary to disconnect the brake pipes from the master cylinder.
Positioning the master cylinder aside without disconnecting the brake pipes helps keep air out of the hydraulic system. Move it slowly and avoid bending the pipes. If the pipes begin to bind or twist, stop and adjust the support position before continuing.
13. Place the brake master cylinder in an upright position and support with heavy mechanics wire or equivalent.
The master cylinder should remain upright so brake fluid does not spill from the reservoir and air is not introduced unnecessarily. Support it securely with heavy mechanics wire or an equivalent method, but do not let the wire damage the reservoir, sensor wiring, brake pipes, or painted surfaces.
14. Remove the left side instrument panel insulator panel. Refer to Instrument Panel Insulator Panel Replacement - Left Side.
Removing the left side insulator panel provides interior access to the brake pedal linkage and booster mounting area. Remove the panel carefully to avoid breaking clips or leaving loose insulation near the pedal assembly.
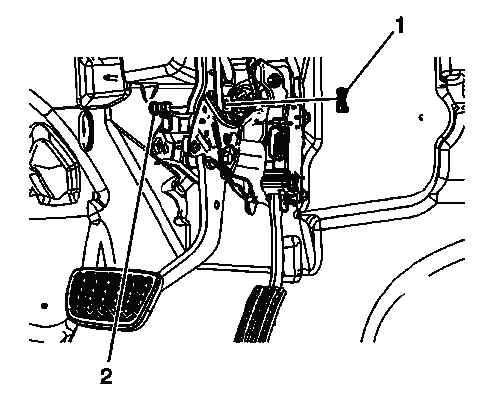
Fig. 37: Identifying Brake Pedal Pushrod Retaining Clip
15. Remove the driver knee bolster. Refer to Driver Knee Bolster Replacement (Acadia) , Driver Knee Bolster Replacement (Enclave) , Driver Knee Bolster Replacement (Traverse).
Removing the driver knee bolster improves access to the brake pedal pushrod and booster fasteners. Take care around trim edges, wiring harnesses, and retaining tabs. Any loose interior panel should be reinstalled securely after the booster replacement is completed.
16. Remove the brake pedal pushrod retaining clip (1).
The retaining clip secures the booster pushrod connection at the brake pedal. Remove it carefully so it does not bend, snap, or fall into the footwell. If the clip is worn, loose, or distorted, replacement is recommended.
17. Remove the brake pedal pushrod clevis pin (2) and disconnect the pushrod from the brake pedal.
Once the clevis pin is removed, the booster pushrod can separate from the pedal arm. Inspect the clevis pin and pedal bushing area for wear, scoring, looseness, or deformation. Excessive play at this connection can affect pedal feel after the new booster is installed.
18. Remove the intermediate steering shaft. Refer to Intermediate Steering Shaft Replacement.
Removing the intermediate steering shaft creates the clearance needed to remove the booster from the dash panel area. Follow the steering shaft procedure carefully and avoid rotating steering components out of alignment. Incorrect steering shaft handling can lead to alignment or steering wheel position concerns.
19. Remove the 4 vacuum brake booster nuts.
Support the booster while removing the nuts. These nuts secure the booster to the dash panel and pedal support area, so the booster may shift once they are removed. On the Buick Enclave, make sure the surrounding brake pipes, wiring, and master cylinder support remain stable while the booster is being released.
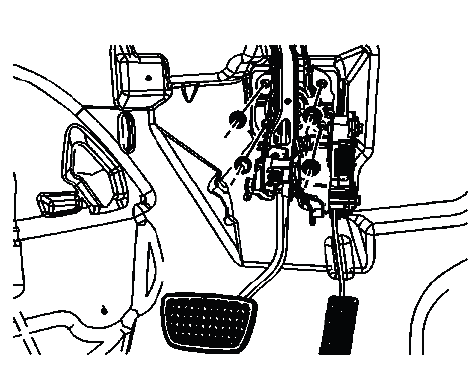
Fig. 38: View Of Vacuum Brake Booster Nuts
20. Pull the vacuum brake booster forward and tilt upward slightly until the mounting studs clear the dash panel.
Move the booster slowly and keep the surrounding brake pipes, wiring, and master cylinder area under control while clearance is created. The booster should be tilted only as much as necessary to clear the dash panel studs. Forcing the unit out of position can damage the mounting studs, sealing surfaces, or nearby hydraulic brake components.
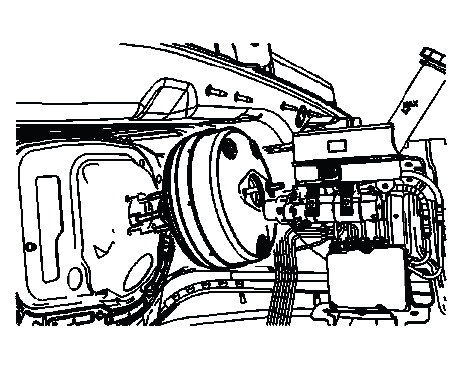
Fig. 39: Identifying Vacuum Brake Booster
21. Remove the vacuum brake booster.
After the booster is removed, inspect the surrounding dash panel area for signs of damaged insulation, bent brackets, worn linkage points, fluid residue, or corrosion. The replacement booster should not be installed until the mounting area is clean, stable, and ready to support the new assembly correctly.
Installation Procedure
1. Align the vacuum brake booster mounting studs to the dash panel.
Position the booster so the studs enter the dash panel openings evenly. The booster should sit squarely against the mounting surface without being forced. If the studs do not align naturally, check for interference at the pedal linkage, dash panel gasket, steering shaft area, or brake pipe routing before continuing.
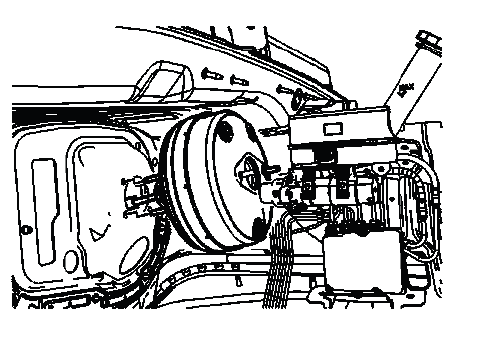
Fig. 40: Identifying Vacuum Brake Booster
NOTE: Inspect the vacuum brake booster to dash panel gasket for damage and replace, if necessary.
The gasket must seal properly between the booster and the dash panel. A damaged, folded, hardened, or missing gasket can allow noise, moisture, air leakage, or poor mounting fit. Replace the gasket if there is any sign that it will not seal evenly.
2. Install the vacuum brake booster.
Guide the booster into place carefully and confirm that it is seated fully. Do not use the retaining nuts to pull a misaligned booster into position. The booster body, studs, gasket, and pedal pushrod must all align correctly before tightening begins.
3. Install the 4 vacuum brake booster nuts and tighten to 25 (18 lb ft).
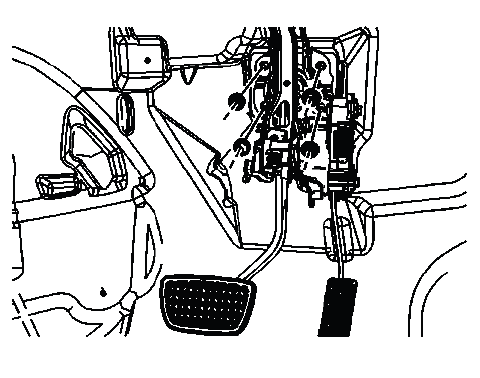
Fig. 41: View Of Vacuum Brake Booster Nuts
CAUTION: Refer to Fastener Caution.
Start all four nuts by hand before tightening. Tighten them evenly so the booster seats flat against the dash panel. Uneven tightening can distort the mounting area or create poor alignment between the booster pushrod and brake pedal.
4. Install the intermediate steering shaft. Refer to Intermediate Steering Shaft Replacement.
Install the steering shaft exactly according to the referenced procedure. Make sure the shaft is seated correctly and that no wiring, trim, or brake pedal components interfere with steering shaft movement. After installation, steering operation should be smooth and free of binding.
5. Connect the brake pedal pushrod to the brake pedal and install the clevis pin (2).
The pushrod should line up naturally with the brake pedal connection. Do not force the pushrod sideways to install the pin. Misalignment at this joint can cause uneven pedal movement, poor return, abnormal pedal feel, or premature bushing wear.
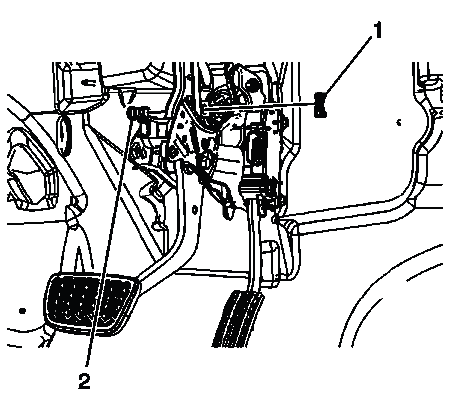
Fig. 42: Identifying Brake Pedal Pushrod Retaining Clip
6. Install the brake pedal pushrod retaining clip (1).
Confirm that the retaining clip is fully seated and locked in place. A loose or incorrectly installed clip can allow the pedal-to-pushrod connection to become unsafe. After the clip is installed, move the pedal by hand to verify that the connection remains secure.
7. Install the driver knee bolster. Refer to Driver Knee Bolster Replacement (Acadia) , Driver Knee Bolster Replacement (Enclave) , Driver Knee Bolster Replacement (Traverse).
Reinstall the knee bolster carefully so it does not interfere with the brake pedal, wiring, or pedal position components. All retainers should be fully seated, and the panel should not rattle or press against the pedal linkage.
8. Install the left side instrument panel insulator panel. Refer to Instrument Panel Insulator Panel Replacement - Left Side.
Make sure the insulator panel is positioned correctly and does not hang into the driver footwell. Loose insulation or trim near the pedal area can interfere with brake pedal travel and should be corrected before the vehicle is operated.
9. Inspect the master cylinder to vacuum brake booster seal for damage and replace, if necessary.
This seal helps maintain the proper interface between the master cylinder and the booster. Inspect it for cuts, flattening, hardening, swelling, or misplacement. A damaged seal can cause fitment problems, noise, moisture entry, or reduced service quality after installation.
10. Position the master cylinder to the vacuum booster.
Move the master cylinder into position without bending the brake pipes. The master cylinder should slide onto the booster studs evenly and sit flat against the seal. If resistance is felt, stop and check alignment rather than pulling the master cylinder into place with the nuts.
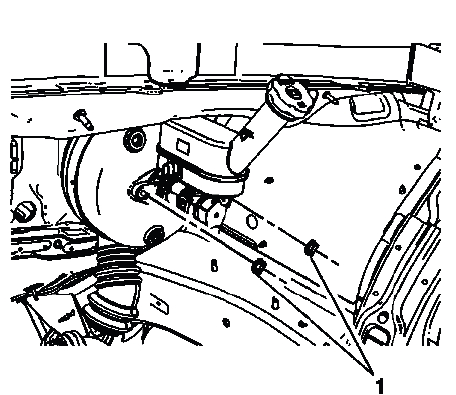
Fig. 43: Power Brake Booster Check Valve And Hose Assembly
NOTE: Ensure the master cylinder to vacuum brake booster seal is properly installed on the back of the master cylinder housing and is not damaged.
A correctly positioned seal helps the master cylinder seat squarely against the booster. Before tightening, visually confirm that the seal did not roll, pinch, or fall out of place during installation.
11. Install the master cylinder nuts (1) and tighten to 20 (15 lb ft).
Tighten the nuts evenly and avoid overloading the master cylinder housing. After tightening, inspect the brake pipes to confirm that they are not twisted, stretched, or forced away from their normal routing.
12. Position the BPMV assembly over the studs.
The BPMV assembly should be placed back over the mounting studs without pulling on the attached brake pipes. Keep the assembly supported and aligned so the hydraulic lines remain in their natural position.
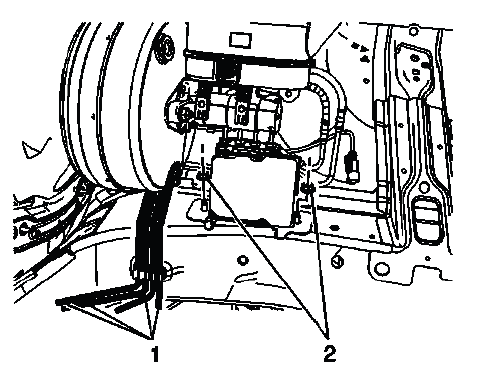
Fig. 44: View Of Front & Rear Brake Pipes
13. Install the 2 nuts (2) to the BPMV and bracket assembly and tighten to 20 (15 lb ft).
Start the nuts by hand and tighten them evenly. The BPMV bracket should sit securely without twisting the assembly or placing tension on the connected brake pipes.
14. Install the front and rear brake pipes (1) to the routing clip on the frame rail.
Make sure the brake pipes are fully seated in the routing clip. Proper retention prevents vibration, rubbing, and fatigue damage. The pipes should not contact sharp edges, moving parts, or components that vibrate during engine or chassis movement.
15. Install the power brake booster vacuum sensor (1).
Install the vacuum sensor carefully so the sealing area is not damaged. The sensor must seat correctly in the booster to provide accurate vacuum information and prevent a vacuum leak.
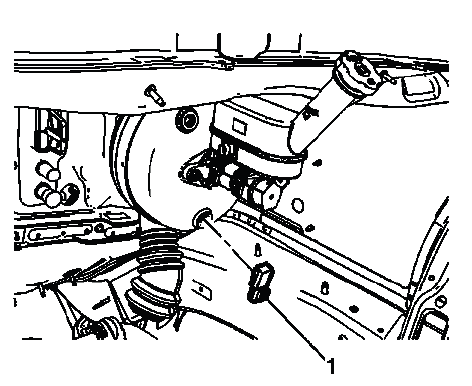
Fig. 45: Power Brake Booster Vacuum Sensor
NOTE: A small amount of denatured alcohol may be used as a lubricant for assembly. Do not use soap.
Denatured alcohol can help the sensor seat without leaving a slippery residue. Soap should not be used because it may leave deposits, affect rubber parts, or interfere with proper sealing.
16. Connect the power brake booster vacuum sensor electrical connector.
Push the connector into place until the lock engages. Inspect the wiring route to make sure it is not stretched, pinched, or positioned near moving parts. A poor connector fit can cause vacuum sensor faults after the repair.
17. Install the power brake booster vacuum check valve and hose assembly (1) to the brake booster.
The check valve and hose assembly must seat firmly in the booster. The hose should not be twisted, kinked, collapsed, or routed against hot or moving components. The check valve helps retain vacuum assist, so a secure seal is required for consistent brake pedal effort.
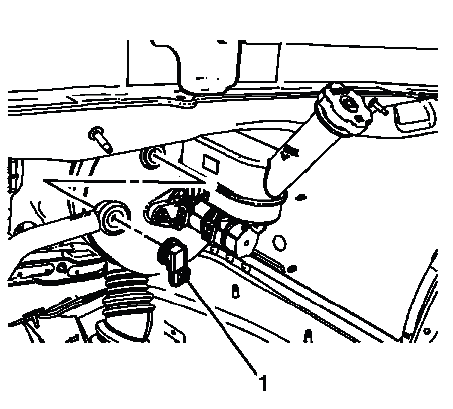
Fig. 46: Power Brake Booster Vacuum Check Valve And Hose Assembly
NOTE: A small amount of denatured alcohol may be used as a lubricant for assembly. Do not use soap.
If lubrication is needed, use only a small amount and allow it to evaporate. The connection should remain tight after installation and should not slide out of the booster grommet or vacuum port.
18. Connect the brake fluid level indicator switch electrical connector.
Make sure the connector is clean, dry, and fully locked. Brake fluid residue or loose terminals at this connector can cause incorrect fluid level warnings or intermittent electrical concerns.
19. Install the air cleaner housing cover and duct. Refer to Air Cleaner Element Replacement.
Reinstall the intake duct and housing cover securely. Check that all clamps, seals, and ducts are seated correctly so unfiltered air cannot enter the engine. Before final inspection, confirm that no tools or loose parts remain in the engine compartment.
After the booster installation is complete, check brake pedal movement, pedal return, vacuum hose routing, sensor connection, and warning lamp operation. The Buick Enclave should not be road tested until the brake pedal feels normal, all related components are secure, and the booster assist function has been verified.
POWER BRAKE BOOSTER VACUUM CHECK VALVE AND HOSE REPLACEMENT
Removal Procedure
The power brake booster vacuum check valve and hose assembly supplies and retains vacuum for brake assist operation. If this assembly leaks, collapses, cracks, or fails to hold vacuum, the driver may experience a hard brake pedal, reduced assist, or inconsistent pedal effort.
1. Turn the ignition switch to the OFF position.
Always begin with the ignition OFF before working around the brake booster vacuum system. This provides a safer service condition and prevents unexpected engine or system operation.
2. Apply and release the brake pedal several times until the brake pedal becomes firm to deplete the brake booster vacuum reserve.
Repeated pedal applications remove stored vacuum from the booster. The pedal should become firm as the reserve is depleted. This step reduces the chance of unexpected assist movement while the vacuum hose and check valve are being removed.
3. Remove the power brake booster vacuum check valve (1) from the power vacuum brake booster.
Pull the check valve out carefully without prying against the booster shell or damaging the booster grommet. Inspect the grommet and the check valve sealing surface for cracks, hardening, or deformation. A damaged seal can create a vacuum leak even if the hose assembly is new.
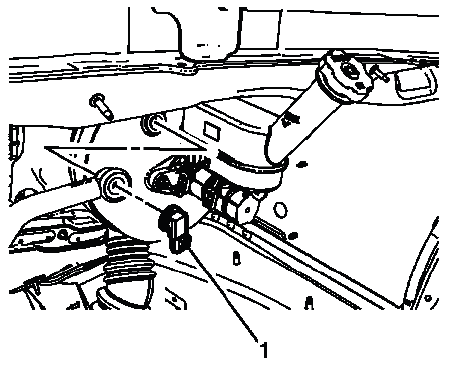
Fig. 47: Power Brake Booster Vacuum Check Valve And Hose Assembly
4. Remove the fuel injector sight shield. Refer to Fuel Injector Sight Shield Replacement.
Removing the sight shield improves access to the vacuum hose routing and intake manifold connection. Set the shield aside carefully so the mounting points and trim surfaces are not damaged.
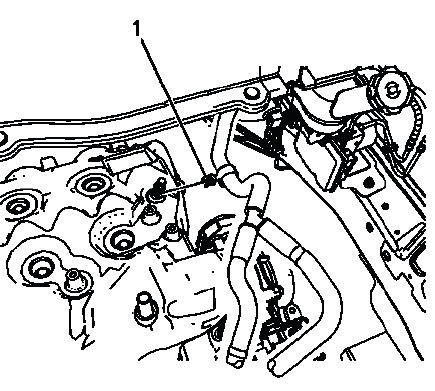
Fig. 48: Identifying Vacuum Hose Routing Clip
5. Release the vacuum hose routing clip (1) from the intake manifold ball stud.
Release the clip without bending it or pulling sharply on the hose. The routing clip keeps the hose away from hot, sharp, or moving components, so it should remain usable and properly positioned during installation.
6. Disconnect the power vacuum brake booster hose (1) from the intake manifold vacuum port.
Disconnect the hose by working at the fitting rather than pulling on the hose body. Inspect the vacuum port area for dirt, oil residue, cracked plastic, or damaged sealing surfaces. Any restriction or leak at this point can reduce brake assist.
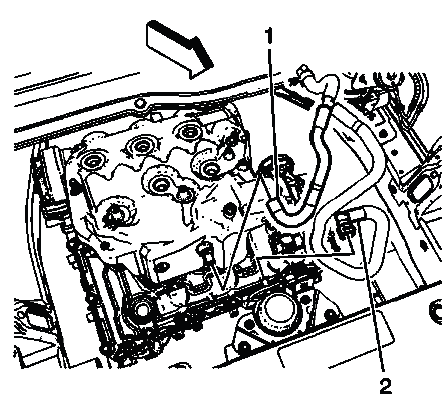
Fig. 49: Identifying Vacuum Brake Booster Hose Quick-Connect Fitting
7. Release the quick connect (2) from the power brake booster auxiliary pump.
Operate the quick-connect fitting carefully so the locking tabs are not broken. If the fitting is stuck, check for dirt or tension in the hose routing before applying more force. A damaged quick-connect can create a vacuum leak or fail to lock during reassembly.
8. Disconnect the power brake booster check valve and hose assembly (1) from the brake booster.
Remove the assembly from the vehicle and compare it with the replacement part before installation. Confirm hose length, fitting design, check valve orientation, and routing clip position. On the Buick Enclave, the vacuum hose must follow the original path so it does not kink, rub, or contact hot engine components during normal operation.
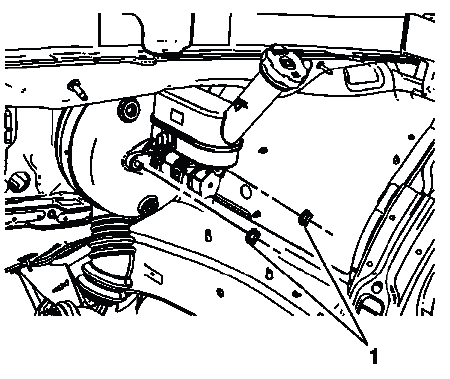
Fig. 50: Power Brake Booster Check Valve And Hose Assembly
9. Remove the vacuum brake booster hose assembly from the vehicle.
Remove the hose assembly carefully and guide it out of the engine compartment without pulling against nearby wiring, fuel system components, intake parts, or vacuum fittings. Before discarding or setting the old assembly aside, compare its routing, clip positions, fitting orientation, and check valve direction with the replacement part. This helps prevent installation errors that could affect vacuum brake assist operation on the Buick Enclave.
Installation Procedure
1. Install the power brake booster check valve and hose assembly (1) to the brake booster.
Seat the check valve and hose assembly firmly into the brake booster. The connection should fit securely without looseness, twisting, or partial engagement. A poor seal at this point can create a vacuum leak, reduce brake assist, and cause a hard or inconsistent brake pedal.
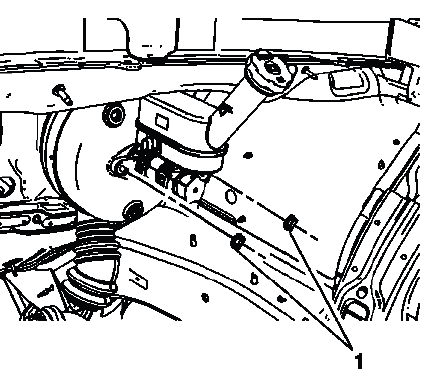
Fig. 51: Power Brake Booster Check Valve And Hose Assembly
NOTE: A small amount of denatured alcohol can be used as a lubricant for installation. Do not use soap.
Denatured alcohol can help the rubber sealing area slide into position and then evaporate without leaving a residue. Soap should not be used because it may leave deposits, affect rubber parts, or reduce the quality of the seal after assembly.
2. Connect the power vacuum brake booster hose (1) to the intake manifold vacuum port.
Push the hose fitting onto the intake manifold vacuum port until it is fully seated. Make sure the hose is not kinked, stretched, collapsed, or routed against hot engine surfaces. The vacuum supply path must remain open and sealed so the booster can provide consistent assist during brake application.
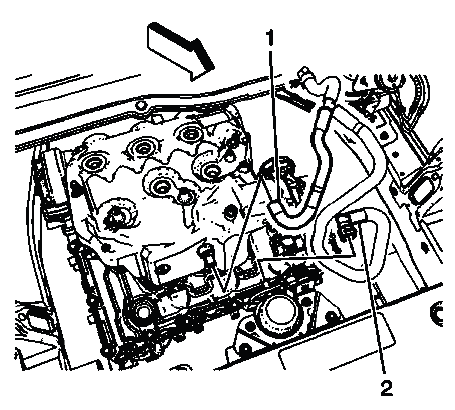
Fig. 52: Identifying Vacuum Brake Booster Hose Quick-Connect Fitting
NOTE: A small amount of denatured alcohol can be used as a lubricant for installation. Do not use soap.
If lubricant is needed, use only a small amount and apply it carefully. The fitting should lock or seat by hand pressure, not by forcing it with tools that may crack the connector or damage the vacuum port.
3. Connect the quick connect (2) to the power brake booster auxiliary pump.
Push the quick-connect fitting into place until the locking mechanism engages. After connecting it, gently pull back on the fitting to confirm that it is secured. A quick connect that is not fully locked can leak vacuum or separate during operation.
4. Connect the vacuum hose routing clip (1) to the intake manifold ball stud.
The routing clip keeps the vacuum hose in its intended position and prevents rubbing, vibration damage, or contact with hot components. Confirm that the hose follows the original path and has enough clearance from surrounding engine parts.
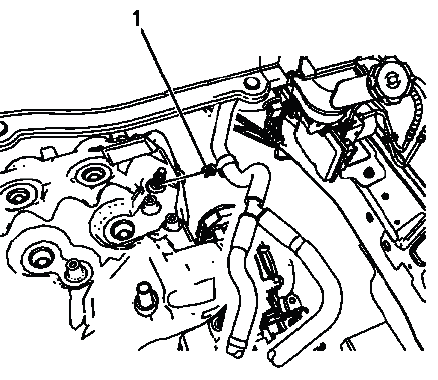
Fig. 53: Identifying Vacuum Hose Routing Clip
5. Install the power brake booster vacuum check valve (1) to the power vacuum brake booster.
The check valve must be installed in the correct orientation and fully seated in the booster grommet. This valve helps retain vacuum in the brake booster when engine vacuum changes, so any looseness, cracking, or poor fit can affect brake pedal effort.
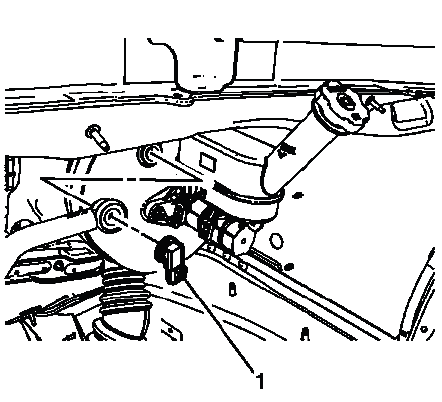
Fig. 54: Power Brake Booster Vacuum Check Valve And Hose Assembly
NOTE: A small amount of denatured alcohol may be used as a lubricant for assembly. Do not use soap.
After the valve is installed, inspect the grommet area for proper seating. The check valve should not sit at an angle or move freely in the booster. If the grommet is hardened, cracked, swollen, or loose, it should be replaced before the vehicle is returned to service.
6. Install the fuel injector sight shield. Refer to Fuel Injector Sight Shield Replacement.
Install the sight shield only after confirming that the vacuum hose routing is correct and that all fittings are secure. The shield should not pinch the hose, press on a connector, or hide a routing problem. Once installed, verify that the engine compartment is clear of tools and loose parts.
POWER BRAKE BOOSTER VACUUM SENSOR REPLACEMENT
Removal Procedure
The power brake booster vacuum sensor monitors vacuum conditions related to brake assist operation. If the sensor or its connection fails, the system may provide incorrect information about booster vacuum, which can lead to warning indicators, diagnostic trouble codes, or inconsistent brake assist diagnosis.
1. Turn the ignition switch to the OFF position.
Always begin with the ignition OFF before disconnecting the vacuum sensor. This helps prevent electrical faults and provides a safer service condition around the brake booster and engine compartment.
2. Apply and release the brake pedal several times until the brake pedal becomes firm to deplete the brake booster vacuum reserve.
Repeated pedal applications remove stored vacuum from the booster. The pedal should become firmer as the reserve is depleted. This step reduces the chance of unexpected vacuum assist influence while the sensor is being removed.
3. Disconnect the power brake booster vacuum sensor electrical connector.
Release the connector lock before separating the connector. Do not pull directly on the wires. Inspect the connector for corrosion, damaged terminals, loose fit, fluid residue, or broken locking tabs before the new sensor is installed.
4. Remove the power brake booster vacuum sensor (1) from the brake booster.
Remove the sensor carefully and avoid prying against the booster shell. The sealing area must remain clean and undamaged. If the old sensor seal is stuck, hardened, or torn, remove any remaining material before installing the replacement sensor.

Fig. 55: Power Brake Booster Vacuum Sensor
Installation Procedure
1. Install the power brake booster vacuum sensor (1) to the brake booster.
Position the sensor squarely and press it into place without forcing it at an angle. A damaged or misaligned sensor seal can create a vacuum leak and may affect brake assist performance. On the Buick Enclave, the sensor should seat firmly and evenly in the booster opening.
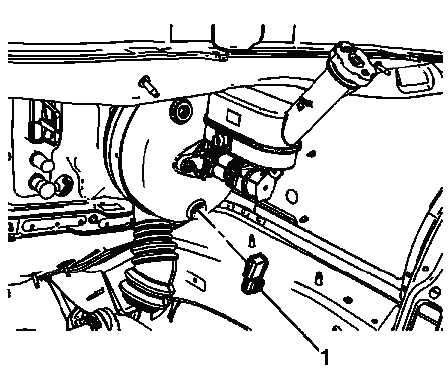
Fig. 56: Power Brake Booster Vacuum Sensor
NOTE: A small amount of denatured alcohol can be used as a lubricant for installation. Do not use soap.
Use denatured alcohol sparingly if needed to help the sensor seal slide into place. Do not use soap, grease, petroleum products, or silicone-based lubricants, because they can leave residue or damage rubber sealing surfaces.
2. Connect the power brake booster vacuum sensor electrical connector.
Push the connector into place until it locks. After connection, verify that the harness is routed away from hot surfaces, sharp edges, and moving parts. A secure connector is necessary for accurate sensor operation and reliable brake assist monitoring.
POWER BRAKE BOOSTER AUXILIARY PUMP REPLACEMENT
Removal Procedure
The power brake booster auxiliary pump supports the brake assist system when additional vacuum assistance is needed. If the pump fails, operates intermittently, has damaged mounts, or has electrical or vacuum connection problems, the driver may experience a hard brake pedal or reduced assist under certain operating conditions.
1. Turn the ignition switch to the OFF position.
Make sure the ignition is OFF before beginning pump removal. This prevents unintended electrical operation and gives a safer starting point for disconnecting the pump, vacuum hose, and related connectors.
2. Apply and release the brake pedal several times until the brake pedal becomes firm to deplete the brake booster vacuum reserve.
Depleting the vacuum reserve removes stored assist from the booster. The brake pedal should become firm after several applications, confirming that vacuum assist has been reduced before the auxiliary pump and hose connections are serviced.
3. Remove the fuel injector sight shield. Refer to Fuel Injector Sight Shield Replacement.
Removing the sight shield provides better access to the auxiliary pump, vacuum hose routing, and electrical connector. Store the shield and fasteners safely so they can be reinstalled without damage.
4. Release the quick connect (2) from the power brake booster auxiliary pump.
Release the quick-connect fitting carefully. Do not pry aggressively or pull on the hose body, because the connector, hose, or pump fitting may crack. If the fitting is tight, check for dirt, tension, or misalignment before applying more force.
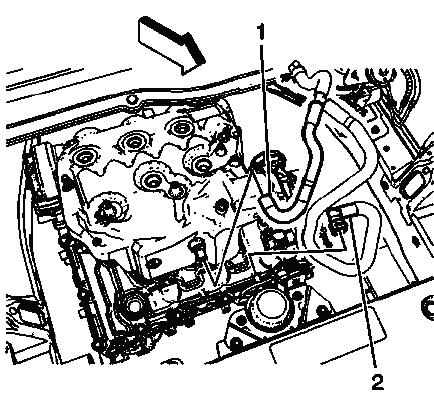
Fig. 57: Identifying Vacuum Brake Booster Hose Quick-Connect Fitting
5. Position the vacuum brake booster hose assembly aside.
Move the hose assembly only far enough to gain access to the auxiliary pump. Avoid kinking the hose or placing stress on the remaining fittings. If the hose shows cracking, flattening, oil contamination, or loose connections, inspect it before reinstallation.
6. Disconnect the power brake booster auxiliary pump electrical connector.
Release the connector lock and pull on the connector body rather than the wiring. Check the terminals for corrosion, heat damage, looseness, or signs of moisture intrusion. Electrical connection quality is important for reliable pump operation.
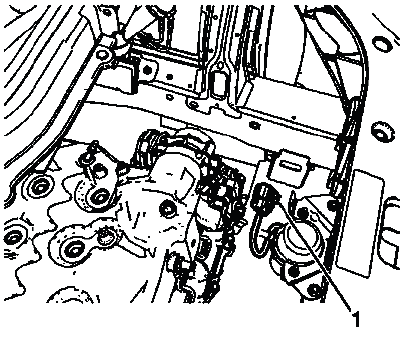
Fig. 58: Identifying Power Brake Booster Auxiliary Pump Electrical Connector
7. Release the power brake booster auxiliary pump electrical connector (1) from the bracket.
Free the connector from the bracket without breaking the locking feature. The bracket keeps the harness positioned correctly, so it should remain intact and reusable unless it is damaged or loose.
8. Remove the power brake booster auxiliary pump nuts (1).
Support the auxiliary pump as the nuts are removed. The pump may shift once the fasteners are loose, and allowing it to hang by the harness or vacuum connection can damage the pump or related components.
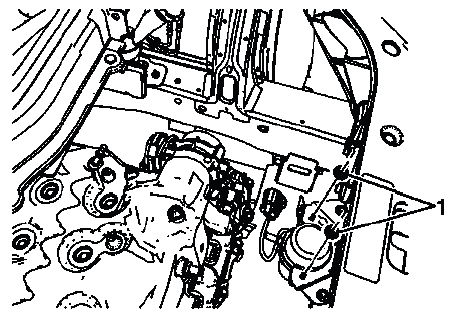
Fig. 59: Identifying Power Brake Booster Auxiliary Pump Nuts
9. Remove the power brake booster auxiliary pump bolts and the pump.
Remove the pump from the bracket area carefully and note its installed position. Before installing the replacement pump, compare the connector location, mounting points, insulators, sleeves, and vacuum fitting orientation with the original part.
10. If necessary, remove the power brake booster auxiliary pump insulators (1) and sleeves (2).
The insulators and sleeves help control vibration and isolate pump noise from the vehicle structure. Inspect them for cracking, compression, deformation, hardening, or missing material. Damaged insulators can allow vibration, noise, or improper pump mounting after service.
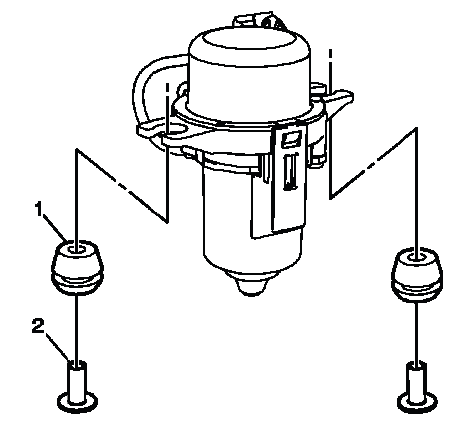
Fig. 60: Identifying Power Brake Booster Auxiliary Pump Insulators & Sleeves
11. If necessary, remove the power brake booster auxiliary pump bracket bolts (1) and bracket (2).
Remove the bracket only if it must be replaced, inspected, or transferred. Check the bracket for bending, cracked mounting points, corrosion, or loose hardware. A distorted bracket can place the pump under stress and may affect hose alignment.
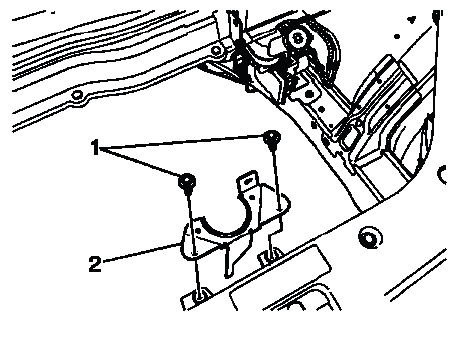
Fig. 61: Identifying Power Brake Booster Auxiliary Pump Bracket & Bolts
Installation Procedure
1. If
The provided source text ends at this point, so the installation procedure is incomplete. Continue the repair content from the next section of the manual to avoid inventing missing torque values, fastener order, or component-specific installation steps.
