Buick Enclave: Specifications, Diagnostic Information and Procedures
SPECIFICATIONS
This section brings together the key service data, wiring references, diagnostic charts, and test procedures used when inspecting the manual HVAC system. For the Buick Enclave, these specifications are not only reference numbers; they help confirm whether a repair, electrical test, sensor reading, or component installation is being performed within the correct service range.
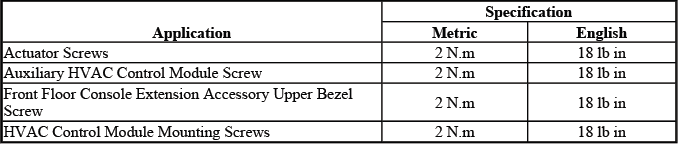
FASTENER TIGHTENING SPECIFICATIONS
Fastener Tightening Specifications
The fastener tightening specifications identify the required torque values for HVAC-related components and mounting hardware. Following these values helps prevent loose components, damaged plastic housings, distorted brackets, or stripped fasteners during service. HVAC parts often mount to lightweight structures, so controlled tightening is more reliable than estimating by hand.
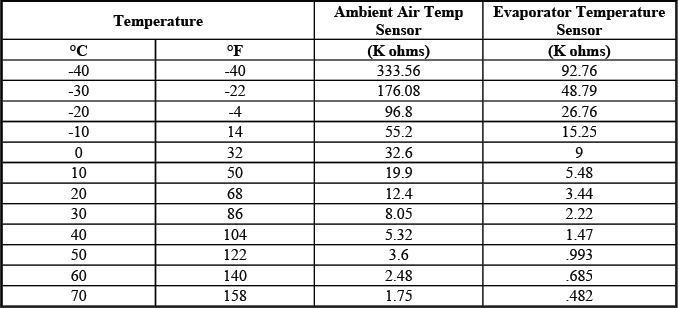
SENSOR RESISTANCE TABLE
Sensor Resistance Table
The sensor resistance table is used to compare the actual resistance of temperature-related sensors against expected values. Because many HVAC sensors use thermistor behavior, resistance changes as temperature changes. A reading that does not match the table can indicate a failed sensor, damaged wiring, poor terminal contact, or a circuit problem that is affecting the control module input.
SCHEMATIC WIRING DIAGRAMS
HVAC SYSTEM WIRING SCHEMATICS
The wiring schematics provide the electrical path for power supply, grounds, blower control, actuator operation, compressor control, sensor circuits, and rear HVAC functions. These diagrams should be used before replacing parts, especially when symptoms could be caused by an open circuit, short to voltage, short to ground, weak ground connection, or poor connector terminal tension.
Power, Ground, Blower Control and Subsystem References
The power, ground, blower control, and subsystem reference schematic shows how the HVAC system receives operating power and how blower operation is controlled. It also helps identify related subsystems that may influence HVAC performance. When the blower does not operate correctly, this diagram is useful for tracing voltage feed, ground integrity, relay operation, and control signals.
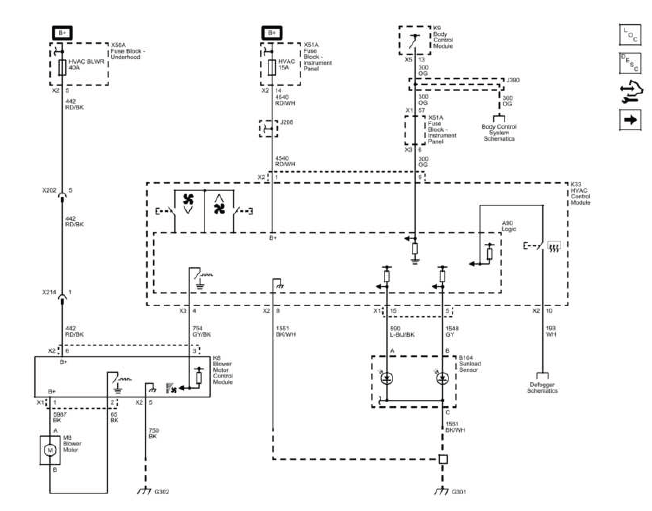
Fig. 1: Power, Ground, Blower Control and Subsystem References Wiring
Schematics
Actuators
The actuator schematic identifies the circuits used to command air temperature, mode, and recirculation door movement. These circuits are important because a control panel request must be followed by actual door travel inside the HVAC case. If the air comes from the wrong outlets or the temperature does not change as expected, the actuator wiring schematic helps separate a failed actuator from a control, reference, signal, or ground issue.
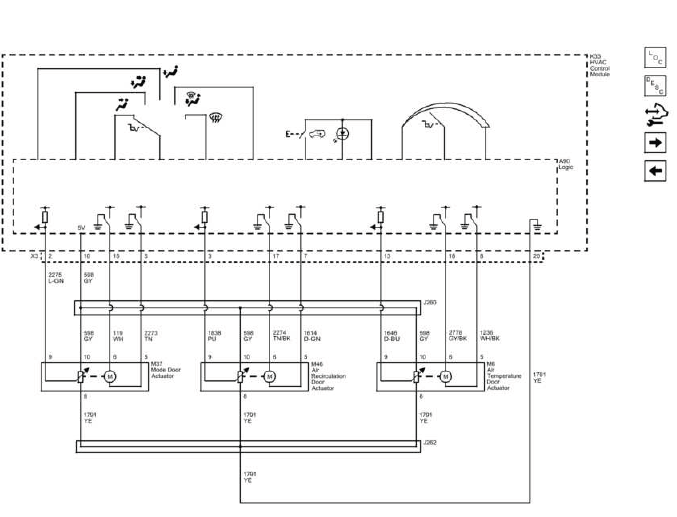
Fig. 2: Actuators Wiring Schematics
Compressor Controls and Temperature Sensors
The compressor controls and temperature sensor schematic combines the circuits that allow the HVAC control module and PCM to manage air conditioning operation. It includes sensor inputs, compressor request logic, pressure-related protection, and temperature information used to decide whether A/C operation should be enabled or disabled.

Fig. 3: Compressor Controls and Temperature Sensors Wiring Schematics
Rear HVAC
The rear HVAC schematic covers the circuits used for auxiliary climate operation. Rear blower control, auxiliary temperature control, and rear mode operation should be checked with this diagram when rear passengers report no airflow, incorrect temperature, or air delivery from the wrong outlets. On a larger cabin layout, rear HVAC performance can affect overall comfort significantly.
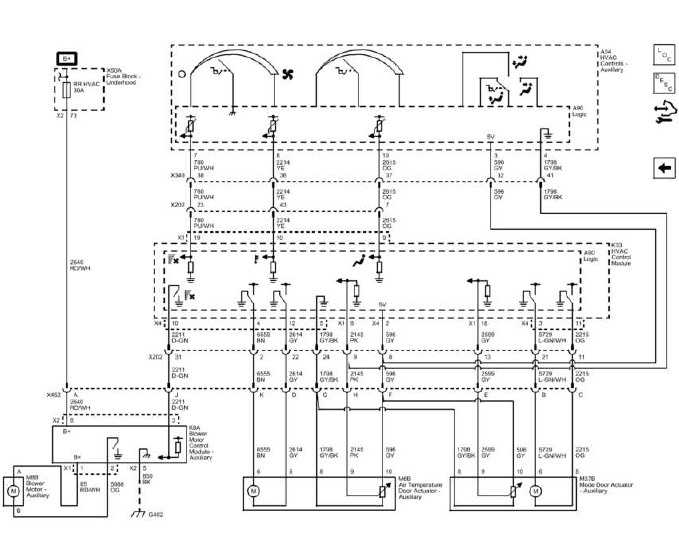
Fig. 4: Rear HVAC Wiring Schematics
DIAGNOSTIC INFORMATION AND PROCEDURES
The diagnostic information and procedures explain how to approach HVAC faults in a structured way. Instead of replacing parts based only on symptoms, the technician should confirm the complaint, check for diagnostic trouble codes, review scan tool data, verify circuit conditions, and test the affected component under the same conditions that caused the fault.
DIAGNOSTIC CODE INDEX
The diagnostic code index lists the available HVAC-related DTCs and helps point the technician toward the correct diagnostic path. A stored code should be treated as a starting point, not as automatic proof that a specific part has failed. Circuit condition, sensor input, module logic, and connector condition all need to be considered before final repair decisions are made.
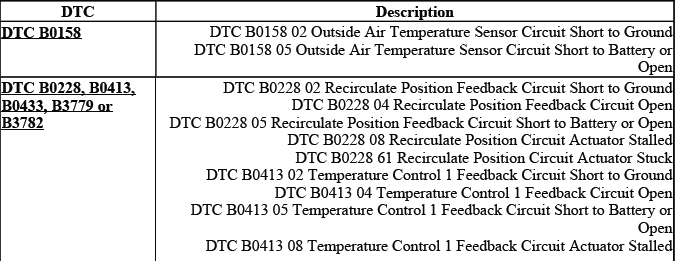
DTC B0158: OUTSIDE AIR TEMPERATURE SENSOR
DTC B0158 relates to the outside air temperature sensor circuit. This sensor input is used by the HVAC control module to understand ambient temperature conditions and to support correct compressor clutch operation. If the input is shorted, open, or outside the expected range, the system may display an incorrect outside temperature or limit A/C compressor operation.
Diagnostic Instructions
- Perform the Diagnostic System Check - Vehicle prior to using this diagnostic procedure.
- Review Strategy Based Diagnosis for an overview of the diagnostic approach.
- Diagnostic Procedure Instructions provides an overview of each diagnostic category.
These instructions help make sure the diagnosis begins with the complete vehicle system check rather than an isolated sensor test. Since HVAC modules, power mode status, scan tool data, and related network information can all affect the result, the general diagnostic process should be followed before focusing on the outside air temperature sensor alone.
DTC Descriptors
DTC B0158 02
- Outside Air Temperature Sensor Circuit Short to Ground
This descriptor indicates that the module sees a signal condition consistent with a short to ground. In practical terms, the sensor signal may be pulled too low, making the module interpret the outside temperature as lower than expected.
DTC B0158 05
- Outside Air Temperature Sensor Circuit Short to Battery or Open
This descriptor points toward a signal circuit that is too high, open, or shorted to battery voltage. The result can be a temperature value that is unrealistically high or outside the module's usable range.
Diagnostic Fault Information
The diagnostic fault information table helps identify the circuit conditions associated with the DTC. It should be used together with the schematic and connector views to determine whether the fault is most likely in the sensor, signal circuit, low reference circuit, connector, or HVAC control module input.
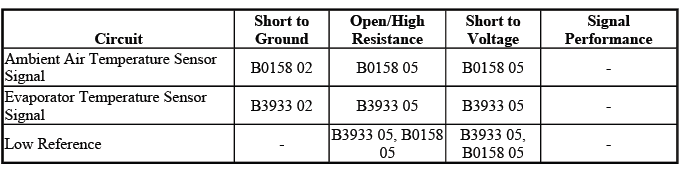
Circuit/System Description
The HVAC control module monitors the ambient air temperature sensor through a low reference circuit and a 5-volt signal circuit. The module reads the voltage drop across the sensor, and that voltage is proportional to temperature. When the outside air is cold, the sensor resistance is high and the signal voltage is also high. When the outside air is warm or hot, the sensor resistance drops and the signal voltage becomes lower.
The HVAC control module converts the voltage value into a temperature value in both Celsius and Fahrenheit. That calculated value can be displayed by the driver information center, or DIC, and may also be used by the climate system when deciding how to manage compressor operation. On the Buick Enclave, an inaccurate ambient temperature signal can therefore affect both the displayed outside temperature and HVAC behavior.
Conditions for Running the DTC
The ignition is turned ON.
With the ignition on, the HVAC control module has the necessary operating state to monitor the outside air temperature sensor circuit. If the circuit voltage falls outside the expected range during this condition, the module can evaluate the input and determine whether a fault should be stored.
Conditions for Setting the DTC
- The HVAC control module detects the sensor signal circuit is less than -35ºC (-39ºF).
- The HVAC control module detects the sensor signal circuit is more than 85ºC (185ºF).
These limits represent signal values that are outside the normal expected operating range for the sensor input. A value below -35ºC (-39ºF) or above 85ºC (185ºF) may not reflect actual weather conditions and is treated as evidence of a circuit or sensor concern.
Action Taken When the DTC Sets
The HVAC control module uses a default air temperature value for compressor clutch operation.
This default value allows the HVAC system to continue operating in a controlled manner even when the actual outside temperature signal cannot be trusted. The system may not respond exactly as it would with a correct sensor input, but the fallback strategy helps protect compressor operation and prevents the module from making decisions based on an unreliable signal.
Conditions for Clearing the DTC
- The DTC will become history if the HVAC control module no longer detects a failure.
- The history DTC will clear after 100 fault-free ignition cycles.
If the fault is no longer present, the code can move to history status. After enough fault-free ignition cycles, the history code clears. This behavior helps separate an intermittent wiring or connector issue from a current, active circuit fault.
Reference Information
The reference information points to the supporting service sections needed to diagnose the outside air temperature sensor circuit correctly. These references are useful when checking wiring paths, connector layouts, circuit test methods, module data, and system operation.
Schematic Reference
HVAC Schematics
Connector End View Reference
COMPONENT CONNECTOR END VIEWS - INDEX
Description and Operation
- Air Delivery Description and Operation
- Air Temperature Description and Operation
Electrical Information Reference
- Circuit Testing
- Connector Repairs
- Testing for Intermittent Conditions and Poor Connections
- Wiring Repairs
Scan Tool Reference
Control Module References for Scan Tool Information
Using these references together gives a more complete diagnostic picture. For example, the schematic shows circuit routing, connector views identify terminal locations, and scan tool data confirms what the HVAC control module is actually seeing from the sensor circuit.
Circuit/System Verification
Ignition ON, observe the ambient air temperature sensor. The reading should be between -35ºC (-39ºF) and 85º C (185ºF) and change with ambient air temperature changes.
During verification, the displayed sensor value should be compared with the actual surrounding air temperature. A small delay or filtered response may be normal, but a fixed reading, an extreme value, or a reading that does not change with temperature conditions suggests a circuit, connector, or sensor problem. For the Buick Enclave, this check is especially important before diagnosing compressor clutch disablement related to outside temperature input.
Circuit/System Testing
IMPORTANT: If the ambient air temperature sensor is in temperatures below 2ºC (35ºF) the compressor clutch will be disabled until the vehicle is driven above 45 mph (72 km/h), the ignition is OFF for more than 3 hours or an instant OAT update is performed.
This note is important because a low ambient temperature value can prevent A/C compressor engagement even if the rest of the air conditioning system is capable of operating. A technician should confirm whether the module is using a filtered outside air temperature value before assuming that the compressor clutch, relay, pressure sensor, or refrigerant charge is at fault.
When testing the circuit, inspect the outside air temperature sensor connector, terminal fit, harness routing, and any signs of corrosion or physical damage. A poor connection can create intermittent readings that may only appear after vibration, moisture exposure, temperature changes, or movement near the front of the vehicle. Accurate testing should include both the signal circuit and the low reference circuit, not only the sensor itself.
IMPORTANT: An instant OAT update must be performed by pressing the A/C and Recirc buttons at the same time before and after the system has been serviced to update the filtered ambient air temperature sensor circuit and convert the A/C permission from withheld to granted.
This step is especially important because the HVAC control module may continue using a filtered outside air temperature value even after the sensor or circuit has been serviced. On the Buick Enclave, the A/C compressor may remain disabled until the outside air temperature value is refreshed and the module recognizes that compressor operation can be allowed.
1. Ignition OFF, disconnect the harness connector at the ambient air temp sensor.
Begin the test with the ignition off so the circuit can be checked without creating false readings or affecting module operation. Inspect the connector at the same time for loose terminals, corrosion, moisture intrusion, damaged locks, or wiring strain near the sensor location.
2. Ignition OFF, test for less than 10 ohms of resistance between the low reference circuit terminal B and ground.
- If greater than the specified range, test the low reference circuit for an open/high resistance. If the circuit tests normal, replace the HVAC control module.
A low resistance reading confirms that the low reference side of the circuit has a usable return path. If resistance is higher than expected, the HVAC control module may receive an inaccurate signal from the ambient air temperature sensor even when the sensor itself is still functional.
3. Ignition ON, verify the scan tool Ambient Air Temp Sensor parameter is less than -35ºC (-39ºF).
- If greater than the specified range, test the signal circuit terminal A for a short to ground. If the circuit tests normal, replace the HVAC control module.
With the sensor disconnected, the scan tool value should move to the expected low-temperature fault range. If the reading does not respond as expected, the signal circuit may be pulled down by a short to ground or the HVAC control module may not be interpreting the circuit correctly.
4. Install a 3 A fused jumper wire between the signal circuit terminal A and the low reference circuit terminal B. Verify the scan tool Ambient Air Temp Sensor Raw parameter is greater than 85ºC (185ºF).
- If less than the specified range, test the signal circuit for a short to voltage or an open/high resistance. If the circuit tests normal, replace the HVAC control module.
The fused jumper provides a controlled way to force the circuit toward the opposite end of the sensor range. This verifies that the signal circuit and low reference circuit can produce the expected scan tool response. Using a fused jumper is important because it protects the circuit if an unexpected short or wiring fault is present.
5. If all circuits test normal, test or replace the ambient air temp sensor.
If the wiring, low reference, signal circuit, and module response all test correctly, the sensor becomes the most likely cause of the incorrect ambient temperature reading. Replacing the sensor without confirming circuit integrity first can lead to repeat faults, especially when the original concern is caused by connector damage or high resistance in the harness.
IMPORTANT: An instant OAT update must be performed to grant A/C permission after testing or replacing the ambient air temperature sensor.
After sensor testing or replacement, the instant OAT update should be completed before judging A/C compressor operation. This prevents a false conclusion where the repair is correct, but the compressor remains disabled because the filtered outside temperature value has not yet been updated.
Component Testing
1. Test the ambient air temperature sensor by varying the sensor temperature while monitoring the sensor resistance.
The sensor should respond smoothly as temperature changes. A sudden open reading, fixed resistance value, or irregular jump in resistance may indicate an internal sensor fault. For the Buick Enclave HVAC system, the sensor reading must remain believable because it can influence both the displayed outside temperature and compressor permission logic.
IMPORTANT: Sensor Resistance Table for this test. A thermometer can be used to test the sensor off the vehicle in warm and or cold water.
When testing the sensor off the vehicle, allow enough time for the sensor body to stabilize at the water temperature before comparing resistance. The thermometer reading and the resistance table should be used together so the test is based on actual temperature, not an estimate.
2. Compare the readings with the Temperature VS Resistance table and verify that the resistance is within 5 percent of the specification.
- If not within the specified range, replace the sensor.
A sensor that is outside the 5 percent range can cause the HVAC control module to calculate an incorrect outside air temperature. Even a small error may affect A/C operation when the temperature is near the compressor enable or disable threshold.
Repair Instructions
Perform the Diagnostic Repair Verification after completing the diagnostic procedure.
- Ambient Air Temperature Sensor Replacement (Enclave, Traverse) , Ambient Air Temperature Sensor Replacement (Acadia)
- Control Module References for HVAC control module replacement, setup and programming
After the repair is completed, verify that the scan tool temperature value changes normally and that the outside temperature display is reasonable for current conditions. If a control module was replaced, setup and programming must be completed according to the proper module reference before final system verification.
DTC B0228, B0413, B0433, B3779 OR B3782: RECIRCULATE POSITION FEEDBACK/TEMPERATURE CONTROL 1-3 FEEDBACK/AIR FLOW CONTROL 9-10 FEEDBACK
These DTCs relate to feedback and movement concerns for the HVAC actuators. The system uses actuator position signals to confirm that the air doors have moved to the requested locations. If the feedback signal is open, shorted, out of range, stuck, or does not change as expected during commanded movement, the HVAC control module can set one of these diagnostic trouble codes.
Diagnostic Instructions
- Perform the Diagnostic System Check - Vehicle prior to using this diagnostic procedure.
- Review Strategy Based Diagnosis for an overview of the diagnostic approach.
- Diagnostic Procedure Instructions provides an overview of each diagnostic category.
The diagnostic system check should be performed first because actuator faults may be linked to power, ground, reference voltage, module communication, or multiple circuit concerns. Starting with the complete diagnostic approach helps avoid replacing an actuator when the real problem is a shared reference circuit or connector issue.
DTC Descriptors
DTC B0228 02
- Recirculate Position Feedback Circuit Short to Ground
This code indicates that the recirculation actuator feedback circuit is being pulled lower than expected, which can make the module read the door position incorrectly.
DTC B0228 04
- Recirculate Position Feedback Circuit Open
An open feedback circuit prevents the HVAC control module from accurately reading recirculation door position. The actuator may still receive a command, but the module cannot reliably confirm where the door is.
DTC B0228 05
- Recirculate Position Feedback Circuit Short to Battery or Open
This descriptor points to a feedback signal that is too high, open, or shorted to voltage. The result can be a position value that does not match actual actuator movement.
DTC B0228 08
- Recirculate Position Circuit Actuator Stalled
A stalled actuator code means the module commanded movement, but the expected position change was not detected. The cause may be a failed motor, a restricted air door, damaged linkage, or a circuit problem.
DTC B0228 61
- Recirculate Position Circuit Actuator Stuck
This code suggests that the actuator or air door remains stuck in one position or cannot complete the commanded travel range.
DTC B0413 02
- Temperature Control 1 Feedback Circuit Short to Ground
This fault applies to the temperature control 1 feedback circuit and indicates a signal condition consistent with a short to ground.
DTC B0413 04
- Temperature Control 1 Feedback Circuit Open
An open temperature control 1 feedback circuit prevents accurate monitoring of the related air temperature actuator position.
DTC B0413 05
- Temperature Control 1 Feedback Circuit Short to Battery or Open
This descriptor indicates that the feedback circuit is reading too high, is open, or is affected by unwanted voltage.
DTC B0413 08
- Temperature Control 1 Feedback Circuit Actuator Stalled
The actuator was commanded to move, but the feedback signal did not change as expected. This may be caused by a seized actuator, blocked door movement, or an electrical fault.
DTC B0413 61
- Temperature Control 1 Feedback Circuit Actuator Stuck Open
This code indicates that the actuator or temperature door appears to be stuck in an open position or cannot return through the normal travel range.
DTC B0433 02
- Temperature Control 3 Feedback Circuit Short to Ground
This fault applies to the temperature control 3 feedback circuit and points toward a low signal caused by a short to ground or related circuit concern.
DTC B0433 04
- Temperature Control 3 Feedback Circuit Open
An open circuit prevents the HVAC control module from receiving a valid feedback signal from the temperature control 3 actuator.
DTC B0433 05
- Temperature Control 3 Feedback Circuit Short to Battery or Open
This condition indicates that the feedback signal is higher than expected, open, or influenced by battery voltage.
DTC B0433 08
- Temperature Control 3 Circuit Actuator Stalled
The actuator is commanded to move, but the module does not see the expected feedback change. The fault may be mechanical, electrical, or related to the actuator itself.
DTC B0433 61
- Temperature Control 3 Circuit Actuator Stuck
This descriptor indicates that the actuator or its door is not moving through the expected range and may be stuck at or near one position.
DTC B3782 02
- Air Flow Control 10 Feedback Circuit Short to Ground
This DTC identifies a low feedback signal on the air flow control 10 circuit, commonly caused by a short to ground or damaged signal wiring.
DTC B3782 04
- Air Flow Control 10 Feedback Circuit Open
An open feedback circuit stops the module from confirming the air flow control 10 actuator position.
DTC B3782 05
- Air Flow Control 10 Feedback Circuit Short to Battery or Open
This code points to a feedback circuit that is open or reading higher than expected because of unwanted voltage.
DTC B3782 08
- Air Flow Control 10 Circuit Actuator Stalled
A stalled actuator condition means the control module requested movement, but the actuator position did not change in the expected direction or amount.
DTC B3782 61
- Air Flow Control 10 Circuit Actuator Stuck
This condition indicates that the actuator or door controlled by air flow control 10 cannot move freely through its commanded range.
DTC B3779 02
- Air Flow Control 9 Feedback Circuit Short to Ground
This descriptor identifies a short-to-ground condition in the air flow control 9 feedback circuit.
DTC B3779 05
- Air Flow Control 9 Feedback Circuit Short to Battery or Open
This DTC indicates that the air flow control 9 feedback circuit is open or shorted to battery voltage.
DTC B3779 08
- Air Flow Control 9 Circuit Actuator Stalled
The HVAC control module commanded actuator travel, but the position feedback did not show the expected movement.
DTC B3779 61
- Air Flow Control 9 Circuit Actuator Stuck
This code is set when the air flow control 9 actuator appears stuck or cannot complete its commanded movement.
Circuit/System Description
The actuators used by the HVAC system operate through five circuits: a 5-volt reference circuit, a low reference circuit, a position signal circuit, and two bi-directional control circuits that can be switched between 0 and 12 volts. The HVAC control module supplies the 5-volt reference and low reference to the feedback potentiometer inside the actuator. It then monitors the voltage drop on the door position signal circuit to determine where the actuator door is located.
As the actuator changes position, the door position signal voltage changes with it. The two bi-directional control circuits allow the HVAC control module to move the actuator in either direction. When the module sees through the feedback potentiometer that the actuator has reached the desired position, both control circuits are set to 0 volts. To move the actuator again, the module switches the proper control circuit to 12 volts while controlling the opposite side as needed.
On the Buick Enclave, this feedback-based design allows the HVAC control module to command a door position and then verify the result instead of assuming the actuator moved correctly. If the commanded position and the feedback signal do not agree, the module can detect a circuit fault, stalled actuator, stuck door, or abnormal feedback signal.
- DTC B0228 is for the recirculate actuator
- DTC B0413 is for the left air temperature actuator
- DTC B0433 is for the auxiliary air temperature actuator
- DTC B3782 is for the auxiliary mode actuator
- DTC B3779 is for the mode actuator
These actuator assignments help narrow the diagnostic path. A temperature concern, incorrect airflow mode, failed recirculation function, or rear HVAC complaint can be matched to the related DTC so testing can focus on the correct actuator, connector, and circuit group instead of the entire HVAC system.
Conditions for Running the DTC
- The ignition is ON.
- The HVAC module is ON.
These conditions allow the HVAC control module to power the actuator circuits, monitor the feedback signal, and compare the actual door position with the commanded position. On the Buick Enclave, the module must be awake and active before it can determine whether an actuator is responding normally or whether the feedback circuit has moved outside the expected range.
Conditions for Setting the DTC
The DTC sets when the actual door position differs from the commanded door position by more than 4 counts, or when the HVAC control module detects that the door position signal circuit is less than 3 counts or greater than 253 counts.
This means the module is either seeing a door that is not following the command accurately, or it is receiving a feedback signal that is too close to the lower or upper electrical limit. A value outside the expected range may be caused by a stuck actuator, restricted air door, open signal circuit, short to ground, short to voltage, poor terminal contact, or an internal actuator feedback failure.
Action Taken When the DTC Sets
The control circuit is deactivated for the appropriate actuator.
Once the fault is detected, the HVAC control module stops driving the affected actuator circuit to prevent repeated motor operation against a stuck door or a circuit fault. This helps protect the actuator, module driver circuits, and related HVAC door mechanism from additional stress.
Conditions for Clearing the DTC
- The DTC becomes history when the HVAC control module no longer detects the condition that set the DTC.
- The history DTC will clear after 100 fault-free ignition cycles.
If the fault no longer appears during normal module operation, the code moves to history status. A history code can be useful when diagnosing intermittent actuator issues because it shows that the problem occurred previously, even if the actuator works normally during the current test.
Reference Information
The reference information below should be used together with the scan tool data and circuit tests. These sections help locate the correct schematic, connector terminal, actuator circuit, and service procedure before any part is replaced.
Schematic Reference
HVAC Schematics
Connector End View Reference
COMPONENT CONNECTOR END VIEWS - INDEX
Description and Operation
- Air Delivery Description and Operation
- Air Temperature Description and Operation
Electrical Information Reference
- Circuit Testing
- Connector Repairs
- Testing for Intermittent Conditions and Poor Connections
- Wiring Repairs
Scan Tool Reference
Control Module References for Scan Tool Information
Using the schematic and connector views before testing helps avoid probing the wrong circuit or misidentifying a shared reference problem as a failed actuator. Since several HVAC actuators use similar circuit designs, careful terminal identification is important during diagnosis.
Circuit/System Verification
Ignition ON, command the appropriate actuator in both directions with a scan tool. The reading should be between 3 and 253 counts.
While commanding the actuator, watch for smooth movement in both directions and a feedback value that changes consistently. A reading that stays fixed, jumps suddenly, moves only in one direction, or remains near either limit suggests that the actuator, air door, feedback circuit, or control circuit needs further testing. For the Buick Enclave HVAC system, this scan tool check is a practical way to confirm whether the module can see the actuator position change before the circuit is tested directly.
Circuit/System Testing
1. Ignition OFF, disconnect the harness connector at the appropriate actuator.
Before disconnecting the actuator, inspect the harness routing and connector body for signs of damage, moisture, loose terminals, or previous repair work. Many intermittent HVAC actuator faults are caused by poor contact at the connector rather than a completely failed component.
2. Ignition OFF, test for less than 10 ohms between the low reference circuit terminal 8 and ground. It may take up to 5 minutes for all vehicle systems to power down.
- If greater than the specified range, test the low reference circuit for an open/high resistance. If the circuit tests normal, replace the HVAC control module.
This test confirms that the actuator feedback circuit has a stable low reference path. Waiting for the vehicle systems to power down helps prevent false readings from active modules or retained accessory power. Excessive resistance in the low reference circuit can distort the feedback signal and make the module calculate an incorrect door position.
3. Ignition ON, test for 4.8-5.2 volts between the 5-volt reference circuit terminal 10 and ground.
- If less than the specified range, test the 5-volt reference circuit for a short to ground or an open/high resistance. If the circuit tests normal, replace the HVAC control module.
- If greater than the specified range, test the 5-volt reference circuit for a short to voltage. If the circuit tests normal, replace the HVAC control module.
The 5-volt reference is the supply voltage used by the actuator feedback potentiometer. A low reading may point to a short to ground, high resistance, or an open circuit. A voltage higher than the specified range may indicate that the reference circuit is being pulled up by an unwanted voltage source.
4. Verify the scan tool Door Position parameter is less than 3 counts.
- If greater than the specified range, test the signal circuit terminal 9 for a short to ground. If the circuit tests normal, replace the HVAC control module.
With the actuator disconnected, the scan tool should display the expected low-end value. If the parameter remains higher than expected, the signal circuit may be affected by a short, unwanted voltage, or a module input problem.
5. Install a 3A fused jumper wire between the signal circuit terminal 9 and the low reference circuit terminal 8. Verify the scan tool Door Position parameter is greater than 250 counts.
- If less than the specified range, test the signal circuit for a short to voltage or an open/high resistance. If the circuit tests normal, replace the HVAC control module.
The fused jumper forces the feedback signal toward the opposite end of the range and verifies that the HVAC control module can recognize the change. The fuse protects the circuit if an unexpected wiring fault is present during the test. If the scan tool does not respond correctly, the signal circuit or module input should be checked before the actuator is condemned.
6. Ignition OFF, test for less than 10 ohms between the control circuit terminal 5 and ground.
- If greater than the specified range, test the control circuit for a short to voltage or an open/high resistance. If circuit tests normal, replace the HVAC control module.
This control circuit is one side of the bi-directional actuator motor drive. High resistance or an open condition can prevent the actuator from moving in one direction or cause the module to detect a stalled actuator condition.
7. Ignition OFF, test for less than 10 ohms between the control circuit terminal 6 and ground.
- If greater than the specified range, test the control circuit for a short to voltage or an open/high resistance. If circuit tests normal, replace the HVAC control module.
The second control circuit must also be verified because the HVAC control module reverses polarity to move the actuator in the opposite direction. If either control circuit is damaged, the actuator may move only one way, fail to move at all, or set a feedback-related DTC when the commanded and actual positions do not match.
8. Connect a test lamp between control circuit terminal 5 and control circuit terminal 6.
The test lamp provides a simple load check across the two actuator control circuits. This helps confirm that the module can command the circuit under load, not just show voltage on a meter with no current demand.
9. Ignition ON, command the appropriate actuator door in both directions with a scan tool. The test lamp should turn ON and OFF when commanded in both directions.
- If the test lamp remains OFF during either of the commands, test for a short to ground on either control circuit. If the circuits test normal, replace the HVAC control module.
When the actuator is commanded in both directions, the lamp should respond as the module switches the control circuits. If the lamp does not illuminate during one or both commands, the fault may be in a control circuit, the module driver, or a short that prevents the circuit from being energized correctly.
10. If both circuits test normal, test or replace the actuator.
After the reference, signal, low reference, and motor control circuits have all passed testing, the actuator becomes the most likely cause. At that point, check for a binding door or mechanical restriction before installing a replacement actuator, because a new actuator can fail or set the same code again if the door inside the HVAC case cannot move freely.
Repair Instructions
Perform the Diagnostic Repair Verification after completing the diagnostic procedure.
- Temperature Valve Actuator Replacement - Right Side
- Temperature Valve Actuator Replacement - Left Side
- Mode Valve Actuator Replacement
- Air Inlet Valve Actuator Replacement
- Auxiliary Temperature Valve Actuator Replacement
- Auxiliary Mode Valve Actuator Replacement
- Control Module References for HVAC control module and HVAC Auxiliary control module or rear seat audio (RSA) replacement, setup and programming.
After repair, verify that the actuator can be commanded through its full range and that the scan tool door position parameter changes smoothly between the expected limits. On the Buick Enclave, actuator replacement or HVAC control module service may require setup, programming, or relearn procedures depending on the component involved and the service information being followed.
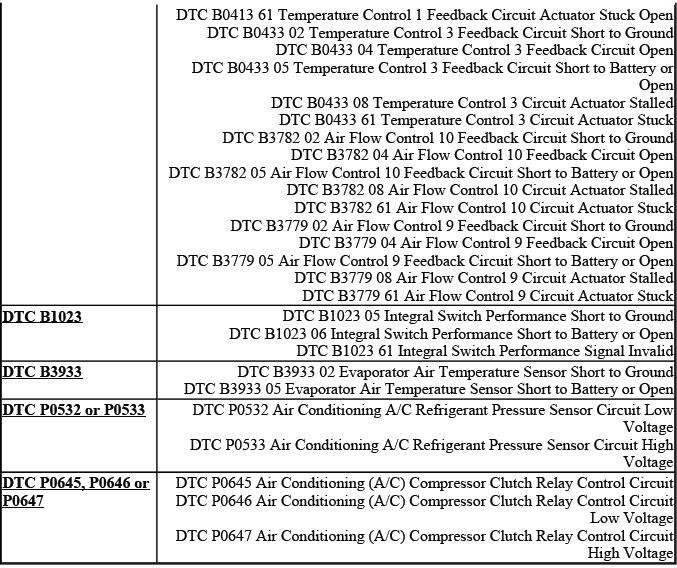
DTC B1023: INTEGRAL SWITCH PERFORMANCE
DTC B1023 relates to the performance of an integral switch circuit used by the HVAC system. This type of fault can occur when the switch signal is shorted, open, pulled to the wrong voltage level, or not believable to the control module during operation.
Diagnostic Instructions
- Perform the Diagnostic System Check - Vehicle prior to using this diagnostic procedure.
- Review Strategy Based Diagnosis for an overview of the diagnostic approach.
- Diagnostic Procedure Instructions provides an overview of each diagnostic category.
The diagnostic system check should be completed first because an integral switch performance code may be affected by power mode status, module communication, shared circuits, connector condition, or another HVAC-related fault. Starting with the full diagnostic process helps prevent unnecessary switch or module replacement.
DTC Descriptors
DTC B1023 05
- Integral Switch Performance Short to Ground
This descriptor indicates that the switch signal is being pulled low when the module expects a different state. A short to ground, damaged wire insulation, moisture in the connector, or an internal switch fault may cause this condition.
DTC B1023 06
- Integral Switch Performance Short to Battery or Open
This descriptor points to a signal that is too high, open, or affected by unwanted battery voltage. The module may not be able to confirm the correct switch state when this condition is present.
DTC B1023 61
- Integral Switch Performance Signal Invalid
An invalid signal means the HVAC control module is receiving switch information that does not match the expected logic. The circuit may not be completely open or shorted, but the input is still not reliable enough for normal operation.
Circuit/System Description
The integral switch circuit is monitored by the HVAC control module so the module can identify the selected switch state and respond with the appropriate system command. When the switch is pressed, released, or placed in a specific position, the module expects to see a corresponding electrical value. If the value remains fixed, changes at the wrong time, or falls outside the expected range, the module can set DTC B1023.
For accurate diagnosis, the switch input should be evaluated together with scan tool data, circuit voltage, connector condition, and module response. A switch concern may be caused by internal contact wear, contamination, terminal tension loss, a shorted signal circuit, an open circuit, or a control module input problem. Confirming the actual signal behavior before replacing parts helps separate a true switch fault from a wiring or module-related issue.
This DTC may be set when the 5-volt reference circuit to the auxiliary HVAC control module is open, shorted to ground, shorted to voltage, or affected by excessive resistance. It may also be caused by an internal fault inside the HVAC control module, especially when the module detects a stuck, shorted, or invalid control button input. In the Buick Enclave HVAC system, this type of code should be approached as both a circuit concern and a possible module logic concern until testing proves otherwise.
Conditions for Running the DTC
Battery voltage is between 9-16 volts and data link communications operate normally.
These conditions confirm that the module has enough voltage to operate and that communication on the vehicle network is stable enough for the HVAC control module to monitor the switch input correctly. If system voltage is too low, too high, or communication is unstable, the diagnostic result may not accurately represent the condition of the switch or reference circuit.
Conditions for Setting the DTC
The HVAC control module detects an internal fault related to a stuck or shorted control button, or it detects a shorted 5-volt reference circuit.
This means the module is seeing a switch signal or reference voltage condition that does not match the expected operating logic. The concern may be inside the HVAC control module, in the auxiliary HVAC control module circuit, or in the wiring between the related components.
Conditions for Clearing the DTC
- A current DTC clears when the malfunction is no longer present.
- A history DTC clears when the module ignition cycle counter reaches the reset threshold, without a repeat of the malfunction.
If the condition is repaired or no longer detected, the DTC can change from current to history. A history code that does not return after several ignition cycles often points to an intermittent issue, while a code that resets immediately usually indicates an active circuit, switch, or module fault.
Reference Information
The following reference sections should be used before replacing any HVAC control component. They provide the wiring paths, connector terminal locations, system descriptions, and scan tool data needed to confirm whether the fault is caused by the circuit, the switch input, or the module itself.
Schematic Reference
HVAC Schematics
Connector End View Reference
COMPONENT CONNECTOR END VIEWS - INDEX
Description and Operation
- Air Temperature Description and Operation
- Air Delivery Description and Operation
Electrical Information Reference
- Circuit Testing
- Connector Repairs
- Testing for Intermittent Conditions and Poor Connections
- Wiring Repairs
Scan Tool Reference
Control Module References for scan tool information
Using these references together helps prevent misdiagnosis. A 5-volt reference fault may affect more than one input, and a poor connector terminal can look like a failed module if the circuit is not checked carefully under the correct conditions.
Circuit/System Verification
1. Ignition ON, disconnect the harness connector at the auxiliary HVAC control module, test for 4.8-5.2 volts between the 5-volt reference circuit terminal 3 and ground.
- If less than the specified range, test the 5-volt reference circuit for a short to ground or an open/high resistance. If the circuit tests normal, replace the HVAC Control Module.
- If greater than the specified range, test the 5-volt reference circuit for a short to voltage. If the circuit tests normal, replace the HVAC Control Module.
This voltage test confirms whether the auxiliary HVAC control module is receiving a correct reference supply. A reading below the specified range can indicate a short to ground, an open circuit, or excessive resistance. A reading above the specified range suggests that the reference circuit may be shorted to voltage. On the Buick Enclave, this test should be performed with careful terminal contact so the connector is not spread or damaged during probing.
2. Reprogram the HVAC control module that set DTC B1023. The module should successfully reprogram.
- If the module will not reprogram, replace the HVAC control module that set the DTC.
Reprogramming is used to confirm that the module can accept calibration or software updates and respond correctly after the fault is addressed. If the module cannot be reprogrammed and the circuit has already tested normally, the control module itself becomes the likely cause.
3. With a scan tool, clear the DTC.
Clearing the code after verification allows the module to run a fresh diagnostic check. This helps confirm whether the repair corrected the original problem or whether the DTC returns under the same operating conditions.
4. Ignition OFF.
Turning the ignition off allows the module to power down and reset its monitoring state before the DTC is checked again. This step is useful because some HVAC faults may not reset until the module completes a new ignition cycle.
5. Wait 60 seconds, then recheck for DTCs. DTC B1023 should not set.
After the wait period, the system should be checked again with the scan tool. If DTC B1023 does not return, the circuit and module response are considered normal at that time.
If DTC B1023 sets, replace the module.
If the code resets after the reference circuit has tested correctly and the module has been reprogrammed or verified, module replacement is the next repair step. The replacement module must be set up and programmed according to the correct service procedure before the HVAC system is returned to normal operation.
Repair Instructions
Perform the Diagnostic Repair Verification after completing the diagnostic procedure.
Control Module References for control module replacement, setup and programming
After repair, confirm that the switch input responds normally, the auxiliary HVAC control module receives the proper reference voltage, and no current DTC returns. Final verification should include normal HVAC operation from both the front and auxiliary controls when equipped.
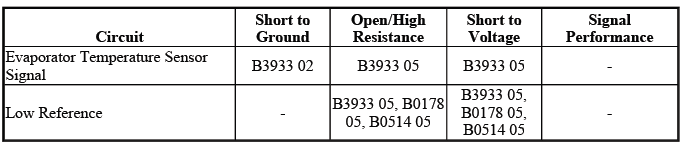
DTC B3933: EVAPORATOR AIR TEMPERATURE SENSOR
DTC B3933 relates to the evaporator air temperature sensor circuit. This sensor is used by the HVAC control module to monitor evaporator temperature and protect the A/C system from evaporator freeze-up. If the signal is shorted, open, or outside the expected temperature range, compressor operation may be disabled to protect the system.
Diagnostic Instructions
- Perform the Diagnostic System Check - Vehicle prior to using this diagnostic procedure.
- Review Strategy Based Diagnosis for an overview of the diagnostic approach.
- Diagnostic Procedure Instructions provides an overview of each diagnostic category.
The diagnostic system check should be completed before focusing on the evaporator sensor alone. A compressor disable complaint may involve the sensor, the wiring, HVAC module logic, pressure inputs, or other A/C-related conditions, so the larger system status should be reviewed first.
DTC Descriptors
DTC B3933 02
- Evaporator Air Temperature Sensor Short to Ground
This descriptor indicates that the evaporator air temperature sensor signal is being pulled lower than expected. A short to ground, damaged signal wire, moisture in the connector, or an internal sensor fault can create this condition.
DTC B3933 05
- Evaporator Air Temperature Sensor Short to Battery or Open
This descriptor points to a signal circuit that is open, shorted to voltage, or reading higher than the module expects. The module may interpret this as an invalid evaporator temperature and disable compressor operation.
Diagnostic Fault Information
The diagnostic fault information table helps identify which circuit conditions correspond to the DTC. It should be used with the HVAC schematic and connector end views before replacing the sensor or module.
Circuit Description
The HVAC control module supplies the evaporator air temperature sensor with a low reference circuit and a 5-volt signal circuit. The module measures the voltage drop across the sensor, and that voltage changes in proportion to evaporator temperature. As air temperature increases, sensor resistance decreases and the signal voltage decreases. As air temperature decreases, sensor resistance increases and the signal voltage increases.
This thermistor behavior allows the HVAC control module to estimate evaporator temperature while the A/C system is operating. In the Buick Enclave, this information is used as a protection input, helping the system prevent ice from forming on the evaporator core during extended cooling operation or humid driving conditions.
Conditions for Running the DTC
The ignition is turned ON.
With the ignition on, the HVAC control module can monitor the evaporator air temperature sensor circuit and compare the signal against the expected range. If the signal remains outside the allowable range long enough, the module can identify the fault and store the DTC.
Conditions for Setting the DTC
The HVAC control module detects the evaporator air temperature sensor signal circuit is less than -36ºC (-38º F) or more than 215ºC (419ºF) for more than 15 seconds.
These values are far outside the normal usable range for evaporator temperature feedback. When the signal indicates an unrealistic temperature for more than 15 seconds, the module treats the input as unreliable rather than using it for compressor control.
Action Taken When the DTC Sets
The A/C compressor will be disabled.
This action protects the evaporator and compressor system. Without a trusted evaporator temperature signal, the HVAC control module cannot accurately determine whether the evaporator is approaching a freeze condition, so disabling compressor operation prevents possible ice buildup and airflow restriction.
Conditions for Clearing the DTC
- The DTC will become history if the HVAC control module no longer detects a failure.
- The history DTC will clear after 100 fault-free ignition cycles.
Once the signal returns to a normal range and the module no longer detects the fault, the DTC can move to history status. If the issue does not repeat after enough fault-free ignition cycles, the history code will clear.
Reference Information
Use the reference sections below to confirm the correct circuit layout, connector terminals, test procedure, and scan tool data for evaporator temperature sensor diagnosis.
Schematic Reference
HVAC Schematics
Connector End View Reference
COMPONENT CONNECTOR END VIEWS - INDEX
Description and Operation
- Air Temperature Description and Operation
- Air Delivery Description and Operation
Electrical Information Reference
- Circuit Testing
- Connector Repairs
- Testing for Intermittent Conditions and Poor Connections
- Wiring Repairs
Scan Tool Reference
Control Module References for scan tool information
These references are useful because an evaporator temperature fault can be caused by the sensor, but it can also result from wiring damage, terminal tension loss, corrosion, or an HVAC control module input problem. Testing the circuit before replacing parts helps avoid repeat compressor disable concerns.
Circuit/System Verification
Ignition ON, observe the scan tool A/C Evaporator Temperature Sensor parameter. The reading should be between -39ºF (-35ºC) and 208ºF (98ºC) and change with evaporator air temperature changes.
During verification, the scan tool value should be compared with actual evaporator or outlet temperature behavior. A value that remains fixed, jumps suddenly, or does not respond as the A/C system changes temperature indicates that circuit testing is needed. A believable value that changes smoothly usually points away from a hard electrical fault.
Circuit/System Testing
IMPORTANT: If the evaporator air temperature sensor has an out of range condition caused by a short to voltage, short to ground or an open/high resistance, the scan tool will display the same value: 11ºC (51ºF).
This note is critical during diagnosis because different circuit failures can produce the same displayed scan tool value. A displayed 11ºC (51ºF) value should not be treated as proof that the evaporator is actually at that temperature. The circuit must be tested directly to determine whether the cause is a short to voltage, short to ground, open circuit, high resistance, or sensor fault.
1. Ignition OFF, disconnect the harness connector at the evaporator air temperature sensor.
Begin this test with the ignition off so the evaporator air temperature sensor circuit can be isolated before voltage or resistance checks are performed. During disconnection, inspect the connector body, terminal fit, wire insulation, and any signs of moisture or corrosion, because a poor connection at this sensor can disable A/C compressor operation even when the sensor itself is not damaged.
2. Ignition OFF, test for less than 10 ohms between the low reference circuit terminal 2 and ground.
- If greater than the specified range, test the low reference circuit for an open/high resistance. If the circuit tests normal, replace the HVAC control module.
This low reference test confirms that the sensor has a stable return path back through the HVAC control module circuit. If resistance is higher than specified, the module may receive a distorted temperature signal and interpret the evaporator temperature as invalid. On the Buick Enclave, this can lead to compressor disablement because the HVAC control module cannot trust the evaporator temperature input.
3. Ignition ON, test for 4.8-5.2 volts between the signal circuit terminal 1 and low reference circuit terminal 2.
- If less than the specified range, test the signal circuit for a short to
ground or open/high resistance.
If the circuit tests normal, replace the HVAC control module.
- If greater than the specified range, test the signal circuit for a short to voltage. If the circuit tests normal, replace the HVAC control module.
The signal circuit should stay within the specified voltage range when tested against the low reference circuit. A low reading can indicate a short to ground, an open circuit, or high resistance that prevents the module from seeing the correct thermistor response. A high reading usually points toward an unwanted voltage source on the signal circuit. Either condition can cause the scan tool value to appear misleading or fixed.
4. If all circuits test normal, test or replace the evaporator air temperature sensor.
If the low reference and signal circuits both test correctly, the evaporator air temperature sensor becomes the most likely cause of the fault. Before replacement, confirm that the sensor response is not being affected by connector damage, harness strain, or a poor terminal contact at the sensor.
Component Testing
1. Test the evaporator air temperature sensor by varying the sensor temperature while monitoring the sensor resistance.
The resistance should change smoothly as the sensor temperature changes. A sensor that stays fixed, jumps suddenly, opens intermittently, or does not follow temperature changes should be considered unreliable. This test is useful because the evaporator temperature sensor is a thermistor, and its resistance behavior is the main information the HVAC control module uses to estimate evaporator temperature.
2. Compare the readings with the Sensor Resistance Table and verify that the resistance is within 5 percent of the specification.
- If not within the specified range, replace the sensor.
When comparing readings, allow the sensor enough time to stabilize at each test temperature. A resistance value outside the 5 percent range can cause the HVAC control module to miscalculate evaporator temperature. In the Buick Enclave HVAC system, even an inaccurate but not completely failed sensor can create poor A/C cycling, reduced cooling performance, or unnecessary compressor shutdown.
Repair Instructions
Perform the Diagnostic Repair Verification after completing the diagnostic procedure.
- Evaporator Air Temperature Sensor Replacement
- Control Module References for HVAC control module replacement, setup and programming
After repair, confirm that the scan tool evaporator temperature value is believable and changes with A/C operation. If the HVAC control module has been replaced, setup and programming must be completed before final system verification. A complete verification should include compressor engagement, outlet air temperature response, and confirmation that the DTC does not return.
DTC P0532 OR P0533: AIR CONDITIONING A/C REFRIGERANT PRESSURE SENSOR
DTC P0532 and DTC P0533 relate to the A/C refrigerant pressure sensor circuit. This sensor allows the engine control module to monitor high-side refrigerant pressure and make decisions about compressor operation, cooling fan command, and system protection. If the signal voltage is too low or too high, the ECM may disable the compressor clutch to protect the air conditioning system from operating under unsafe pressure conditions.
Diagnostic Instructions
- Perform the Diagnostic System Check - Vehicle prior to using this diagnostic procedure.
- Review Strategy Based Diagnosis for an overview of the diagnostic approach.
- Diagnostic Procedure Instructions provides an overview of each diagnostic category.
These diagnostic instructions should be followed before focusing only on the pressure sensor. A refrigerant pressure code may be caused by a sensor fault, wiring issue, poor connector contact, ECM input concern, or an actual refrigerant system pressure problem. Starting with the complete system check helps avoid replacing electrical parts when the real cause is excessive pressure or low refrigerant charge.
DTC Descriptors
DTC P0532
- Air Conditioning A/C Refrigerant Pressure Sensor Circuit Low Voltage
This code indicates that the ECM is seeing a refrigerant pressure sensor signal that is lower than expected. Possible causes include a short to ground, open 5-volt reference, low reference concern, sensor failure, or an actual pressure condition that drives the signal very low.
DTC P0533
- Air Conditioning A/C Refrigerant Pressure Sensor Circuit High Voltage
This code indicates that the signal voltage is higher than the ECM expects. A short to voltage, open low reference, faulty pressure sensor, overcharged system, restricted condenser airflow, or a true high-pressure condition can all lead to this type of fault.
Diagnostic Fault Information
The diagnostic fault information table should be used with the HVAC schematic and connector end views to identify which circuit condition matches the stored code. It helps separate a signal circuit issue from a reference circuit problem or an actual high-side pressure concern.

Circuit/System Description
The engine control module monitors high-side refrigerant pressure through the A/C refrigerant pressure sensor. The ECM supplies the sensor with a 5-volt reference and a low reference. As refrigerant pressure changes, the pressure sensor changes the signal voltage sent back to the ECM. When pressure is low, the signal voltage is low. As pressure increases, the signal voltage rises.
When pressure becomes high, the ECM can command the cooling fans on to help reduce condenser temperature and bring system pressure down. If pressure becomes too high or too low, the ECM will not allow the A/C compressor clutch to engage. This protects the compressor, refrigerant lines, condenser, seals, and related components from damage caused by abnormal operating pressure.
For the Buick Enclave, this pressure input is important because it links the HVAC system with powertrain control. The ECM must know whether compressor operation is safe before it allows the clutch to engage, and it may also use pressure information to manage engine load and cooling fan operation.
Conditions for Running the DTC
- The engine is running.
The engine must be running because the ECM evaluates the refrigerant pressure sensor input during active powertrain and A/C system operation. This allows the module to compare sensor voltage with real operating conditions instead of checking the circuit only in a static key-on state.
Conditions for Setting the DTC
- The ECM detects that the A/C pressure is less than 1 psi (0.01 volt) sets DTC P0532.
- The ECM detects that the A/C pressure is greater than 425 psi (4.90 volts) sets DTC P0533.
These thresholds represent signal values that fall outside the expected pressure range. A pressure reading below 1 psi is treated as an extremely low signal condition, while a reading above 425 psi is treated as an excessive high-pressure or high-voltage condition. Either result causes the ECM to protect the A/C system by preventing compressor operation.
Action Taken When the DTC Sets
- The ECM will not illuminate the malfunction indicator lamp (MIL).
- The ECM stores the failure records.
- The A/C compressor clutch is disabled.
The malfunction indicator lamp is not turned on for these DTCs, but the failure record is stored for diagnosis. The most noticeable symptom is usually loss of A/C compressor engagement. This is intentional: the ECM disables the compressor clutch because continued operation with an invalid or extreme pressure reading could damage the system.
Conditions for Clearing the DTC
- The DTC will become history if the ECM no longer detects a failure.
- The history DTC will clear after 40 consecutive ignition cycles have occurred without a malfunction.
If the pressure signal returns to a normal range and the ECM no longer detects the fault, the code can move to history status. If the malfunction does not repeat through 40 consecutive ignition cycles, the history code clears. This behavior helps identify whether the concern is current or intermittent.
Diagnostic Aids
A malfunction within the refrigerant system causing high pressure can cause DTC P0533 to set.
DTC P0533 should not be treated only as an electrical fault. A restricted condenser, inoperative cooling fan, blocked airflow, overcharged refrigerant system, contaminated refrigerant, or restriction in the high-side circuit can raise pressure enough to trigger the code. Comparing scan tool pressure data with actual manifold gauge readings is a strong way to separate a true pressure problem from a sensor or wiring concern.
Reference Information
The reference information below supports accurate pressure sensor diagnosis by identifying the correct circuit layout, connector terminals, electrical test methods, and scan tool data. These references should be used before replacing the sensor, ECM, or any refrigerant system component.
Schematic Reference
HVAC Schematics
Connector End View Reference
COMPONENT CONNECTOR END VIEWS - INDEX
Description and Operation
- Air Temperature Description and Operation
- Air Delivery Description and Operation
Electrical Information Reference
- Circuit Testing
- Connector Repairs
- Testing for Intermittent Conditions and Poor Connections
- Wiring Repairs
Scan Tool Reference
Control Module References for scan tool information
Using these references together helps confirm whether the ECM is receiving a valid signal, whether the sensor has proper reference and ground circuits, and whether the refrigerant pressure shown on the scan tool makes sense for the actual A/C system condition.
Circuit/System Verification
Ignition ON, observe the scan tool A/C Refrigerant Pressure Sensor parameter. The reading should be between 0.1 volts (1 psi) and 4.90 volts (425 psi) and change with A/C refrigerant pressure changes.
During verification, the pressure sensor value should respond in a believable way as refrigerant pressure changes. A value that stays fixed, shows 0 volts, remains near 5 volts, or does not match actual gauge pressure indicates that circuit testing is required. On the Buick Enclave, this check is important because the ECM may disable compressor operation even though the HVAC control panel appears to request A/C normally.
Circuit/System Testing
1. Ignition OFF, disconnect the harness connector at the A/C refrigerant pressure sensor.
With the ignition off, disconnect the sensor carefully and inspect the connector for damaged terminals, corrosion, oil contamination, loose locks, or signs of harness strain near the pressure line. Connector condition matters because the pressure sensor depends on a stable 5-volt reference, low reference, and signal circuit.
2. Ignition OFF, test for less than 10 ohms between the low reference circuit terminal 1 and ground.
- If greater than the specified range, test the low reference circuit for an open/high resistance. If the circuit tests normal, replace the ECM.
This test confirms that the pressure sensor has a good low reference path. High resistance in this circuit can shift the sensor signal and cause the ECM to calculate an incorrect refrigerant pressure. If the circuit itself tests correctly but the low reference remains incorrect, the ECM input or internal circuit may be at fault.
3. Ignition ON, test for 4.8-5.2 volts between the 5-volt reference circuit terminal 2 and ground.
- If less than the specified range, test the 5-volt reference circuit for a short to ground or an open/high resistance. If the circuit tests normal, replace the ECM.
- If greater than the specified range, test the 5-volt reference circuit for a short to voltage. If the circuit tests normal, replace the ECM.
The 5-volt reference circuit must remain within the specified range for the pressure sensor to operate accurately. A low reading can point to a short to ground, high resistance, or an open circuit. A high reading suggests a short to voltage or another circuit feeding unwanted voltage into the reference line. If the wiring is correct and the voltage remains out of range, ECM diagnosis or replacement may be required.
4. Verify the scan tool A/C High Side Pressure Sensor parameter is less than 0.1 volts (1 psi).
- If greater than the specified range, test the signal circuit terminal 3 for a short to voltage. If the circuit tests normal, replace the ECM.
This reading confirms that the ECM is seeing the expected low-end value when the pressure sensor is disconnected. If the scan tool still shows a higher voltage or pressure value, the signal circuit may be receiving voltage from another source, or the ECM input may be interpreting the circuit incorrectly. On the Buick Enclave, this step helps separate a true pressure sensor fault from a wiring or module input issue.
5. Install a 3A fused jumper wire between the signal circuit terminal 3 and the 5-volt reference circuit terminal 2. Verify the scan tool A/C Refrigerant High Side Pressure Sensor parameter is greater than 4.90 volts (425 psi).
- If less than the specified range, test the signal circuit for short to
ground or an open/high resistance.
If the circuit tests normal, replace the ECM.
The fused jumper forces the signal circuit toward the high end of the sensor range. This verifies that the signal wire can carry the expected voltage back to the ECM and that the module can recognize a high-pressure input. Using a fused jumper protects the circuit during testing if an unexpected short or wiring problem is present.
6. If all circuits test normal, test or replace the A/C refrigerant pressure sensor.
If the low reference circuit, 5-volt reference circuit, and signal circuit all respond correctly, the A/C refrigerant pressure sensor becomes the most likely cause of the incorrect reading. Before replacing it, inspect the connector terminals and harness near the high-side line, because vibration, heat, and previous service work can create intermittent contact problems.
Repair Instructions
Perform the Diagnostic Repair Verification after completing the diagnostic procedure.
- Air Conditioning (A/C) Refrigerant Pressure Sensor Replacement
- Control Module References for the ECM replacement, setup and programming
After the repair is complete, verify the scan tool pressure reading against the actual refrigerant system condition. If the ECM was replaced, setup and programming must be completed before the A/C system is judged. A correct repair should allow the pressure value to change normally and should prevent DTC P0532 or P0533 from resetting.
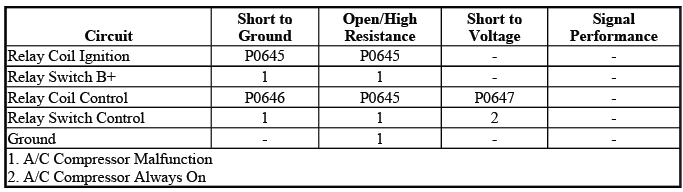
DTC P0645, P0646 OR P0647: AIR CONDITIONING (A/C) COMPRESSOR CLUTCH RELAY
DTC P0645, P0646, and P0647 relate to the A/C compressor clutch relay control circuit. These codes indicate that the ECM has detected a fault in the relay command circuit used to engage the compressor clutch. Because the compressor clutch depends on relay control, battery voltage, ECM grounding strategy, and system permission logic, diagnosis should include both the electrical circuit and the operating conditions that allow A/C engagement.
Diagnostic Instructions
- Perform the Diagnostic System Check - Vehicle prior to using this diagnostic procedure.
- Review Strategy Based Diagnosis for an overview of the diagnostic approach.
- Diagnostic Procedure Instructions provides an overview of each diagnostic category.
These instructions help ensure that the diagnosis begins with the full vehicle check rather than only the relay. A compressor clutch fault may be linked to a failed relay, open fuse feed, shorted clutch coil, control circuit fault, ECM driver concern, or a system condition that prevents compressor engagement.
DTC Descriptor
DTC P0645
- Air Conditioning (A/C) Compressor Clutch Relay Control Circuit
This code identifies a general fault in the compressor clutch relay control circuit. It should be treated as a circuit performance concern until relay control, circuit continuity, and ECM command operation are verified.
DTC P0646
- Air Conditioning (A/C) Compressor Clutch Relay Control Circuit Low Voltage
This descriptor indicates that the control circuit voltage is lower than expected. A short to ground, open relay feed, poor connection, or ECM control issue can cause this condition.
DTC P0647
- Air Conditioning (A/C) Compressor Clutch Relay Control Circuit High Voltage
This code points toward a control circuit that is higher than expected, commonly from a short to voltage, unwanted voltage feed, relay circuit fault, or an ECM driver circuit concern.
Diagnostic Fault Information
The diagnostic fault information table should be used with the wiring schematic before parts are replaced. It helps identify whether the fault is more likely in the B+ feed, relay control circuit, compressor clutch circuit, relay, clutch assembly, or ECM command path.
Circuit System Description
When the A/C switch is pressed, the HVAC control module sends a serial data message to the ECM requesting air conditioning operation. If the required operating conditions are met, the ECM grounds the A/C compressor clutch relay control circuit. This switches the A/C CMPRSR CLUTCH relay on, closes the relay contacts, and allows battery voltage to reach the A/C compressor clutch assembly.
In the Buick Enclave, the relay acts as the controlled power path between the battery feed and the compressor clutch. The HVAC control module requests A/C operation, but the ECM makes the final decision based on pressure, temperature, engine speed, throttle position, and engine load conditions. This prevents compressor engagement when operation could reduce drivability or damage the A/C system.
Conditions for Running the DTC
- The ignition voltage is between 11-18 volts.
- The engine speed is greater than 600 RPM.
- An A/C request is made.
These conditions allow the ECM to monitor the compressor clutch relay control circuit during an actual A/C request. The engine must be running above the minimum speed, system voltage must be within range, and the HVAC system must request compressor operation before the ECM can evaluate whether the relay control circuit responds correctly.
Conditions for Setting the DTC
P0645 or P0646
The ECM detects a short to ground or an open at the A/C compressor clutch relay control circuit.
A short to ground or open circuit can prevent the ECM from controlling the relay correctly. Depending on the exact failure, the compressor may not engage, may engage at the wrong time, or may create a circuit response that does not match the ECM command.
P0647
The ECM detects a short to voltage at the A/C compressor clutch relay control circuit.
A short to voltage can hold the relay circuit in an unintended state or prevent the ECM from pulling the circuit to the expected level. This is why circuit voltage must be checked before condemning the relay or compressor clutch.
Action Taken When the DTC Sets
P0645 or P0646
The A/C compressor is inoperative or always active. The A/C compressor solenoid is commanded to 0% displacement. This causes warm air from the ducts, even with unwanted clutch engagement.
With these faults, the system may lose normal compressor control. Even if the clutch appears to engage unexpectedly, the compressor output may be reduced or disabled, leading to warm outlet air and poor cooling performance.
P0647
The A/C compressor is inoperative.
When the ECM detects a high-voltage fault on the relay control circuit, it disables compressor operation to protect the system and prevent uncontrolled clutch engagement.
Conditions for Clearing the DTC
A History DTC clears after 40 consecutive warm-up cycles have occurred without a malfunction.
If the circuit fault does not repeat through the required number of warm-up cycles, the history code clears. If the DTC returns immediately after clearing, the fault is still active and the relay control circuit should be tested directly.
Diagnostic Aids
The following conditions must be met in order for the ECM to turn on the compressor clutch:
- Battery voltage is between 9-18 volts.
- Engine coolant temperature (ECT) is less than 123ºC (253ºF).
- Engine speed is greater than 600 RPM.
- Engine speed is less than 4, 760 RPM.
- A/C high side pressure is between 269-2929 kPa (39-425 psi)-Refer to Air Conditioning (A/C) System Performance Test.
- Throttle position is less than 100%.
- Evaporator temperature is greater than 0ºC (32ºF).
- ECM does not detect excessive torque load.
- ECM does not detect insufficient idle quality.
- The ambient temperature is above 1ºC (34ºF).
These enable conditions are important because a compressor that does not engage is not always caused by a failed relay. The ECM may intentionally withhold clutch operation if pressure is outside range, engine temperature is too high, engine speed is outside the allowed window, evaporator temperature is too low, or the powertrain is under a condition where compressor load should be removed.
For the Buick Enclave, scan tool data should be reviewed before relay replacement. A/C request status, clutch relay command, high-side pressure, evaporator temperature, ambient temperature, engine speed, coolant temperature, and throttle position can show whether the ECM is refusing compressor operation by design or losing control because of a circuit fault.
Reference Information
The references below provide the correct supporting information for relay circuit diagnosis. Use them to confirm connector views, relay terminal identification, wiring paths, and scan tool data before replacing the relay, compressor clutch, or ECM.
Schematic Reference
HVAC Schematics
Connector End View Reference
COMPONENT CONNECTOR END VIEWS - INDEX
Description and Operation
- Air Delivery Description and Operation
- Air Temperature Description and Operation
Electrical Information Reference
- Circuit Testing
- Connector Repairs
- Testing for Intermittent Conditions and Poor Connections
- Wiring Repairs
Scan Tool Reference
Control Module References for scan tool information
Circuit/System Testing
1. Ignition OFF, disconnect the KR29 A/C compressor clutch relay, ignition ON.
Disconnecting the relay isolates the relay terminals so the B+ feed, relay control side, and compressor clutch output side can be checked separately. This prevents a faulty relay or shorted clutch circuit from hiding the true circuit condition.
2. Verify a test lamp illuminates between the B+ circuit terminal 30 and ground.
A lit test lamp confirms that terminal 30 has a usable battery feed under load. A voltmeter may show voltage on a weak circuit, but the test lamp adds a small load and is better for identifying an open, high resistance, or fuse feed concern.
If the test lamp does not illuminate and the circuit fuse is good
- Ignition OFF.
- Test for less than 2 ohms in the B+ circuit end to end.
- If 2 ohms or greater, repair the open/high resistance in the circuit.
- If less than 2 ohms, verify the fuse is not open and there is voltage at the fuse.
If the fuse is good but the lamp does not illuminate, the B+ circuit may have an open or high-resistance condition between the fuse and relay terminal. The circuit should be checked end to end so the repair is made at the actual high-resistance point rather than at the relay by assumption.
If the test lamp does not illuminate and the circuit fuse is open
- Ignition OFF.
- Test for infinite resistance between the B+ circuit and ground.
- If less than infinite resistance, repair the short to ground on the circuit.
- If infinite resistance,
- Disconnect the harness connector at the Q2 A/C compressor clutch.
- Test for infinite resistance between the control circuit terminal 87 and
ground.
- If less than infinite resistance, repair the short to ground on the circuit.
- If infinite resistance, test or replace the Q2 A/C compressor clutch.
An open fuse usually means the circuit must be checked for a short before another fuse is installed. If the B+ circuit is not shorted to ground, the compressor clutch output circuit and clutch assembly should be isolated and tested. A shorted clutch coil or damaged wire to the compressor can open the fuse and cause the relay circuit to appear inoperative.
If the test lamp illuminates
3. Ignition ON.
Turn the ignition on so the relay feed and control side of the circuit can be checked under the same electrical state used during normal A/C compressor clutch operation.
4. Verify a test lamp illuminates between the ignition circuit terminal 85 and ground.
This check confirms that terminal 85 has the ignition voltage needed for the relay coil side of the circuit. If this feed is missing, the ECM cannot control the relay correctly, even if the rest of the A/C compressor clutch circuit is in good condition.
If the test lamp does not illuminate
Replace the X50A underhood fuse block.
If the test lamp illuminates
5. Connect a test lamp between the ignition circuit terminal 85 and the control circuit terminal 86.
Connecting the lamp across the relay coil control side allows the circuit to be checked as a working load, not only as a voltage reading on a meter. This is useful because a circuit with high resistance may show voltage but still fail when current is required.
6. Verify the test lamp turns ON and OFF when commanding the Engine Control Module A/C Compressor Clutch Relay ON and OFF with a scan tool.
When the relay is commanded with the scan tool, the lamp should follow the command. On the Buick Enclave, this confirms that the ECM can switch the compressor clutch relay control circuit and that the relay coil control path is capable of responding to module commands.
If the test lamp is always OFF
- Ignition OFF, disconnect the harness connector at the K20 engine control module, ignition ON.
- Test for less than 1 V between the control circuit and ground.
- If 1 V or greater, repair the short to voltage on the circuit.
- If less than 1 V
- Ignition OFF.
- Test for less than 2 ohms in the control circuit end to end.
- If 2 ohms or greater, repair the open/high resistance in the circuit.
- If less than 2 ohms, replace the K20 engine control module.
If the test lamp never turns on, the relay control circuit is not being pulled through the proper command path. The circuit should be checked for unwanted voltage, an open, or high resistance before the ECM is replaced. This prevents a control module from being condemned when the actual problem is a damaged wire or poor terminal connection.
If the test lamp is always ON
- Ignition OFF, disconnect the harness connector at the K20 engine control module,
- Test for infinite resistance between the control circuit and ground.
- If less than infinite resistance, repair the short to ground on the circuit.
- If infinite resistance, replace the K20 engine control module.
If the lamp remains on all the time, the control circuit may be shorted to ground or the ECM driver may be holding the circuit active when it should not. This can create unwanted relay behavior and may cause the compressor clutch circuit to operate incorrectly.
If the test lamp turns ON and OFF
7. Verify a test lamp does not illuminate between the control circuit terminal 87 and ground.
This step checks whether the compressor clutch output side of the relay circuit is being fed voltage when it should not be. Terminal 87 should not have unintended voltage with the relay removed and the circuit isolated.
If the test lamp illuminates
Repair the short to voltage on the circuit.
If the test lamp does not illuminate
8. Ignition OFF and all vehicle systems OFF, disconnect the harness connector at the Q2 A/C compressor clutch. It may take up to 2 minutes for all vehicle systems to power down.
Allowing the vehicle systems to power down helps avoid false readings from retained power or active module circuits. Once the compressor clutch connector is disconnected, the clutch ground and feed side can be checked without the clutch coil affecting the test result.
9. Test for less than 10 ohms between the ground circuit terminal 1 and ground.
This verifies that the compressor clutch has a usable ground path. A weak or open ground can prevent clutch engagement even when the relay, fuse, and ECM command are working correctly.
If 10 ohms or greater
- Ignition OFF.
- Test for less than 2 ohms in the ground circuit end to end.
- If 2 ohms or greater, repair the open/high resistance in the circuit.
- If less than 2 ohms, repair the open/high resistance in the ground connection.
If resistance is too high, the ground path must be repaired before further clutch testing is trusted. A poor ground can mimic a failed compressor clutch because the coil may not receive enough current to pull in reliably.
If less than 10 ohms
10. Connect the harness connector at the Q2 A/C compressor clutch.
Reconnect the clutch connector only after the ground circuit has been verified. This allows the next test to check actual clutch engagement through the output side of the relay circuit.
11. Ignition ON, connect a 10 A fused jumper wire between the B+ circuit terminal 30 and the control circuit terminal 87.
The fused jumper bypasses the relay contacts and sends battery voltage directly through the compressor clutch output circuit. The fuse protects the circuit during the test if the clutch coil or wiring has a short.
12. Verify the Q2 A/C compressor clutch is activated.
The clutch should engage when voltage is supplied through the fused jumper. If it does, the compressor clutch assembly and output wiring are capable of operating, and attention should return to the relay itself or its command side.
If the Q2 A/C compressor clutch does not activate
- Ignition OFF, disconnect the harness connector at the Q2 A/C compressor clutch.
- Test for less than 2 ohms in the control circuit end to end.
- If 2 ohms or greater, repair the open/high resistance in the circuit.
- If less than 2 ohms, test or replace the Q2 A/C compressor clutch.
If the clutch does not activate, the output circuit from the relay to the clutch should be checked for an open or high-resistance condition. If the circuit tests correctly, the clutch coil or clutch assembly is the likely fault.
If the Q2 A/C compressor clutch activates
13. Test or replace the KR29 A/C compressor clutch relay.
If the clutch activates during the fused jumper test, the relay contacts or internal relay coil are the likely remaining concern. Testing the relay before replacement confirms whether the relay can close the power path under command.
Component Testing
1. Ignition OFF, disconnect the KR29 A/C compressor clutch relay.
Removing the relay allows the coil and contact circuits to be checked directly. This separates relay failure from wiring faults in the fuse block, ECM control circuit, or compressor clutch circuit.
2. Test for 60-180 ohms between terminals 85 and 86.
This resistance check evaluates the relay coil. A reading outside this range indicates that the coil is open, shorted, or internally damaged and cannot be trusted for normal A/C compressor clutch control.
If not between 60-180 ohms
Replace the KR29 A/C compressor clutch relay.
If between 60-180 ohms
3. Test for infinite resistance between the terminals listed below:
- 30 and 86
- 30 and 87
- 30 and 85
- 85 and 87
These checks confirm that the relay contacts and coil terminals are not internally shorted when the relay is not energized. Any continuity where infinite resistance is expected means the relay may pass current at the wrong time.
If less than infinite resistance
Replace the KR29 A/C compressor clutch relay.
If infinite resistance
4. Install a 15 A fused jumper wire between terminal 85 and 12 V. Install a jumper wire between terminal 86 and ground.
This energizes the relay coil manually. When the coil is powered, the internal contacts should close and create continuity between the power feed and output terminals.
5. Test for less than 2 ohms between terminals 30 and 87.
A low resistance reading between terminals 30 and 87 confirms that the relay contacts close properly when the coil is energized. High resistance here can cause voltage drop, weak clutch engagement, intermittent A/C operation, or warm air from the vents even when the system requests compressor operation.
If 2 ohms or greater
Replace the KR29 A/C compressor clutch relay.
If less than 2 ohms
6. All OK.
If all relay tests pass, the KR29 relay is operating as designed at the time of testing. Any remaining concern should be traced through the control command, fuse block terminals, compressor clutch wiring, pressure inputs, or ECM A/C permission logic.
Repair Instructions
Perform the Diagnostic Repair Verification after completing the repair.
- Air Conditioning Compressor Replacement
- Relay Replacement (Within an Electrical Center) , Relay Replacement (Attached to Wire Harness)
- Air Conditioning Clutch Assembly Replacement
- Control Module References for HVAC control module and ECM replacement, setup and programming
After any repair, verify that the compressor clutch engages only when commanded and that the A/C system cools normally under approved operating conditions. For the Buick Enclave, final verification should include scan tool A/C request status, relay command, clutch operation, high-side pressure, evaporator temperature, and outlet air temperature.
SYMPTOMS - HVAC SYSTEMS - MANUAL
Manual HVAC symptoms should be diagnosed by confirming the customer complaint first, then checking the most visible and accessible causes before moving into electrical testing. A problem with airflow, temperature, fogging, compressor operation, or outlet selection may be caused by a simple restriction, a seized component, a water leak, a circuit fault, or incorrect operating conditions.
IMPORTANT: Review the system operation in order to familiarize yourself with the system functions. Refer to the following procedures:
- Air Delivery Description and Operation
- Air Temperature Description and Operation
Reviewing system operation before diagnosis helps avoid chasing normal behavior as a fault. For example, compressor operation may be blocked in cold ambient temperatures, and airflow complaints may be tied to mode selection, recirculation position, filter condition, or cabin air restrictions rather than a failed control module.
Visual/Physical Inspection
- Inspect for aftermarket devices which could affect the operation of the HVAC System. Refer to Checking Aftermarket Accessories.
- Inspect the easily accessible or visible system components for obvious damage or conditions which could cause the symptom.
- Verify the A/C compressor clutch turns freely and is not seized.
- The A/C compressor will not operate in cold outside air temperatures. Refer to Air Temperature Description and Operation.
- The following could cause window fogging:
- Wet carpet or mats
- High humidity
- Interior water leak
- Blocked A/C evaporator drain tube
- Maximum passenger capacity
- Blocked body pressure relief valves
- Inspect the air distribution system for causes of reduced air flow:
- Obstructed or dirty passenger compartment air filter, if equipped
- Blocked or damaged air inlet or outlet vents
A careful visual inspection often saves diagnostic time. Aftermarket wiring, added electronics, damaged connectors, blocked drains, soaked carpet, debris in the air inlet, or a restricted cabin filter can create symptoms that look like HVAC module or actuator faults. In the Buick Enclave manual HVAC system, checking these basic conditions first helps separate a physical airflow or moisture problem from an electrical control problem.
Intermittent
Intermittent HVAC faults are often caused by weak electrical connections, loose terminals, damaged wiring, moisture inside a connector, or a circuit that only fails when the harness is moved, heated, cooled, or exposed to vibration. Refer to Testing for Intermittent Conditions and Poor Connections before replacing major components, because a fault that appears only at certain times can easily be mistaken for a failed module, relay, or compressor.
On the Buick Enclave manual HVAC system, intermittent A/C complaints should be checked carefully around the compressor clutch connector, relay terminals, HVAC control module connector, ECM connector, fuse block, and any harness areas close to heat, sharp edges, or previous repair work.
Symptom List
Refer to a symptom diagnostic procedure from the following list in order to diagnose the symptom. Selecting the correct symptom path helps keep the diagnosis focused instead of testing unrelated HVAC circuits:
- Blower Motor Malfunction
- Air Conditioning Compressor Malfunction
- Air Temperature Malfunction
- Auxiliary Blower Motor Malfunction
- Air Recirculation Malfunction
- Noise Diagnosis - Air Conditioning (A/C) System
- Noise Diagnosis - Blower Motor
- Odor Diagnosis
Each symptom points toward a different part of the heating, ventilation, and air conditioning system. A blower concern may involve power, ground, speed control, or the motor itself. A temperature concern may involve coolant flow, refrigerant performance, blend-door movement, or sensor input. A noise or odor complaint usually requires both electrical testing and a close physical inspection of the HVAC case, ducts, blower area, and evaporator drain.
AIR CONDITIONING COMPRESSOR MALFUNCTION
Diagnostic Instructions
- Perform the Diagnostic System Check - Vehicle prior to using this diagnostic procedure.
- Review Strategy Based Diagnosis for an overview of the diagnostic approach.
- Diagnostic Procedure Instructions provides an overview of each diagnostic category.
These instructions should be followed before testing the compressor circuit directly. The compressor clutch may be disabled by an electrical fault, but it may also be disabled intentionally by the ECM because pressure, engine speed, coolant temperature, evaporator temperature, or engine load is outside the allowed range.
Circuit/System Description
When the A/C switch is pressed, the HVAC control module grounds the A/C request signal circuit. This request is sent to the ECM so the engine control module can decide whether the A/C compressor clutch relay should be commanded on. If the required conditions are met, the ECM grounds the A/C compressor clutch relay control circuit, switching the A/C CMPRSR CLUTCH relay.
When the relay contacts close, battery voltage is supplied to the A/C compressor clutch assembly. The clutch then engages the compressor drive so refrigerant can circulate through the system. In the Buick Enclave, this control path allows the HVAC system to request cooling while the ECM retains final authority over compressor engagement for engine protection and A/C system safety.
Diagnostic Aids
The following conditions must be met in order for the ECM to turn on the compressor clutch:
- Battery voltage is between 9-18 volts.
- Engine coolant temperature (ECT) is less than 123ºC (253ºF).
- Engine speed is less than 4760 RPM.
- Engine speed is more than 600 RPM.
- A/C high side pressure is between 2929-269 kPa (425-39 psi).
- Throttle position is less than 100 percent.
- Evaporator temperature is greater than 0ºC (32ºF)
- ECM does not detect excessive torque load
- ECM does not detect insufficient idle quality.
These enable conditions are important because a compressor that does not engage is not automatically defective. The ECM may block clutch operation during low voltage, high coolant temperature, incorrect refrigerant pressure, wide throttle demand, low evaporator temperature, poor idle quality, or excessive torque load. Scan tool data should be reviewed so a normal compressor inhibit condition is not misdiagnosed as a relay, wiring, or clutch failure.
Reference Information
The following reference information should be used to support the circuit tests and confirm the correct connector locations, circuit numbers, and scan tool data before any parts are replaced.
Schematic Reference
HVAC Schematics
Connector End View Reference
COMPONENT CONNECTOR END VIEWS - INDEX
Electrical Information Reference
- Circuit Testing
- Connector Repairs
- Testing for Intermittent Conditions and Poor Connections
- Wiring Repairs
Scan Tool Reference
Control Module References for Scan Tool Information
Using the schematic together with scan tool data helps separate a missing A/C request from a failed relay control circuit, poor ground, open fuse feed, shorted clutch coil, or ECM command issue. This is especially useful when the system appears to respond at the control panel but the compressor clutch does not engage.
Circuit/System Testing
1. Ignition OFF, disconnect the harness connector X2, terminal 8 ground circuit terminal at the HVAC control module.
Disconnecting the HVAC control module connector isolates the ground circuit so resistance can be checked without module influence. Before testing, inspect the connector for spread terminals, corrosion, water entry, or damage caused by previous probing.
2. Test for less than 1.0 ohm of resistance between the ground circuit terminal 2 and ground.
- If greater than the specified range, test the ground circuit for an open/high resistance.
A low resistance reading confirms that the HVAC control module has a reliable ground path for the A/C request circuit. If resistance is higher than specified, the module may not be able to send a clean request signal to the ECM, which can prevent compressor engagement even when the A/C button is pressed.
3. Remove the A/C compressor clutch relay.
Removing the relay allows the relay coil feed, relay switch feed, control side, and compressor clutch output circuit to be tested separately. This helps identify whether the fault is in the relay itself or in one of the circuits connected to it.
4. Verify that a test lamp illuminates between the relay coil B+ circuit terminal 85 and ground.
- If the test lamp does not illuminate, test the B+ circuit for a short to ground or an open/high resistance.
The test lamp checks whether the relay coil has the required B+ supply under load. A voltmeter may show voltage on a weak circuit, but a test lamp is better for revealing an open or high-resistance feed that cannot carry enough current to operate the relay coil.
5. Verify that a test lamp illuminates between the relay switch B+ circuit terminal 30 and ground.
- If the test lamp does not illuminate, test the relay switch B+ circuit for an open/high resistance. If the A/C clutch fuse is open, test the relay switch control circuit for a short to ground. If all circuits test normal, test or replace the A/C compressor clutch.
Terminal 30 supplies the power that will be sent to the compressor clutch when the relay contacts close. If this feed is missing, the compressor clutch cannot engage. If the fuse is open, the output side of the circuit and clutch coil should be checked for a short before another fuse is installed.
6. Disconnect the harness connector at the A/C compressor clutch terminal 1.
This isolates the compressor clutch assembly from the vehicle harness so the ground and control circuits can be checked without the clutch coil affecting the readings.
7. Ignition OFF test for less than 1.0 ohm of resistance between the A/C compressor ground circuit terminal 2 and ground.
- If greater than the specified range, test the ground circuit for an open/high resistance.
The compressor clutch requires a strong ground path to pull in firmly. High resistance at the ground can cause no engagement, weak engagement, intermittent engagement, or clutch chatter. On the Buick Enclave, this ground check should be completed before condemning the clutch assembly.
8. Connect the harness connector at the A/C compressor clutch.
Reconnect the clutch only after the ground path has been verified. The next step checks whether the clutch can operate when battery voltage is supplied through the relay output circuit.
9. Connect a 10-amp fused jumper wire between the relay switch B+ circuit terminal 30 and the relay switch control circuit terminal 87. Verify the A/C compressor clutch engages.
- If the A/C compressor clutch does not activate, test the control circuit
for an open/high resistance.
If the circuit tests normal, test or replace the A/C compressor.
The fused jumper bypasses the relay contacts and sends power directly through the clutch output circuit. If the clutch engages, the output wiring and clutch assembly are capable of operating. If it does not engage, the output circuit, connector, ground, or clutch coil must be tested further before moving back to the ECM command side.
10. Connect a test lamp between the relay control circuit terminal 86 and the relay coil B+ circuit terminal 85.
This setup allows the ECM relay control circuit to be tested as a loaded circuit. The lamp should respond when the ECM grounds or releases the relay control circuit.
11. Using a scan tool, command the A/C relay output ON and OFF. The test lamp should turn ON and OFF when changing between the commanded states.
- If the test lamp remains ON all the time, test for a short to ground on the control circuit connector X1 terminal 53. If the circuit tests normal, replace the ECM.
- If the test lamp remains OFF all the time, test for a short to voltage or an open/high resistance on the control circuit. If the circuit tests normal, replace the ECM.
If the lamp stays on all the time, the relay control circuit may be shorted to ground or the ECM driver may be stuck active. If the lamp stays off all the time, the circuit may be open, shorted to voltage, or unable to be grounded by the ECM. This command test is one of the most useful checks because it confirms whether the ECM can actually control the compressor relay.
12. If all circuits test normal, test or replace the A/C compressor.
If the request circuit, relay feeds, relay control, compressor ground, and output circuit all pass testing, the compressor clutch or compressor assembly becomes the likely fault. Before replacement, verify that the clutch air gap, connector condition, coil resistance, and mechanical compressor condition are not creating the symptom.
Repair Instructions
Perform the Diagnostic Repair Verification after completing the diagnostic procedure.
- Air Conditioning Clutch Assembly Replacement
- Air Conditioning Compressor Replacement
- Control Module References for HVAC control module and ECM replacement, setup and programming
After repair, confirm that the A/C request is recognized, the relay is commanded correctly, the compressor clutch engages under approved conditions, and the outlet air temperature drops as expected. For the Buick Enclave manual HVAC system, final verification should include scan tool A/C request status, relay command status, clutch engagement, high-side pressure, evaporator temperature, and a check for returning DTCs.
BLOWER MOTOR MALFUNCTION
A blower motor malfunction should be diagnosed by separating the power supply, ground path, control signal, blower motor control module, and blower motor itself. In the Buick Enclave manual HVAC system, the blower may fail completely, operate only at one speed, respond slowly, run intermittently, or deliver less airflow than expected even when the control panel appears to respond normally.
Diagnostic Instructions
- Perform the Diagnostic System Check - Vehicle prior to using this diagnostic procedure.
- Review Strategy Based Diagnosis for an overview of the diagnostic approach.
- Diagnostic Procedure Instructions provides an overview of each diagnostic category.
These instructions should be followed before direct circuit testing begins. A blower concern may be caused by the blower motor, the control module, the HVAC control module command, an open fuse feed, a poor ground, damaged terminals, or high resistance in the harness. Starting with the correct diagnostic approach helps avoid replacing the blower motor when the actual fault is in the control circuit.
Diagnostic Fault Information
The diagnostic fault information table identifies the circuits and possible fault types related to blower motor operation. It should be used together with the wiring schematic and connector end views so each circuit can be checked at the correct terminal.
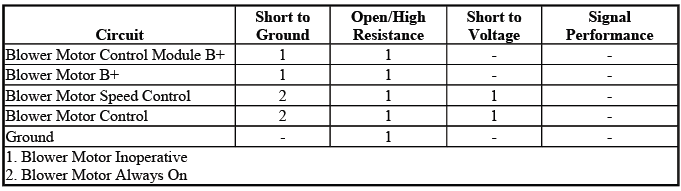
Circuit/System Description
The blower motor control module works as the interface between the HVAC control module and the blower motor. It receives the blower speed command and then controls how much power is delivered to the blower motor. The blower motor speed control circuit, battery positive circuit, and ground circuit allow the module to operate and respond to driver-selected blower settings.
The HVAC control module sends a pulse width modulation, or PWM, signal to the blower motor speed control module. This PWM command tells the blower motor control module how fast the blower should run. The module then supplies 12 volts to the blower motor through the blower motor voltage supply circuit and adjusts the blower output according to the requested speed.
This design allows blower speed to change smoothly instead of relying only on fixed resistor steps. When the system is working correctly, blower speed should increase or decrease in response to the control setting. If the PWM signal, B+ feed, ground, module output, or motor load is not correct, the Buick Enclave may have weak airflow, no airflow, or blower operation that does not match the selected speed.
Reference Information
The following reference sections support accurate blower motor diagnosis. Use them to confirm circuit routing, connector terminal locations, module communication, and proper electrical test methods before replacing the blower motor or blower motor control module.
Schematic Reference
HVAC Schematics
Connector End View Reference
COMPONENT CONNECTOR END VIEWS - INDEX
Description and Operation
- Air Delivery Description and Operation
- Air Temperature Description and Operation
Electrical Information Reference
- Circuit Testing
- Connector Repairs
- Testing for Intermittent Conditions and Poor Connections
- Wiring Repairs
Scan Tool Reference
Control Module References for scan tool information
Using scan tool data with direct circuit testing is useful because the HVAC control module may be commanding blower speed correctly while the blower control module or power circuit fails to carry out the command. Likewise, a good motor may not run if the command signal or module ground is missing.
Circuit/System Testing
1. Ignition OFF, disconnect the harness X2 connector at the blower motor control module.
Disconnecting the X2 connector isolates the blower motor control module circuits for testing. Before probing the connector, inspect for overheated terminals, loose fit, corrosion, moisture, damaged locks, or signs that the connector has been spread by previous testing.
2. Test for less than 1.0 ohm between the ground circuit terminal 5 and ground.
- If greater than the specified range, test the ground circuit for an open/high resistance.
A ground circuit with less than 1.0 ohm confirms that the blower motor control module has a solid return path. If resistance is too high, the module may not regulate blower output correctly, and the blower may run slowly, intermittently, or not at all.
3. Ignition ON, verify that a test lamp illuminates between the B+ circuit terminal 6 and ground.
- If the test lamp does not illuminate, test the B+ circuit for a short to ground or an open/high resistance. If the circuit tests normal and the B+ circuit fuse (HVAC BLWR 40-amp) in the underhood fuse block is open, test all components connected to the B+ circuit and replace as necessary.
The test lamp verifies the B+ supply under load. This is important because a digital meter can sometimes show voltage on a weak circuit that cannot carry enough current for blower operation. If the HVAC BLWR 40-amp fuse is open, the connected components and wiring should be checked for a short before installing another fuse.
4. Connect a DVOM between the control circuit terminal 3 and the B+ circuit terminal 6.
This setup checks the blower speed control signal against the available B+ circuit. The reading should change as the HVAC control module changes the requested blower speed.
5. Cycle the blower motor from OFF to HIGH. The voltage should increase while changing between the commanded states.
- If voltage remains greater than 11.5 volts while changing between the commanded states, test the control circuit for a short to voltage. If the circuit test normal, replace the HVAC control module.
- If voltage remains less than 1.0 volts while changing between the commanded states, test the control circuit for a short to ground or an open/high resistance. If the circuit tests normal, replace the HVAC control module.
- If voltage is between 1.0-11.5 volts and does not increase when changing between the commanded states, replace the HVAC control module.
The control circuit should not remain fixed while the blower command changes. A steady high reading can indicate a short to voltage, while a steady low reading may point to a short to ground, open circuit, or high resistance. If the circuit is electrically normal but the command does not change, the HVAC control module may not be producing the correct blower speed signal.
6. Ignition OFF, reconnect the harness connector X2 at the blower motor control module. Disconnect the harness connector at the blower motor.
Reconnecting the control module and disconnecting the blower motor lets the technician check module output without the blower motor load affecting the reading. This helps determine whether the blower motor control module is capable of supplying power to the motor.
7. Ignition ON, verify that a test lamp illuminates between the B+ circuit terminal A of the blower motor control module and ground.
- If the test lamp does not illuminate, test the B+ circuit for a short to ground or an open/high resistance. If the circuit tests normal, replace the blower motor control module.
If the lamp does not illuminate at this point, the blower motor is not receiving the expected voltage supply from the control module side of the circuit. When the wiring tests correctly but output is still missing, the blower motor control module becomes the likely fault.
8. Connect a test lamp between the control circuit terminal B and the B+ circuit terminal A.
This test checks the blower control module output as a loaded circuit. The lamp should change brightness as the blower command changes, showing that the module can vary blower motor control.
9. Turn the blower motor on high speed then to low speed. The test lamp intensity should be bright when in high speed and very dim or off when the blower is on low speed.
- If the test lamp intensity does not vary, test the control circuit for a short to voltage, short to ground or an open/high resistance. If the circuit tests normal, replace the blower motor control module.
A bright lamp at high speed and a dim or off lamp at low speed confirms that the blower motor control module is changing output as commanded. If lamp intensity does not vary, the circuit may be shorted, open, or the blower motor control module may be unable to regulate output correctly.
10. If all circuits test normal, test or replace the blower motor.
If the power feed, ground, PWM command, blower control module output, and related circuits all pass testing, the blower motor itself becomes the most likely cause. Before replacement, check the blower wheel for debris, drag, water damage, or signs of bearing resistance, because mechanical restriction can create symptoms that resemble an electrical fault.
Repair Instructions
Perform the Diagnostic Repair Verification after completing the diagnostic procedure.
- Blower Motor Replacement
- Control Module References for blower motor control module and HVAC control module setup, replacement and programming
After the repair, verify that blower speed changes smoothly from low to high and that airflow is strong at the vents. On the Buick Enclave, final verification should include blower operation at all speed settings, connector temperature after operation, fuse condition, HVAC control response, and confirmation that the concern does not return after several blower speed changes.
AUXILIARY BLOWER MOTOR MALFUNCTION
An auxiliary blower motor malfunction affects airflow to the rear seating area. Because the rear HVAC system uses its own blower control path, a rear airflow concern should be diagnosed separately from the front blower system. A fault may involve the auxiliary blower motor, auxiliary control module, rear HVAC wiring, power feed, ground, or control signal.
Diagnostic Instructions
- Perform the Diagnostic System Check - Vehicle prior to using this diagnostic procedure.
- Review Strategy Based Diagnosis for an overview of the diagnostic approach.
- Diagnostic Procedure Instructions provides an overview of each diagnostic category.
These steps help confirm whether the rear blower complaint is electrical, mechanical, or control-related. Before replacing parts, compare front and rear HVAC operation, verify rear control settings, check for related DTCs, and inspect accessible rear HVAC connectors and wiring.
Diagnostic Fault Information
The auxiliary blower motor diagnostic fault information table should be used to identify the correct rear blower circuits and possible fault paths. It is especially helpful when rear airflow is inoperative, stuck at one speed, intermittent, or does not respond to auxiliary control commands.
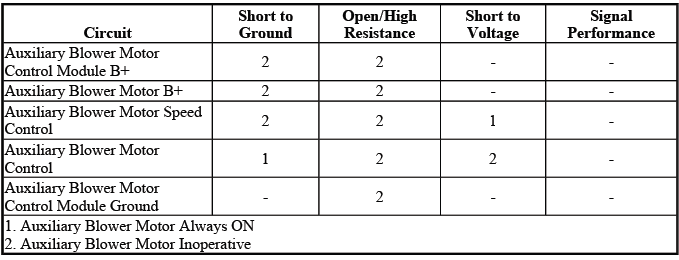
Circuit/System Description
The auxiliary blower motor is a variable-speed fan used to move conditioned air through the rear HVAC section of the vehicle. In the Buick Enclave, the rear blower does not simply run at one fixed speed; it is controlled electronically so rear airflow can increase or decrease according to the selected auxiliary HVAC setting.
The HVAC control module controls auxiliary blower speed by sending a pulse width modulated signal to the auxiliary blower motor control module. The auxiliary blower motor control module then changes the duty cycle applied across the auxiliary blower motor in relation to that PWM command. As the duty cycle increases, the blower speed increases. As the duty cycle decreases, rear airflow is reduced.
The auxiliary blower motor speed can be adjusted from 10% to 90% duty cycle, with 90% representing high fan speed. This control strategy allows smoother rear airflow adjustment than a simple fixed-speed circuit. If the PWM command, B+ supply, ground path, blower control module, or auxiliary blower motor circuit is incorrect, the rear HVAC system may operate weakly, intermittently, only at one speed, or not at all.
Reference Information
The following references should be used before replacing the auxiliary blower motor or the auxiliary blower motor control module. They help confirm the correct circuit path, connector terminals, module locations, and approved testing methods.
Schematic Reference
HVAC Schematics
Connector End View Reference
COMPONENT CONNECTOR END VIEWS - INDEX
Description and Operation
- Air Delivery Description and Operation
- Air Temperature Description and Operation
Electrical Information Reference
- Circuit Testing
- Connector Repairs
- Testing for Intermittent Conditions and Poor Connections
- Wiring Repairs
Scan Tool Reference
Control Module References for scan tool information
Using the schematic with scan tool data is especially useful on the Buick Enclave because a rear blower complaint may be caused by a missing command, a failed control module, a weak ground, an open B+ feed, or a blower motor that draws too much current. Checking the circuit in sequence prevents unnecessary replacement of rear HVAC components.
Circuit/System Testing
1. Ignition OFF and all vehicle systems OFF, disconnect the X2 harness connector at the K8A Blower Motor Control Module - Auxiliary. It may take up to 2 min for all vehicle systems to power down.
Allowing the vehicle systems to power down helps prevent false resistance readings from active modules or retained voltage. Before testing, inspect the X2 connector for loose terminals, heat damage, corrosion, water entry, damaged locking tabs, or wiring strain near the auxiliary blower motor control module.
2. Test for less than 10 ohms between the ground circuit terminal 5 and ground.
If 10 ohms or greater
- Test for less than 2 ohms in the ground circuit end to end.
- If 2 ohms or greater, repair the open/high resistance in the circuit.
- If less than 2 ohms, repair the open/high resistance in the ground connection.
A stable ground is required before the auxiliary blower motor control module can regulate fan speed correctly. If the ground circuit has excessive resistance, the rear blower may run slowly, fail under load, or respond inconsistently to speed commands.
If less than 10 ohms
3. Ignition ON.
Turning the ignition on places the circuit in the operating state needed to verify the B+ supply to the auxiliary blower motor control module.
4. Verify a test lamp illuminates between the B+ circuit terminal 6 and ground.
The test lamp confirms that the B+ circuit can carry current, not just show voltage on a meter. This is important because a high-resistance feed can sometimes measure voltage but still fail when the blower control module needs real operating current.
If the test lamp does not illuminate and the circuit fuse is good
- Ignition OFF, remove the test lamp.
- Test for less than 2 ohms in the B+ circuit end to end.
- If 2 ohms or greater, repair the open/high resistance in the circuit.
- If less than 2 ohms, verify the fuse is not open and there is voltage at the fuse.
If the fuse is good but the test lamp does not illuminate, the B+ circuit should be checked end to end for an open or high-resistance condition. A poor splice, damaged wire, loose fuse-block terminal, or corroded connector can interrupt power to the rear blower control module.
If the test lamp does not illuminate and the circuit fuse is open
- Ignition OFF, remove the test lamp.
- Test for infinite resistance between the B+ circuit terminal 6 and
ground.
- If less than infinite resistance, repair the short to ground on the circuit.
- If infinite resistance
- Disconnect the X1 harness connector at the K8A Blower Motor Control Module - Auxiliary and disconnect the harness connector at the M8B Blower Motor - Auxiliary.
- Test for infinite resistance between the M8B Blower Motor - Auxiliary B+
terminal A and ground.
- If less than infinite resistance, repair the short to ground on the circuit.
- If infinite resistance, test or replace the M8B Blower Motor - Auxiliary.
An open fuse usually indicates that a short must be found before another fuse is installed. Isolating the K8A auxiliary blower motor control module and the M8B auxiliary blower motor helps determine whether the short is in the wiring, the control module, or the blower motor itself.
If the test lamp illuminates
5. Ignition OFF, remove the test lamp and disconnect the X4 harness connector at the K33 HVAC Control Module, ignition ON.
This step isolates the HVAC control module side of the auxiliary blower control circuit. With the module disconnected, the circuit can be checked for unwanted voltage without the K33 HVAC Control Module affecting the test result.
6. Test for less than 1 V between the K8A Blower Motor Control Module - Auxiliary control circuit terminal 3 and ground.
If 1 V or greater
Repair the short to voltage on the circuit.
If less than 1 V
A reading of less than 1 volt confirms that the control circuit is not being pulled up by unwanted voltage. If the voltage is higher than specified, the circuit may be shorted to another voltage source, which can prevent the auxiliary blower motor control module from reading the PWM command correctly.
7. Ignition OFF.
Switching the ignition off prepares the circuit for resistance testing. Resistance checks should not be performed on an energized circuit.
8. Test for infinite resistance between the control circuit and ground.
If less than infinite resistance
Repair the short to ground on the circuit.
If infinite resistance
Infinite resistance confirms that the control circuit is not shorted to ground. A short to ground can hold the PWM command low and cause the rear blower to remain off, run incorrectly, or fail to change speed when commanded.
9. Test for less than 2 ohms in the control circuit end to end.
If 2 ohms or greater
Repair the open/high resistance in the circuit.
If less than 2 ohms
This end-to-end test verifies that the auxiliary blower control signal can travel from the HVAC control module to the auxiliary blower motor control module with minimal resistance. High resistance can weaken or distort the PWM command and may create rear blower operation that is delayed, erratic, or stuck at an incorrect speed.
10. Connect the harness connectors at the K8A Blower Motor Control Module - Auxiliary and the K33 HVAC Control Module and disconnect the harness connector at the M8B Blower Motor - Auxiliary, ignition ON and blower ON.
Reconnecting the modules restores the command path while disconnecting the auxiliary blower motor isolates the motor load. This allows the output from the auxiliary blower motor control module to be checked before the blower motor is blamed for the complaint.
11. Verify a test lamp illuminates between the B+ circuit terminal B and ground.
This confirms that the auxiliary blower motor is receiving the required power feed at the motor connector. On the Buick Enclave, this step helps separate a failed rear blower motor from a missing voltage supply coming out of the auxiliary blower motor control module or its related circuit.
If the test lamp does not illuminate
- Ignition OFF, disconnect the X2 harness connector at the K8A Blower Motor Control Module - Auxiliary.
- Test for less than 2 ohms in the B+ circuit end to end.
- If 2 ohms or greater, repair the open/high resistance in the circuit.
- If less than 2 ohms replace the K8A Blower Motor Control Module - Auxiliary.
If power is missing at the auxiliary blower motor connector, the B+ output circuit should be checked for an open or high-resistance condition. If that circuit is normal, the K8A auxiliary blower motor control module is the likely cause because it is not providing the proper output to the rear blower motor.
If the test lamp illuminates
If the test lamp illuminates, the B+ side of the auxiliary blower motor circuit is present. The remaining diagnosis should focus on the motor control side, the auxiliary blower motor ground path, the blower motor itself, and whether the control module can vary output according to the commanded rear blower speed.
12. Connect a test lamp between the control circuit terminal B and the B+ circuit terminal A.
This test places the lamp across the auxiliary blower motor control side so the output can be checked under a light electrical load. It helps show whether the rear blower control circuit is being varied correctly by the K8A Blower Motor Control Module - Auxiliary.
13. Verify the test lamp becomes progressively brighter as the blower speed is increased and progressively dimmer as the blower speed is decreased.
The lamp brightness should follow the commanded rear blower speed. A brighter lamp indicates a stronger output command, while a dimmer lamp indicates reduced blower output. On the Buick Enclave, this is a practical way to confirm that the auxiliary blower control module is not only supplying power, but also changing the output in response to rear HVAC speed commands.
If the test lamp does not illuminate
- Ignition OFF, disconnect the X1 harness connector at the K8A Blower Motor Control Module - Auxiliary, ignition ON.
- Test for less than 1 V between the M8B Blower Motor - Auxiliary control
circuit terminal B and
ground.
- If 1 V or greater, repair the short to voltage on the circuit.
- If less than 1 V
- Test for less than 2 ohms in the control circuit end to end.
- If 2 ohms or greater, repair the open/high resistance in the circuit.
- If less than 2 ohms
- Replace the K8A Blower Motor Control Module - Auxiliary.
- Verify the symptom or DTC was corrected.
- If the symptom or DTC was not corrected, replace the K33 HVAC Control Module.
- If the symptom or DTC was corrected
- All OK.
If the test lamp does not illuminate, the auxiliary blower motor is not receiving a usable control output. The circuit should be checked for a short to voltage, an open, or excessive resistance before the auxiliary blower motor control module is replaced. If the K8A module is replaced and the symptom remains, the K33 HVAC Control Module may not be providing a valid command.
If the test lamp illuminates, but does not change in brightness
- Ignition OFF, disconnect the X1 harness connector at the K8A Blower Motor Control Module - Auxiliary.
- Test for infinite resistance between the control circuit and ground.
- If less than infinite resistance, repair the short to ground on the circuit.
- If infinite resistance, replace the K8A Blower Motor Control Module - Auxiliary.
If the lamp turns on but stays at the same brightness, the control circuit is not being modulated correctly. A short to ground can hold the circuit in one state, while a failed auxiliary blower motor control module can lose its ability to vary output even though power is present.
If the test lamp changes in brightness as the blower speed is changed
14. Test or replace the M8B Blower Motor - Auxiliary.
When the lamp responds correctly to speed changes, the command and control module output are working as expected. At that point, the auxiliary blower motor itself becomes the most likely cause of the rear airflow concern. Before replacing it, inspect the blower wheel for debris, drag, water damage, bearing noise, or signs that the motor is drawing excessive current.
Repair Instructions
Perform the Diagnostic Repair Verification after completing the repair.
- Auxiliary Blower Motor Replacement
- Control Module References for HVAC control module replacement, setup and programming
After repair, verify that the rear blower operates at low, medium, and high speeds and that airflow changes smoothly with the auxiliary HVAC command. For the Buick Enclave rear HVAC system, final verification should include rear outlet airflow, blower noise, connector condition, related DTCs, and confirmation that the symptom does not return after several speed changes.
AIR TEMPERATURE MALFUNCTION
An air temperature malfunction occurs when the HVAC system cannot deliver the requested warm or cool air, or when the control module receives temperature information that does not match actual conditions. This type of concern may involve the ambient air temperature sensor, A/C evaporator temperature sensor, low reference circuit, signal circuit, HVAC control module logic, actuator operation, or the physical heating and cooling performance of the system.
Diagnostic Instructions
- Perform the Diagnostic System Check - Vehicle prior to using this diagnostic procedure.
- Review Strategy Based Diagnosis for an overview of the diagnostic approach.
- Diagnostic Procedure Instructions provides an overview of each diagnostic category.
These instructions should be completed before sensor testing begins. A temperature complaint can be caused by a failed sensor, but it can also come from low refrigerant charge, poor coolant flow, a stuck blend door, inaccurate scan tool data, an electrical fault, or an operating condition that prevents the HVAC system from responding normally.
Diagnostic Fault Information
The diagnostic fault information table identifies the circuits involved in air temperature sensor operation and helps separate a signal circuit problem from a low reference issue or module input concern. It should be used with the wiring schematic and connector end views before any sensor is replaced.

Circuit/System Description
Air Temperature Sensors
The air temperature sensors are 2-wire negative temperature coefficient thermistors. Their resistance changes according to the temperature around the sensing element, allowing the HVAC control module to estimate air temperature from the voltage signal. The vehicle uses the following air temperature sensors:
- Ambient Air Temperature Sensor
- A/C Evaporator Temperature Sensor
A signal circuit and a low reference circuit allow each sensor to operate. As the air temperature around the sensor increases, sensor resistance decreases. As resistance decreases, the sensor signal voltage also decreases. The sensor operates within a temperature range of -40 to +101ºC (-40 to +215ºF), and the signal varies between 0 and 5 volts.
The HVAC control module converts the sensor signal into a 0-255 count range. As air temperature increases, the count value decreases. This count-based interpretation allows the module to use the sensor value for HVAC control decisions rather than reading temperature only as a raw voltage.
If the HVAC control module or auxiliary HVAC control module detects a malfunctioning sensor, the control module software uses a default air temperature value. The default value for the ambient temperature sensor will be displayed on the scan tool. This fallback action helps the HVAC system continue adjusting inside air temperature close to the desired range until the condition is corrected.
In the Buick Enclave, accurate air temperature sensor input is important because the module uses this information to manage compressor permission, evaporator protection, and temperature regulation. A sensor that reads too cold or too hot can cause poor cooling, unnecessary compressor disablement, incorrect temperature display, or HVAC behavior that does not match the actual cabin or outside conditions.
Diagnostic Aids
The diagnostic aids provide additional information for interpreting air temperature sensor behavior and related scan tool values. These aids should be reviewed before replacing a sensor, especially when the reading seems fixed, delayed, or different from actual measured temperature.

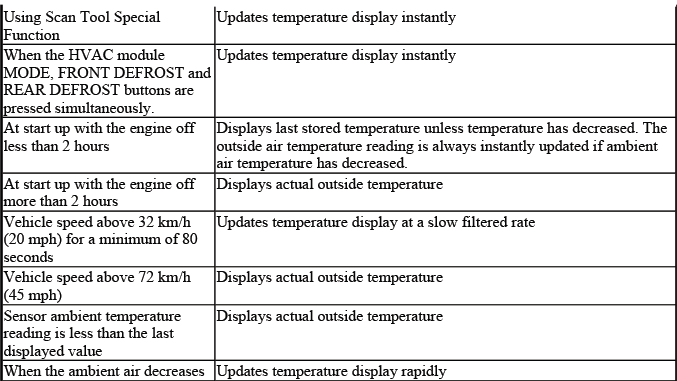
Reference Information
The following references help confirm the correct diagnostic path for air temperature sensor faults. Use them to identify the correct schematic, terminal location, circuit test method, scan tool parameter, and system operation before making a repair decision.
Schematic Reference
HVAC Schematics
Connector End View Reference
COMPONENT CONNECTOR END VIEWS - INDEX
Description and Operation
- Air Delivery Description and Operation
- Air Temperature Description and Operation
Electrical Information Reference
- Circuit Testing
- Connector Repairs
- Testing for Intermittent Conditions and Poor Connections
- Wiring Repairs
Scan Tool Reference
Control Module References for Scan Tool Information
Combining scan tool data with direct temperature measurement helps prevent misdiagnosis. A sensor value may be delayed by filtering, affected by heat soak, or influenced by circuit resistance, so the displayed value should always be compared with the actual temperature and the correct sensor location.
Circuit/System Verification
1. Measure actual outside air temperature.
Measure the outside air temperature with a reliable thermometer near the vehicle, away from direct engine heat, hot pavement, or strong sunlight. This gives a real-world reference that can be compared with the scan tool and driver information display. If the measured temperature and scan tool value are far apart, continue with circuit and sensor verification before replacing components.
