Buick Enclave: Repair Instructions
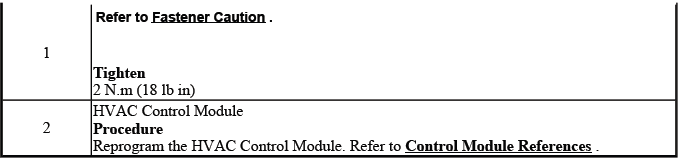
HVAC CONTROL MODULE REPLACEMENT
This repair section covers the main HVAC control module and related manual HVAC components used to manage air delivery, temperature selection, recirculation, and auxiliary rear climate functions. On the Buick Enclave, these parts are closely linked through control signals, actuator feedback, and module communication, so a replacement should always be followed by proper verification rather than judged only by whether the part physically fits.
Fig. 5: Identifying HVAC Control Module
HVAC Control Module Replacement
The HVAC control module is the main operator interface for the manual heating, ventilation, and air conditioning system. It receives switch input, sends commands to HVAC-related components, and works with the vehicle network to support blower operation, compressor requests, air distribution, and temperature control.
Before removing the module, confirm that the concern has been diagnosed correctly. A no-blower, no-A/C, incorrect temperature, or mode-control complaint may be caused by wiring, fuses, grounds, actuators, pressure inputs, or sensor signals rather than the control module itself. Connector condition should also be inspected carefully because loose terminals or previous probing damage can create symptoms that look like an internal module fault.
During replacement, handle the module and trim surfaces carefully to avoid damage to the control face, retaining tabs, and electrical connectors. After installation, verify that all control functions respond normally, including blower speed, temperature adjustment, mode selection, recirculation, and A/C request operation. If service information calls for setup, programming, or calibration, complete that process before final testing.
TEMPERATURE VALVE ACTUATOR REPLACEMENT - RIGHT SIDE
The right-side temperature valve actuator controls the position of the air temperature door for the passenger-side temperature blend. Its movement determines how much air is routed through or around the heater core, which directly affects outlet air temperature on that side of the cabin.
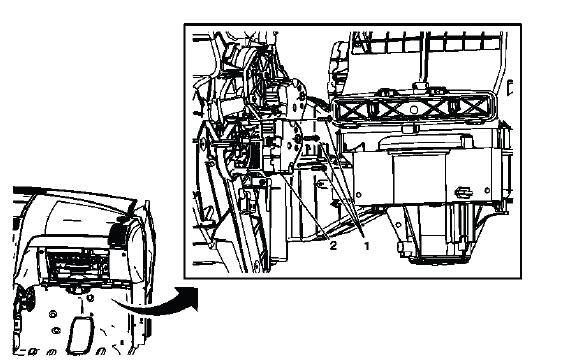
Fig. 6: Identifying Air Temperature Valve Actuator - Right Side
Temperature Valve Actuator Replacement - Right Side
When replacing the right-side temperature valve actuator, confirm that the complaint is not caused by a restricted temperature door, damaged linkage, loose connector, or incorrect actuator command. A failed actuator can cause air that stays too hot, too cold, or does not respond smoothly to temperature changes.
After removal, inspect the actuator mounting area and the temperature door shaft for signs of binding or misalignment. Do not force the new actuator onto the shaft if the door does not move freely. Once installed, command the temperature setting through its range and confirm that the outlet air temperature changes evenly without clicking, skipping, or delayed movement.
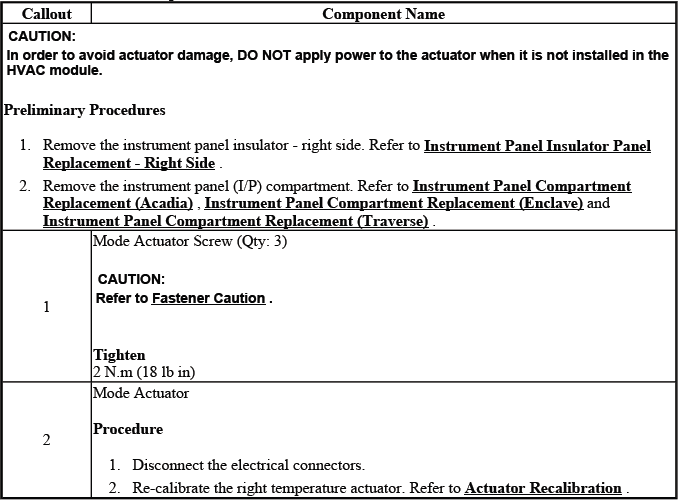
MODE VALVE ACTUATOR REPLACEMENT
The mode valve actuator controls where air is delivered inside the cabin, such as the panel outlets, floor ducts, defrost outlets, or a combination of these paths. If the actuator fails or the mode door binds, airflow may come from the wrong vents even though the control panel appears to respond.
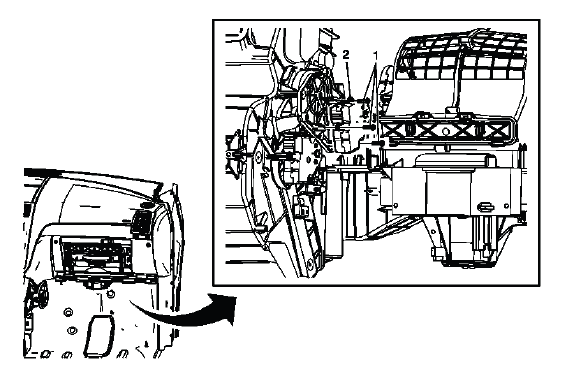
Fig. 7: Identifying Mode Valve Actuator
Mode Valve Actuator Replacement
Before replacing the mode valve actuator, verify that the actuator receives the correct command and that the door position changes are not being blocked mechanically. A clicking sound, incomplete travel, or air delivery that remains stuck in one position can indicate an actuator gear problem or a restricted mode door.
During installation, align the actuator correctly with the door shaft and avoid rotating the shaft beyond its normal travel. After replacement, cycle through all air delivery modes and confirm that air moves to the selected outlets. Defrost operation should be checked especially carefully because proper windshield clearing depends on accurate mode-door movement.
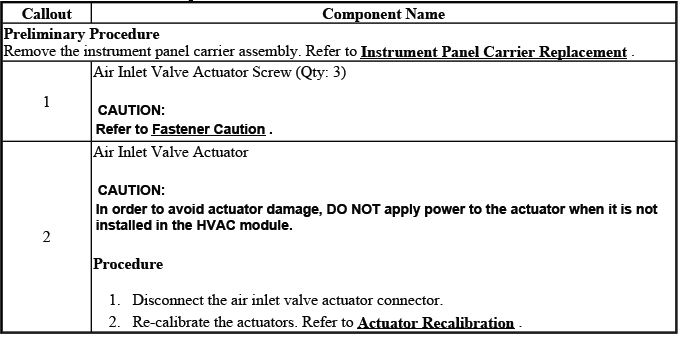
AIR INLET VALVE ACTUATOR REPLACEMENT
The air inlet valve actuator controls the recirculation or outside-air inlet door. This actuator allows the HVAC system to switch between drawing fresh outside air and recirculating cabin air. When it does not work correctly, the vehicle may have poor cooling performance, unwanted odors, excess window fogging, or a recirculation function that does not respond.
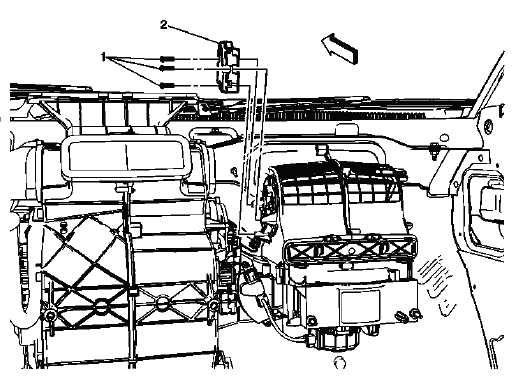
Fig. 8: Air Inlet Valve Actuator
Air Inlet Valve Actuator Replacement
Before replacing the air inlet valve actuator, check for debris near the air inlet door and confirm that the door can move through its intended travel. Leaves, broken foam, damaged seals, or a warped door can make a good actuator appear faulty.
After installing the replacement actuator, operate the recirculation control and listen for smooth movement. The change in airflow sound should be noticeable as the inlet door changes position. On the Buick Enclave, this verification helps confirm that the actuator, door, and control command are working together instead of only confirming that the part was installed.
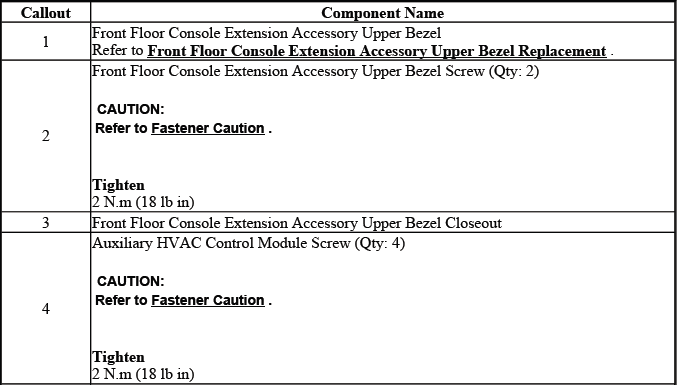
AUXILIARY HEATER AND AIR CONDITIONING CONTROL MODULE REPLACEMENT
The auxiliary heater and air conditioning control module supports rear climate operation. It allows rear HVAC functions to be managed separately from the front controls when equipped, giving rear passengers airflow and temperature control through the auxiliary system.
Fig. 9: View Of Auxiliary Heater & Air Conditioning Control Modules
Auxiliary Heater and Air Conditioning Control Module Replacement
When diagnosing the auxiliary HVAC control module, confirm whether the concern affects only the rear climate system or both front and rear operation. Rear blower response, auxiliary temperature control, and rear mode selection should be checked before the module is replaced.
During replacement, inspect the module connector and surrounding harness for loose terminals, damaged wiring, moisture, or trim-related pressure on the connector. After installation, test the rear controls through their full range. If the auxiliary system communicates with other modules or requires setup, complete the required programming or configuration procedure before final verification.

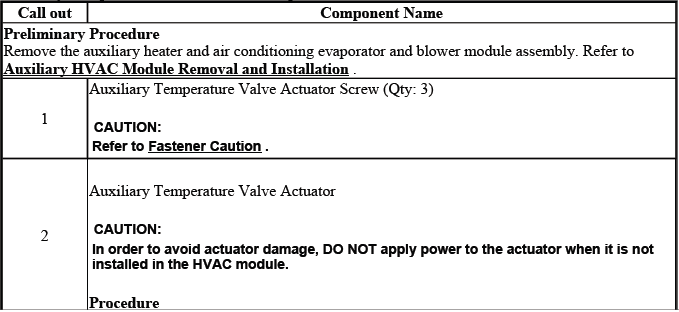
AUXILIARY TEMPERATURE VALVE ACTUATOR REPLACEMENT
The auxiliary temperature valve actuator controls rear air temperature blending. It changes the position of the rear temperature door so the auxiliary HVAC system can deliver warmer or cooler air to the rear cabin area.
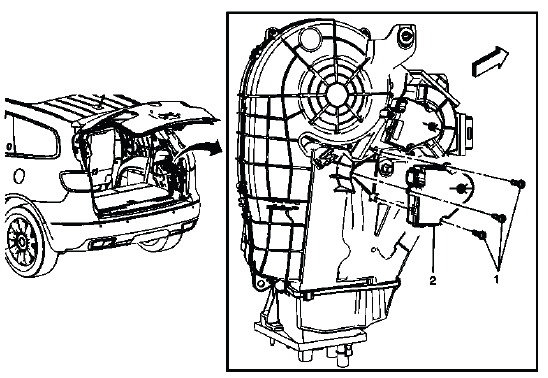
Fig. 10: Identifying Auxiliary Temperature Valve Actuator
Auxiliary Temperature Valve Actuator Replacement
A faulty auxiliary temperature valve actuator may cause the rear vents to stay hot, stay cold, or respond inconsistently to rear temperature settings. Before replacement, verify that the actuator command, circuit condition, and door movement have been checked so a wiring or mechanical fault is not mistaken for a failed actuator.
After the new actuator is installed, operate the rear temperature control through the full range and confirm that rear outlet temperature changes gradually. If the actuator clicks, stalls, or does not complete its travel, inspect the rear temperature door and shaft before assuming the replacement actuator is defective.

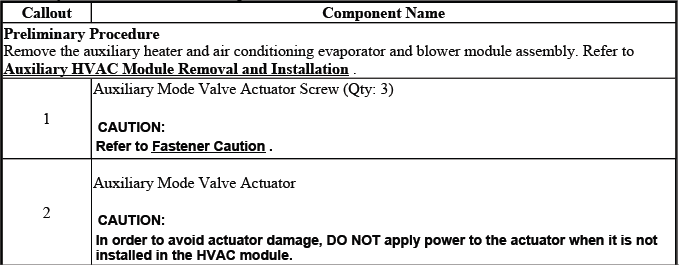
AUXILIARY MODE VALVE ACTUATOR REPLACEMENT
The auxiliary mode valve actuator controls rear air delivery direction. It determines whether rear airflow is routed through the upper outlets, lower outlets, or another selected rear HVAC path depending on the system design and control request.
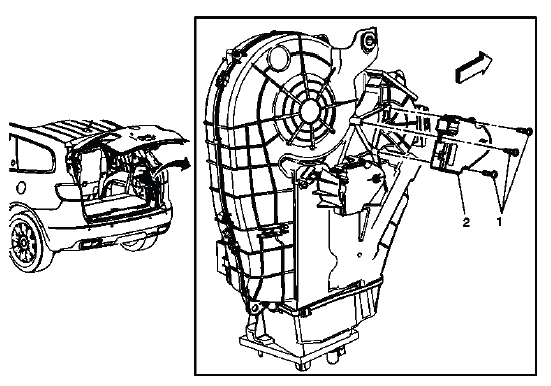
Fig. 11: Auxiliary Temperature Valve Actuator
Auxiliary Mode Valve Actuator Replacement
Replacement of the auxiliary mode valve actuator should be followed by a full rear airflow check. A mode actuator concern can feel like weak rear HVAC performance because air may be directed to the wrong outlets even when the rear blower is operating normally.
Before installation, inspect the rear mode door travel and make sure the actuator shaft alignment is correct. Once installed, command each rear air delivery mode and verify that airflow changes at the expected rear vents. For the Buick Enclave, this final check is important because rear passenger comfort depends on both blower output and accurate auxiliary mode-door control.