Buick Enclave: Specifications, Diagnostic Information and Procedures
SPECIFICATIONS
FASTENER TIGHTENING SPECIFICATIONS
Fastener Tightening Specifications
Fastener tightening specifications must be followed whenever tire and wheel components are removed, inspected, or replaced. Correct torque helps maintain wheel attachment, prevents distortion of mounting surfaces, and reduces the chance of vibration, looseness, or damage after service. For Buick Enclave tire and wheel repairs, always use the specified tightening sequence and a calibrated torque wrench rather than relying on impact tool feel.

ADHESIVES, FLUIDS, LUBRICANTS AND SEALERS
Adhesives, Fluids, Lubricants and Sealers
Use only approved adhesives, lubricants, fluids, and sealers during tire and wheel service. The wrong compound can affect tire bead seating, damage wheel finish, contaminate TPMS components, or create corrosion around the rim and valve stem area. When mounting tires, use an approved tire lubricant and avoid silicone or corrosive products that can leave residue on the wheel or tire bead.
DIAGNOSTIC INFORMATION AND PROCEDURES
TIRE DIAGNOSIS - IRREGULAR OR PREMATURE WEAR
Tire Wear
Irregular or premature tire wear should be treated as a diagnostic clue, not only as a tire replacement issue. Tread patterns can point toward incorrect inflation, lack of rotation, wheel alignment concerns, worn suspension parts, weak shock absorbers or struts, bent wheels, or road impact damage. On the Buick Enclave, tire wear should be checked across the full tread width and compared side to side before making alignment or suspension repair decisions.
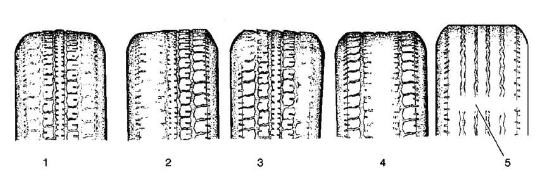
Fig. 1: Identifying Types Of Tire Wear
Inspection Procedure
1. Inspect the front tire wear. Look for shoulder wear, center wear, feathering, cupping, exposed cords, uneven tread depth, and differences between the left and right tires.
2. Inspect the rear tire wear. Compare the rear pattern with the front tires because a repeated pattern may point toward rotation history, while a single-wheel pattern may indicate a local alignment, wheel, bearing, or suspension concern.
3. Rotate the tires if any of the following conditions exist:
- The amount of time or mileage since the last tire rotation matches the maintenance schedule.
- The outer tread blocks are worn more than the middle tread blocks (1).
- The outer tread blocks are worn more than the inner tread blocks (2).
- The middle tread blocks are worn more than the outer tread blocks (4).
Tire rotation helps even out normal wear differences between axle positions. If the wear is mild and consistent with normal service mileage, rotation may restore a more balanced wear pattern. If the wear is severe, rapid, or isolated to one tire, further inspection is needed before simply moving the tire to another position.
4. Measure the wheel alignment if any of the following conditions exist:
- The tread blocks have feathered edges (3).
- The outer tread blocks are worn more than the inner tread blocks (2).
- The inner tread blocks are worn more than the outer tread blocks (2).
Feathered edges or uneven inner-to-outer wear often indicate toe or camber concerns. Before alignment readings are trusted, inspect tire pressure, wheel runout, loose suspension joints, damaged bushings, bent control arms, and ride height. Alignment adjustment will not hold if a worn or damaged component is still allowing the wheel position to shift.
5. Inspect the struts or the shock absorbers if the tire tread exhibits a cupped appearance (3). Cupping can develop when the tire is not being controlled firmly against the road surface, especially when damping is weak or a rotating assembly has excessive runout.
TIRE DIAGNOSIS - WADDLE COMPLAINT
A waddle complaint usually feels different from a high-speed balance vibration. The vehicle may seem to move side to side at low speed, as if the tire or wheel is not tracking in a straight line. This condition should be verified with a road test and then traced to the tire, wheel, or mounting surface before replacing suspension parts.
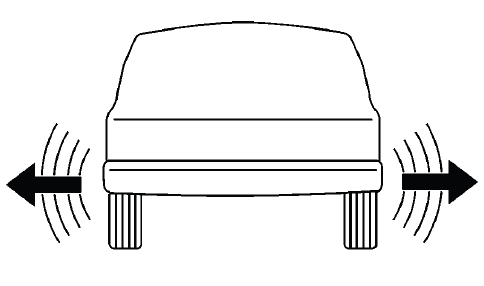
Fig. 2: Identifying Tire Wobble/Waddle
Tire waddle is a side to side movement at the front of the vehicle and/or the rear of the vehicle. Tire waddle can be caused by the following conditions:
- A steel belt not being straight within the tire
- Excessive lateral runout of the tire
- Excessive lateral runout of the wheel
A shifted or distorted belt can make the tire appear to steer slightly from side to side as it rotates. Wheel lateral runout can create a similar feel because the tire contact patch does not travel in a clean, straight path. On a Buick Enclave, this may be noticed as a low-speed body sway, seat movement, steering wheel shimmy, or a roughness that changes with vehicle speed.
The tire waddle is most noticeable at a low speed of about 8-48 km/h (5-30 mph). Tire waddle may appear as ride roughness at 80-113 km/h (50-70 mph). Tire waddle may appear as a vibration at 80-113 km/h (50-70 mph).
Because the symptom can change with speed, the road test should include both low-speed observation and highway-speed confirmation where safe. A waddle at parking-lot or neighborhood speeds may later feel like a vibration or ride harshness at higher speeds, which can make it easy to confuse the issue with wheel balance.
Inspection Procedure
1. Raise and support the vehicle with safety stands. Refer to Lifting and Jacking the Vehicle. Make sure the vehicle is stable before rotating the wheels by hand or inspecting the tread and sidewalls.
2. Perform the following preliminary inspection:
WARNING: Wear gloves when inspecting the tires in order to prevent personal injury from steel belts sticking through the tire.
- Mark the tire with a crayon in order to note the start and the stop position.
- Rotate each tire and wheel by hand.
- Inspect the tire for bulges or bent wheels. Replace as necessary.
Marking the tire helps identify the area where the tread or sidewall moves abnormally. While rotating the assembly, watch the tread face, sidewall, bead area, and rim edge. Any bulge, flat spot, belt separation, sidewall distortion, bent rim flange, or obvious lateral movement should be treated as a possible source of the complaint.
3. Use tire substitution in order to identify the faulty tire. Perform the following steps for a tire substitution check:
- Use a comparable tire in order to replace each tire, one at a time.
- Test drive the vehicle.
- If the problem is tire or wheel related, you will eliminate the problem when you remove the faulty tire from the vehicle.
Tire substitution is useful when visual inspection does not clearly reveal the problem. Replace only one tire and wheel assembly at a time during testing so the result can be tied to a specific position. If the symptom disappears after a certain assembly is removed, inspect that tire and wheel closely for belt shift, lateral runout, radial runout, bead seating problems, or rim damage.
WHEEL MOUNTING SURFACE CHECK
Replace any wheels that are bent or dented or have excessive lateral or radial runout. Wheels with runout greater than specified may cause objectionable vibrations.
The wheel mounting surface must sit flat against the hub. Rust buildup, dirt, burrs, paint thickness, corrosion, or debris between the hub and wheel can create runout even when the wheel itself is not bent. Before condemning a wheel, clean the hub face and wheel mounting pad, reinstall the assembly correctly, and recheck runout if needed.
A damaged wheel can create vibration, tire wear, steering shake, TPMS sealing problems, and uneven brake feel. If the wheel has visible impact damage or runout beyond specification, replacement is usually more reliable than attempting to correct the symptom with repeated balancing. After any wheel replacement or tire movement, verify wheel torque and check that the Buick Enclave drives smoothly during a final road test.
1. Thoroughly clean the wheel mounting surface with a clean shop towel and denatured alcohol or equivalent. Remove dirt, corrosion dust, brake residue, old balancing debris, and any material that could prevent the wheel from seating flat against the hub. A clean mounting face is essential before checking the wheel because even a small layer of buildup can imitate runout or create a vibration after the wheel is installed.
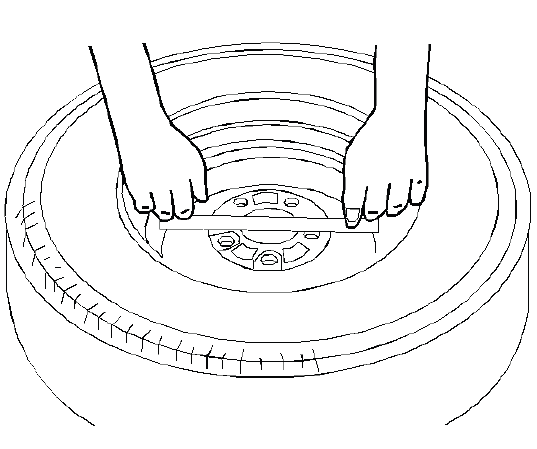
Fig. 3: Checking Wheel Mounting Surface
2. Use a straight edge 203-229 mm (8-9 in) long. Place the straight edge on the wheel inboard mounting surface. Try to rock the straight edge up and down within the mounting surface. If the straight edge moves or rocks, the surface is not flat and the wheel may not clamp evenly against the hub.
3. For aluminum flat-mount wheels, repeat the procedure in step 2 on at least 3-4 different positions on the inboard mounting surface. Checking several positions helps identify distortion that may not be visible during a quick inspection.
If you can rock the straight edge, the mounting surface is bent and you must replace the wheel. A bent mounting surface can cause wheel vibration, uneven clamp load, brake pulsation complaints, and repeat balance issues even when the tire itself appears normal.
4. Inspect the mounting wheel/nut holes for damage caused from over-torquing the wheel/nuts. Inspect for collapsed wheel/nut bosses. Inspect for cracked wheel bosses. Pay close attention to the seat area where the wheel nut contacts the wheel, because distortion in this area can prevent accurate torque and may allow the wheel to loosen during service.
5. For steel wheels, repeat the procedure in step 2 on at least 3-4 different positions on the inboard mounting surface. Steel wheels may show bending at the mounting pad, outer mounting ring, rim flange, or nut seat area after curb impact, pothole damage, or improper installation.
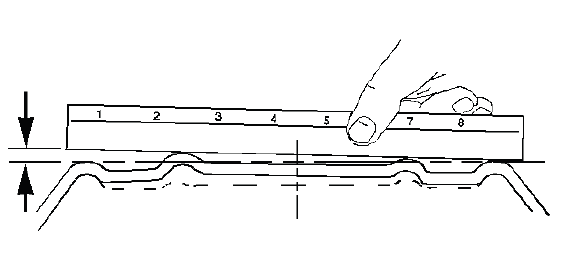
Fig. 4: Inspecting Wheel Inboard Mounting Surface
- The outer mounting ring is designed to be raised slightly above the inner mounting ring.
- If you can rock the straight edge, the mounting surface is bent and you must replace the wheel.
The raised outer mounting ring should not be mistaken for accidental damage unless the straight edge shows rocking, uneven contact, or visible deformation. The check should be performed carefully so the design of the wheel is not confused with an actual bent mounting surface.
6. Inspect the mounting wheel/nut holes for damage caused from over-torquing the wheel/nuts. Inspect for collapsed wheel/nut bosses. Inspect for cracked wheel bosses. Damage in these areas can develop when wheel nuts are tightened unevenly, over-tightened with an impact wrench, installed with dirt between the wheel and hub, or used with incorrect wheel hardware.

Fig. 5: Inspecting Mounting Wheel/Nut Holes For Damage Caused From Over-Torquing The Wheel/Nuts
7. Replace the wheel if the wheel is bent. A wheel with a bent mounting face, cracked boss, or excessive runout should not be reused because balancing cannot correct a structural seating problem. On the Buick Enclave, a wheel that does not sit flat can create vibration, steering shake, uneven tire wear, and repeated torque complaints.
CAUTION: The use of non-GM original equipment wheels may cause:
- Damage to the wheel bearing, the wheel fasteners and the wheel
- Tire damage caused by the modified clearance to the adjacent vehicle components
- Adverse vehicle steering stability caused by the modified scrub radius
- Damage to the vehicle caused by the modified ground clearance
- Speedometer and odometer inaccuracy
Wheel selection affects more than appearance. Offset, width, diameter, load rating, center bore, mounting seat design, and clearance all influence how the vehicle drives and how the suspension, brakes, tires, and wheel bearings are loaded. A wheel that does not match the original specifications may create problems that appear later as vibration, tire contact, bearing noise, steering instability, or incorrect speed readings.
NOTE:
- Replacement wheels must be equivalent to the original equipment wheels in the following ways:
- The load capacity
- The wheel diameter
- The rim width
- The wheel offset
- The mounting configuration
- A wheel of the incorrect size or type may affect the following conditions:
- Wheel and hub-bearing life
- Brake cooling
- Speedometer/odometer calibration
- Vehicle ground clearance
- Tire clearance to the body and the chassis
When replacing a wheel, compare the replacement part to the original equipment wheel before installation. The wheel should match the load requirement, diameter, width, offset, mounting style, and clearance needs of the vehicle. If the wheel places the tire too far inward or outward, it may change scrub radius, reduce suspension clearance, affect brake cooling, or cause tire contact during steering and suspension travel.
8. Replace the wheel if the wheel/nut boss area is cracked. Cracks around the nut seat or boss area can spread under normal driving loads and may prevent the wheel from holding clamp load safely.
Identify steel wheels with a 2 or 3-letter code stamped into the rim near the valve stem. Aluminum wheels have the code, the part number and the manufacturer identification cast into the back side of the wheel. Use these markings to confirm that the wheel matches the correct service application before installation. For Buick Enclave tire and wheel service, this identification step helps avoid installing a wheel that looks similar but has the wrong offset, load rating, or mounting configuration.
RADIAL TIRE LEAD/PULL CORRECTION
Radial Tire Lead/Pull Correction
Radial tire lead or pull occurs when the tire construction causes the vehicle to drift or pull even when the alignment angles are within specification. This condition can be caused by tire conicity, belt placement, tread stiffness variation, uneven inflation, or a tire that has developed internal distortion. Before adjusting alignment to compensate, verify tire pressure, wheel condition, suspension looseness, brake drag, and road crown influence.
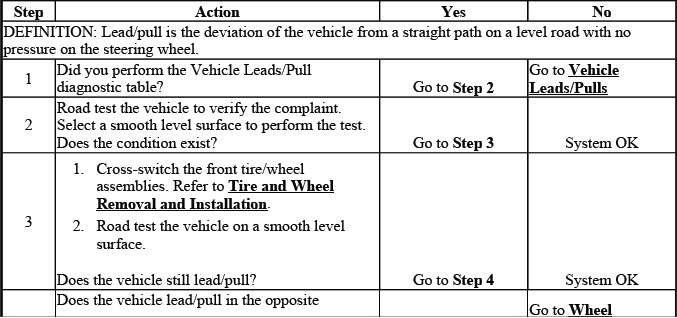
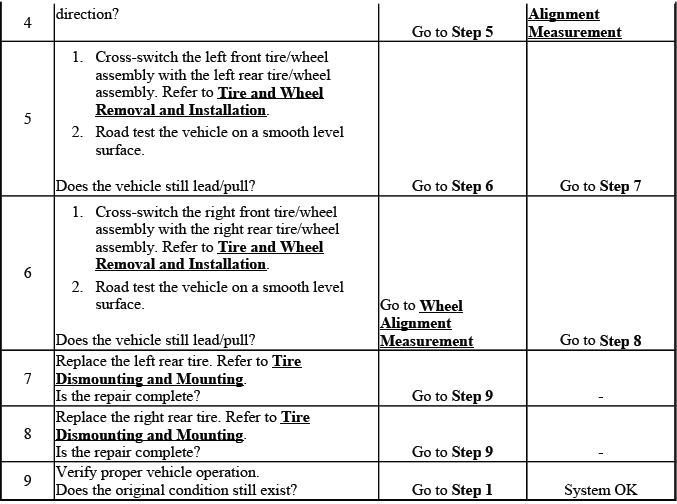
A practical way to isolate radial tire pull is to move tires between positions and road test the vehicle after each controlled change. If the pull changes direction, improves, or disappears after a tire is moved, the tire is contributing to the complaint. If the pull remains the same, continue checking alignment, steering components, suspension bushings, brake drag, wheel bearing condition, and ride height before replacing tires unnecessarily.
During the final road test, drive on a smooth, level road when possible and compare the vehicle response under steady throttle, light braking, and normal cruising. The Buick Enclave should track consistently without requiring constant steering correction. If tire lead is confirmed, correct the tire placement or replace the affected tire according to the diagnostic results rather than masking the issue with excessive alignment adjustment.
