Buick Enclave: Repair Instructions
ALUMINUM WHEEL POROSITY REPAIR
Aluminum wheel porosity repair is performed when air leaks through a porous area in the wheel casting rather than through the tire, valve stem, bead seat, or puncture. Before applying any sealant, the leak must be positively identified, the tire orientation must be marked, and the inside surface of the wheel must be prepared carefully so the repair material can bond correctly. On the Buick Enclave, this procedure helps correct slow air loss while preserving wheel balance and tire positioning.
1. Remove the tire and wheel. Refer to Tire and Wheel Removal and Installation. Handle the wheel carefully to avoid scratching the visible aluminum finish or damaging the valve stem area.
2. Inflate the tire to the manufactures specified pressure as stated on the tire. Use an accurate pressure gauge and avoid exceeding the tire or wheel pressure limits during leak testing.
3. Submerge the tire/wheel into a water bath in order to locate the leak. Watch for a steady stream of bubbles from the wheel surface, bead area, valve stem, or tire casing so the actual source of the air loss can be confirmed.
4. Inscribe a mark on the wheel in order to indicate the leak areas. Mark the location clearly enough that it can still be identified after the tire is removed from the rim.
5. Inscribe a mark on the tire at the valve stem in order to Indicate the orientation of the tire to the wheel. Returning the tire to the same position helps reduce balance changes after the repair.
6. Remove the tire from the wheel. Refer to Tire Dismounting and Mounting. Keep the tire machine tools away from the marked leak area and valve stem components.
7. Use number 80 grit sandpaper to scuff the inside of the rim surface at the leak area. Sand only enough to create a clean bonding surface for the adhesive/sealant.
IMPORTANT: Do not damage the exterior surface of the wheel.
8. Use general purpose cleaner such as 3M, P/N 08984 or equivalent, to clean the leak area. The surface must be free of moisture, dust, oil, tire lubricant, and loose aluminum residue before sealant is applied.
9. Apply 3 mm (0.12 in) thick layer of adhesive/sealant, GM P/N 12378478, (Canadian P/N 88900041) or equivalent to the leak area. Spread the material evenly over the porous section and slightly beyond the marked leak location to ensure full coverage.
10. Allow for the adhesive/sealant to dry. Follow the product cure time and temperature requirements so the repair is not disturbed before the material has sealed the porous area.
11. Align the inscribed mark on the tire with the valve stem on the wheel. This returns the tire to its original orientation and helps preserve the previous balance relationship.
12. Install the tire to the wheel. Refer to Tire Dismounting and Mounting. Use approved tire mounting lubricant and avoid dragging the bead across the repaired area aggressively.
13. Inflate the tire to the manufactures specified pressure as stated on the tire. Check the bead seating and valve stem for leaks before repeating the water bath inspection.
14. Submerge the tire/wheel into a water bath in order to ensure the leak is sealed. No bubbles should be visible from the repaired area, valve stem, bead seat, or tire casing.
15. Balance the tire and wheel. Refer to Tire and Wheel Assembly Balancing - Off Vehicle. Any dismounting and remounting operation can change balance, so this step should not be skipped.
16. Install the tire and wheel. Refer to Tire and Wheel Removal and Installation. Tighten the wheel fasteners using the correct pattern and torque procedure.
17. Lower the vehicle. After lowering, recheck tire pressure and confirm that the repaired wheel is stable during normal service.
ALUMINUM WHEEL REFINISHING
Aluminum wheel refinishing may be performed when the finish has cosmetic damage that does not affect wheel strength, mounting accuracy, or rim shape. Refinishing is not a repair for cracks, bent flanges, severe gouges, structural damage, or chrome-plated surfaces. The wheel must be evaluated carefully before any refinishing work begins.
Finish Damage Evaluation Procedure
1. Inspect the wheels for damage from uncoated wheel balance weights or from automatic car wash facilities. Pay attention to corrosion around balance weight locations, scratches near the rim flange, staining, peeling clear coat, and abrasion caused by cleaning equipment.
NOTE:
- If the wheels are chrome-plated, do not re-plate or refinish the wheels.
- If the wheels are polished aluminum, do not refinish the wheels in the dealer environment. Utilize a refinisher that meets manufacturer guidelines.
2. Inspect the wheels for the following conditions:
- Corrosion
- Scrapes
- Gouges
Surface damage should be judged by depth, location, and whether the damage affects the mounting surface, bead seat, valve stem area, or wheel structure. Cosmetic marks on the face may be refinished, but damage near critical sealing or mounting areas requires closer inspection.
3. Verify the damage is not deeper than what sanding can remove. If sanding would remove too much material or alter the wheel shape, the wheel should not be refinished as a cosmetic repair.
4. Inspect the wheels for cracks. If a wheel has cracks, discard the wheel. Cracked aluminum wheels are not suitable for refinishing because the crack can spread under normal driving loads.
5. Inspect the wheels for bent rim flanges. If a rim flange is bent, discard the wheel. A bent flange can create air leaks, vibration, bead seating problems, and tire wear concerns even if the finish appears repairable.
Refinishing Procedure
1. Remove the tire and wheel assembly from the vehicle. Refer to Tire and Wheel Removal and Installation. Protect the wheel face during handling so additional scratches are not added before refinishing.
WARNING: To avoid serious personal injury when applying any two part component paint system, follow the specific precautions provided by the paint manufacturer. Failure to follow these precautions may cause lung irritation and allergic respiratory reaction.
2. Remove the balance weights from the wheel. Mark any original weight locations if needed, but use new coated weights during final balancing.
3. Remove the tire from the wheel. Refer to Tire Dismounting and Mounting. Keep tire machine contact away from the finished face and avoid damaging the bead seat.
4. Use a suitable cleaner in order to remove the following contaminants from the wheel:
- Lubricants
- Wax
- Dirt
A clean surface is necessary before blasting, sanding, masking, or painting. Remaining wax, tire lubricant, or road film can cause poor paint adhesion, fisheyes, peeling, or uneven gloss.
5. Use plastic media blasting in order to remove the paint from the wheel.
NOTE:
- Do not re-machine the wheel.
- Do not use chemicals in order to strip the paint from the wheel.
Plastic media blasting removes finish material without the aggressive cutting action of harder abrasive media. Re-machining or chemical stripping can remove material, alter the surface, attack aluminum, or create a finish that no longer meets the intended wheel specification.
6. If the wheel had a machined aluminum finish, spin the wheel and use sand paper in order to restore the circular machined appearance. Work evenly so the repaired surface blends with the original directional pattern without creating flat spots or waves.
7. Mask the wheel mounting surface and the wheel nut contact surface.
NOTE: The wheel mounting surface and the wheel nut contact surface must remain free of paint.
Paint on the mounting surface or nut seat area can compress, flake, or create uneven clamp load after installation. On the Buick Enclave, these surfaces must remain clean metal-to-metal contact areas to help maintain wheel torque and reduce vibration risk.
8. Follow the paint manufacturer's instructions for painting the wheel. Apply the coating system only under the required temperature, ventilation, mixing, flash time, and curing conditions.
9. Unmask the wheel. Inspect the masked areas to make sure no overspray, paint edge buildup, or debris remains on the mounting surface or wheel nut contact areas.
10. Install a new valve stem. A new valve stem reduces the chance of slow air loss after the tire is reinstalled.
11. Install the tire to the wheel. Refer to Tire Dismounting and Mounting. Use care around the refinished surface so the tire machine does not scratch or chip the new coating.
NOTE: Use new coated balance weights in order to balance the wheel.
12. Use a suitable cleaner in order to remove the following contaminants from the wheel mounting surface:
- Corrosion
- Overspray
- Dirt
The mounting surface must be clean and flat before the wheel is installed on the hub. Any corrosion or overspray left behind may create wheel runout, brake pulsation complaints, or a vibration that feels like a balance issue.
13. Install the tire and wheel assembly to the vehicle. Refer to Tire and Wheel Removal and Installation. After installation, confirm the wheel is properly seated, torque the fasteners correctly, and verify tire pressure.
TIRE AND WHEEL REMOVAL AND INSTALLATION
Special Tools
- CH-41013 Rotor Resurfacing Kit
- CH-42450-A Wheel Hub Resurfacing Kit
For equivalent regional tools, refer to Special Tools.
These tools may be used to prepare related mounting surfaces when corrosion or buildup prevents clean wheel seating. Clean hub and rotor contact areas help reduce lateral runout, wheel vibration, and repeat balance complaints after tire and wheel service.
Removal Procedure
1. Raise and support the vehicle. Refer to Lifting and Jacking the Vehicle. Use the correct lift points and verify the vehicle is stable before loosening or removing the wheel assembly.
2. Remove the wheel center cap, if equipped. Use a suitable trim tool when needed so the cap is not cracked or scratched.
3. Remove the wheel nut caps (1), if equipped. Store the caps in a clean area so they are not lost or damaged during service.
Fig. 6: Wheel Nut Caps
4. Remove the wheel nuts (1). Loosen them evenly and support the wheel as the last nut is removed to prevent the assembly from dropping against the hub or brake rotor.
Fig. 7: Wheel Nuts
5. Remove the tire and wheel assembly (1). If the wheel is stuck to the hub, do not pry against finished aluminum surfaces or brake components.
Fig. 8: Tire And Wheel Assembly
6. If the tire and wheel assembly is difficult to remove or cannot be removed, perform the following steps:
WARNING: If penetrating oil gets on the vertical surfaces between the wheel and the rotor or drum it could cause the wheel to work loose as the vehicle is driven, resulting in loss of control and an injury accident.
CAUTION: Removing the wheel may be difficult because of foreign materials or a tight fit between the wheel and the hub/rotor. Slightly tap the tire side wall with a rubber mallet in order to remove the wheel. Failure to follow these instructions may result in damage to the wheel.
Corrosion between the wheel center bore and hub pilot can make the assembly difficult to remove. Use controlled force at the tire sidewall, not at the wheel face or brake parts. After the wheel is removed, clean the hub pilot and wheel bore before installation so the Buick Enclave wheel seats flat and can be removed normally during future service.
CAUTION: Never use heat to loosen a tight wheel bolt or nut. This can shorten the life of wheel and damage wheel bearings.
Heat can change the strength and finish of wheel hardware, damage nearby bearings, and create a condition that may not be visible during reassembly. If the wheel is seized to the hub, use controlled mechanical methods rather than applying heat to the fasteners or wheel mounting area.
- Hand install the wheel nuts.
- Loosen the wheel nuts 2 complete turns.
- Lower the vehicle.
- Rock the vehicle from side to side.
- Repeat the procedure if necessary.
This procedure uses the weight of the vehicle to help break the corrosion bond between the wheel and hub while keeping the wheel retained by the loosened nuts. Do not drive the vehicle during this operation. The wheel nuts must remain installed loosely enough to allow movement, but tight enough to keep the wheel from separating suddenly.
7. When the tire and wheel assembly loosens, raise and support the vehicle. Refer to Lifting and Jacking the Vehicle. Confirm the vehicle is stable before removing the wheel nuts completely.
8. Remove the wheel nuts. Support the wheel while removing the final nut so the assembly does not drop against the brake rotor, caliper, or wheel studs.
9. Remove the tire and wheel assembly. Inspect the hub pilot, wheel center bore, and mounting surfaces for corrosion or debris that caused the tight fit.
Installation Procedure
1. Using a wire brush or wire wheel, clean the wheel to brake rotor or drum mating surface. Remove corrosion, scale, dirt, and loose material so the wheel can sit flat against the mounting surface.
WARNING: Before installing the wheels, remove any buildup of corrosion on the wheel mounting surface and brake drum or disc mounting surface.
Installing wheels with poor metal-to-metal contact at the mounting surfaces can cause wheel nuts to loosen. This can cause a wheel to come off when the vehicle is moving, causing loss of control and possibly personal injury.
NOTE: Do not use power grinding tools to clean the brake rotor or drum to wheel mating surfaces.
Poor contact between the wheel and hub can create lateral runout, vibration, brake pulsation, uneven wheel clamp load, and repeat torque complaints. Clean the surfaces carefully without removing base metal or creating grooves in the rotor, drum, hub, or wheel mounting pad.
2. Using the CH-41013 Rotor Resurfacing Kit, clean the rotor or drum to wheel contact area. This tool helps remove corrosion and buildup from the contact face without aggressive grinding.
3. Using the CH-42450-A Wheel Hub Resurfacing Kit, clean the surfaces around the wheel studs. Pay close attention to the hub pilot and the area at the base of the studs, where rust buildup can keep the wheel from seating evenly.
4. Clean the threads of the wheel studs. The threads must be free of rust, dirt, old lubricant, and damaged material before the wheel nuts are installed.
5. If the threads of the wheel stud are damaged, replace the wheel stud. Refer to Wheel Stud Replacement or Wheel Stud Replacement. Damaged threads can give a false torque reading and may prevent the wheel nut from clamping the wheel correctly.
6. After cleaning all of the wheel and brake rotor or drum contact areas, use brake cleaner or denatured alcohol to remove any dirt and debris from the wheel nuts and the brake rotor or drum. Allow the cleaned surfaces to dry before assembly.
7. Inspect and clean the contact areas of the wheel. Refer to Wheel Mounting Surface Check. The wheel mounting pad, nut seats, and center bore should be flat, clean, and free from cracks or distortion before installation on the Buick Enclave.
8. Apply a small amount of lubricant to the inner diameter of the wheel hub pilot hole (1) where it contacts the wheel hub flange. Refer to Adhesives, Fluids, Lubricants and Sealers. Apply lubricant only to the pilot contact area, not to the studs, nuts, wheel seats, or mounting faces.
Fig. 9: Rim Inner Center Seat
9. Install the tire and wheel assembly (1). Align the wheel with the studs carefully and slide it straight onto the hub pilot so the mounting surface seats evenly.
Fig. 10: Tire And Wheel Assembly
10. Hand install the wheel nuts (1). Thread each nut by hand first to avoid cross-threading and to confirm the wheel is centered against the hub.
Fig. 11: Wheel Nuts
WARNING: Never grease or lubricate wheel nuts, studs and mounting surfaces.
Wheel nuts, studs and mounting surfaces must be clean and dry.
Tightening the lubricated parts can cause damage to the wheel studs. This can cause a wheel to come off when the vehicle is moving, causing loss of control and possibly personal injury.
Lubricant changes the relationship between torque and clamp load. A lubricated wheel nut may appear to tighten normally, but the stud can be overstretched or the wheel can be clamped incorrectly. For Buick Enclave wheel installation, keep the wheel nuts, studs, and seating surfaces dry and clean while applying lubricant only where the procedure specifically allows it.
11. Using a torque wrench and the appropriate socket, alternately and evenly tighten the wheel nuts to 190 (140 lb ft) in the sequence illustrated. Tightening in the correct pattern draws the wheel against the hub evenly and helps prevent rotor distortion or wheel vibration.

Fig. 12: Wheel Nut Tightening Sequence
CAUTION: Improperly tightened wheel bolts or nuts can lead to brake pulsation and rotor damage. In order to avoid expensive brake repairs, evenly tighten the wheel bolts or nuts to the proper torque specification.
CAUTION: Refer to Fastener Caution.
Final tightening should always be done with a torque wrench, not by impact tool alone. Uneven or excessive torque can distort the brake rotor, damage the wheel seats, stretch the studs, and create a vibration or pulsation that appears after the vehicle is driven.
12. Install the wheel nut caps (1), if equipped. Make sure each cap is fully seated and aligned with the wheel nut.
Fig. 13: Wheel Nut Caps
13. Install the wheel center cap, if equipped. Confirm the cap is secure and does not interfere with the valve stem, wheel nut caps, or wheel surface.
TIRE REPAIR
Many different materials and techniques are available on the market in order to repair tires. Not all of the materials and techniques work on some types of tires. Tire manufacturers have published detailed instructions on how and when to repair tires. Obtain the instructions from the manufacturer. Do NOT repair the compact spare tire.
Tire repair should be based on the tire manufacturer’s approved repair limits, the location of the damage, the size of the puncture, the remaining tread condition, and whether the tire has been driven while underinflated. Sidewall damage, shoulder damage, internal separation, exposed cords, run-flat damage, or contamination from unapproved sealants may make the tire unsafe to repair. A proper repair requires inspection from inside the tire, not only an external plug.
TIRE DISMOUNTING AND MOUNTING
CAUTION: Use a tire changing machine in order to dismount tires. Do not use hand tools or tire irons alone in order to remove the tire from the wheel. Damage to the tire beads or the wheel rim could result.
CAUTION: Do not scratch or damage the clear coating on aluminum wheels with the tire changing equipment. Scratching the clear coating could cause the aluminum wheel to corrode and the clear coating to peel from the wheel.
Modern tire and wheel assemblies require controlled bead breaking and mounting pressure. Using only hand tools can tear the tire bead, bend the rim flange, damage the TPMS sensor, or scratch the aluminum wheel finish. The tire changer should be set up so the tool head, bead breaker, and clamping points do not contact finished surfaces unnecessarily.
1. Remove the valve core from the valve stem. This allows the tire to deflate through the valve stem before bead breaking begins.
CAUTION: Damage to either the tire bead or the wheel mounting holes can result from the use of improper wheel attachment or tire mounting procedures. It takes up to 70 seconds for all of the air to completely exhaust from a large tire. Failure to follow the proper procedures could cause the tire changer to put enough force on the tire to bend the wheel at the mounting surface. Such damage may result in vibration and/or shimmy and under severe usage lead to wheel cracking.
2. Deflate the tire completely. Wait long enough for all air pressure to leave the tire before clamping or applying bead breaker force. A partially inflated tire can resist the machine and transfer damaging load into the wheel.
3. Use the tire changer in order to remove the tire from the wheel. Follow steps 4-7 to remove the tire from the wheel. Keep the wheel face protected and observe the tire bead as it moves across the rim.
NOTE: Rim-clamp European-type tire changers are recommended.
A rim-clamp style tire changer helps control the wheel more evenly and reduces the chance of damaging the bead seat or wheel face. For Buick Enclave tire service, this is especially useful when working with aluminum wheels, larger tire sizes, or wheels equipped with tire pressure monitoring sensors.
4. When separating the tire bead from the wheel, position the bead breaking fixture 90, 180 and 270 degrees from the valve stem. This keeps the bead breaker away from the valve stem and TPMS sensor area, reducing the chance of cracking the sensor body, bending the stem, or damaging the bead seat during dismounting.
Fig. 14: Using Tire Changer to Remove Tire
5. Position the wheel and tire so the valve stem is at the 7 o'clock position relative to the head. Apply tire bead lubricant to the pry bar to prevent damage to the tire bead. The tire iron or pry bar can be inserted when prying the outer tire bead up and over the mounting/dismounting head.
Keeping the valve stem at the correct position gives the bead enough room to move over the tool head without pressing directly against the sensor. This is especially important on wheels equipped with tire pressure monitoring components, where careless tool placement can damage the sensor even though the tire appears to come off normally.
CAUTION: Failure to position valve stem in proper position while dismounting and mounting the tire may result in the TPM sensor to become damaged.
6. Position the wheel and tire so the valve stem is again at the 7 o'clock position relative to the head. The tire iron or pry bar can be inserted when prying the inner tire bead up and over the mounting/dismounting head. Use steady pressure and allow the machine to do the work rather than forcing the bead with the pry bar.
Fig. 15: Separating Tire Bead from Wheel
7. Remove all residual liquid sealant from the inside of the tire and wheel surfaces. If any tire sealant is noted upon tire dismounting on vehicles equipped with TPM, replace the tire pressure sensor. Refer to Tire Pressure Indicator Sensor Replacement (Snap In Style).
Liquid sealant can block the pressure sensing port, contaminate the sensor body, and create inaccurate tire pressure readings. Cleaning the tire and wheel surfaces also helps the bead seal correctly after the tire is mounted again.
8. Use medium coarseness steel wool in order to remove any rubber, light rust or corrosion from the wheel bead seats. Work around the bead seat evenly and avoid cutting into the wheel surface. A clean bead seat helps prevent slow air leaks and reduces the chance of repeat tire pressure complaints.
9. Apply mounting lubricant to the tire bead and the wheel rim. Refer to Adhesives, Fluids, Lubricants and Sealers.
CAUTION: When mounting the tires, use an approved tire mounting lubricant.
DO NOT use silicon or corrosive base compounds to lubricate the tire bead and the wheel rim. A silicon base compound can cause the tire to slip on the rim. A corrosive type compound can cause tire or rim deterioration.
The lubricant should allow the tire bead to slide smoothly over the rim without excessive force. Too much lubricant or the wrong type of compound can create problems after installation, including tire movement on the wheel, bead leaks, rim corrosion, or TPMS contamination.
10. Position the rim so the valve stem (1) is at the 7 o'clock position relative to the head (2). This will protect the sensor when the bottom bead seats. On the Buick Enclave, maintaining this orientation is one of the simplest ways to avoid sensor damage during tire mounting.
Fig. 16: Position Rim So Valve Stem Is At 7 O'clock Position Relative To Head
11. Using the tire machine, rotate the tire/wheel assembly clockwise when transferring the tire bead to the inside of the wheel rim. Ensure that the valve stem (1) is at the 7 o'clock position. Watch the bead as it passes the sensor area and stop if the bead begins to push against the valve stem or sensor body.
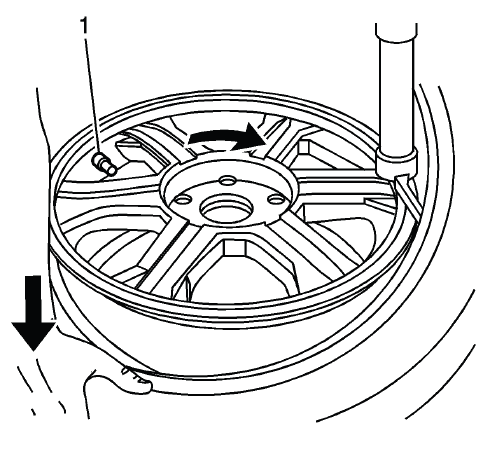
Fig. 17: Ensure Valve Stem Is At 7 O'clock Position
12. After the bottom bead is on the wheel, reposition the wheel and tire so that the valve stem (1) is at the 7 o'clock position relative to the head. This will protect the sensor while mounting the tire bead to the outside of the wheel.
The outer bead can place heavy load near the valve stem area if the wheel is not positioned correctly. Rechecking the valve stem position before mounting the second bead helps prevent damage that might otherwise appear later as a missing TPMS reading or a slow leak.
Fig. 18: Reposition Wheel And Tire So Valve Stem Is At 7 O'clock Position Relative To Head
13. Use the tire changer in order to install the tire to the wheel. Keep the tire bead lubricated, maintain correct tool head position, and avoid sudden force as the bead transfers over the rim.
Fig. 19: Transferring Tire Bead
14. Inflate the tire until it passes the bead humps. Be sure that the valve core is not installed at this time. Leaving the valve core out allows air to flow quickly while the beads move into position.
WARNING: To avoid serious personal injury, do not stand over tire when inflating. The bead may break when the bead snaps over the safety hump. Do not exceed 275 kPa (40 psi) pressure when inflating any tire if beads are not seated. If 275 kPa (40 psi) pressure will not seat the beads, deflate, relubricate the beads and reinflate. Overinflation may cause the bead to break and cause serious personal injury.
If the bead does not seat at the pressure limit, stop the process, release the air, relubricate both beads, and inspect the tire and rim for obstruction or damage. Do not continue adding pressure in an attempt to force the bead into place.
15. Install the valve core to the valve core stem. Make sure the core is clean, undamaged, and fully seated before final inflation.
16. Inflate the tire to the proper air pressure. Use the vehicle placard pressure for service inflation unless a specific procedure requires otherwise.
17. Ensure that the locating rings are visible on both sides of the tire in order to verify that the tire bead is fully seated on the wheel. Inspect the bead area around the full circumference of both sides, then check for leaks at the valve stem and bead seat before the tire and wheel assembly is returned to service.
TIRE ROTATION
Rotate the tires and wheels at frequent intervals to equalize wear. In addition to scheduled rotation, rotate the tire and wheel whenever uneven tire wear is noticed.
Regular tire rotation helps distribute wear between front and rear positions, especially when steering, braking, drive forces, and vehicle loading affect each tire differently. On the Buick Enclave, tire rotation also supports smoother ride quality, longer tread life, and more consistent road noise as the tires age.
Radial tires tend to wear faster in the shoulder area, particularly in front positions. Radial tires in non-drive locations may develop an irregular wear pattern that may increase tire noise. This makes regular rotation especially necessary.
If uneven wear is already visible, inspect tire pressure, wheel alignment, suspension components, and shock or strut condition before relying on rotation alone. Rotation can help even out normal wear, but it will not correct an active mechanical or alignment problem.
Refer to Tire and Wheel Removal and Installation for tire removal.
Fig. 20: Identifying Tire Rotation Pattern
Always use a 4-wheel rotation. After rotation, check the wheel nuts for specified torque. Then, set the tire pressure.
After rotating the tires, update or relearn the tire pressure sensor locations if the vehicle procedure requires it. Confirm that the displayed tire positions match the physical wheel locations, because incorrect sensor location information can mislead the driver during a future low-pressure warning.
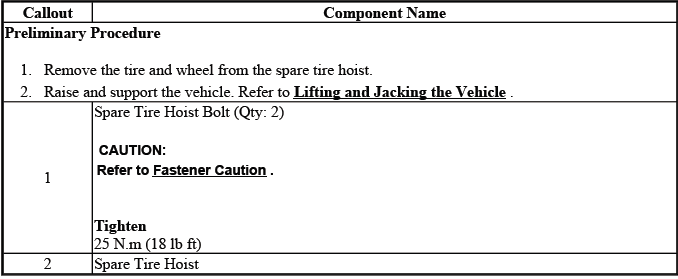
SPARE WHEEL HOIST REPLACEMENT
The spare wheel hoist supports and secures the spare tire under the vehicle. If the hoist cable, latch, crank mechanism, or mounting hardware is damaged or corroded, the spare tire may not raise, lower, or lock correctly. Inspect the hoist any time the spare tire is difficult to remove or does not sit firmly in its stored position.
Fig. 21: Identifying Spare Wheel Hoist
Spare Wheel Hoist Replacement
During spare wheel hoist replacement, support the spare tire before loosening the hoist hardware and make sure the cable is not twisted or frayed. After installation, raise and lower the spare tire through a full cycle to confirm smooth operation and secure storage. For Buick Enclave service, the spare wheel should sit tight against its support and should not rattle, hang loosely, or bind during lowering.