Buick Enclave: Specifications, Diagnostic Information and Procedures
SPECIFICATIONS
APPROXIMATE FLUID CAPACITIES
Approximate Fluid Capacities
The approximate fluid capacity chart should be used as a guide when servicing the Getrag 790 transfer case. Fluid level is not only a maintenance detail; it directly affects bearing lubrication, gear contact, heat control, and long-term transfer case durability. Always use the specified fluid type and confirm the final level by the approved service procedure rather than relying only on the amount drained or poured in.
For a Buick Enclave equipped with this transfer case, fluid condition can also provide useful diagnostic information. Dark fluid, metallic debris, burnt odor, or evidence of water contamination may point to internal wear, overheating, seal failure, or previous service with an incorrect lubricant.

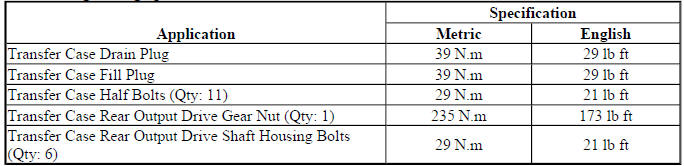
FASTENER TIGHTENING SPECIFICATIONS
Fastener Tightening Specifications
The fastener tightening specifications are used during removal, installation, inspection, and reassembly of transfer case components. Correct torque is important because over-tightening may distort housings, damage threads, crush seals, or alter component alignment, while under-tightening can allow leaks, movement, noise, or fastener loosening during operation.
Use a calibrated torque wrench and follow the correct tightening sequence when one is provided. Clean the threads, check for damaged bolts or threaded holes, and apply threadlocker or sealant only where the service information calls for it. Fasteners that pass through a fluid cavity or clamp a sealing surface should receive extra attention because small errors can become oil leaks after the vehicle is returned to service.
ADHESIVES, FLUIDS, LUBRICANTS AND SEALERS
Adhesives, Fluids, Lubricants and Sealers
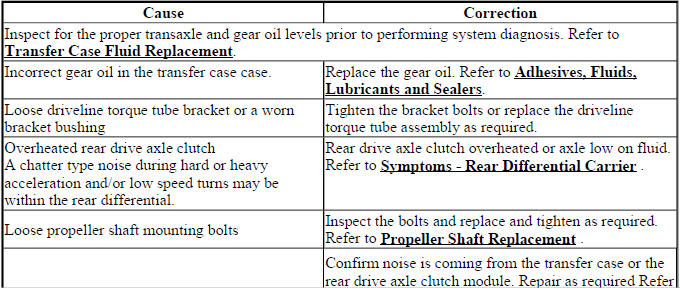
The adhesives, fluids, lubricants, and sealers listed for the transfer case should be followed exactly. A transfer case may appear simple from the outside, but its sealing surfaces, bearings, splines, and gear contact areas depend on the correct products. Substituting a different fluid or sealant can cause leaks, noise, poor lubrication, chemical incompatibility, or difficulty during future disassembly.
Before applying any sealer, clean the mating surfaces thoroughly and remove old gasket material without gouging the aluminum or machined surface. Apply sealer in the specified location and amount. Too little sealant can allow seepage, while excess material can squeeze into the case and contaminate the lubricant or block small passages.

COMPONENT LOCATOR
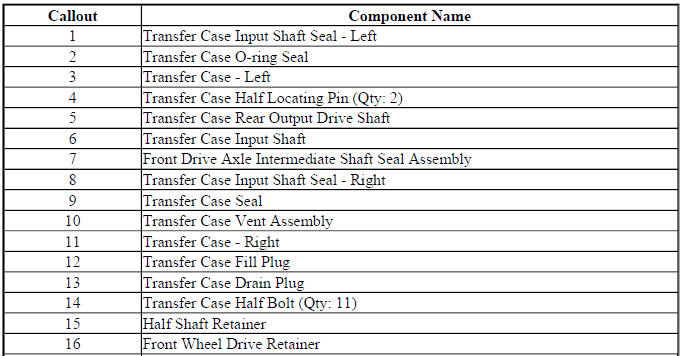
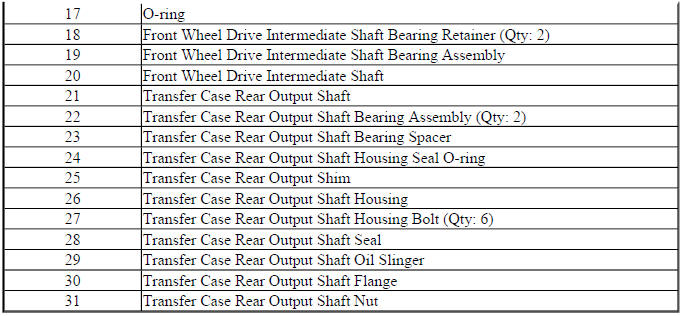
TRANSFER CASE DISASSEMBLED VIEW
The disassembled view helps identify the major transfer case components before service begins. It should be reviewed together with the written procedure so the technician understands how the housings, shafts, bearings, seals, gears, and retaining parts fit together. This is especially useful when diagnosing noise or leakage because the diagram shows where load-bearing and sealing areas are located.
When disassembling the unit, keep related parts organized and note their installed direction. Washers, bearings, retainers, seals, and small hardware may look similar, but their placement affects alignment and operation. If internal wear is found, compare the damaged part with the related mating surface before deciding which components must be renewed.
Fig. 1: Disassembled View Of Transfer Case
DIAGNOSTIC INFORMATION AND PROCEDURES
SYMPTOMS - TRANSFER CASE
Strategy Based Diagnostics
Review the system operation before attempting transfer case diagnosis. The technician should understand how the transfer case is assembled, how torque is transferred, how the rear drive axle relates to the system, and what operating conditions are considered normal. Refer to Transfer Case Disassembled View, Transfer Case Description and Operation, and Rear Drive Axle Description and Operation as needed.
All diagnosis should follow a logical process. Strategy based diagnostics provides a consistent method for handling mechanical, hydraulic, electrical, and customer-reported concerns. The diagnostic flow is the proper starting point when a repair is needed because it prevents the technician from jumping directly to part replacement without confirming the real cause. On a Buick Enclave, transfer case symptoms can sometimes be confused with tire noise, wheel bearing noise, rear drive axle concerns, or transmission-related conditions, so the first step is to narrow the complaint carefully.
Visual/Physical Inspection
- Inspect for aftermarket devices, modifications, or recently installed parts that could affect the operation of the vehicle. Refer to Checking Aftermarket Accessories. Non-original driveline parts, altered suspension height, incorrect tires, or added wiring can change vibration, load, or noise behavior.
- Inspect the easily accessible or visible system components for obvious damage or conditions that could cause the symptom. Look for cracked mounts, loose fasteners, damaged housings, fluid trails, worn seals, missing shields, impact marks, or contact between the driveline and surrounding parts.
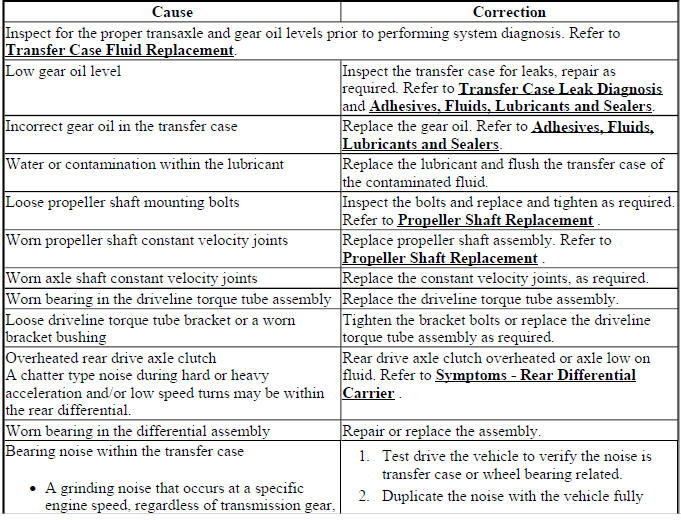
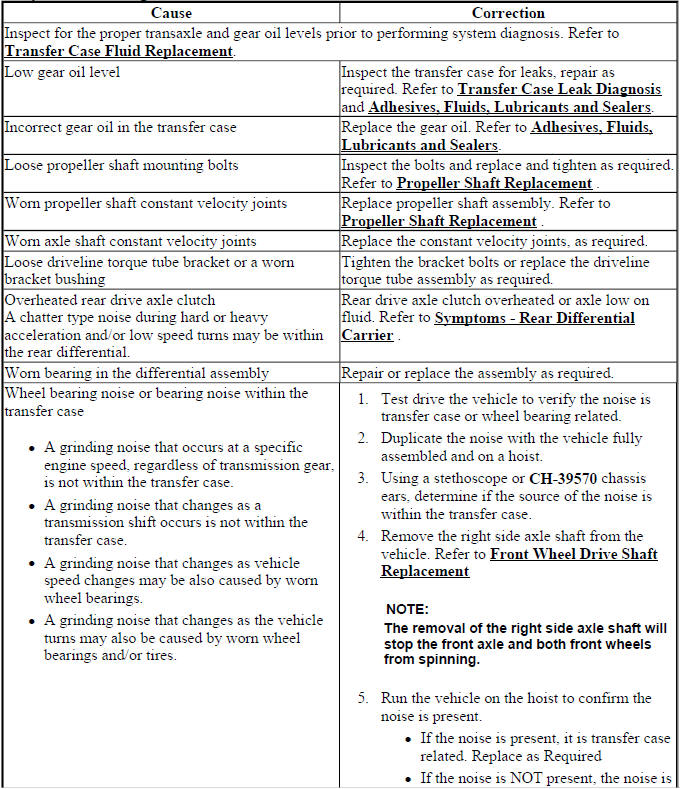
- Inspect for the correct lubricant level and proper viscosity. Low lubricant can create bearing noise, gear whine, overheating, and accelerated internal wear. Incorrect fluid can also change lubrication performance and sealing behavior.
- Verify the exact operating conditions under which the concern exists. Note vehicle speed, road surface, throttle position, coast or drive load, turning angle, temperature, duration of the drive, and whether the sound changes during acceleration or deceleration.
- Compare the driving characteristics or sounds, if applicable, to a known good vehicle. Some driveline sound, gear mesh noise, or AWD operating feel may be normal, and the goal is to avoid repairing a condition that is within normal operation.
Intermittent
Test the vehicle under the same conditions reported by the customer in order to verify the system is operating properly. Intermittent transfer case concerns may not appear during a short road test, especially if they depend on temperature, load, long-distance driving, or a specific road surface. When possible, duplicate the same speed range, acceleration pattern, coast condition, and turning situation described by the driver.
If the symptom cannot be duplicated, inspect for witness marks, fluid residue, loose hardware, worn mounts, or metal particles in the lubricant. These clues may remain even when the noise or vibration is not active during the inspection.
Symptom List
Refer to a symptom diagnostic procedure from the following list in order to diagnose the symptom:
- Diagnostic System Check - Vehicle
- Noisy in Drive
- Noisy When Coasting
- Intermittent Noise
- Constant Noise
- Transfer Case Leak Diagnosis
The symptom list helps organize the complaint by operating condition. A noise under drive load may indicate a different internal load path than a noise on coast. An intermittent noise may be related to temperature, fluid movement, bearing preload, or mount movement, while a constant noise may point more directly to continuous bearing, gear, tire, or driveline rotation.
NOISY IN DRIVE
Noisy in Drive
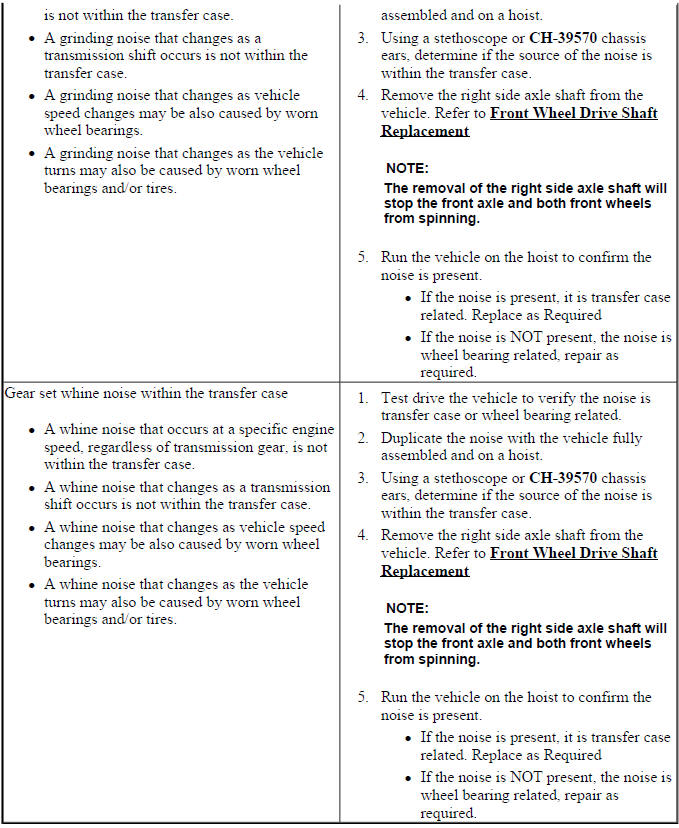
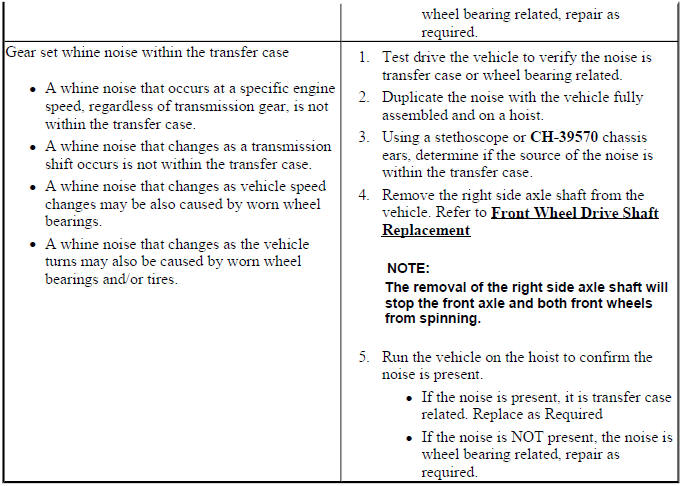
A noise that occurs primarily in drive should be evaluated while the transfer case is under engine torque. Pay attention to whether the sound increases with throttle, changes with road speed, or disappears when the load is removed. Gear whine, growling, rumbling, or vibration during drive can come from internal transfer case wear, bearing damage, incorrect fluid level, driveline angle concerns, axle components, or tires.
During diagnosis, avoid focusing on the transfer case alone until other rotating components have been considered. Tire pattern noise, wheel bearings, propeller shaft joints, rear axle bearings, and transmission output concerns can produce sounds that travel through the body and seem to come from the same area.
NOISY WHEN COASTING
Noisy When Coasting
A noise that is more noticeable when coasting should be diagnosed under deceleration or light-load conditions. This type of complaint may point to gear coast side contact, bearing wear, driveline backlash, mount movement, or a component that changes position when engine torque is removed. The road test should include steady speed, light throttle, throttle release, and gentle re-application of power so the technician can hear exactly when the sound begins and ends.
If the noise changes sharply between drive and coast, record the speed range and load condition. That information is often more useful than a general description such as “transfer case noise.” It helps separate gear mesh concerns from wheel-end or tire-related sound.
INTERMITTENT NOISE
Intermittent Noise
Intermittent noise requires careful duplication of the driver’s complaint. Ask whether the sound happens after a cold start, after a long highway drive, during turns, over bumps, in wet weather, or only at a certain speed. A brief rattle, clunk, hum, or grind may be caused by internal wear, loose mounting points, driveline movement, fluid aeration, thermal expansion, or contact between components.
Because intermittent symptoms can disappear during inspection, look for secondary evidence. Check for polished contact marks, heat discoloration, loose shields, leaking seals, damaged mounts, metal in the fluid, or uneven tire wear. A clean road test route and repeatable conditions make this type of diagnosis much more reliable.
CONSTANT NOISE
Constant Noise
A constant noise is usually easier to duplicate, but it still needs careful isolation. The technician should identify whether the sound follows vehicle speed, engine RPM, gear selection, load, or wheel rotation. Transfer case bearing noise often changes with vehicle speed, while engine or transmission-related noise may respond differently to RPM or gear changes.
Before condemning the transfer case, inspect tires, wheel bearings, axle components, propeller shaft condition, mounts, shields, and fluid level. A constant hum or growl can travel through the chassis and make the source difficult to locate from the driver’s seat. Chassis ears, a lift inspection, and lubricant inspection may be needed to confirm the source.
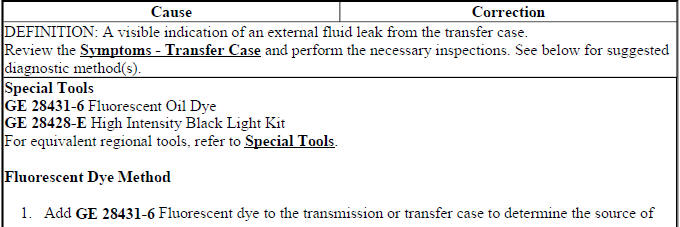
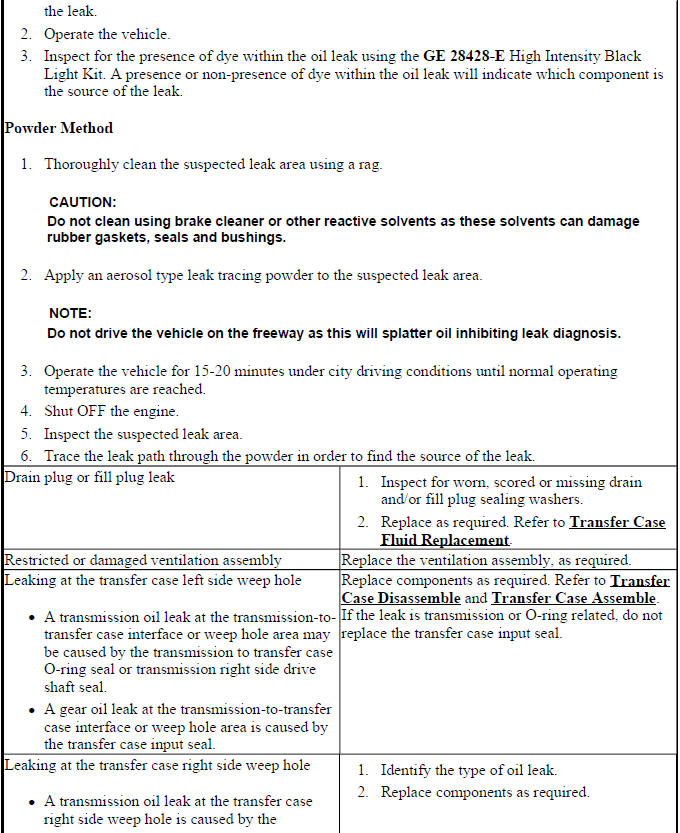
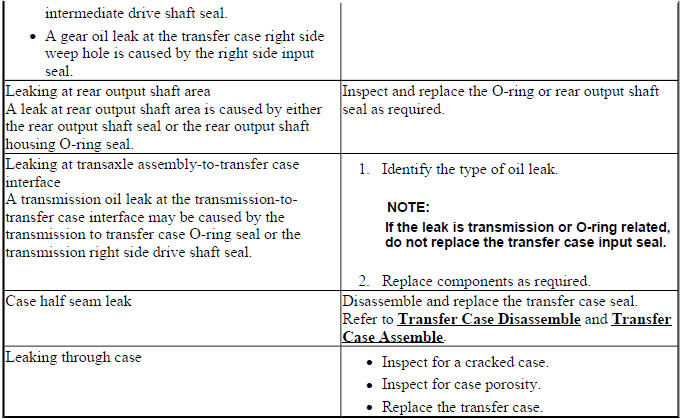
TRANSFER CASE LEAK DIAGNOSIS
Transfer Case Leak Diagnosis
Transfer case leak diagnosis should begin with cleaning the suspected area and confirming the actual source of the fluid. Oil can travel along the housing, fasteners, brackets, or underbody airflow path, making the leak appear to come from a different location. A small amount of residue near a seam, seal, vent, drain plug, or fill plug should be verified before parts are removed.
Check the fluid level, vent condition, seal lips, mating surfaces, housing porosity, plug sealing surfaces, and nearby components. Overfilled fluid, a blocked vent, damaged seal surface, loose fastener, incorrect sealant application, or worn output seal can all cause leakage. If dye is used, clean the area first and road test the vehicle long enough for the leak path to appear clearly.
On Buick Enclave transfer case service, leak repair should include both the failed sealing point and the reason the leak developed. Replacing a seal without checking shaft surface condition, vent operation, bearing play, and housing alignment may lead to a repeat leak soon after the repair.