Buick Enclave: Repair Instructions
TIRE PRESSURE INDICATOR SENSOR REPLACEMENT (SNAP IN STYLE)
The snap-in tire pressure indicator sensor is installed as part of the wheel and valve stem assembly. It must be handled carefully during tire removal, tire mounting, valve service, and sensor replacement because the sensor body, pressure port, and stem area can be damaged by tire tools or incorrect installation. On the Buick Enclave, a damaged or incorrectly learned TPMS sensor can cause warning messages, missing tire pressure readings, or sensor-related DTCs after service.
Removal Procedure
1. Raise the vehicle on a suitable support. Refer to Lifting and Jacking the Vehicle. Make sure the vehicle is supported at the approved lift points before removing the wheel assembly.
2. Remove the tire/wheel assembly from the vehicle. Refer to Tire and Wheel Removal and Installation. Keep the wheel protected from scratches and avoid placing the valve stem area against the floor or lift arms.
3. Dismount the tire from the rim. Refer to Tire Dismounting and Mounting. Position the tire machine carefully so the bead breaker and mounting head do not contact the TPMS sensor inside the wheel.
4. Remove the TORX screw (1) from the tire pressure sensor (2) and pull it straight off the tire pressure valve stem (3). Pulling the sensor straight away from the stem reduces the chance of cracking the sensor housing or bending the valve stem.
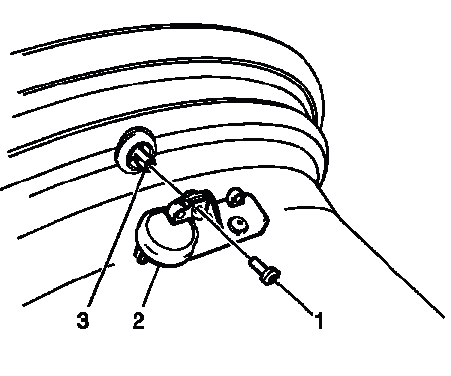
Fig. 1: View Of Tire Pressure Indicator Sensor
NOTE: When servicing the tire pressure sensor always use a new Schrader tire pressure monitor (TPM) and a new TORX screw during installation.
5. Remove the tire pressure valve stem by pulling it through the rim. Inspect the valve hole area for corrosion, burrs, rubber residue, or damage that could prevent the new valve stem from sealing correctly.
CAUTION: Do not scratch or damage the clear coating on aluminum wheels with the tire changing equipment. Scratching the clear coating could cause the aluminum wheel to corrode and the clear coating to peel from the wheel.
Installation Procedure
1. Assemble the tire pressure sensor (2) to the valve stem and install the new TORX screw (3) and tighten to 1.3 N.m (11.5 lb in). Do not over-tighten the screw, because the sensor housing and stem attachment point are designed for a light, controlled clamp load.
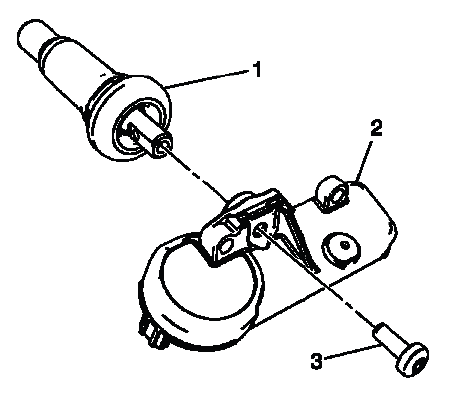
Fig. 2: View Of Tire Pressure Indicator Sensor
CAUTION: Refer to Fastener Caution.
NOTE:
- Ensure the flat of the valve, lines up with the flats of the snap in the enclosure.
- TPM valves and TORX screws are one-time use only.
Correct alignment of the valve and sensor body is required so the sensor sits in the intended position inside the wheel. Reusing the valve or TORX screw can lead to sealing issues, improper clamp load, or sensor movement after the tire is inflated.
2. Apply tire soap to the rubber portion of the valve stem (1). Lubricate only the rubber area that must pass through the wheel opening, and avoid contaminating the sensor pressure port.
NOTE: Use and approved tire mounting lubricant. DO NOT use silicon or corrosive base compounds to lubricate the tire bead and the wheel rim. A corrosive type compound can cause tire or rim deterioration.
3. Using a tire valve stem mounting tool, pull the valve stem through in a direction parallel to the valve hole on the rim. Pulling at an angle can tear the rubber stem or prevent the valve from seating fully against the wheel.
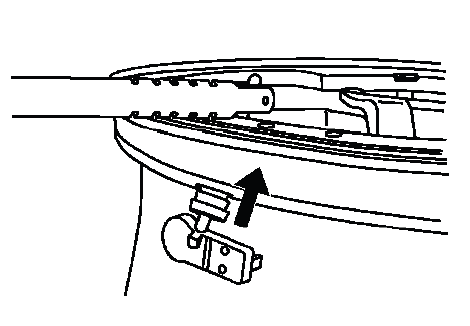
Fig. 3: View Of Tire Valve Stem Mounting Tool
4. Mount the tire to the rim. Refer to Tire Dismounting and Mounting. Keep the mounting head and bead movement away from the sensor body to prevent impact damage during installation.
NOTE: Snap Fit TPM sensors are still shipped in the OFF mode. However, the TPM no longer needs to be spun to remove it from the OFF mode. The sensor will exit its OFF state when the tire is inflated. The technician can then program the vehicle as normal.
After inflation, confirm the sensor wakes up and can be activated with the correct TPMS tool. If the tire was mounted correctly but the sensor does not respond, verify tool position, sensor compatibility, and valve stem seating before replacing additional parts.
5. Install the tire/wheel assembly on the vehicle. Refer to Tire and Wheel Removal and Installation. Tighten the wheel fasteners using the proper pattern and torque procedure.
6. Lower the vehicle. After lowering, check that the tire is inflated to the placard specification and that the valve stem is not leaking.
7. Learn the tire pressure sensors. Refer to Tire Pressure Indicator Sensor Learn. The learn procedure is required so the Buick Enclave can assign each sensor ID to the correct wheel position and display accurate tire pressure information.
TIRE VALVE STEM GROMMET REPLACEMENT
The tire valve stem grommet seals the TPMS sensor assembly at the wheel opening. If the grommet is cracked, compressed, leaking, contaminated, or disturbed during service, it should be replaced so the valve stem can seal correctly against the wheel. A small leak at this area may create a slow pressure loss that looks like a tire puncture but is actually a valve sealing concern.
Removal Procedure
1. Raise the vehicle on a suitable support. Refer to Lifting and Jacking the Vehicle.
2. Remove the tire/wheel assembly from the vehicle. Refer to Tire and Wheel Removal and Installation.
3. Remove the tire from the wheel. Refer to Tire Dismounting and Mounting.
NOTE: Before the tire is removed from the wheel, note the following items to avoid tire pressure sensor damage upon tire dismounting:
- Place the sensors cap and valve on a dry clean surface after removal.
The cap is aluminum and the valve is nickel plated to prevent corrosion and are not to be substituted with a cap or valve made of any other material.
- Position the bead breaking fixture 90º from the valve stem when separating the tire bead from the wheel.
- Position the mounting/dismounting head so the tire iron or pry bar can be inserted slightly clockwise of the sensor body when prying the tire bead up and over the mounting/dismounting head.
- Using the tire machine, rotate the tire/wheel assembly clockwise when transferring the tire bead to the outside of the wheel rim.
- Repeat items for inner bead.
These handling steps protect the sensor from bead breaker impact and tool contact. The TPMS sensor sits close to the valve stem inside the wheel, so incorrect bead breaking or pry bar placement can crack the sensor, bend the stem, damage the grommet sealing area, or cause an intermittent sensor signal after the tire is reinstalled.
4. Remove the tire pressure sensor nut. Hold the sensor body steady while loosening the nut so the valve stem and sealing surface are not twisted.
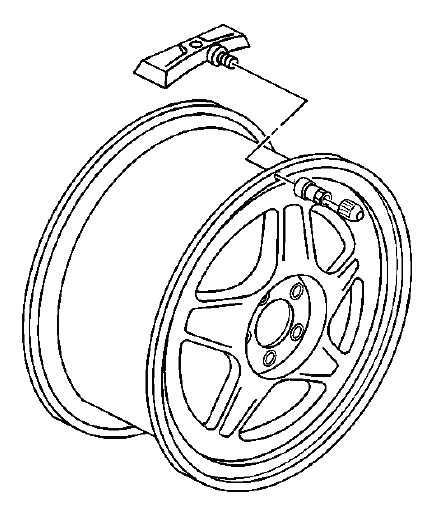
Fig. 4: View Of Tire Pressure Sensor
NOTE: If any tire sealant is noted upon tire dismounting, replace the sensor. Refer to Tire Pressure Indicator Sensor Replacement (Snap In Style). Also remove all residual liquid sealant from the inside of the tire and wheel surfaces.
5. Remove the sensor from the wheel hole. Pull it out without scraping the sensor body across the wheel opening.
6. Remove the sensor grommet from the valve stem. Discard the old grommet and inspect the valve stem shoulder for corrosion, dirt, or damage.
Installation Procedure
1. Clean any dirt or debris from the grommet sealing areas. The wheel surface around the valve hole must be clean and smooth so the new grommet can seal evenly.
2. Install the grommet on the sensor valve stem. Make sure it sits flat and is not rolled, twisted, or stretched out of position.
3. Insert the sensor in the wheel hole with the air passage facing away from the wheel. Position the sensor carefully so the pressure port is not blocked and the body rests correctly inside the rim.
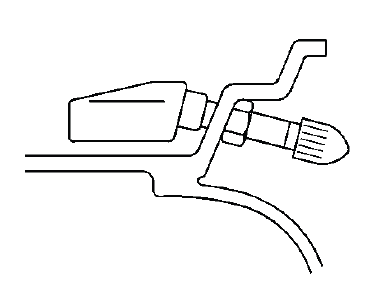
Fig. 5: View Of Tire Pressure Monitor Sensor & Nut
4. Install the sensor nut and position the sensor body parallel to the inside wheel surface while torquing. Keeping the sensor parallel prevents the body from contacting the tire bead during mounting and helps maintain a reliable seal at the grommet.
CAUTION: Refer to Fastener Caution.
Tighten
- Tighten the sensor nut to 7 N.m (62 lb in).
5. Install the tire on the wheel. Refer to Tire Dismounting and Mounting.
NOTE: Before installing the tire on the wheel, note the following items to avoid tire pressure sensor damage upon tire mounting:
- Position the mounting/dismounting head 180º from the valve stem.
- Position the bead transition area 45º counterclockwise of the valve stem.
- Using the tire machine, rotate the tire/wheel assembly clockwise when transferring the tire bead to the inside of the wheel rim.
- Repeat items for outer bead.
Mount the tire slowly near the sensor area and watch the bead path as it passes the valve stem. If the bead catches the sensor body, stop and reposition the assembly instead of forcing the tire over the rim.
6. Install the tire/wheel assembly on the vehicle. Refer to Tire and Wheel Removal and Installation. After installation, inflate the tire to specification and check for leakage at the valve stem.
7. Lower the vehicle. Confirm that the TPMS reading is reasonable and that no warning appears after the system has been learned or driven as required.
TIRE PRESSURE INDICATOR SENSOR LEARN
Special Tools
- EL-46079 Tire Pressure Monitor Diagnostic Tool
or
- EL-50448 Tire Pressure Monitor Sensor Activation Tool
For equivalent regional tools, refer to Special Tools.
The sensor learn procedure assigns each tire pressure sensor ID to its correct wheel location. This step is required after tire rotation, sensor replacement, RCDLR replacement, and any service event where learned sensor locations may no longer match the physical tire positions. Without a proper learn, the vehicle may display the wrong tire location or set a sensor-not-learned DTC.
Learn Mode Description
The tire pressure monitor (TPM) system uses the instrument panel cluster (IPC), body control module (BCM), remote control door lock receiver (RCDLR), keyless entry transmitter, 4 radio frequency transmitting pressure sensors and the serial data circuit to perform the TPM learn mode functions. The sensor learn procedure must be performed after every tire rotation, RCDLR replacement or sensor replacement. Once the learn mode has been enabled, each of the sensors unique identification codes can be learned into the RCDLR memory. When a sensor ID has been learned, the RCDLR sends a serial data message to the BCM to sound a horn chirp. This verifies the sensor has transmitted its ID and the RCDLR has received and learned it. The RCDLR must learn the sensor IDs in the proper sequence to determine correct sensor location. The first learned ID is assigned to the left front location, the second to right front, the third to right rear and the fourth to left rear. The turn signals will individually illuminate indicating which location is to be learned in the proper sequence.
On the Buick Enclave, the horn chirp and turn signal prompts are the technician’s confirmation that the learn process is moving through the correct sequence. If a horn chirp is missed or a sensor is activated out of order, the displayed tire locations may be incorrect. Always follow the indicated wheel order and verify the final sensor positions with the scan tool when a TPMS complaint follows recent wheel service.
Sensor Functions Using EL-46079, EL-50448 or Equivalent
Each sensor has an internal low frequency coil. When the TPM special tool is used in activate mode, it produces a low frequency transmission that activates the sensor. The sensor responds to a low frequency activation by transmitting in learn mode. When the RCDLR receives a learn mode transmission while in TPM learn mode, it will assign that sensors ID to the location on the vehicle relative to the order in which it was learned.
The activation tool should be held near the valve stem area and aimed as instructed so the sensor receives a strong activation signal. If the tool shows sensor data but the vehicle does not chirp, reposition the wheel, check the tool location, and repeat the activation before assuming that the sensor or receiver has failed.
Learn Mode Cancellation
The learn mode will cancel if the ignition is cycled to OFF or if more than 2 minutes has elapsed for any sensor that has not been learned. If the learn mode is cancelled before the first sensor is learned, the original sensor IDs will be maintained. If the learn mode is canceled after the first sensor is learned, the following will occur:
- All stored sensor IDs will be invalidated in the RCDLR memory.
- If equipped, the DIC will display dashes instead of tire pressures.
- DTC C0775 will be set.
These conditions will now require the learn procedure to be repeated for the system to function properly.
Because cancellation after the first learned sensor can erase the stored ID set, do not start the learn process unless the activation tool is available and all four tires can be accessed in sequence. If the process is interrupted, repeat the entire learn procedure from the beginning instead of trying to continue from the last wheel.
TPM Learn Procedure
NOTE: In the event a particular sensor's information is displayed on the special tool upon activation but the horn does not chirp, it may be necessary to rotate the wheel valve stem to a different position due to the sensor signal is being blocked by another component.
If this happens, rotate the wheel so the valve stem is positioned away from the obstructing component, then activate the sensor again. The sensor may be working correctly even when the receiver does not hear the signal from the first wheel position.
TPM Learn Enable Methods
1. Ignition ON, initiate the TPM Learn Mode using one of the following procedures:
- Using a scan tool, initiate the TPM Learn Mode. A double horn chirp will sound indicating the Learn Mode has been enabled. The left front turn signal will also be illuminated.
- On vehicles equipped with keyless entry, simultaneously press the keyless entry transmitters lock and unlock buttons until a double horn chirp sounds indicating the Learn Mode has been enabled.
The left front turn signal will also be illuminated.
- On vehicles not equipped with keyless entry, press and release the driver information center (DIC) INFO button until the TIRE LEARN message appears on the DIC display. Press and hold the SET/RESET button until a double horn chirp sounds indicating the Learn Mode has been enabled.
The left front turn signal will also be illuminated.
Use the method that matches the vehicle equipment and available tools. The double horn chirp confirms that the RCDLR is ready to learn sensor IDs, and the illuminated turn signal identifies the first wheel position to activate.
2. Starting with the left front tire, active the sensor by holding the antenna of the TPM special tool aimed upward against the tire sidewall close to the wheel rim at the valve stem location. Press and release the Activate button. Ensure that the transmit indicator on the special tool indicates that the sensor activation signal is being transmitted. Wait for a horn chirp. If the horn does not chirp, repeat the sensor activation sequence with the tool. Once the horn chirp has sounded, the sensor information is learned and the turn signal in the next location to be learned will illuminate.
Keep the tool close to the valve stem and wait for the horn confirmation before moving to the next tire. If the tool is moved too soon or the wrong wheel is activated, the sensor order may be learned incorrectly. This is one of the most common causes of tire pressure values appearing at the wrong position on the display.
3. After the horn chirp has sounded and the right front turn signal is illuminated, repeat step 2 for the remaining 3 sensors in the following order:
- Right front
- Right rear
- Left rear
This order must be followed exactly because the RCDLR assigns sensor locations based on learn sequence. Do not skip a wheel, activate a tire out of order, or restart halfway through the process without confirming the learn status.
4. When the left rear sensor has been learned and a double horn chirp has sounded, the learn process is complete and the RCDLR exits the learn mode.
After the final double horn chirp, verify that all four tire pressure values display correctly and match the physical wheel positions. If equipped with a DIC, confirm that dashes are no longer displayed and that no service tire monitor message remains. A short road test may be used to confirm that the Buick Enclave retains the learned sensor locations and reports pressure normally during driving.
