Buick Enclave: Repair Instructions
FRONT WHEEL DRIVE INTERMEDIATE SHAFT REPLACEMENT
Removal Procedure
1. Raise and support the vehicle. Refer to Lifting and Jacking the Vehicle. Make sure the vehicle is stable and properly supported before working around the front driveline and suspension area.
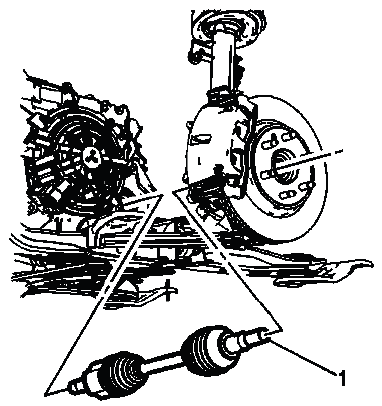
2. Remove the right front wheel drive shaft. Refer to Front Wheel Drive Shaft Replacement. Keep the shaft supported during removal so the boots, splines, and seal contact areas are not damaged.
3. Remove the intermediate drive shaft mounting bolts from the engine bracket. Loosen the bolts evenly and keep the bracket area clean so the support can be reinstalled without misalignment.
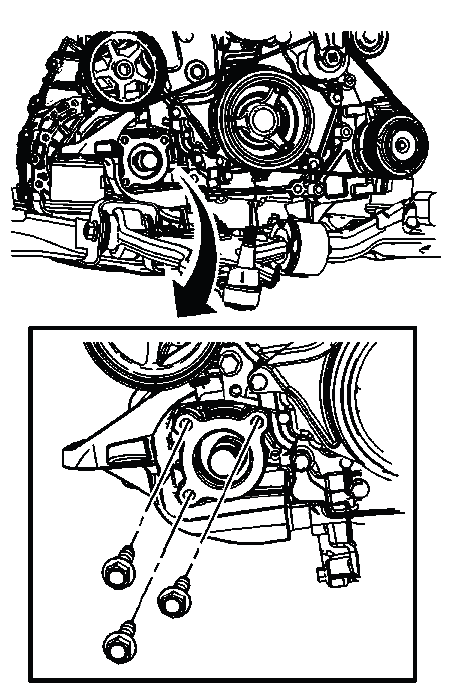
Fig. 3: View Of Intermediate Drive Shaft Mounting Bolts
4. Remove the intermediate drive shaft from the vehicle. Pull the shaft straight out and avoid dragging the splines across the seal or bracket surfaces. If the shaft feels tight, check for remaining fastener load or bracket interference before applying more force.
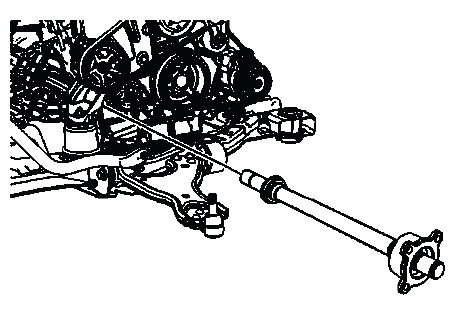
Fig. 4: Removing/Installing Intermediate Drive Shaft
Installation Procedure
1. Install the intermediate drive shaft to the transaxle. Guide the shaft into place squarely so the splines engage cleanly and the seal is not rolled, nicked, or pushed out of position.

Fig. 5: Removing/Installing Intermediate Drive Shaft
2. Position the intermediate shaft support bracket to the engine. The bracket should sit naturally against its mounting surface without being forced or pulled into position by the bolts.
3. Install the support bracket bolts. Start the bolts by hand first to protect the threads and keep the intermediate shaft aligned with the transaxle and support bracket.
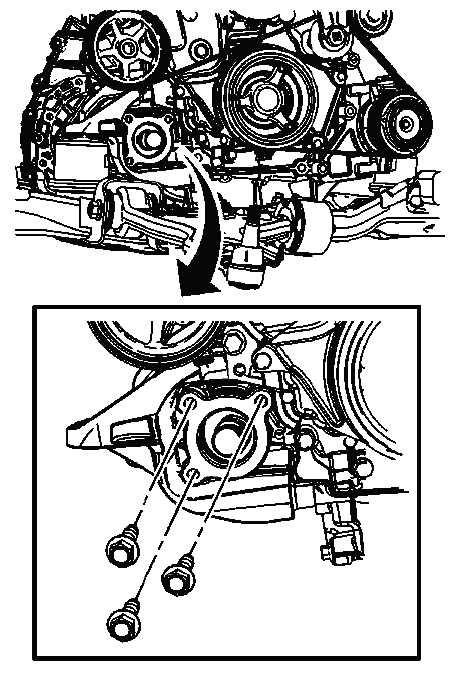
Fig. 6: View Of Intermediate Drive Shaft Mounting Bolts
CAUTION: Refer to Fastener Caution. The support bracket bolts must be tightened to specification. Incorrect torque can allow bracket movement, shaft misalignment, noise, vibration, or thread damage.
Tighten
- Tighten the bolts to 58 N.m (43 lb ft).
4. Install a new wheel drive shaft retaining ring. Do not reuse a distorted or weakened retaining ring, because it may not hold the shaft securely in place during operation.
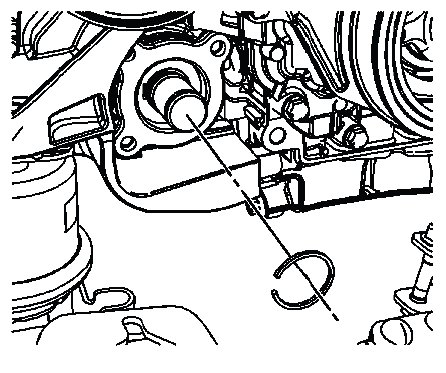
Fig. 7: Identifying Wheel Drive Shaft Retaining Ring
5. Install the right wheel drive shaft. Refer to Front Wheel Drive Shaft Replacement. Confirm that the shaft seats fully and that the boot is not twisted, stretched, or contacting nearby components.
6. Remove the support and lower the vehicle. After the vehicle is lowered, verify that the front driveline area is free of tools and that no fluid seepage or abnormal shaft angle is visible.
FRONT WHEEL DRIVE SHAFT REPLACEMENT
Special Tools
- J-2619-O1 Slide Hammer
- J-29794 Axle Shaft Remover Extension
- J-33008-A Axle Shaft Puller
- J 44394-A Seal Protector
For the equivalent regional tools, refer to Special Tools. Using the correct tools helps remove the shaft without damaging the transmission seal, joint housing, splines, or steering knuckle area.
Removal Procedure
WARNING: To prevent personal injury and/or component damage, do not allow the weight of the vehicle to load the front wheels and do not attempt to operate the vehicle when the wheel drive shaft(s) or wheel drive shaft nut(s) are removed. Doing so may allow the inner bearing race to separate, which can damage brake and suspension components and may result in loss of vehicle control.
CAUTION: Wheel drive shaft boots, seals and clamps should be protected from sharp objects any time service is performed on or near the wheel drive shaft(s).
Damage to the boot(s), the seal(s) or the clamp(s) may allow lubricant to leak from the joint. Loss of lubricant can quickly lead to joint noise, rough operation, and possible wheel drive shaft failure.
NOTE: The following service procedure can be used for both left and right front wheel drive shafts.
1. Raise and support the vehicle. Refer to Lifting and Jacking the Vehicle. Support the Buick Enclave securely before removing any suspension or driveline components.
2. Remove the tire and wheel assembly. Refer to Tire and Wheel Removal and Installation. This provides access to the shaft nut, steering knuckle, stabilizer link, tie rod end, and related front suspension parts.
3. Insert a punch or brass drift (2) in the brake rotor so that the brass drift or punch rests against the brake caliper mounting bracket. This prevents the rotor and shaft from turning while the shaft nut is being loosened.
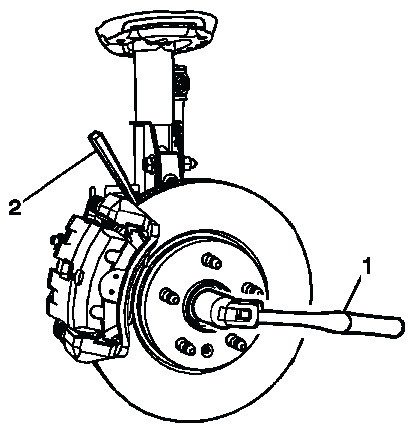
Fig. 8: Loosening/Tightening Wheel Drive Shaft Nut
NOTE: The following procedure is used to ensure that the wheel drive shaft assembly does not rotate while the nut is being removed. Keep the drift positioned securely so it does not slip and damage the rotor or caliper bracket.
4. Using a breaker bar and socket, loosen the wheel drive shaft nut. Apply steady force and keep the socket square on the nut to avoid rounding the fastener.
5. Remove the wheel drive shaft nut (1). Once removed, set it aside for discard and do not reinstall it.
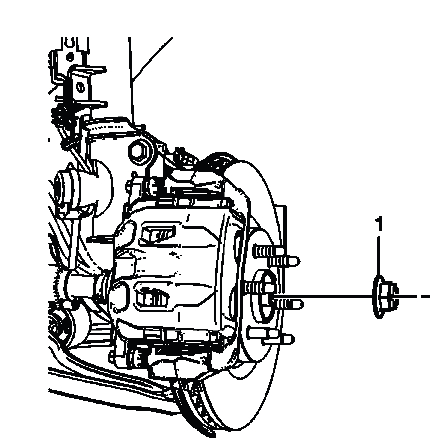
Fig. 9: Wheel Drive Shaft Nut
NOTE: DO NOT re-use the wheel drive shaft nut, discard and use NEW. The nut is designed for one-time service retention and may not hold proper clamp load if reused.
6. Remove the outer tie rod end from the steering knuckle. Refer to Steering Linkage Outer Tie Rod Replacement. Protect the tie rod end boot and threads during separation.
NOTE: In the following service procedure, it is NOT necessary to completely remove the tie rod end. Only remove the tie rod end from the steering knuckle. This gives the knuckle enough movement for shaft removal without disturbing more steering linkage than needed.
7. Remove the stabilizer shaft link at the stabilizer bar and secure. Refer to Stabilizer Shaft Link Replacement. Securing the link prevents it from hanging, twisting, or interfering with shaft and knuckle movement.
8. Using the appropriate tool, separate the wheel drive shaft from the steering knuckle. Do not hammer directly on the shaft threads or outer joint, because impact damage can make reassembly difficult and can harm the joint.
9. Remove the lower ball joint from the steering knuckle. Refer to Lower Control Arm Ball Joint Replacement. Support the knuckle as the joint is separated so the brake hose, ABS harness, and strut area are not pulled.
10. Remove and relocate the front strut assembly to the side and secure. Move it only as far as needed for clearance, keeping nearby hoses and wiring protected from strain.
11. Using the J-2619-O1 hammer, J-29794 extension and the J-33008-A puller, remove the wheel drive shaft. The puller should apply force straight through the shaft axis so the joint housing and transmission seal area are not damaged.
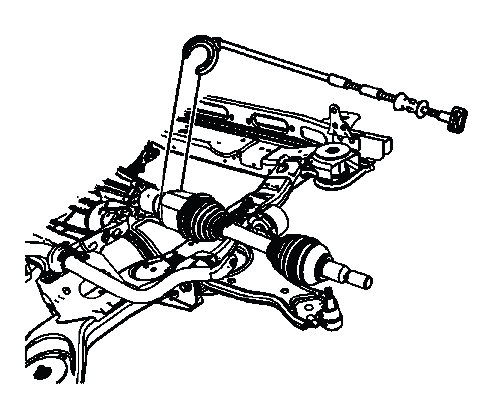
Fig. 10: Identifying Wheel Drive Shaft
NOTE: The following service procedure can be used on vehicles that are Front Wheel Drive (FWD) left side only, as well as vehicles equipped with All Wheel Drive (AWD).
12. Remove the wheel drive shaft from the vehicle. Guide the shaft out carefully and keep the boots away from sharp suspension edges. On the Buick Enclave, a small cut in the boot can later cause grease loss and CV joint failure even if the shaft appears normal during installation.
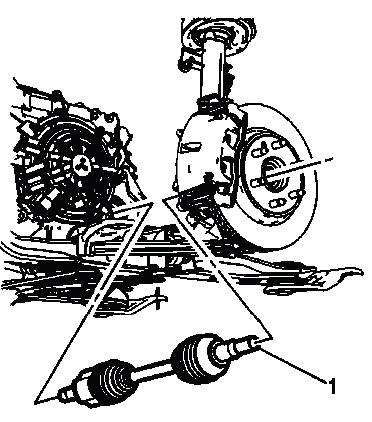
Fig. 11: Removing/Installing Wheel Drive Shaft
Installation Procedure
1. Insert the J 44394-A protector into the transmission. The protector shields the oil seal while the shaft splines pass through the opening.

Fig. 12: Protector Tool
2. Apply a small amount of grease to the intermediate shaft and/or the wheel drive shaft splines. Refer to Adhesives, Fluids, Lubricants and Sealers. Use only enough grease to help assembly; excess lubricant can attract dirt or be pushed into areas where it does not belong.
3. Install the washer (1) on the wheel drive shaft (2). Confirm the washer is facing the correct direction and is fully seated before the shaft is installed.
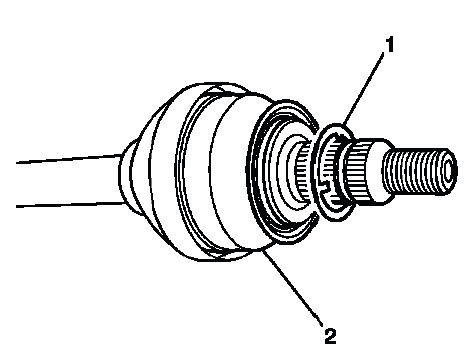
Fig. 13: Wheel Drive Shaft And Washer
NOTE: The washer must be installed on the wheel drive shaft. Missing or incorrectly positioned washer hardware can affect clamp load, joint seating, and long-term hub or bearing operation.
4. Ensure that the front wheel drive shaft is properly seated. A fully seated shaft should lock into position and should not pull back out easily by hand.
5. Remove the J 44394-A protector from the oil seal. Remove it carefully so the seal lip is not disturbed after the shaft is seated.
6. Install the wheel drive shaft into front strut assembly. Guide the outer joint through the knuckle area without dragging the boot across sharp edges or forcing the shaft at an extreme angle.
7. Install the lower ball joint in the steering knuckle. Refer to Lower Control Arm Ball Joint Replacement. Make sure the joint is fully seated before tightening the related hardware.
8. Install the outer tie rod end to the steering knuckle. Refer to Steering Linkage Outer Tie Rod Replacement. After installation, confirm that the tie rod end boot is not twisted or pinched and that the steering linkage moves normally.
9. Install the stabilizer link to the stabilizer bar. Refer to Stabilizer Shaft Link Replacement. Make sure the link is positioned correctly and that the stabilizer bar is not under unusual tension before the fasteners are tightened.
10. Install the wheel drive shaft nut (1), tighten by hand. Starting the nut by hand prevents thread damage and helps confirm that the shaft is seated correctly in the hub before final torque is applied.
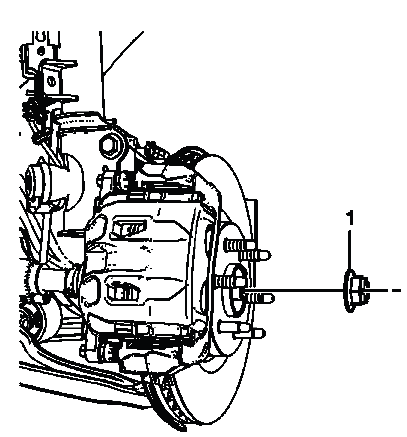
Fig. 15: Wheel Drive Shaft Nut
11. Insert a brass drift or punch (2) in the brake rotor so that it rests against the brake caliper mounting bracket. This holds the rotor and shaft from rotating while the nut is tightened.
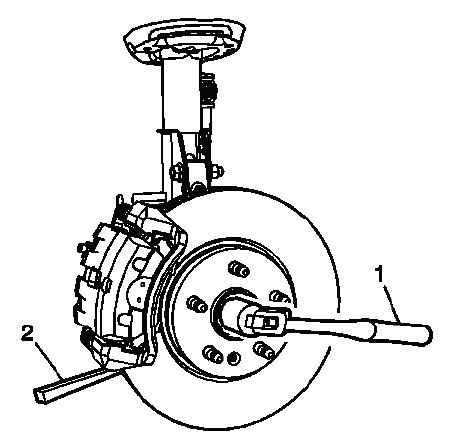
Fig. 16: Tightening Wheel Drive Shaft Nut
12. Using a torque wrench and socket (1), tighten the wheel drive shaft nut to 235 N.m (173 lb ft). Use a torque wrench for the final tightening, because the shaft nut clamp load is critical for hub bearing support and wheel drive shaft retention.
CAUTION: Refer to Fastener Caution. The wheel drive shaft nut must be tightened to specification. Incorrect torque can affect bearing preload, shaft seating, hub durability, and front suspension reliability.
13. Install the wheel house panel on the vehicle. Refer to Front Wheelhouse Front Liner Replacement (Acadia, Enclave, Traverse). Confirm the liner is properly clipped and does not rub the tire or shaft area.
14. Install the tire and wheel. Refer to Lifting and Jacking the Vehicle. Tighten the wheel fasteners using the correct pattern and specification for the vehicle.
15. Remove the support and lower the vehicle. After the vehicle is lowered, listen for abnormal noise during the first movement and confirm that the front shaft area is clear.
16. Check the fluid level of the transmission. Refer to Transmission Fluid Level and Condition Check. This is important after shaft service because fluid loss can occur when the shaft is removed from the transaxle.
REAR WHEEL DRIVE SHAFT AND REAR AXLE SHAFT SEAL REPLACEMENT
Tools Required
- J 2619-01 Slide Hammer
- J 29794 Axle Shaft Remover Extension
- J 33008-A Axle Shaft Puller
- J 44809 Output Shaft Seal Installer
Removal Procedure
NOTE: Both the right and left wheel drive shafts are serviced the same. Always compare the removed shaft, seal, and retaining parts with the replacement components before installation.
1. Remove the tire and wheel assembly. Refer to Tire and Wheel Removal and Installation. This provides access to the rear hub, shaft nut, and axle opening through the knuckle.
2. Insert a brass drift or punch in the brake rotor so that the brass drift or punch rests against the brake caliper mounting bracket. The drift prevents the wheel drive shaft from rotating while the nut is loosened.
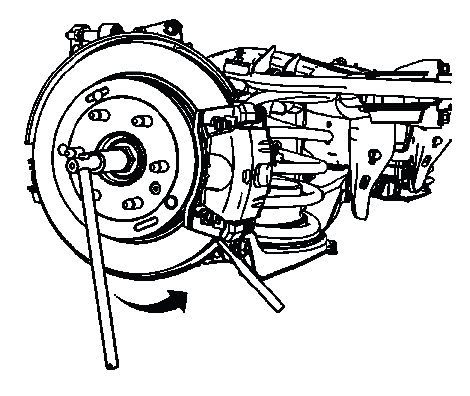
Fig. 17: Tightening/Loosening The Wheel Drive Shaft Nut
NOTE: The following procedure is used to ensure that the wheel drive shaft assembly does not rotate while the nut is being removed or tightened. Keep the drift seated securely so it does not slip against the rotor or caliper bracket.
3. Using the breaker bar and socket, loosen the wheel drive shaft nut. Apply steady force and keep the socket square on the nut to avoid damaging the fastener.
4. Remove the wheel drive shaft nut. The nut must be discarded after removal and replaced with a new one during installation.
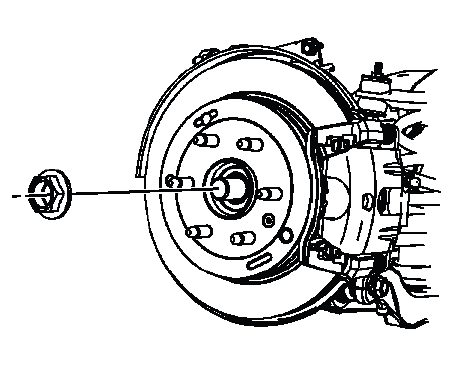
Fig. 18: Identifying Wheel Drive Shaft Nut
NOTE: DO NOT re-use the wheel drive shaft nut, discard and use NEW. Reusing the nut can reduce clamp load and may affect shaft retention or hub bearing service life.
5. Remove the wheel bearing/hub assembly. Refer to Rear Wheel Bearing and Hub Replacement (AWD), Rear Wheel Bearing and Hub Replacement (FWD). Support the surrounding components so the brake hose, ABS wiring, and knuckle are not strained.
6. Position the J 33008-A axle shaft puller, J 29794 axle shaft remover extension and J 2619-01 slide hammer on the wheel drive shaft. Align the puller straight with the shaft so removal force is applied evenly to the inner joint housing.
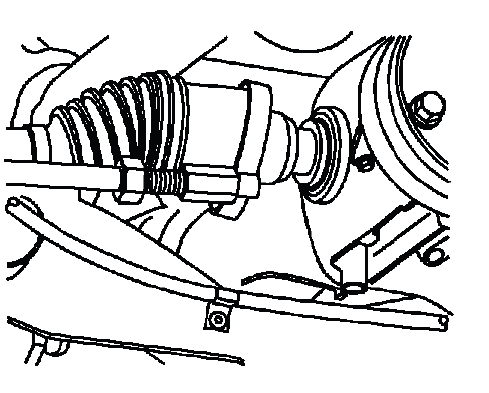
Fig. 19: View Of Wheel Drive Shaft Inner Joint Housing
7. Using the J 33008-A axle shaft puller, J 29794 axle shaft remover extension and J 2619-01 slide hammer, remove the wheel drive shaft. Use controlled slide hammer movement and avoid side loading the seal bore or joint housing.
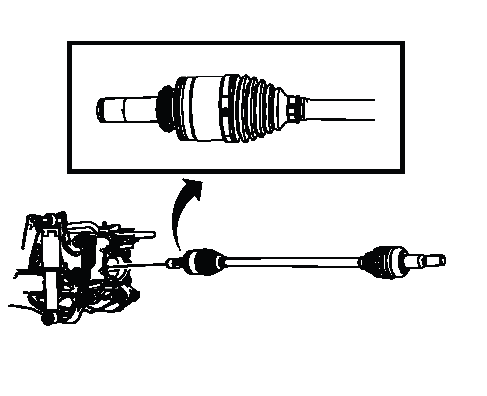
Fig. 20: View Of Wheel Drive Shaft
NOTE: Because of the design of the wheel drive shaft inner seal, the seal will be removed at the same time the wheel drive shaft is removed. Replace the seal, DO NOT re-use the seal. Replace with NEW. A reused seal may leak after the shaft is installed.
8. Remove the wheel drive shaft through the knuckle. Guide the shaft carefully so the boots, splines, and seal contact areas are not scraped against the knuckle opening.
NOTE: The rear knuckle does not have to be removed in order to service either the right or left rear wheel drive shaft. The opening in the knuckle is large enough to allow the wheel drive shaft to pass through. Avoid forcing the shaft at a sharp angle, as this can damage the boot or joint.
9. If servicing the right wheel drive shaft, remove the muffler assembly. Refer to Exhaust Muffler Replacement (NB5), Exhaust Muffler Replacement (NEA/NED or N10). This gives the needed clearance for shaft removal and installation.
10. Remove the retaining ring from the tripod. Inspect the tripod area for wear, contamination, or damage before the new retaining ring is installed.
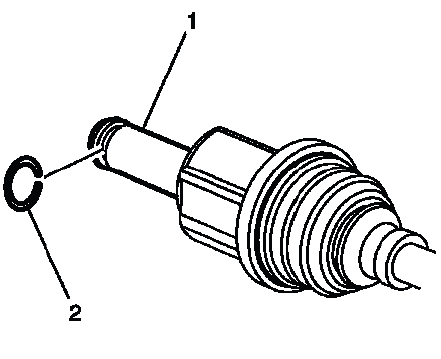
Fig. 21: Identifying Retaining Ring
NOTE: DO NOT re-use the retaining clip, replace with NEW. A used retaining ring may not hold the joint securely after reassembly.
Installation Procedure
1. Install the NEW retaining ring on the tripod. Make sure the ring is fully seated in its groove before installing the shaft into the rear differential.

Fig. 22: Identifying Retaining Ring
2. Position the new seal in the wheel drive shaft seal opening. The seal must be started squarely so it does not cock, fold, or damage the sealing lip during installation.
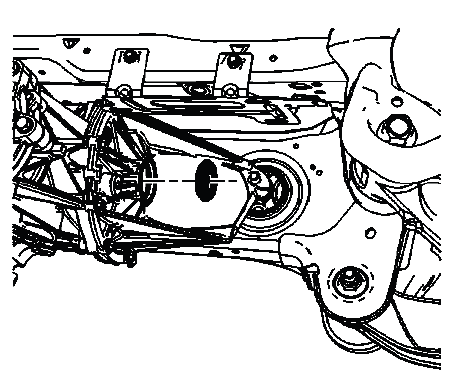
Fig. 23: Identifying Wheel Drive Shaft Seal
3. Using the J 44809 output shaft seal installer, install the wheel drive shaft seal. Drive the seal evenly to the correct position and do not strike the seal directly with a hammer. Proper seal installation helps prevent rear differential fluid leakage after the shaft is installed.
4. Install the wheel drive shaft through the knuckle. Feed the shaft through the opening carefully and keep the boots clear of sharp edges, brake components, and suspension hardware.
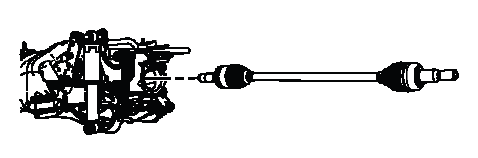
Fig. 24: Identifying Wheel Drive Shaft
5. Check to ensure that the wheel drive shaft is fully seated by pulling on the inner joint housing and NOT the wheel drive shaft. Pulling on the shaft bar can stress the joint or boot, while checking at the inner housing confirms the retaining ring is engaged correctly.
6. Install the wheel bearing/hub assembly. Refer to Rear Wheel Bearing and Hub Replacement (AWD), Rear Wheel Bearing and Hub Replacement (FWD). Make sure the hub sits squarely against the knuckle and that the shaft passes through without binding.
7. Install the wheel drive shaft nut. Start the nut by hand to protect the threads and confirm that the shaft is aligned properly in the hub.
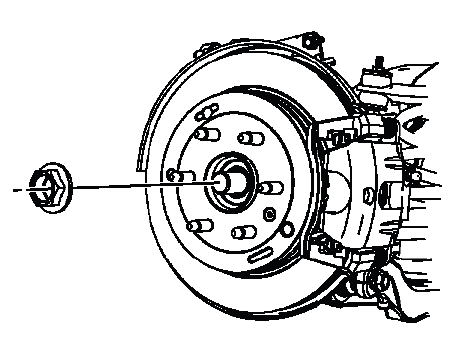
Fig. 25: Identifying Wheel Drive Shaft Nut
8. Install the muffler assembly, if removed. Refer to Exhaust Muffler Replacement (NB5), Exhaust Muffler Replacement (NEA/NED or N10). Confirm there is adequate clearance between the exhaust, rear suspension, and shaft area after installation.
9. Insert a brass drift or punch in the brake rotor so that the brass drift or punch rests against the brake caliper mounting bracket. This holds the shaft from rotating during final nut tightening.
Fig. 26: View Of Tightening Procedure For New Wheel Drive Shaft Nut
10. Using a torque wrench and socket, tighten the new wheel drive shaft nut to 205 N.m (151 lb ft). Use only a new nut and tighten it to the specified torque so the hub bearing and shaft are clamped correctly.
CAUTION: Refer to Fastener Caution. The rear wheel drive shaft nut is a critical fastener. Incorrect torque can affect hub bearing support, shaft retention, driveline noise, and overall wheel-end reliability.
11. Check the fluid level in the rear differential for any fluid loss during the service procedure. Refer to Rear Axle Lubricant Level Inspection. On AWD Buick Enclave models, fluid loss at the rear axle seal area should be corrected before the vehicle is returned to service.
12. Install the tire and wheel assembly. Refer to Tire and Wheel Removal and Installation. After installation, inspect for leaks, verify shaft seating, and check for abnormal noise during the first road test.
FRONT WHEEL DRIVE SHAFT INNER JOINT AND BOOT REPLACEMENT
Special Tools
- J 35910 Drive Axle Seal Clamp Pliers
Disassemble Procedure
1. Remove the wheel drive shaft from the vehicle. Refer to Front Wheel Drive Shaft Replacement. Place the shaft on a clean work surface and keep dirt away from the joint, grease, and boot sealing areas.
2. Install the wheel drive shaft in a soft jawed vise. Clamp only with enough force to hold the shaft steady, and do not crush, dent, or mark the shaft tube. Protect the boot and joint housing while the inner joint and boot are being serviced.

Fig. 27: View Of Front Wheel Drive Shaft Inner Joint
3. Using a pair of side cutters, remove and discard the small boot clamp (4) from the boot (3). Cut only the clamp and keep the tool away from the shaft, boot sealing lands, and joint housing surfaces.
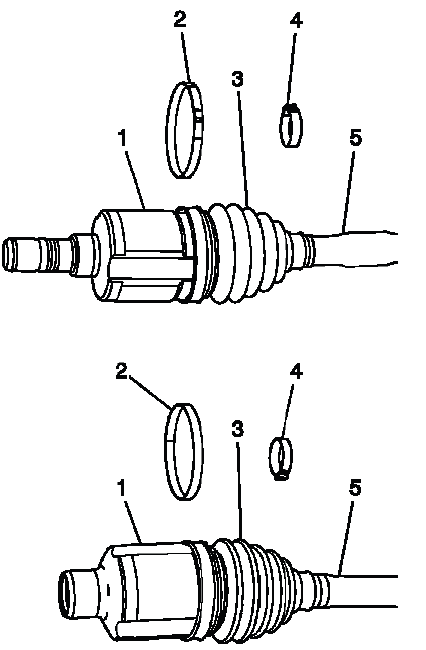
Fig. 28: View Of Wheel Drive Shaft Components
4. Using the appropriate tool, remove and discard the large boot clamp (2) from the boot (3). The clamp should not be reused because it may not hold the correct tension after it has been removed.
5. Remove the boot (3) from the tripot housing (1). Work the boot off carefully so the housing sealing surface is not scratched or distorted.
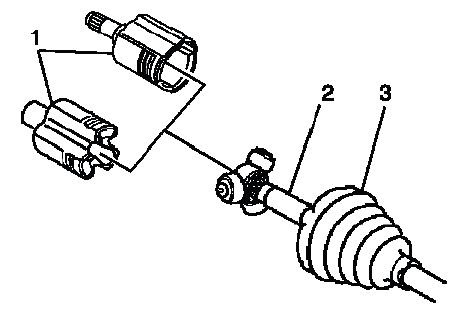
Fig. 29: View Of Boot, Tripot & Housing
6. Remove the inner tripot housing (1) from the wheel drive shaft (3). Keep the housing level as it is removed so the internal components are not dropped or contaminated.
7. Using the appropriate tool, remove the outer tripot spider retaining ring (1) from the wheel drive shaft (5). Do not pry against the shaft splines or machined surfaces while removing the ring.
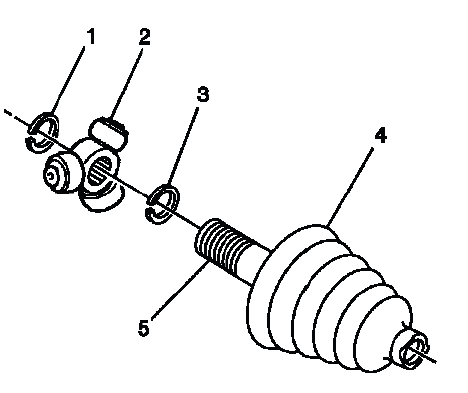
Fig. 30: View Of Tripot Spider & Retaining Ring
8. Remove the tripot spider (2) from the wheel drive shaft (5). Slide it off straight and note its installed direction before removal, because incorrect orientation during assembly can affect joint movement.
9. Using the appropriate tool, remove the inner tripot retaining ring (3), if equipped, from the wheel drive shaft (5).
NOTE: Step 9 is for those vehicles that have an inner retaining ring for the tripot spider. If there is not an inner retaining ring, skip step 9 and proceed to step 10. Do not add a retaining ring to a shaft design that was not built with one.
10. Remove the wheel drive shaft boot (4) from the wheel drive shaft (5). Slide the boot off without scraping the shaft surface where the new boot must seal.
11. Inspect the wheel drive shaft inner joint. Refer to Wheel Drive Shaft Inner Joint Inspection. Look for worn rollers, rough movement, damaged grooves, pitting, contamination, boot sealing damage, or any sign that the joint has operated without enough lubricant.
Assemble Procedure
1. Install the boot (1) on the wheel drive shaft (3). Slide the boot on gently and keep the sealing lip clean so it can seat properly in the shaft groove.
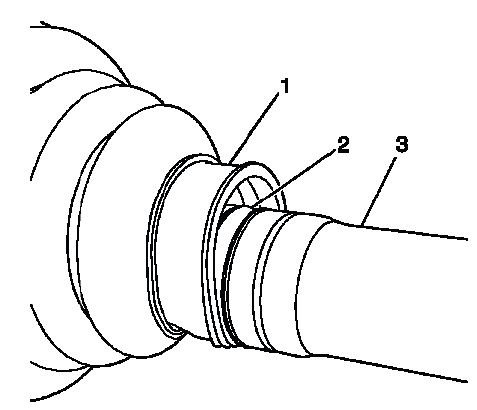
Fig. 31: Identifying Groove In Wheel Drive Shaft
2. Ensure that the boot (1) is properly seated in the groove (2) in the wheel drive shaft. A boot that is not fully seated may leak grease or pull loose after the shaft begins operating through suspension travel.
3. Using the appropriate tool, install the inner tripot retaining ring (3), if equipped. Make sure the ring is seated completely in its groove before the tripot spider is installed.

Fig. 32: View Of Tripot Spider & Retaining Ring
NOTE: Step 3 is for those vehicles that have an inner retaining ring for the tripot spider. If there is not an inner retaining ring, skip step 3 and proceed to step 4. Follow the shaft design exactly as built.
4. Install the tripot spider (2) until it just touches the shoulder on the wheel drive shaft (5). Do not drive the spider past the shoulder or damage the roller surfaces.
5. Using the appropriate tool, install the outer tripot spider retaining ring (1). Verify that the retaining ring is locked in place and that the tripot spider cannot move out of position.
6. Using the J 35910 pliers (1), close the boot clamp (2) until the gap (3) measures 1.8 mm (0.07 in) for vehicles with X88 and 2.6 mm (0.10 in) for vehicles with Z88/W49/WDA. The clamp gap must be measured, not estimated, because clamp tension controls boot sealing.
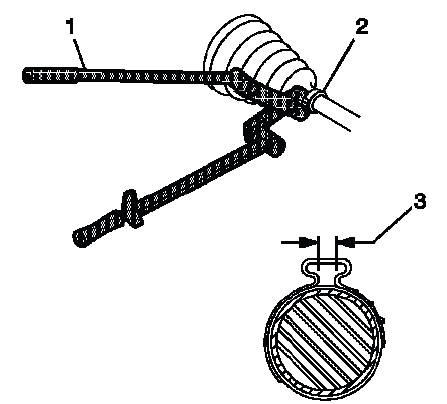
Fig. 33: Identifying Pliers Breaker Bar, Torque Wrench, Ratchet & Gap Measurement
7. Install the tripot housing (1) on the wheel drive shaft (3). Guide the housing over the tripot spider carefully so the rollers remain aligned and the boot is not pinched.
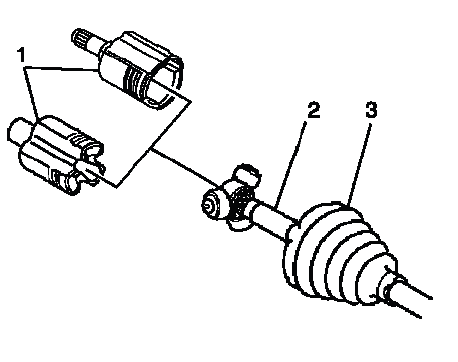
Fig. 34: View Of Boot, Tripot & Housing
8. Install the wheel drive shaft boot (3) on the tripot housing (1). Seat the boot evenly around the housing groove and make sure there is no twist in the rubber.
9. Place approximately half of the lubricant (2) in the boot (1) and the remaining half in the tripot housing (3). Splitting the lubricant between the boot and housing helps the joint receive grease quickly when it first begins moving after installation.
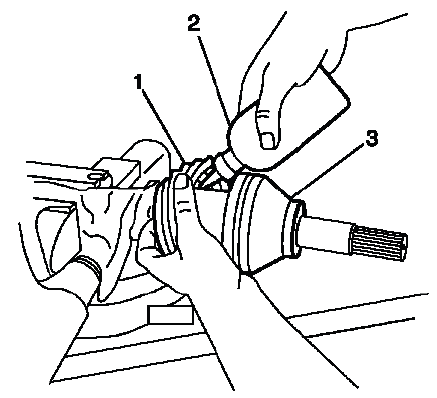
Fig. 35: Adding Lubricant Into Axle Boot
10. Using the J 35910 pliers (3), ratchet wrench (4) and a breaker bar (5), close the boot clamp (1) until the gap (6) measures 1.9 mm (0.07 in) for vehicles with X88 and 2.6 mm (0.10 in) for vehicles with Z88/W49/WDA. Tighten the clamp gradually and confirm the boot does not walk out of the groove as the clamp closes.
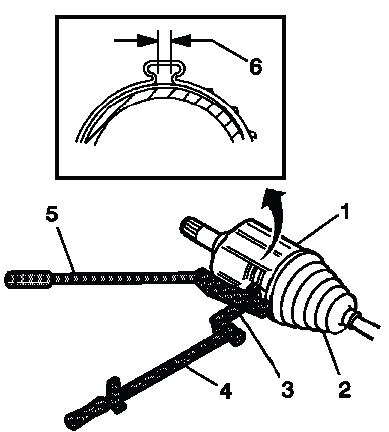
Fig. 36: Measuring Boot Clamp Gap
11. Remove any excess lubricant from the tripot housing and wheel drive shaft. Cleaning the outside of the assembly makes it easier to identify a real grease leak later.
12. Move the tripot joint housing in a circular motion to distribute the lubricant in the tripot housing. The movement should be smooth and even, without binding or rough spots. On the Buick Enclave, this final hand check helps confirm that the inner joint is assembled correctly before the shaft is installed.
13. Remove the wheel drive shaft from the vise. Release the soft jaws carefully and inspect the shaft for clamp position, boot seating, and any sign of boot twist.
14. Install the wheel drive shaft in the vehicle. Refer to Front Wheel Drive Shaft Replacement. Protect the new boot and clamps during installation so the completed repair is not damaged while the shaft is being positioned.
REAR WHEEL DRIVE SHAFT INNER JOINT AND BOOT REPLACEMENT
Special Tools
- J 35910 Drive Axle Boot Clamp Pliers
Disassemble Procedure
1. Remove the wheel drive shaft. Refer to Rear Wheel Drive Shaft and Rear Axle Shaft Seal Replacement. Place the shaft on a clean bench and avoid setting the joint or boot surfaces in dirt or metal chips.
2. Remove the outer CV joint and boot. Refer to Rear Wheel Drive Shaft Outer Joint and Boot Replacement. Removing the outer boot first gives access to the rear inner joint boot service area.
3. Using the appropriate tool, remove and discard the outer boot clamp (3) and the inner boot clamp (2) from the CV joint (4). Cut the clamps carefully and do not allow the tool to mark the sealing surface of the joint housing.
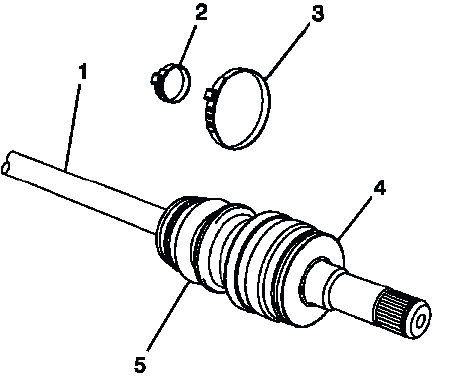
Fig. 37: Identifying Outer Boot Clamp And Inner Boot Clamp At CV Joint
CAUTION: Do not cut through the wheel drive shaft inboard or outboard boot during service. Cutting through the boot may damage the sealing surface of the housing and the tripot or the constant velocity joint bushing. Damage to the sealing surface may allow water and dirt intrusion and can cause premature wear of the constant velocity joint.
4. Remove the CV joint boot (2) from the CV joint (3) and the wheel drive shaft (1). Slide the boot away from the joint slowly and watch for grease contamination, water, grit, or metal particles inside the joint area.
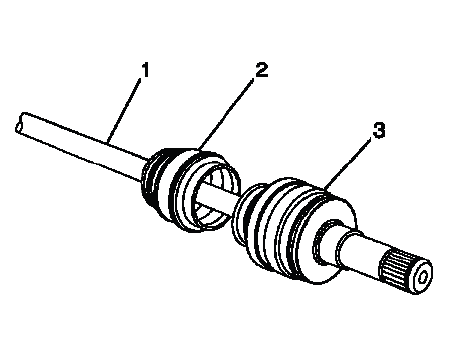
Fig. 38: Identifying CV Joint Boot, CV Joint And Wheel Drive Shaft
NOTE: If the boot is damaged and either water or other foreign material is found in the CV joint, replace the wheel drive shaft as an assembly. The inner CV joint is NOT SERVICED. Cleaning and rebooting a contaminated non-serviceable joint may lead to repeat noise or early failure.
5. Using the appropriate cleaner, remove the lubricant from the CV joint and the wheel drive shaft. Clean only with approved materials and dry the parts thoroughly before inspection or assembly.
NOTE: If the ball bearings for the CV joint have a dull surface on them, replace the wheel drive shaft as an assembly. The inner CV joint is NOT SERVICED. A dull, pitted, or rough bearing surface indicates wear that cannot be corrected by replacing only the boot.
Assemble Procedure
1. Install the CV joint boot and clamp (1) on the wheel drive shaft and CV joint housing (2). Position the boot without twisting it and leave the clamp loose enough to allow final seating in the groove.
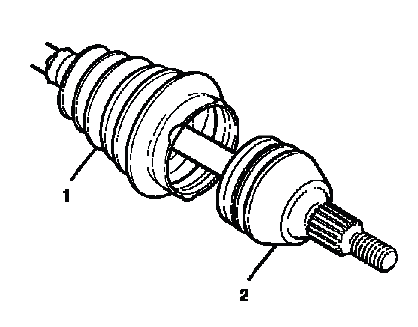
Fig. 39: View Of Outer Seal & C/V Joint
2. Ensure that the CV joint boot (1) is properly seated in the groove (2) in the wheel drive shaft (3). The boot lip must sit fully in the groove before the clamp is tightened, otherwise grease may escape and the joint may become contaminated during operation.
Fig. 40: Identifying Groove In Wheel Drive Shaft
3. Using the J 35910 pliers together with a breaker bar, torque wrench, or ratchet (1), draw the retaining band (2) closed in a controlled manner until the gap (3) measures 2.6 mm (0.10 in). Work gradually and keep the tool square to the ear so the band tightens evenly around the sealing area without twisting, stretching, or cutting into the rubber.
Fig. 41: Identifying Pliers Breaker Bar, Torque Wrench, Ratchet & Gap Measurement
4. Place approximately half of the lubricant (1) inside the CV joint boot (2), then apply the remaining lubricant into the CV joint (3). Dividing the grease this way helps the joint receive immediate lubrication while leaving enough material inside the rubber cover to continue feeding the working surfaces as the joint articulates during normal operation.
Fig. 42: Lubricating Boot Of Tripot Housing
5. Install the CV joint boot and retaining band (2) onto the CV joint housing (1). Make sure the lip is fully seated in its groove before tightening, because even a small misalignment can allow grease leakage or let moisture and road grit enter the joint.
6. Using the J 35910 pliers (3), breaker bar (5), and a torque wrench or ratchet wrench (4), close the retaining band until the opening measures 2.6 mm (0.10 in). On a Buick Enclave wheel drive shaft, this connection should hold the rubber cover firmly against the housing while still preserving its shape and flexibility.
Fig. 43: Measuring Boot Clamp Gap
7. Move the CV joint in a smooth circular motion to spread the lubricant throughout the CV joint housing. Rotate and articulate the joint several times so the grease reaches the ball tracks, internal contact areas, and the surrounding cavity instead of remaining packed in one spot.
8. Clean any remaining lubricant from the outside of the CV joint. Wipe the rubber cover, housing, and shaft area carefully so any later grease trace can be identified as a true leak rather than leftover service material.
9. Install the outer CV joint and boot. Refer to Rear Wheel Drive Shaft Outer Joint and Boot Replacement for the related procedure, retaining band placement, and final seating checks.
10. Install the wheel drive shaft. Refer to Rear Wheel Drive Shaft and Rear Axle Shaft Seal Replacement. After installation, confirm that the rubber cover is not stretched, collapsed, folded, or rubbing against nearby suspension or chassis components.
FRONT WHEEL DRIVE SHAFT OUTER JOINT AND BOOT REPLACEMENT
Special Tools
- CH 48894 Wheel Drive Shaft Boot Clamp Pliers
- J 35910 Drive Axle Seal Clamp Pliers
Disassemble Procedure
1. Remove the wheel drive shaft from the vehicle. Refer to Front Wheel Drive Shaft Replacement. Support the shaft during removal so the joints are not allowed to hang sharply or bind, since excessive articulation can damage the sealing cover or internal joint surfaces.
2. Install the drive axle shaft in a soft jawed vice. Clamp only the shaft area that can be safely held, and do not crush, nick, or distort the machined surfaces. The soft jaws help protect the finish while giving enough stability for band and cover removal.
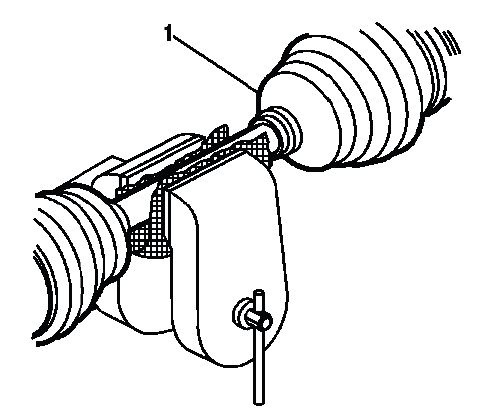
Fig. 44: View Of Front Wheel Drive Shaft Inner Joint
3. Using a flat-bladed tool, remove the boot clamp (2) from the constant velocity (CV) joint (1) and the boot (3). Lift the metal band carefully rather than prying aggressively against the joint housing, as the sealing area must remain smooth for the new cover to seal correctly.
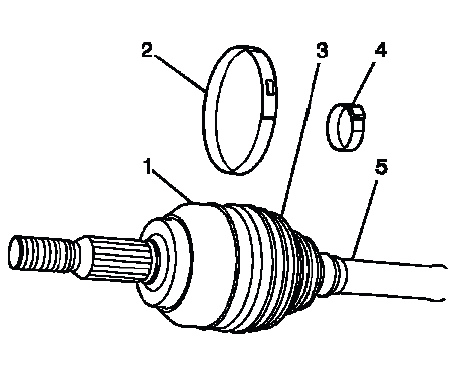
Fig. 45: Identifying Boot Clamps
CAUTION: Do not cut through the wheel drive shaft inboard or outboard boot during service. Cutting through the boot may damage the sealing surface of the housing and the tripot or the constant velocity joint bushing. Damage to the sealing surface may lead to water and dirt intrusion and premature wear of the constant velocity joint.
4. Using a pair of side cutters, remove the boot clamp (4) from the boot (3) and the wheel drive shaft (5). Cut or release only the metal retainer, keeping the tool away from the shaft and sealing lands. Any scratch or gouge in these areas can create a path for contamination or grease loss after reassembly.
5. Discard the boot clamps (2) and (4). Use NEW clamps only. Reusing old retainers is not recommended because their locking tension and shape may already be weakened from the first installation.
6. Using a block of wood and a hammer, remove the CV joint (2) from the wheel drive shaft (1). The wood block spreads the impact and helps prevent metal-to-metal damage. Strike the block with controlled blows until the joint separates from the shaft without deforming the joint housing.
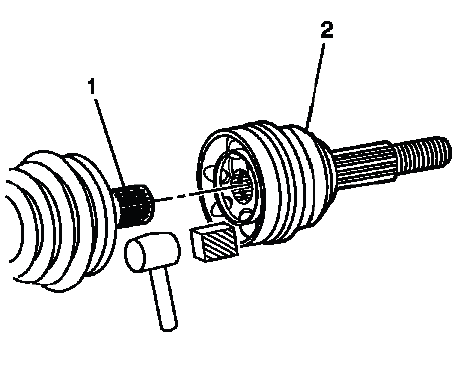
Fig. 46: Separating CV Joint From Axle Shaft
7. Remove the boot (1) from the wheel drive shaft (2). Slide it off carefully and keep track of its orientation, especially if the removed parts are being inspected to understand the cause of failure, such as cracking, loose retention, or grease contamination.
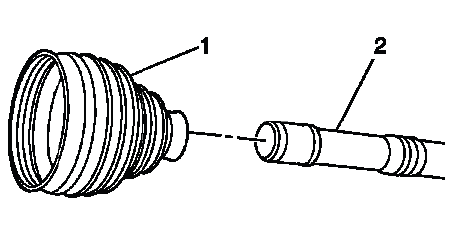
Fig. 47: Identifying Clamp & Wheel Drive Shaft
8. Inspect the outer CV joint for damage and wear. Refer to Wheel Drive Shaft Outer Joint Inspection. Look for rough movement, looseness, pitting, scoring, blue discoloration from heat, damaged splines, or signs that dirt has entered the grease. If the joint does not move smoothly after cleaning and inspection, replacement is usually the better repair than installing a new cover over a worn assembly.
Assemble Procedure
1. Position the boot (1) on the wheel drive shaft (2). Before sliding it into place, verify that the shaft surface is clean and free from burrs. A clean seating area helps the lip sit flat and reduces the chance of grease escaping during Buick Enclave front axle operation.
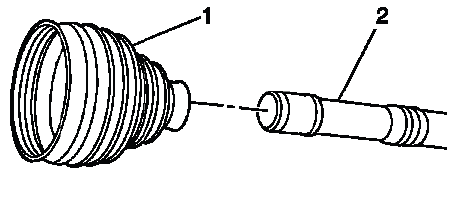
Fig. 48: Identifying Clamp & Wheel Drive Shaft
2. Confirm that the boot (1) is fully seated in the grooved (2) area of the wheel drive shaft (3). The edge must sit evenly around the entire circumference, with no rolled lip, pinched section, or stretched area.
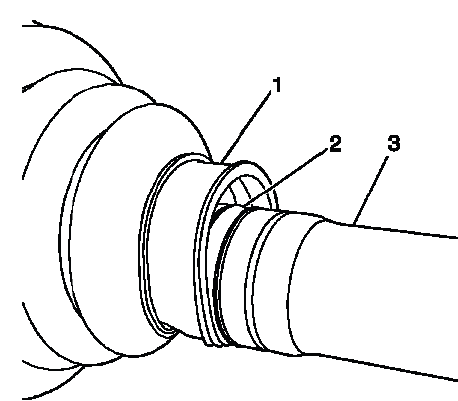
Fig. 49: Identifying Groove In Wheel Drive Shaft
3. Place approximately half of the lubricant from the service kit inside the outboard boot and pack the CV joint with the remaining lubricant. Use only the grease supplied or specified for the service kit, because CV joint lubricant is formulated for high pressure, high angle movement, and constant flexing inside the protective cover.
Fig. 50: Inserting Remaining Grease From Service Kit Into Seal
4. Using a block of wood and a hammer, install the CV joint (1) on the wheel drive shaft. Align the joint with the shaft splines before applying force, then drive it on straight until it is fully seated. Avoid angled impacts because they can damage the splines or prevent the retaining feature from locking correctly.
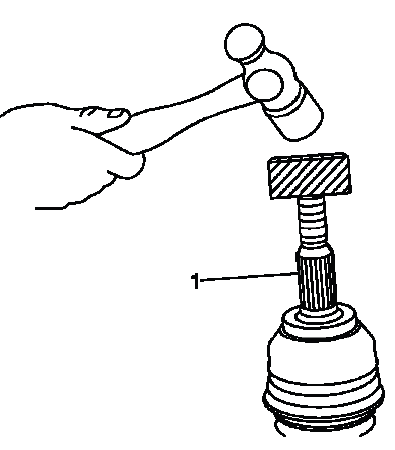
Fig. 51: Installing CV Joint
5. Install the boot clamp (4) on the boot (3) and the wheel drive shaft (5). Check that the metal band sits over the reinforced sealing area rather than on the flexible bellows section.
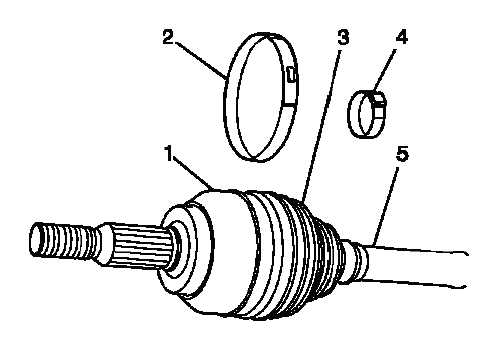
Fig. 52: Identifying Boot Clamps
6. Install the boot clamp (2) on the boot (3) and the CV joint housing (1). The retainer must follow the seat evenly around the joint housing so the seal remains consistent through steering, suspension travel, and wheel rotation.
7. Using the J 35910 pliers, tighten the boot clamp (2) until the gap (3) in the boot clamp measures 1.8 mm (0.07 in) for vehicles with X88 and 2.6 mm (0.10 in) for vehicles with Z88/W49/WDA. Measure the opening carefully after tightening rather than relying on feel, because insufficient tension may allow leakage and excessive compression can distort or weaken the rubber.
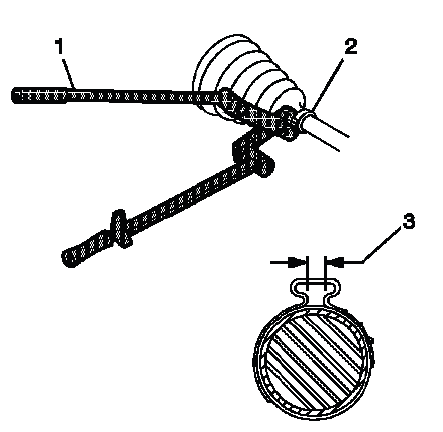
Fig. 53: Identifying Pliers Breaker Bar, Torque Wrench, Ratchet & Gap Measurement
NOTE:
- Make sure that the boot clamp is properly positioned around the entire circumference of the boot.
- Verify that the gap measurement does not exceed 1.8 mm (0.07 in) for vehicles with X88 and 2.6 mm (0.10 in) for vehicles with Z88/W49/WDA.
8. The following service procedure is for those vehicles equipped with the earless type clamp (1). For vehicles equipped with the ear type clamp (2), proceed to step 10. Identifying the retainer design before tightening prevents using the wrong pliers or applying force in the wrong location.
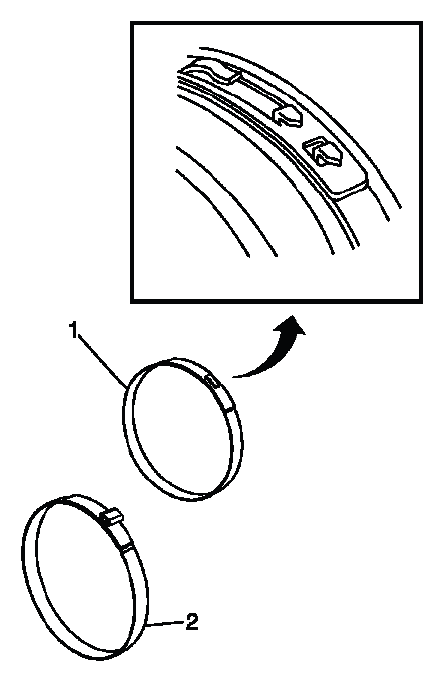
Fig. 54: View Of Ear Type Boot Clamp
9. Using the CH 48894 pliers, close the boot clamp. Keep the pliers aligned with the locking area and close it smoothly until the retainer is latched and evenly seated. After closing, inspect the boot edge to confirm that it has not shifted out of the groove.

Fig. 55: Latching Large Seal Retaining Clamp
NOTE: Ensure the boot clamp is securely closed and seated properly on the boot.
10. Using the J 35910 pliers, torque or ratchet wrench, and breaker bar, close the boot clamp until the gap measures 1.9 mm (0.07 in) for vehicles with X88. Recheck the measurement after the tool is removed, since some retainers can relax slightly once the tightening force is released.
11. Distribute the lubricant within the outer CV joint by moving it in a circular motion at least four to five times. This final movement helps spread grease through the joint before the Buick Enclave wheel drive shaft is returned to service and also confirms that the protective cover flexes naturally without pulling away from either side.
12. Remove the wheel drive shaft from the bench vise. Release the soft jaws carefully so the shaft is not dropped, scratched, or allowed to strike the workbench surface.
13. Install the wheel drive shaft assembly. Refer to Front Wheel Drive Shaft Replacement. After installation, check that the shaft is seated correctly, the splines are fully engaged, and the CV boots are not twisted or stretched.
REAR WHEEL DRIVE SHAFT OUTER JOINT AND BOOT REPLACEMENT
Special Tools
- J 8059 Snap Ring Pliers
- J 35910 Drive Axle Boot Clamp Pliers
Disassemble Procedure
1. Remove the wheel drive shaft from the vehicle. Refer to Rear Wheel Drive Shaft and Rear Axle Shaft Seal Replacement. Handle the assembly carefully during removal, because the sealing surfaces, splines, and CV joint components must remain clean and free from impact damage.
2. Install the wheel drive axle shaft in a soft jawed vice. Tighten the vice only enough to hold the shaft securely. Excessive clamping force can mark the shaft surface or distort areas that must remain smooth for proper boot seating.
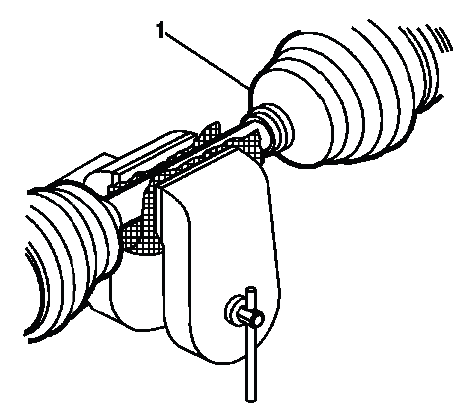
Fig. 56: View Of Front Wheel Drive Shaft Inner Joint
3. Using the appropriate tool, remove and discard the outer boot clamp (2) from the CV joint boot (3). Work around the retaining band with care so the tool does not cut into the rubber cover or damage the joint housing sealing area.
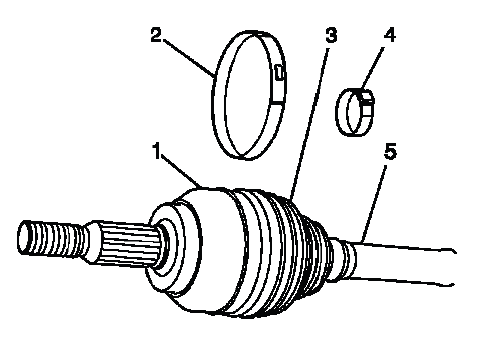
Fig. 57: Identifying Boot Clamps
CAUTION: Do not cut through the wheel drive shaft inboard or outboard boot during service. Cutting through the boot may damage the sealing surface of the housing and the tripot or the constant velocity joint bushing. Damage to the sealing surface may lead to water and dirt intrusion and premature wear of the constant velocity joint.
NOTE: The following procedure is for a wheel drive shaft equipped with the low profile boot clamp. If the wheel drive shaft is equipped with the ear type boot clamp, proceed to step 6.
4. Using a pair of side cutters, remove and discard the inner boot clamp (4) from the CV joint boot (3). Cut only the metal retainer. Avoid dragging the cutter edge across the shaft or the housing, since even a small groove can weaken the sealing contact after reassembly.
5. Remove the CV joint boot (3) from the CV joint housing (1). If the rubber cover is stuck to the housing, loosen it gently rather than pulling sharply. A controlled removal makes it easier to inspect the sealing land and understand whether the previous failure was caused by age, grease loss, contamination, or loose retention.
6. Using a pair of side cutters, remove and discard the outer boot clamp (3) and the inner boot clamp (1). These retainers are single-use parts and should not be reused, because their locking shape and clamping tension may no longer be reliable.
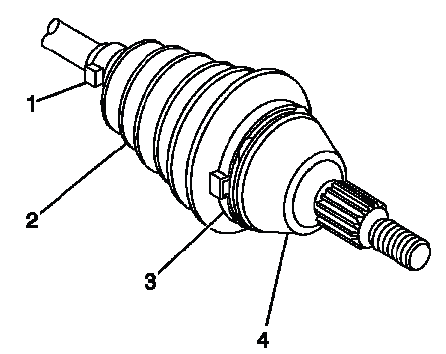
Fig. 58: Identifying Outer Boot Clamp, Inner Boot Clamp, CV Joint Boot And CV Joint Housing
7. Remove the CV joint boot (2) from the CV joint housing (4). Slide it away evenly so the lip does not tear and leave rubber fragments on the housing. Any remaining grease, dirt, or rubber residue should be cleaned before inspection or assembly.
8. Using a hammer and a block of wood, remove the CV joint (2) from the wheel drive shaft (1). Place the wood block against the joint so the impact is spread across a broader surface. Use firm, controlled blows to separate the joint without striking the metal housing directly.

Fig. 59: Separating CV Joint From Axle Shaft
9. Using the J 8059 pliers, remove the retaining ring (2) from the wheel drive shaft. Keep the ring from flying away during removal and inspect the groove for burrs or damage. A clean groove is needed so the new or reused retaining ring can seat evenly.
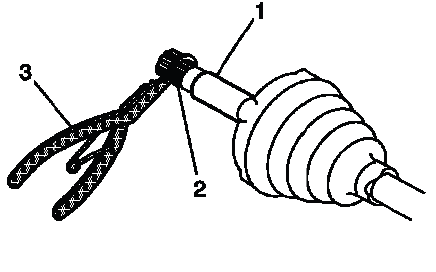
Fig. 60: Installing Spacer Ring
10. Remove the CV joint boot (1) from the wheel drive shaft (2). Slide the cover off slowly and keep the shaft supported. If the boot has split or hardened, inspect the surrounding area for grease loss and possible contamination before continuing.
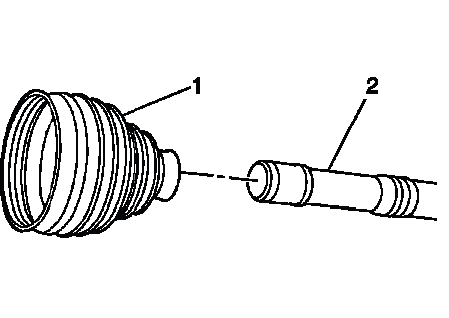
Fig. 61: Identifying Clamp & Wheel Drive Shaft
11. Inspect the wheel drive shaft CV joint. Refer to Wheel Drive Shaft Outer Joint Inspection. Check for rough articulation, scoring, pitting, worn ball tracks, damaged splines, heat discoloration, or metal particles in the old grease. If the joint has visible wear or does not move smoothly, replacing the damaged component is safer than fitting a new boot over a failing joint.
Assemble Procedure
1. Position the boot and the clamp (1) on the wheel drive shaft (2), DO NOT crimp. Leave the retaining band loose at this stage so the rubber cover can be aligned correctly in the shaft groove before final tightening.
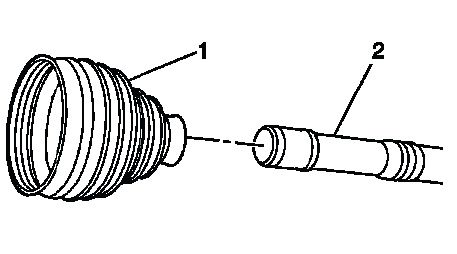
Fig. 62: Identifying Clamp & Wheel Drive Shaft
2. Make sure the boot (1) is seated correctly in the groove (2) in the wheel drive shaft (3). The lip must sit evenly around the full circumference, with no rolled edge, trapped fold, or stretched section. On a Buick Enclave rear wheel drive shaft, this seating point is critical because it keeps the lubricant inside the joint while blocking water and road debris.

Fig. 63: Identifying Groove In Wheel Drive Shaft
3. Using the J 8059 pliers, install the retaining ring (2) on the wheel drive shaft (1). Confirm that the ring sits fully in its groove and is not cocked to one side. A poorly seated ring may prevent the CV joint from reaching its correct final position.
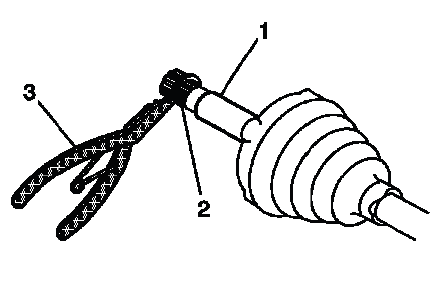
Fig. 64: Installing Spacer Ring
4. Using the J 35910 pliers (1), close the boot clamp (2) until the end gap measures 2.6 mm (0.10 in). Apply pressure gradually and keep the pliers aligned with the clamping ear so the retainer draws down squarely around the boot.
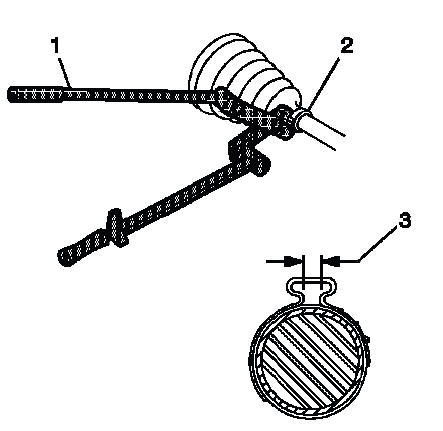
Fig. 65: Identifying Pliers Breaker Bar, Torque Wrench, Ratchet & Gap Measurement
NOTE: When measuring the clamp end gap dimension, the gap should not exceed 2.6 mm (0.10 in).
5. Using a block of wood and a hammer, install the CV joint (1) on the wheel drive shaft. Align the joint with the shaft splines before applying force, then drive it on straight. Do not use direct metal hammer blows on the joint, because impact marks can damage the housing and affect joint operation.
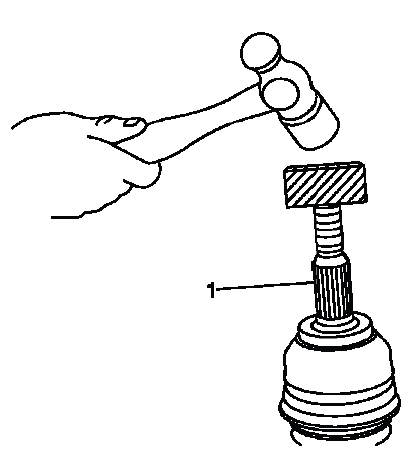
Fig. 66: Installing CV Joint
NOTE: The CV joint should just touch the inner retaining ring.
6. Place approximately half of the lubricant (2) inside the CV boot (1) and the other half in the CV joint (3). This split helps the working surfaces receive immediate lubrication while leaving enough grease in the protective cover to move into the joint during articulation.

Fig. 67: Lubricating Boot Of Tripot Housing
7. Remove any excess lubricant from the CV joint housing or the boot. Cleaning the outside of the assembly prevents service grease from being mistaken for a leak after the shaft is installed and road-tested.
8. Using the J 35910 pliers, torque or ratchet wrench, and breaker bar (3), close the boot clamp (1) until the gap measures 2.6 mm (0.10 in). Recheck the gap after the tool is removed, because some retaining bands can relax slightly once the closing force is released.
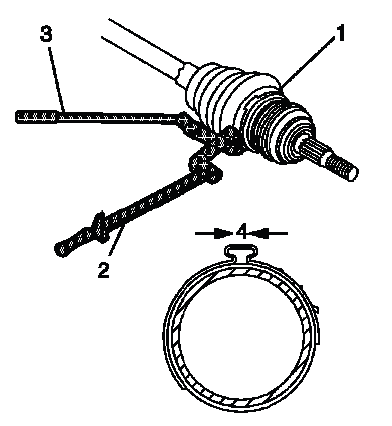
Fig. 68: View Of Outboard Seal, Large Seal Retaining Clamp & CV Joint Outer Race
9. Move the CV joint in a circular motion 4 to 5 times to distribute the lubricant. The movement should feel smooth and consistent, with no catching, grinding, or tight spots. This step also confirms that the boot flexes naturally without pulling away from the seated areas.
10. Remove the wheel drive shaft from the vise. Support the assembly with both hands and keep the newly installed boot away from sharp bench edges, tools, or metal chips.
11. Install the wheel drive shaft. Refer to Rear Wheel Drive Shaft and Rear Axle Shaft Seal Replacement. Once installed, verify that the shaft is fully seated, the seals are not disturbed, and the boot has enough clearance through normal suspension movement.
WHEEL DRIVE SHAFT OUTER JOINT INSPECTION
Disassembly Procedure
1. Remove the outer constant velocity (CV) joint and boot from the wheel drive shaft. Refer to Front Wheel Drive Shaft Outer Joint and Boot Replacement. Keep the parts organized during disassembly so wear patterns can be inspected in their original relationship.
2. Remove any lubricant from the CV joint. Wipe away the bulk of the grease first, then clean the race, cage, and ball contact areas enough to see the metal surfaces clearly. Old grease can hide scoring, pitting, heat marks, and small cracks.
3. Install the outer CV joint assembly in a soft jawed vise. Hold the assembly securely without crushing or marking the outer race. For Buick Enclave CV joint inspection, stable support makes it easier to control the cage and remove the ball bearings without damaging precision surfaces.

Fig. 69: Taping Gently On Brass Drift With A Hammer In Order To Tilt Cage
NOTE: Position the cage and the inner race so they are level.
4. Using a brass drift (1), gently tap the cage until the ball bearing can be removed from the cage. Brass is used because it is softer than the hardened joint parts and is less likely to leave damaging marks on the cage or race surfaces.
NOTE: The following procedure will have to be repeated until all the ball bearings are removed from the cage.
5. Using a small screwdriver, remove the ball bearings (1) from the CV joint (2). Lift each ball carefully and avoid prying against the polished tracks. As the balls are removed, watch for flat spots, pitting, discoloration, or uneven wear that would indicate the joint has been running with contamination or insufficient lubrication.
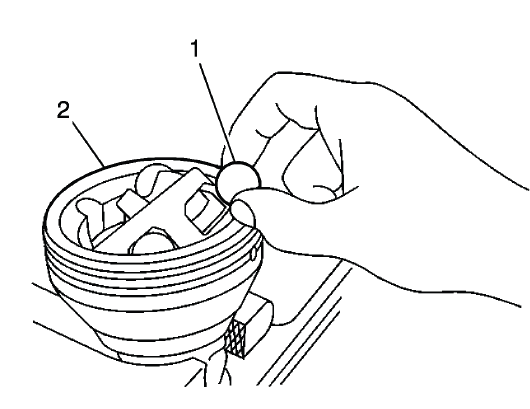
Fig. 70: Removing/Install Ball From Cage & Inner Race
6. Remove the ball bearings from the CV joint in sequence. Keep the bearings in order as they come out, and avoid mixing them with dirt, metal chips, or old grease. This helps preserve the original wear pattern and makes the inspection more accurate.
Fig. 71: View Of Ball Removal/Installation Sequence
7. Position the cage (1) at a 90º angle to the centerline of the outer race (2). Move the cage slowly and do not force it against the race, since the machined edges and bearing tracks must remain smooth for correct joint operation.
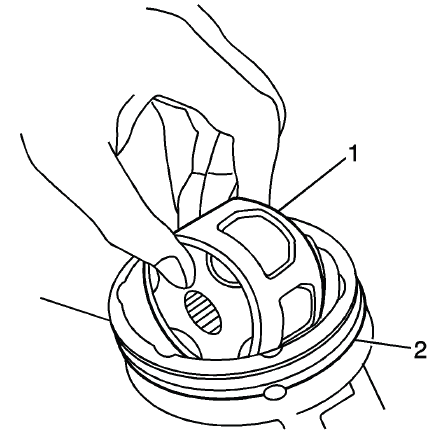
Fig. 72: Positioning Cage & Inner Race 90 Degrees To Centerline Of Outer Race
NOTE: Position the cage so that the larger radius corners of the cage windows are facing up.
8. Align the cage windows with the lands of the outer race (2). This alignment gives enough clearance to lift the cage and inner race assembly out without dragging the bearing windows across the outer race tracks.
9. Lift and remove the cage (1) and the inner race from the outer race (2). Keep the parts level as they come out, because tilting them too sharply can scratch the contact surfaces or make the assembly bind inside the race.
10. Position the cage (2) and the inner race (1) so that the larger radius corners of the cage windows are up. The orientation matters because the cage windows are shaped to guide the bearings through a specific installation and removal path.
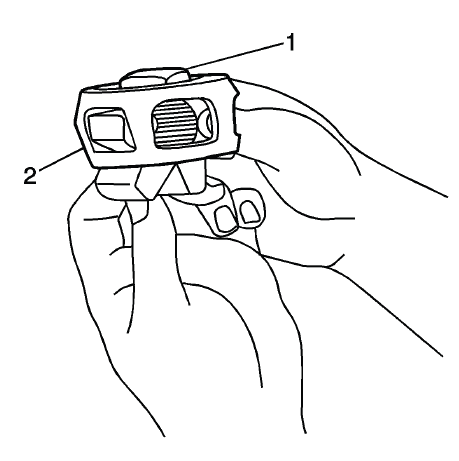
Fig. 73: Positioning Cage So Larger Radius Corners Of Cage Windows Are Up
11. Rotate the inner race (1) 90º to the center line of the cage (2). Rotate it gently, watching the lands and windows so the race can move through the cage without forcing the edges together.
12. Align the lands of the inner race (1) with the windows of the cage (2). The lands must line up cleanly with the openings before removal, otherwise the race can catch on the cage and damage the window edges.
13. Move the inner race (1) land into the cage window (2). Use a steady hand and controlled movement so the land clears the window without scoring either part.
14. Rotate the inner race (1) down and remove it from the cage (2). Once removed, place the race on a clean surface in the same orientation used during disassembly, especially if the parts will be inspected closely for wear patterns.
15. Clean the following items thoroughly with the proper cleaning solvent:
- The inner race
- The outer race
- The cage
- The ball bearings
- The exposed end of the wheel drive shaft
After cleaning, dry the components with clean shop towels or low-pressure air. Do not leave solvent trapped in the bearing tracks, because it can dilute the fresh lubricant when the joint is reassembled.
16. If any of the above items are found to have excessive wear or are damaged, replace the outer CV joint as an assembly. Look for pitting, scoring, flaking, heat discoloration, cracked cage windows, rough ball surfaces, or visible wear grooves in the race tracks. On a Buick Enclave wheel drive shaft, installing new grease and a boot will not correct a joint that already has internal wear.
NOTE: The internal parts of the CV joint are NOT SERVICED separately. The outer CV joint is serviced as an assembly.
Assembly Procedure
1. Position the cage (2) so that the larger radius corners of the cage windows are up. Confirm the orientation before adding the inner race, since reversing the cage position can make the joint difficult to assemble and may prevent smooth articulation.
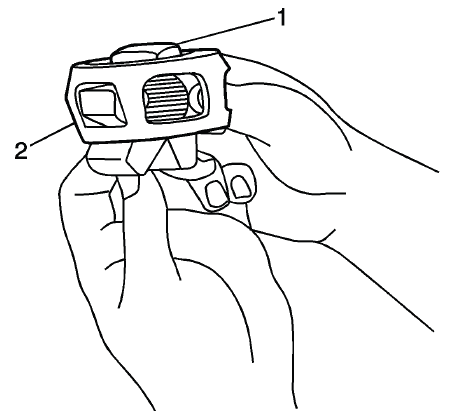
Fig. 74: Positioning Cage So Larger Radius Corners Of Cage Windows Are Up
2. Position the inner race (1) 90º to the centerline of the cage (2). Hold both parts cleanly and avoid touching the polished tracks with dirty gloves or contaminated tools.
3. Insert the inner race (1) through the bottom of the cage (2). Feed it through carefully, using the window clearance rather than force. The inner race should pass into position without gouging the cage windows.
4. Align the lands of the inner race (1) with the windows of the cage (2). Proper alignment at this stage makes the next rotation smoother and keeps the assembly from binding.
5. Move the inner race (1) land into the cage window (2). The movement should be controlled and deliberate, with the race kept square to the cage opening.
6. Rotate the inner race (1) down and remove it from the cage (2). This step confirms the alignment path before the race is turned into its final working position inside the cage.
7. Rotate the inner race (1) within the cage (2) so that the grooved surface of the inner race (1) is facing up. The grooved side must be visible because it identifies the correct bearing track orientation for final assembly.
8. Align the inner race (1) ball bearing tracks with the cage (2) windows. Each track must be accessible through a cage window so the ball bearings can be installed without forcing them across the polished race surfaces.
9. Wrap a clean shop towel around the CV joint outer race splined shaft. The towel protects the splines from bench vise marks and also helps keep dirt away from the machined surfaces during assembly.
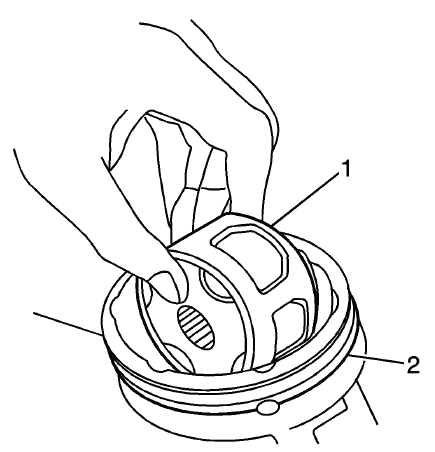
Fig. 75: Positioning Cage & Inner Race 90 Degrees To Centerline Of Outer Race
10. Place the outer race (2) vertically in a bench vise. Use soft jaws or protective covering so the vise holds the part securely without marking the outer race or splined shaft.
11. Position the cage (1) and the inner race at a 90º angle to the centerline of the outer race (2). Keep the assembly centered and avoid side-loading the cage as it enters the race.
12. With the inner race and the cage (1) assembly in a vertical position, insert the cage and the inner race into the outer race (2). Lower the assembly evenly so the cage windows and race lands remain aligned.
13. Position the cage (2) and the inner race so that they are level in the vise. A level position gives better control when installing the bearings and reduces the chance of one side dropping deeper than the other.
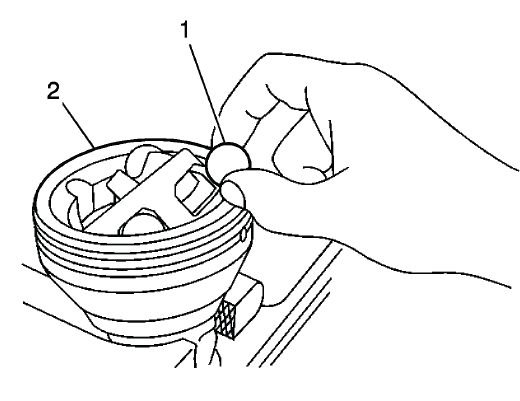
Fig. 76: Removing/Install Ball From Cage & Inner Race
NOTE: The larger radius corners of the cage windows should be positioned up and the grooved surface of the inner race should be visible.
14. Rotate the appropriate component(s) and align the cage windows and the inner race ball bearing (1) tracks with the outer race ball bearing tracks. When the tracks line up correctly, the bearing can be inserted with light pressure instead of being forced into place.
15. Position a cage window and the inner race ball bearing track for the ball bearing installation. Work with one window and one track at a time to maintain control over the assembly.
16. Press down on the cage following one of the outer race ball bearing (1) tracks. This movement opens access to the opposing track and gives the ball bearing a clear path into its working position.
NOTE: When performing the following procedure, the opposing cage (2) window and the inner ball bearing (1) track will be accessible for the ball bearing installation.
17. Install the ball bearing through the cage window onto the inner race ball bearing (1) track. Place the bearing gently into the track and confirm that it sits between the inner and outer race surfaces without being pinched.
18. After the first ball bearing (1) has been installed, use a brass drift and a hammer and gently tap the cage in order to drive the cage and the inner race down completely in the outer race. Use light, controlled taps only. Brass reduces the chance of marking the hardened steel parts, but careless impact can still damage the precision surfaces.
NOTE: The following service procedure will have to be performed after each ball bearing (1) has been installed.
19. Position the cage and the inner race so that they are level. Re-leveling the parts after every bearing keeps the remaining windows aligned and prevents the assembly from locking at an angle.
NOTE: After the ball bearing (1) has been installed, there should be NO GAP between the ball bearing and the inner race.
20. Using a plastic hammer, lightly tap the ball bearing (1) into place. The bearing should seat smoothly against the inner race track without a visible gap. If it does not seat, stop and realign the cage rather than striking harder.
21. Install the ball bearings in sequence. Follow the specified order so the load is introduced evenly around the joint. For Buick Enclave CV joint service, this sequence helps prevent the cage from twisting or trapping a bearing before all balls are installed.
Fig. 77: View Of Ball Removal/Installation Sequence
22. Repeat steps 18 thru 20 until all the ball bearings are installed. After the final bearing is seated, rotate and tilt the joint by hand to confirm that movement is smooth, even, and free of binding.
23. Install the outer CV joint and boot on the wheel drive shaft. Refer to Front Wheel Drive Shaft Outer Joint and Boot Replacement. Before final installation, verify that the joint is clean, properly lubricated, and ready to be sealed by the boot.
WHEEL DRIVE SHAFT INNER JOINT INSPECTION
Inspection Procedure
1. Remove the front wheel drive shaft inner joint and boot. Refer to Front Wheel Drive Shaft Inner Joint and Boot Replacement. Keep the removed parts clean and arranged in order so the joint condition can be evaluated accurately.
2. Remove the wheel drive shaft tripod bushing (1) from the tripod housing (3). Pull the bushing out evenly and avoid scraping the housing bore, since the sealing and sliding surfaces must remain smooth.
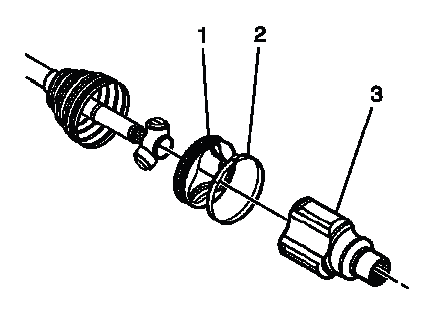
Fig. 78: Identifying Wheel Drive Shaft Inner Joint Inspection Areas
3. Remove the wheel drive shaft tripod housing (3) from the wheel drive shaft. Support the housing as it comes off so it does not drop or drag across the shaft end.
4. Remove the wheel drive shaft tripod joint boot bushing (1). Inspect the bushing as it is removed for hardening, cracking, wear marks, or distortion that could affect sealing or joint movement.
5. Using a suitable cleaner, remove the excess grease from the tripod assembly. Clean enough of the old lubricant away to expose the rollers, tracks, housing surfaces, and shaft end. Do not allow abrasive debris to remain in the assembly.
6. Inspect the following items for damage or excessive wear:
- The wheel drive shaft tripod boot
- The wheel drive shaft tripod assembly
- The wheel drive shaft tripod joint housing
- The wheel drive shaft tripod joint bushing
- The wheel drive shaft
During inspection, look for torn rubber, loose fit, worn roller surfaces, scoring inside the housing, cracked bushings, corrosion, or signs that the grease has been contaminated by water or dirt. Any roughness in the tripod movement can lead to vibration, clicking, or premature joint failure.
7. If any of the internal parts are found to be excessively worn or damaged, replace the wheel drive shaft inner joint and boot. Refer to Front Wheel Drive Shaft Inner Joint and Boot Replacement. On the Buick Enclave, replacing the damaged joint components as a proper service assembly is the most reliable way to restore smooth shaft movement and protect the drivetrain from repeated boot or grease failure.
