Buick Enclave: Repair Instructions
PARKING BRAKE SHOE REPLACEMENT
Removal Procedure
WARNING: Refer to Brake Dust Warning. Brake dust can be harmful if inhaled, especially during service on worn rear brake components. Use approved cleaning methods and avoid blowing dust from the assembly with compressed air.
1. Raise and support the vehicle. Refer to Lifting and Jacking the Vehicle. Make sure the Buick Enclave is positioned securely before working near the rear brake and parking brake components.
2. Remove the tire and wheel assembly. Refer to Tire and Wheel Removal and Installation. Removing the wheel gives clear access to the rear rotor area and allows the parking brake hardware to be serviced without forcing parts around the hub.
3. Remove the rear brake rotor. Refer to Rear Brake Rotor Replacement. If the rotor does not slide off easily, do not pry aggressively against the brake components; the park brake shoes may still be expanded inside the rotor hat.
4. Retract the park brake shoe adjuster to ease removal. Refer to Parking Brake Adjustment. Backing off the adjuster reduces pressure between the shoes and the inner surface of the rotor, making disassembly cleaner and helping prevent damage to the shoe lining or hardware.
5. Remove the upper park brake shoe retainer spring (1). Keep note of the spring position before removal, since the retainer must return to the same functional location during installation.
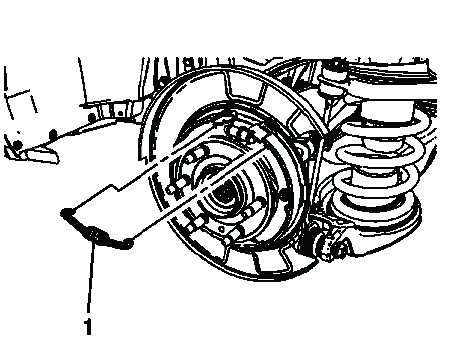
Fig. 1: Upper Park Brake Shoe Retainer Spring
6. Remove the park brake shoe adjuster (1). The adjuster should be inspected for corrosion, damaged threads, seized movement, or uneven wear before reuse.
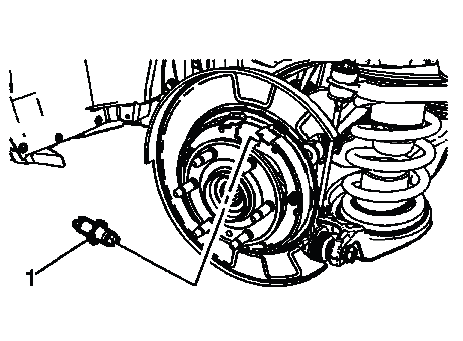
Fig. 2: Park Brake Shoe Adjuster
7. While holding the rear park brake shoe hold down spring pin (1) stationary, compress and rotate the hold down spring and cup (2) 1/4 turn. This releases spring tension from the shoe without bending the pin or distorting the cup.
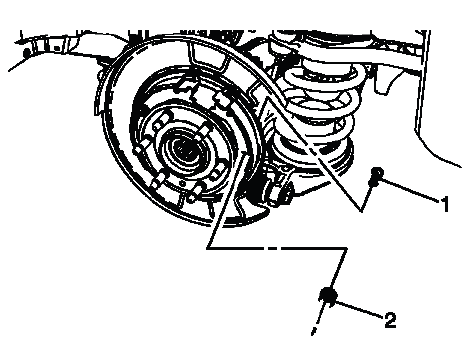
Fig. 3: Park Brake Shoe Hold Down Spring Pin And Cup
8. Remove the rear park brake shoe hold down spring assembly and the pin. Place the spring, cup, and pin aside in order so the parts can be checked and compared during reassembly.
9. While holding the front park brake shoe hold down spring pin (1) stationary, compress and rotate the hold down spring and cup (2) 1/4 turn. The front and rear hold down parts may look similar, but their position should still be kept clear during service.
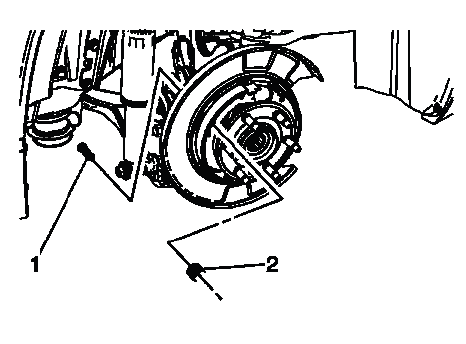
Fig. 4: Cup And Park Brake Shoe Hold Down Spring Pin
10. Remove the front park brake shoe hold down spring assembly and the pin. Check the pin head and spring cup for wear marks or deformation that could keep the shoe from sitting flat against the backing plate.
11. Grasp the top of the park brake shoes and spread the shoes apart slightly. Spread them only enough to clear the anchor points; forcing the shoes too far can stretch the lower retaining spring or damage the shoe contact areas.
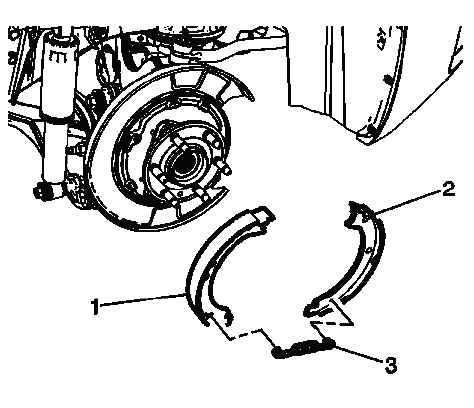
Fig. 5: Front And Rear Park Brake Shoe And Lower Retaining Spring
12. Remove the front park brake shoe (1), rear park brake shoe (2) and the lower retaining spring (3) from the parking brake anchor backing plate. Keep the shoe orientation in mind so the replacement parts are installed in the same relationship to the actuator and adjuster.
13. Separate the park brake shoe components. At this point, compare the old shoes with the replacement shoes and check that the friction lining shape, mounting points, and contact surfaces match before installation begins.
14. Clean the parking brake anchor backing plate with denatured alcohol or equivalent and allow to dry. Remove brake dust, rust particles, and old lubricant from the contact pads. A clean backing plate helps the shoes move smoothly and reduces the chance of noise, drag, or uneven parking brake engagement.
Installation Procedure
1. Apply a light coat of high temperature brake lubricant to the park brake shoe contact areas of the parking brake anchor backing plate. Use only a thin film on the metal contact points; lubricant must not touch the shoe lining or the inner braking surface of the rotor hat.
2. Install the front park brake shoe (1), rear park brake shoe (2), and the lower retaining spring (3) to the parking brake anchor backing plate. Make sure the lower spring is seated correctly and that both shoes rest naturally against the backing plate contact areas.
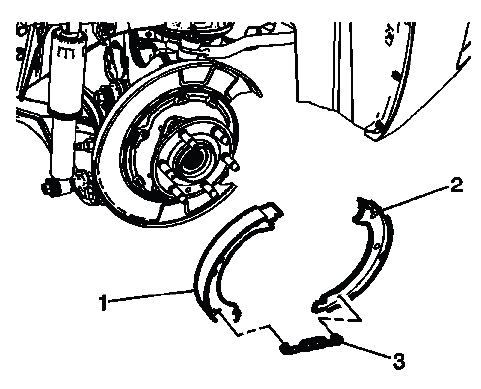
Fig. 6: Front And Rear Park Brake Shoe And Lower Retaining Spring
3. While holding the front park brake shoe hold down spring pin (1) stationary, compress and rotate the hold down spring and cup (2) 1/4 turn. Once locked, the cup should sit firmly on the spring and the shoe should remain flat without twisting.
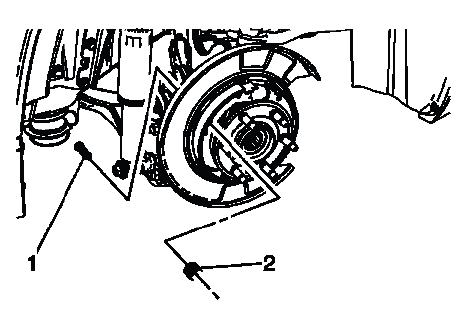
Fig. 7: Cup And Park Brake Shoe Hold Down Spring Pin
4. While holding the rear park brake shoe hold down spring pin (1) stationary, compress and rotate the hold down spring and cup (2) 1/4 turn. This step secures the rear shoe and keeps the shoe aligned while the adjuster and upper spring are installed.
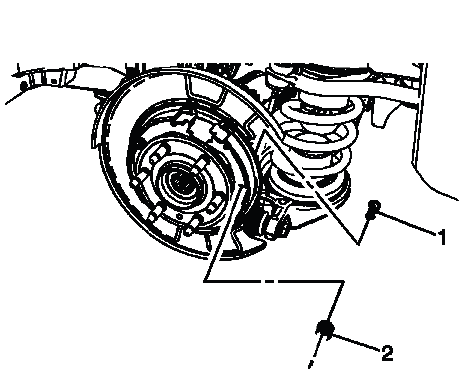
Fig. 8: Park Brake Shoe Hold Down Spring Pin And Cup
5. Install the park brake shoe adjuster (1). The adjuster should turn freely and sit squarely between the shoes. If it binds, remove it and correct the position before continuing, because a poorly seated adjuster can cause weak holding force or brake drag after the Buick Enclave is returned to service.
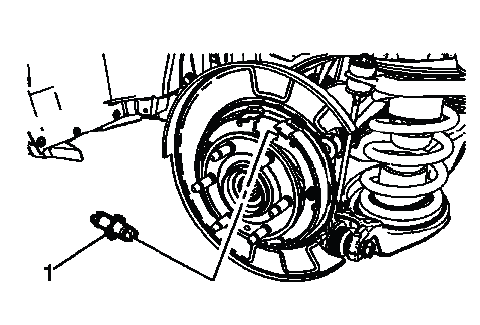
Fig. 9: Park Brake Shoe Adjuster
6. Install the rear park brake shoe hold down spring (1) by compressing the spring and rotating 1/4 turn. The spring should lock positively and hold the shoe against the backing plate without pulling it out of alignment.
7. Install the upper park brake shoe retainer spring (1). The upper spring brings the shoe assembly back into its working shape, so confirm that the spring ends are fully seated and that the shoes return evenly.
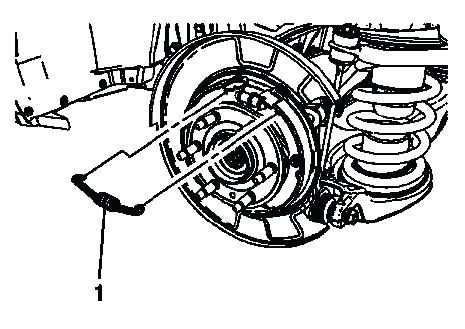
Fig. 10: Upper Park Brake Shoe Retainer Spring
8. Adjust the park brake. Refer to Parking Brake Adjustment. Proper adjustment is important because excessive clearance will reduce holding power, while an overly tight setting can create drag, heat, lining wear, and noise. After adjustment, the rotor should install smoothly and rotate without abnormal resistance.
PARKING BRAKE LEVER PEDAL ASSEMBLY REPLACEMENT
Special Tools
- J 37043 Parking Brake Cable Release Tool
Removal Procedure
1. Raise and support the vehicle. Refer to Lifting and Jacking the Vehicle. The cable tension is relieved from below the vehicle, so the vehicle must be supported safely before the equalizer area is accessed.
2. Loosen the park brake cable locknut (1) at the equalizer to relieve tension on the park brake cable. Back the nut off enough to remove load from the front cable, but keep the hardware in place so the cable routing and adjustment position remain easy to identify.
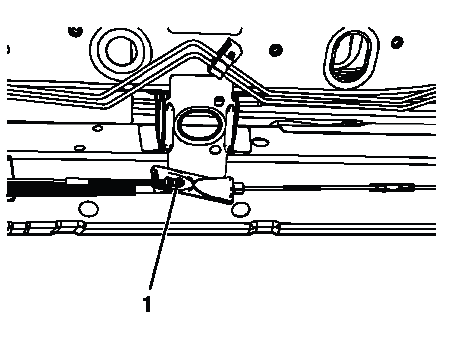
Fig. 11: Identifying Park Brake Cable Locknut
3. Lower the vehicle. Once the cable tension has been reduced, the remaining work can continue from inside the driver footwell area.
4. Remove the left side instrument panel insulator panel. Refer to Instrument Panel Insulator Panel Replacement - Left Side. Removing the panel opens the working area around the parking brake pedal assembly and cable connection.
5. Remove the driver side front carpet retainer. Refer to Front Side Door Opening Floor Carpet Retainer Replacement. Move the trim and carpet only as needed to gain access, and avoid pulling the carpet sharply around the pedal bracket.
6. Disconnect the park brake warning indicator switch electrical connector. Release the connector carefully so the switch wiring is not stretched or damaged while the pedal assembly is being removed.
7. Disconnect the front park brake cable from the park brake pedal clevis (1). The cable end should be free of load at this point because the equalizer locknut was loosened earlier.
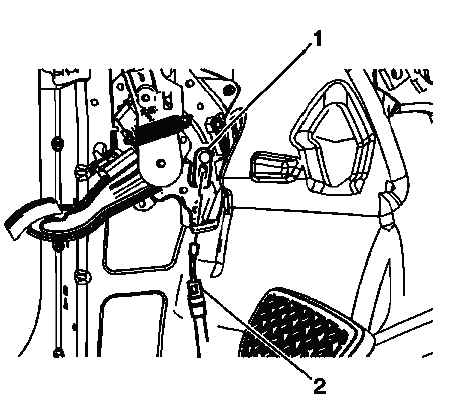
Fig. 12: Identifying Front Park Brake Cable & Park Brake Pedal Clevis
8. Using the J 37043 parking brake cable release tool, remove the front park brake cable from the park brake pedal assembly by compressing the locking tabs on the cable conduit (2). The release tool helps collapse the retaining fingers evenly, which reduces the chance of breaking the tabs or damaging the cable conduit.
9. Apply the park brake pedal until the clevis exposes the lower park brake pedal nut. This creates the needed access to the lower fastener without forcing a tool around the bracket.
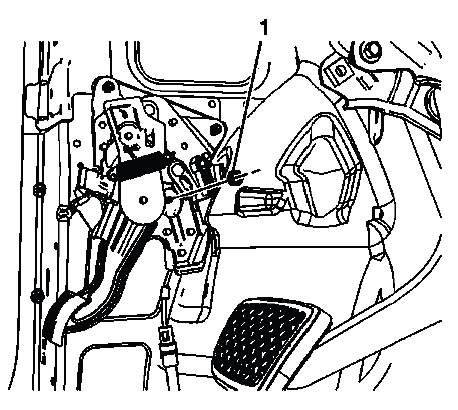
Fig. 13: Identifying Lower Park Brake Pedal Nut
10. Remove the lower park brake pedal nut (1). Support the pedal assembly as the fastener is removed so the bracket does not shift suddenly.
11. Remove the 2 upper park brake pedal nuts (1). With the upper nuts removed, the pedal assembly can be separated from its mounting points. On the Buick Enclave, keeping the bracket square during removal helps prevent unnecessary stress on nearby trim, wiring, and the cable opening.
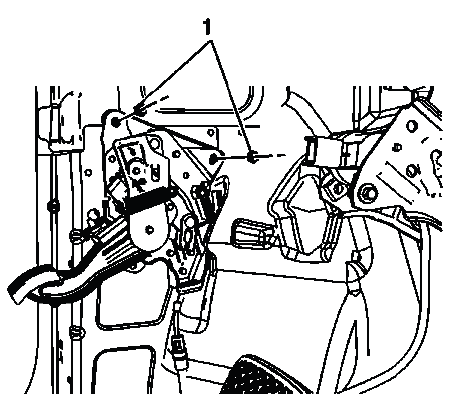
Fig. 14: View Of Upper Park Brake Pedal Nuts
12. Remove the park brake pedal assembly. Guide the assembly out carefully so the bracket does not catch on the front cable opening, trim edge, or nearby wiring.
Installation Procedure
1. Install the park brake pedal assembly. Position the pedal bracket squarely against the mounting points before starting the nuts, because a misaligned bracket can affect pedal movement and cable engagement on the Buick Enclave.
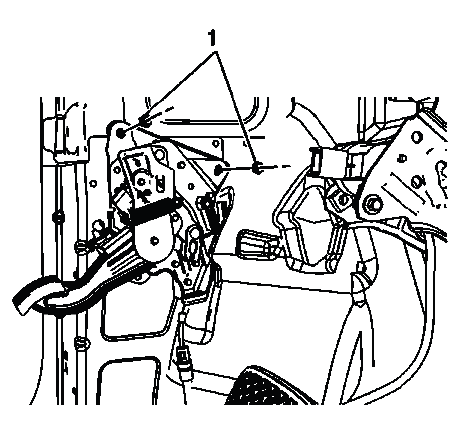
Fig. 15: View Of Upper Park Brake Pedal Nuts
2. Install the 2 upper park brake pedal nuts (1). Start both nuts by hand first so the assembly seats evenly against the body structure.
CAUTION: Refer to Fastener Caution. Fasteners used in brake-related assemblies must be tightened correctly; over-tightening can damage mounting points, while under-tightening can allow movement during pedal operation.
Tighten
- Tighten the nuts to 10 N.m (89 lb in).
3. If necessary, apply the park brake pedal until the clevis exposes the lower park brake pedal assembly mounting stud. This creates proper access to the lower fastener without forcing tools around the pedal bracket.
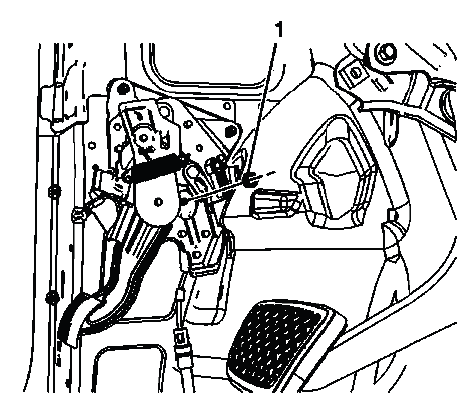
Fig. 16: Identifying Lower Park Brake Pedal Nut
4. Install the lower park brake pedal nut (1). Keep the pedal assembly supported while the nut is started so the bracket remains aligned with the lower mounting stud.
Tighten
- Tighten the nut to 10 N.m (89 lb in).
5. Release the park brake pedal. The pedal should return smoothly without a harsh snap, binding, or hesitation.
6. Connect the front park brake cable to the park brake pedal clevis (1). Make sure the cable end sits fully in the clevis and is not twisted or loaded at an angle.
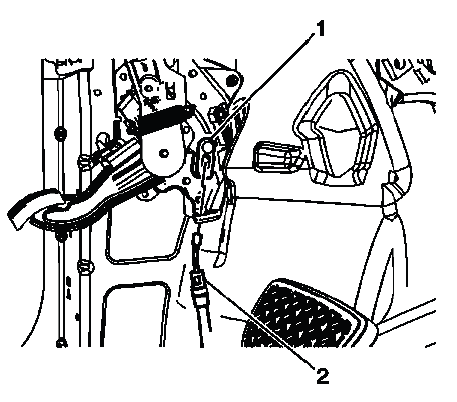
Fig. 17: Identifying Front Park Brake Cable & Park Brake Pedal Clevis
7. Install the front park brake cable to the park brake pedal assembly.
Ensure the locking tabs on the cable conduit (2) are fully engaged to the park brake pedal assembly. A loose conduit can change pedal feel and may prevent the parking brake from applying with consistent cable travel.
8. Connect the park brake warning indicator switch electrical connector. The connector should lock cleanly in place so the warning indicator responds correctly when the parking brake is applied or released.
9. Install the driver side front carpet retainer. Refer to Front Side Door Opening Floor Carpet Retainer Replacement. Position the carpet and retainer so they do not rub against the pedal arm or interfere with the cable path.
10. Install the left side instrument panel insulator panel. Refer to Instrument Panel Insulator Panel Replacement - Left Side. Check that the panel is seated properly and does not contact the parking brake pedal during full travel.
11. Adjust the park brake. Refer to Parking Brake Adjustment. Adjustment should be completed after the pedal assembly and cable are fully installed, since final cable tension affects holding force, pedal travel, and release quality.
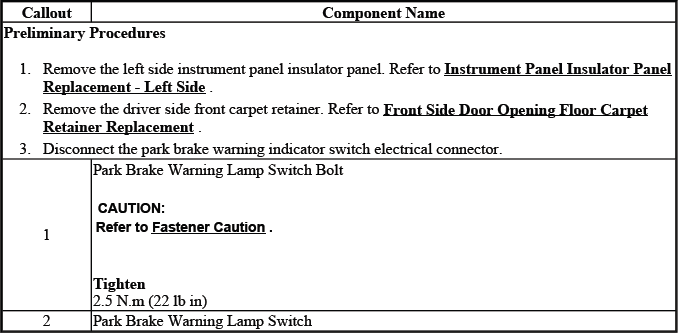
PARKING BRAKE INDICATOR SWITCH REPLACEMENT
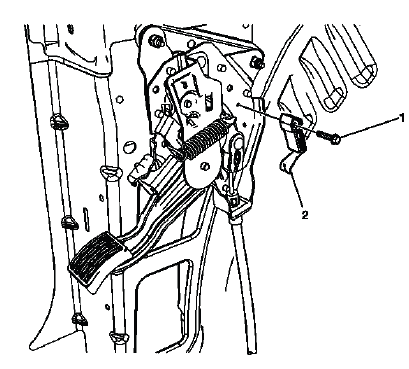
Fig. 18: Identifying Parking Brake Indicator Switch
Parking Brake Indicator Switch Replacement
The parking brake indicator switch is part of the warning circuit that tells the driver when the parking brake is applied. During service, the switch should be handled carefully because a damaged connector, bent switch contact, or poor mounting position can cause the warning lamp to stay on, fail to illuminate, or respond intermittently.
Before replacing the switch, look at the connector condition and the way the switch contacts the pedal mechanism. On the Buick Enclave, a simple alignment issue around the pedal assembly can sometimes create a warning indicator complaint that looks like an electrical failure.
PARKING BRAKE FRONT CABLE REPLACEMENT
Special Tools
- J 37043 Parking Brake Cable Release Tool
Removal Procedure
1. Raise and support the vehicle. Refer to Lifting and Jacking the Vehicle. The front cable is released from both the underbody and driver footwell areas, so the vehicle must be safely supported before cable tension is relieved.
2. Loosen the park brake cable locknut (1) at the equalizer to relieve tension on the park brake cable. Backing off the locknut makes the cable easier to separate and reduces stress on the clevis, bracket, and conduit locking tabs.
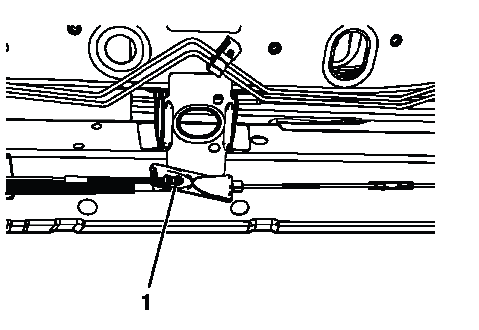
Fig. 19: Identifying Park Brake Cable Locknut
3. Disconnect the front park brake cable (1) from the rear park brake cable. Keep the cable ends clean and note the routing so the replacement cable follows the original path.

Fig. 20: Identifying Front Park Brake Cable
4. Using the J 37043 parking brake cable release tool, remove the front park brake cable from the park brake cable bracket on the body by compressing the locking tabs on the cable conduit (2). The release tool helps compress the tabs evenly, which is much safer than prying on the conduit with a screwdriver.
5. Remove the left side instrument panel insulator panel. Refer to Instrument Panel Insulator Panel Replacement - Left Side. This opens access to the pedal assembly and the cable connection inside the vehicle.
6. Remove the driver side front carpet retainer. Refer to Front Side Door Opening Floor Carpet Retainer Replacement. Move the carpet only as much as needed; sharp pulling can distort the carpet edge or expose the cable path unevenly.
7. Remove the 2 nuts and the driver footrest. Set the footrest and nuts aside together so the parts are easy to identify during installation.

Fig. 21: View Of Driver Footrest & Nuts
8. Lift the driver floor carpet to expose the front park brake cable routing clip. The cable should be visible along its path through the floor area.
Fig. 22: View Of Park Brake Cable & Routing Clip
9. Release the park brake cable routing clip from the floor stud. Avoid bending the clip if it will be reused, because a weak clip can allow the cable to move or rattle under the carpet.
10. Release the front park brake cable pass through grommet. Work the grommet out evenly so the floor opening and sealing lip are not damaged.
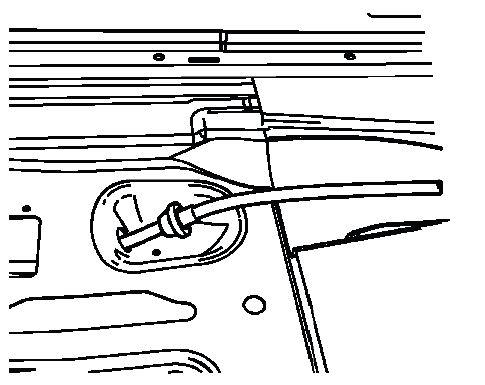
Fig. 23: View Of Park Brake Cable Pass Through Grommet
11. Disconnect the front park brake cable from the park brake pedal clevis (1). With cable tension already relieved, the cable end should come free without force.
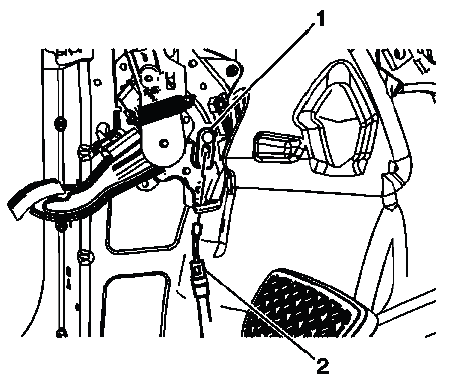
Fig. 24: Identifying Front Park Brake Cable & Park Brake Pedal Clevis
12. Remove the front park brake cable from the park brake pedal assembly by compressing the locking tabs on the cable conduit (2). Make sure the tabs are fully compressed before pulling the conduit through the bracket.
13. Remove the front park brake cable assembly. Feed the cable out along the original route, watching for carpet edges, body brackets, and the floor opening so the cable does not snag.
Installation Procedure
1. Install the front park brake cable assembly. Route the new cable in the same position as the original cable, keeping it away from sharp edges, moving pedals, and areas where the carpet could press against it.
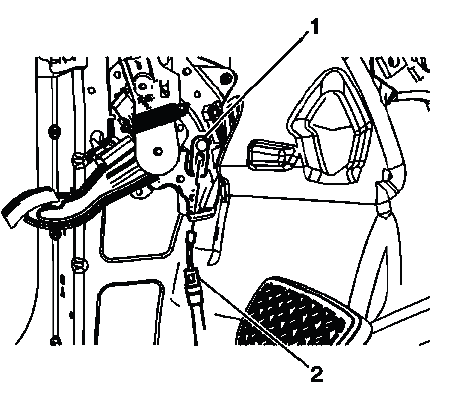
Fig. 25: Identifying Front Park Brake Cable & Park Brake Pedal Clevis
2. Connect the front park brake cable to the park brake pedal clevis (1). The cable end should seat fully in the clevis so pedal movement transfers smoothly into cable pull.
3. Install the front park brake cable to the park brake pedal assembly.
Ensure the locking tabs on the cable conduit (2) are fully engaged to the park brake pedal assembly. Pull lightly on the conduit after engagement; it should stay locked in the bracket without slipping back out.
4. Route the front park brake cable through the vehicle floor and seat the pass through grommet. The grommet must sit evenly in the floor opening to help seal the cabin from moisture, road dust, and noise.
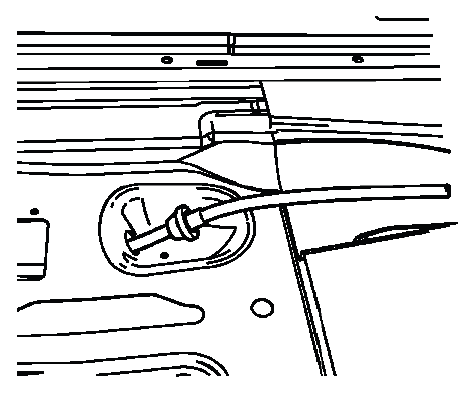
Fig. 26: View Of Park Brake Cable Pass Through Grommet
5. Position the park brake cable routing clip to the floor stud. Correct clip placement keeps the cable in its intended path and prevents unwanted movement under the carpet.

Fig. 27: View Of Park Brake Cable & Routing Clip
6. Position the driver floor carpet to the vehicle floor. Smooth the carpet back into place so it lies flat around the cable route and does not interfere with pedal operation.
7. Install the driver footrest. Once installed, make sure the footrest is secure and the carpet remains properly positioned. On the Buick Enclave, the parking brake cable should move freely beneath the trim area without rubbing, pinching, or creating a raised spot in the driver footwell.
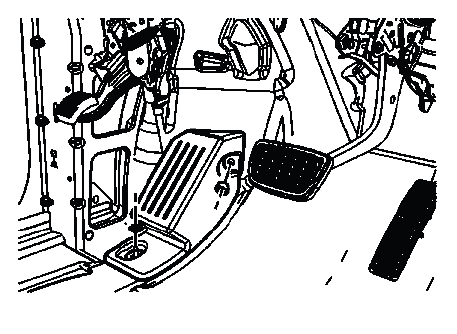
Fig. 28: View Of Driver Footrest & Nuts
8. Install the 2 driver footrest nuts. Seat the footrest evenly against the floor before tightening, so it does not sit crooked or press into the carpet around the cable route.
CAUTION: Refer to Fastener Caution. Brake and pedal-area fasteners must be tightened to the specified value. Too little torque can allow parts to shift during use, while too much torque can damage studs, brackets, or mounting surfaces.
Tighten
- Tighten the nuts to 10 N.m (89 lb in).
9. Connect the park brake warning indicator switch electrical connector. The connector should click into place cleanly, with no tension on the wiring and no contact with the pedal movement area.
10. Install the driver side front carpet retainer. Refer to Front Side Door Opening Floor Carpet Retainer Replacement. Lay the carpet flat first, then secure the retainer so the carpet does not bunch near the driver footrest or parking brake cable path.
11. Install the left side instrument panel insulator panel. Refer to Instrument Panel Insulator Panel Replacement - Left Side. After the panel is installed, check that it does not touch the parking brake pedal or restrict pedal travel on the Buick Enclave.
12. Install the front park brake cable (1) to the park brake cable bracket on the body. The cable conduit should sit squarely in the bracket before the locking tabs are allowed to engage.
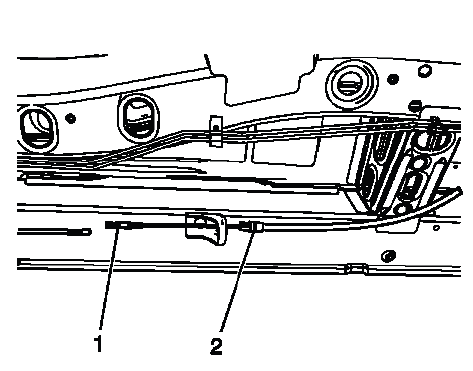
Fig. 29: Identifying Front Park Brake Cable
Ensure the locking tabs on the cable conduit (2) are fully engaged to the park brake cable bracket. A cable that is only partly locked can move under load and cause excessive pedal travel, poor holding force, or an uneven release.
13. Connect the front park brake cable to the rear park brake cable. Make sure both cable ends are fully seated and aligned with the equalizer so the cable pull remains straight when the pedal is applied.
14. Adjust the park brake. Refer to Parking Brake Adjustment. Final adjustment should be done only after all cables, brackets, clips, and interior trim pieces are secured, because cable position directly affects pedal travel and rear shoe application.
PARKING BRAKE REAR CABLE REPLACEMENT - LEFT SIDE
Special Tools
- J 37043 Parking Brake Cable Release Tool
Removal Procedure
1. Release the park brake. The cable must be unloaded before disassembly; working against spring tension can make the cable difficult to remove and may damage the retaining tabs.
2. Raise and support the vehicle. Refer to Lifting and Jacking the Vehicle. Support the Buick Enclave securely, since the rear cable is routed along the underbody and near the rear brake assembly.
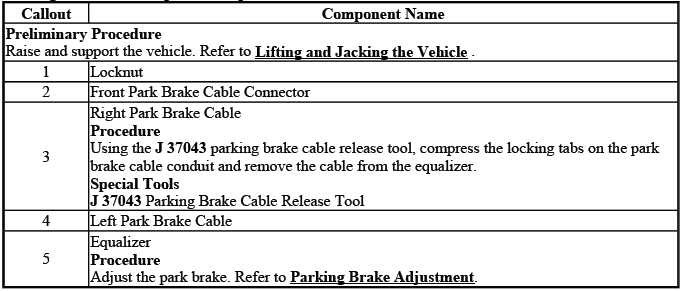
3. Remove the park brake equalizer locknut (1). Removing the locknut allows the left rear cable to be separated from the equalizer without pulling against the front cable.
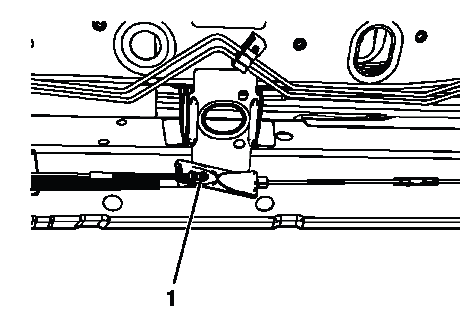
Fig. 30: Identifying Park Brake Cable Locknut
4. Using the J 37043 parking brake cable release tool, release the park brake cable from the park brake cable bracket (1) by compressing the locking tabs on the cable conduit (2). The release tool helps collapse the tabs evenly, which is cleaner and safer than prying against the bracket.
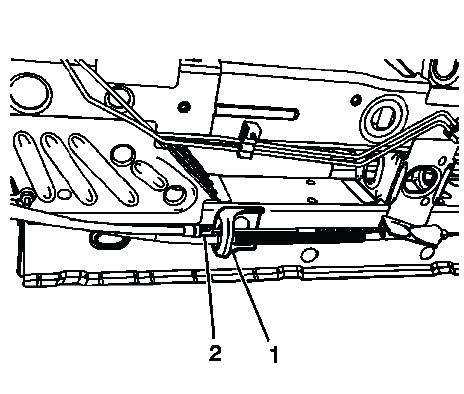
Fig. 31: View Of Park Brake Cable Bracket
5. Remove the park brake cable from the bracket and the equalizer. Keep the cable routing in mind as it comes out, especially around the guides and suspension area.
6. Disconnect the park brake cable eyelet (1) from the park brake actuator. The eyelet should come away from the actuator without being twisted; if it is tight, check for remaining cable tension or corrosion around the connection.
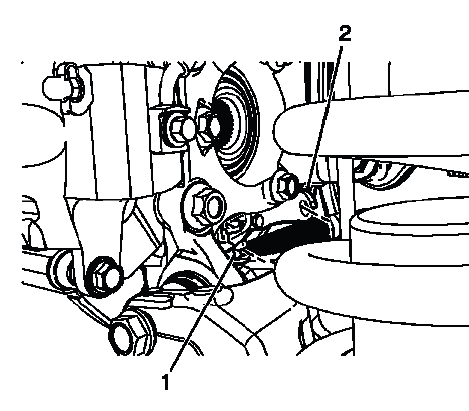
Fig. 32: Identifying Park Brake Cable Eyelet
7. Compress the locking tabs and pull the park brake cable conduit toward the front of the vehicle to compress the park brake cable spring. This movement creates the clearance needed to remove the cable from its bracket without bending the bracket or damaging the conduit end.
8. Remove the park brake cable from the cable bracket (2). Once the tabs are compressed, guide the cable out straight so the locking fingers are not torn or flattened.
9. Pull the park brake cable through the cable guides and remove the park brake cable from the vehicle. Work slowly through each guide; a cable that is dragged out at an angle can snag on underbody hardware or leave dirt and rust packed into the guide channel.
Installation Procedure
1. Install the park brake cable to the cable guides. Follow the original routing through each guide so the cable does not rub against the suspension, body structure, or moving brake components.
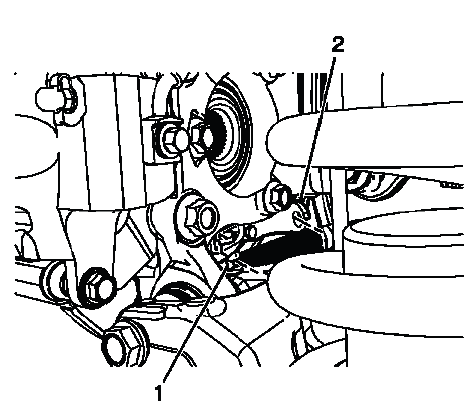
Fig. 33: Identifying Park Brake Cable Eyelet
2. Connect the park brake cable eyelet (1) to the park brake actuator. The eyelet must sit fully on the actuator so the cable pull transfers directly into park brake shoe movement.
3. Compress the park brake cable spring and install the park brake cable to the cable bracket (2). The conduit should enter the bracket straight; if it is angled, the locking tabs may not seat correctly.
Ensure the locking tabs on the cable conduit are fully engaged to the cable bracket. After it locks in, pull lightly on the conduit to confirm it is secure and will not release when the parking brake is applied.
4. Install the park brake cable to the park brake cable bracket (1). Correct bracket engagement keeps the cable stable and prevents unwanted cable movement during pedal operation.
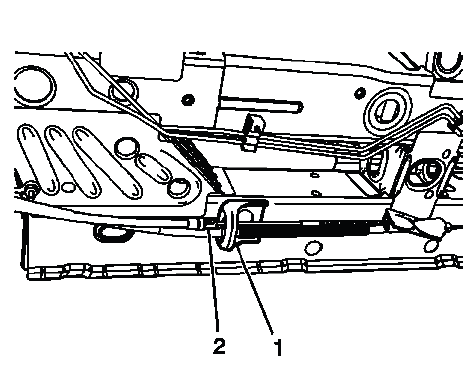
Fig. 34: View Of Park Brake Cable Bracket
Ensure the locking tabs on the cable conduit (2) are fully engaged to the park brake cable bracket. A properly seated conduit helps keep the left rear cable pull consistent and prevents noise or movement under the vehicle.
5. Install the park brake cable to the equalizer. The cable should sit in the equalizer without crossing, twisting, or pulling sideways against the adjacent cable.
6. Loosely install the park brake equalizer locknut (1). Leave the locknut loose at this stage so the final park brake adjustment can be made accurately after all cable connections are complete.
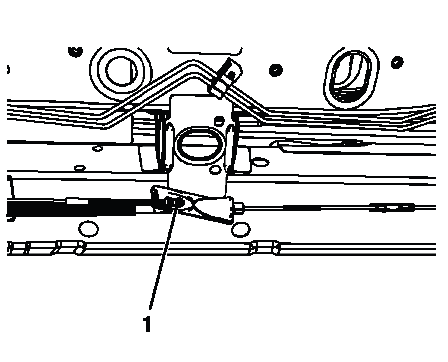
Fig. 35: Identifying Park Brake Cable Locknut
7. Adjust the park brake. Refer to Parking Brake Adjustment. After adjustment, verify that the pedal travel feels even and that the rear brakes release fully without drag.
PARKING BRAKE REAR CABLE REPLACEMENT - RIGHT SIDE
Special Tools
- J 37043 Parking Brake Cable Release Tool
Removal Procedure
1. Release the park brake. The right rear cable should be free of load before the equalizer, bracket, and actuator connections are disturbed.
2. Raise and support the vehicle. Refer to Lifting and Jacking the Vehicle. The right side cable runs near the rear suspension module, so stable vehicle support and clear access are important before removal begins.
3. Loosen, but do not remove the park brake equalizer locknut (1). Loosening the locknut relieves cable tension while keeping the equalizer hardware together for easier reassembly.
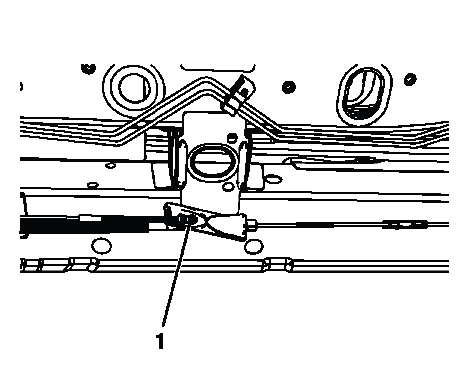
Fig. 36: Identifying Park Brake Cable Locknut
4. Disconnect the front park brake cable (1) from the right park brake cable. Separate the cables carefully so the equalizer position and cable routing remain easy to follow.
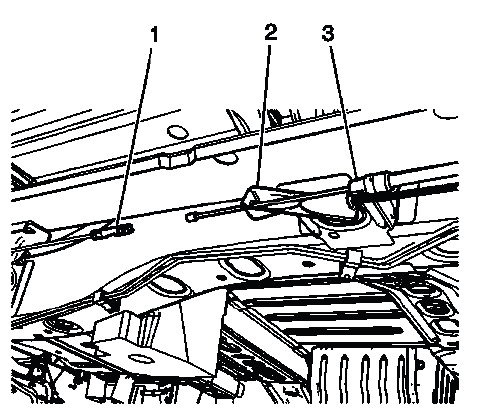
Fig. 37: View Of Park Brake Cable & Park Brake Equalizer
5. Using the J 37043 parking brake cable release tool, release the park brake cable from the park brake equalizer (2) by compressing the locking tabs on the cable conduit (3). Make sure the tabs are fully compressed before pulling the conduit free, because partial release can damage the conduit end.
6. Remove the 2 park brake cable bracket bolts located on top of the crossmember above the rear suspension module. Access can be tight in this area, so keep the socket square on the bolts to avoid rounding the heads.
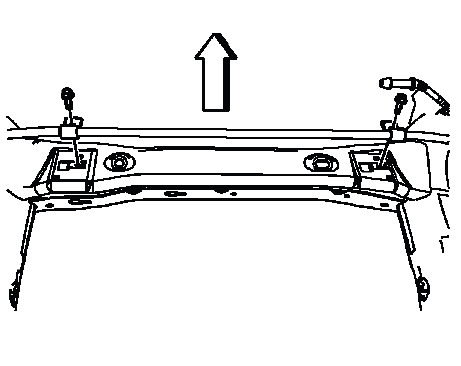
Fig. 38: View Of Park Brake Cable Bracket Bolts
7. Disconnect the park brake cable eyelet (1) from the park brake actuator. If the eyelet feels stuck, inspect for rust or cable tension before applying force to the actuator lever.
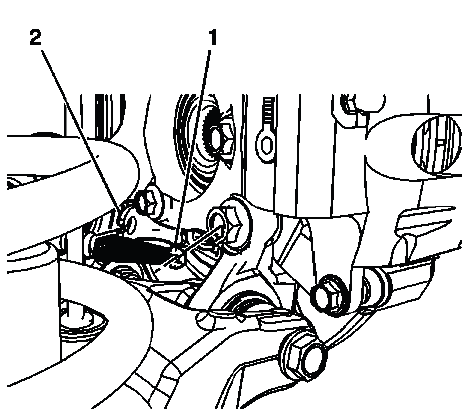
Fig. 39: Identifying Park Brake Cable Eyelet & Cable Bracket
8. Compress the locking tabs and pull the park brake cable conduit toward the front of the vehicle to compress the park brake cable spring. This gives the cable enough movement to clear the bracket without forcing the conduit sideways.
9. Remove the park brake cable from the cable bracket (2). Guide the cable straight out of the bracket so the locking tabs do not catch on the bracket edge.
10. Pull the park brake cable through the cable guides and remove the park brake cable from the vehicle. Watch the route over and around the rear suspension module; on the Buick Enclave, the cable should be removed along its original path to avoid snagging on nearby brackets or suspension hardware.
Installation Procedure
1. Position the park brake cable over the rear suspension module. Route it in the same path as the original cable, keeping it away from sharp edges, heat sources, and moving suspension components.
2. Connect the park brake cable eyelet (1) to the park brake actuator. The eyelet should sit fully on the actuator lever, with no twist in the cable and no side load that could reduce the smooth movement of the parking brake mechanism.
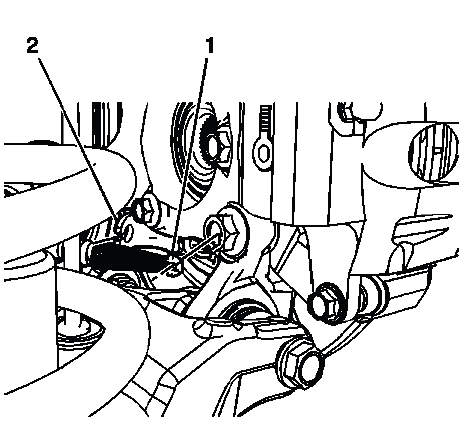
Fig. 40: Identifying Park Brake Cable Eyelet & Cable Bracket
3. Compress the park brake cable spring and install the park brake cable to the cable bracket (2). Work the conduit into the bracket in a straight line so the spring tension does not push the cable out of position before the tabs lock.
Ensure the locking tabs on the cable conduit are fully engaged to the cable bracket. A properly seated conduit should not slide back out when light pulling force is applied by hand.
4. Install the 2 park brake cable bracket bolts. Start both bolts before tightening either one, so the bracket sits flat against the mounting surface and does not become cocked above the rear suspension module.
Fig. 41: View Of Park Brake Cable Bracket Bolts
CAUTION: Refer to Fastener Caution. The bracket bolts must be tightened to the specified value. Under-tightening can allow cable bracket movement during park brake application, while over-tightening can damage the threads or distort the bracket.
Tighten
- Tighten the bolts to 10 N.m (89 lb in).
5. Install the park brake cable to the cable guides. Follow the original routing through each guide so the cable does not rub against the body, suspension parts, or any sharp edges when the vehicle is moving.
6. Position the park brake cable to the equalizer. The cable end should line up naturally with the equalizer, not pull sideways or cross over another cable.
7. Connect the front park brake cable (1) to the right park brake cable. The connection should seat cleanly so pedal movement transfers evenly from the front cable into the right rear cable.
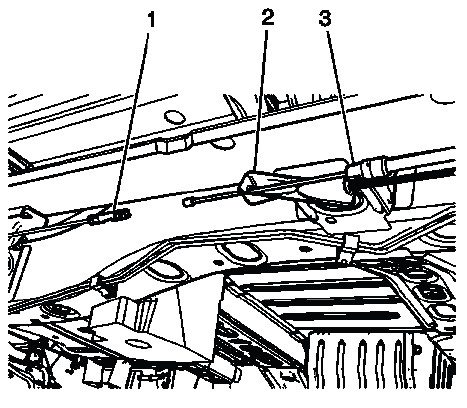
Fig. 42: View Of Park Brake Cable & Park Brake Equalizer
8. Install the park brake cable to the park brake equalizer (2). Keep the cable conduit aligned with the equalizer opening as the locking tabs are engaged.
Ensure the locking tabs on the cable conduit (3) are fully engaged to the equalizer. If the conduit is only partly locked, the cable can shift under load and create poor holding force, excessive pedal travel, or an uneven release.
9. Loosely install the park brake equalizer locknut (1). Leave the nut loose at this stage because the final adjustment still needs to be set after the cable has been routed, connected, and seated correctly.
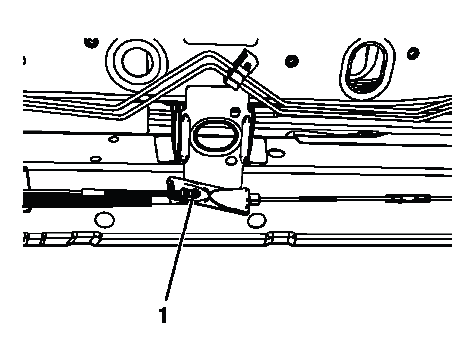
Fig. 43: Identifying Park Brake Cable Locknut
10. Adjust the park brake. Refer to Parking Brake Adjustment. On the Buick Enclave, correct adjustment is important because the cable tension affects pedal travel, rear shoe contact, holding strength, and full release after the pedal is let up.
PARKING BRAKE CABLE EQUALIZER REPLACEMENT
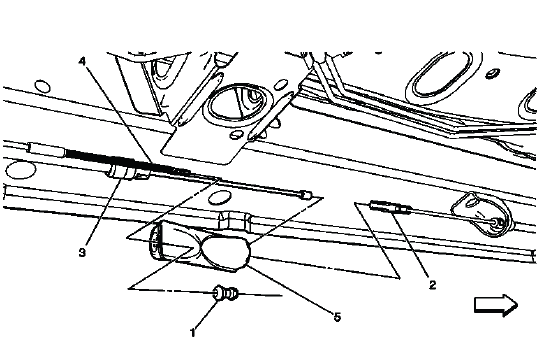
Fig. 44: Identifying Park Brake Cable Equalizer
Parking Brake Cable Equalizer Replacement
The parking brake cable equalizer balances the pull between the front cable and the rear parking brake cables. If the equalizer is damaged, corroded, misaligned, or incorrectly adjusted, one rear brake may apply harder than the other, or the pedal may feel normal while the rear shoes do not hold evenly.
During replacement, pay close attention to cable routing, the position of the locknut, and the way each cable seats in the equalizer. The equalizer should move in line with the cable pull, without twisting or forcing either rear cable sideways. Any binding in this area can make the parking brake feel inconsistent and can also affect release quality.
PARKING BRAKE ACTUATOR REPLACEMENT
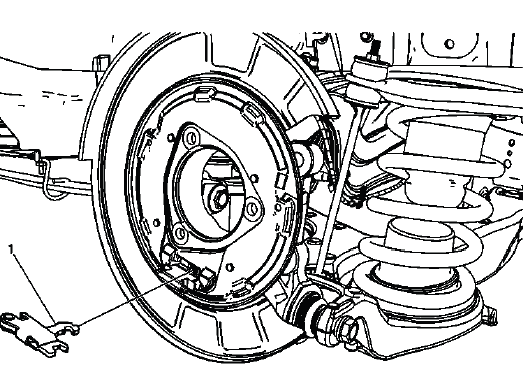
Fig. 45: Identifying Parking Brake Actuator
Parking Brake Actuator Replacement
The parking brake actuator converts cable movement into shoe movement inside the rear brake assembly. When the actuator is worn, seized, rusted, or not returning freely, the parking brake may not apply with enough force or may remain partially applied after release.
Before installing a replacement actuator, the surrounding hardware should be checked for rust buildup, damaged shoe contact points, weak springs, or anything that could limit movement. A new actuator will not correct the concern if the shoe assembly is dirty, misaligned, or dragging because of another mechanical fault.

REAR PARKING BRAKE ANCHOR BACKING PLATE REPLACEMENT
Fig. 46: View Of Rear Disc Brake Backing Plate
Rear Parking Brake Anchor Backing Plate Replacement
The rear parking brake anchor backing plate provides the mounting surface and support points for the parking brake shoe assembly. If the plate is bent, heavily corroded, cracked, or worn at the shoe contact areas, the shoes may not sit squarely or move smoothly during application and release.
When servicing this plate, inspect the anchor points and the shoe contact pads closely. Even small grooves, rust scale, or distortion can change how the shoes expand inside the rotor hat. A clean, solid backing surface helps the parking brake apply evenly and reduces the chance of noise, drag, and uneven shoe wear.
PARKING BRAKE ADJUSTMENT
Special Tools
- J-21177-A Drum-to-Brake Shoe Clearance Gauge
WARNING: Refer to Brake Dust Warning. Brake dust may be harmful if inhaled. Use approved brake cleaning equipment and avoid blowing dust from the parking brake components with compressed air.
1. Apply and fully release the park brake. This helps settle the cable and pedal mechanism before adjustment begins.
2. Verify that the park brake pedal releases completely. The pedal must return fully to its stop before cable tension and shoe clearance are adjusted.
- Turn ON the ignition. Verify the BRAKE indicator lamp is off.
- If the BRAKE indicator lamp is on, ensure the park brake pedal is in release mode and has fully returned to the stop. Remove the slack in the front park brake cable by pulling downward on the cable. This helps confirm that the front cable is not holding the pedal or switch in a partly applied position.
3. Raise and support the vehicle. Refer to Lifting and Jacking the Vehicle. Make sure the vehicle is stable before working around the rear wheels and brake assemblies.
4. Remove the rear tire and wheel assemblies. Refer to Tire and Wheel Removal and Installation. With both rear wheels removed, the adjustment can be checked evenly from side to side.
5. Loosen the locknut (1) at the park brake cable equalizer to relieve tension on the park brake system. Removing cable load allows the shoe clearance to be set accurately before final cable adjustment.
Fig. 47: Identifying Park Brake Cable Locknut
6. Remove the rear brake rotors. Refer to Rear Brake Rotor Replacement. If a rotor is tight against the parking brake shoes, back off the adjustment as needed rather than forcing the rotor off.
7. Using appropriate cleaning equipment, clean the parking brake components of any accumulated dust. The shoe area should be clean enough to inspect the lining, springs, adjuster, and actuator movement before measurements are taken.
8. Set the J-21177-A Drum-to-Brake Shoe Clearance Gauge inside of the park brake drum (1) at the widest point. This measurement represents the inside diameter of the rotor hat where the parking brake shoes will contact.
Fig. 48: Measuring Inside Of Rotor
- Place the contacts on the tool to the widest point of the drum.
- Tighten the set screw on the tool to ensure the proper measurement when removing the tool from the drum. The gauge should hold the measurement without slipping, because a small error here can change final shoe clearance.
9. Position the J-21177-A Drum-to-Brake Shoe Clearance Gauge over the park brake shoe (1) at the widest point. Keep the gauge square to the shoe assembly so the reading matches the actual working diameter of the shoes.
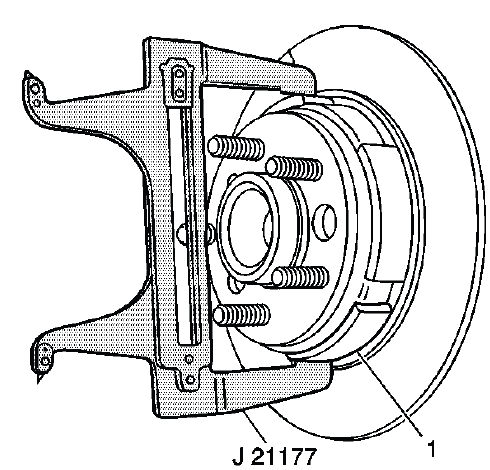
Fig. 49: Adjusting Parking Brake Shoes Using Special Tool
10. Turn the adjuster screw until the park brake shoe just contacts the J-21177-A Drum-to-Brake Shoe Clearance Gauge. The contact should be light; forcing the shoe tightly against the gauge can lead to drag once the rotor is installed.
11. Repeat steps 7-9 for the opposite side. Both sides should be adjusted with the same care so the parking brake applies evenly and the pedal feel remains consistent.
12. Install the rear brake rotors. Refer to Rear Brake Rotor Replacement. The rotors should slide into place without excessive force and should rotate without heavy drag.
13. Install the rear tire and wheel assemblies. Refer to Tire and Wheel Removal and Installation. Tighten the wheel fasteners evenly according to the specified procedure.
14. Adjust the park brake by turning the locknut (1) at the equalizer while spinning both rear wheels. When either rear wheel starts to drag, back off the locknut one full turn. This final cable setting balances holding force with full release, which is especially important for the Buick Enclave because cable tension and shoe clearance work together.
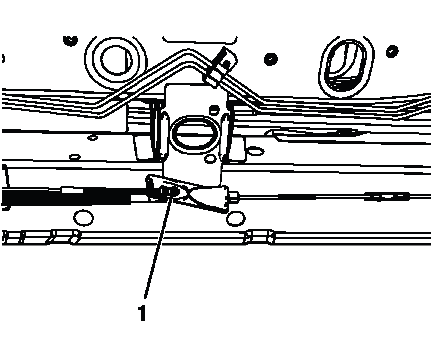
Fig. 50: Identifying Park Brake Cable Locknut
15. Lower the vehicle to curb height. Checking the parking brake at normal ride height helps confirm the cable position under realistic suspension load.
16. Apply the park brake, then inspect for rotation of the rear wheels. If the rear wheels rotate during this inspection, then readjust the park brake shoes. The parking brake should hold firmly without needing excessive pedal travel.
17. Release the park brake. Verify the rear wheels rotate freely. Any remaining drag after release should be corrected before the vehicle is returned to service.
18. Lower the vehicle. After the final check, confirm normal pedal feel, proper BRAKE indicator operation, and smooth release with no cable noise or rear brake drag.
