Buick Enclave: Repair Instructions
ANTI-LOCK BRAKE SYSTEM AUTOMATED BLEED
WARNING: Refer to Brake Fluid Irritant Warning before handling any brake fluid or opening the hydraulic brake system.
CAUTION: Refer to Brake Fluid Effects on Paint and Electrical Components Caution. Brake fluid can damage painted surfaces and may affect electrical connectors if it is allowed to remain on components.
NOTE: The base hydraulic brake system must be bled before performing this automated bleeding procedure. If the base hydraulic brake system bleeding procedure has not already been completed, refer to Hydraulic Brake System Bleeding (Manual), Hydraulic Brake System Bleeding (Pressure) before proceeding. The automated bleed is intended to move trapped air through the ABS hydraulic unit after the base system has already been properly serviced.
1. Install a suitable scan tool to the vehicle and confirm that communication with the electronic brake control module is available before beginning the procedure.
2. Start the engine and allow the engine to idle. A steady idle helps maintain proper system voltage while the scan tool commands the ABS hydraulic components during the automated bleed routine.
3. Using the scan tool, begin the automated bleed procedure. Follow the menu path carefully and do not interrupt the process once the routine has started.
4. Follow the instructions displayed on the scan tool to complete the automated bleed procedure. Apply the brake pedal only when instructed by the scan tool, because the timing of pedal application is part of the controlled bleeding sequence.
5. Turn the ignition OFF after the scan tool indicates that the automated bleed routine has been completed.
6. Remove the scan tool from the vehicle after the procedure is finished and the ignition has been switched OFF.
7. Fill the brake master cylinder reservoir to the maximum-fill level with GM approved brake fluid from a clean, sealed brake fluid container. Refer to Master Cylinder Reservoir Filling. Do not reuse old brake fluid or fluid from an open container, because moisture or debris can reduce brake system performance.
8. Bleed the hydraulic brake system after the automated routine has been performed. Refer to Hydraulic Brake System Bleeding (Manual), Hydraulic Brake System Bleeding (Pressure). This final bleeding step helps remove any air that may have moved into the lines during the ABS automated process.
9. With the ignition OFF, apply the brakes 3-5 times or until the brake pedal becomes firm, in order to deplete the brake booster power reserve. This allows the pedal feel to be checked without stored booster assist masking a soft or spongy condition.
10. Slowly depress and release the brake pedal. Observe the feel of the brake pedal through the full range of travel, paying attention to excessive softness, sinking, or uneven resistance.
11. If the brake pedal feels spongy, repeat the automated bleeding procedure. If the brake pedal still feels spongy after repeating the automated bleeding procedure, inspect the brake system for external leaks, loose fittings, damaged brake pipes, or a master cylinder reservoir level that is dropping unexpectedly.
Refer to Brake System External Leak Inspection.
12. Turn the ignition key ON, with the engine OFF. Check to see if the brake system warning lamp remains illuminated. A warning lamp that remains ON after service should be treated as an active safety concern.
13. If the brake system warning lamp remains illuminated, DO NOT allow the vehicle to be driven until it is diagnosed and repaired. Refer to Symptoms - Hydraulic Brakes. A Buick Enclave with an unresolved brake warning should not be road-tested as a normal vehicle until the cause has been identified.
14. Drive the vehicle to exceed 13 km/h (8 mph) to allow ABS initialization to occur. Observe brake pedal feel during low-speed operation and confirm that the pedal remains firm and predictable.
15. If the brake pedal feels spongy, repeat the automated bleeding procedure until a firm brake pedal is obtained. Do not consider the repair complete until the hydraulic pedal feel is stable and the warning indicators behave normally.
STEERING ANGLE SENSOR CENTERING
The steering angle sensor does not require centering as a regular maintenance item. Centering is normally needed only after certain service operations that can change the relationship between the steering wheel, front wheels, steering gear, or chassis control data. When the steering angle value is not centered correctly, the stability control system may interpret driver input incorrectly.
Centering of the steering angle sensor might be required after certain service procedures are performed. Some of these procedures are as follows:
- Any change to the front wheel alignment
- Collision or other physical damage
- Electronic brake control module (EBCM) replacement
- Intermediate shaft replacement
- Steering angle sensor replacement
- Steering column replacement
- Steering gear replacement
- Outer tie rod replacement
The EBCM, Steering Position Sensor Calibration procedure can be completed with a scan tool using the steps below. Before starting, position the vehicle on a level surface, make sure the steering wheel is not being held off-center, and confirm that the front wheels are pointing straight ahead.
1. Using the steering wheel, align the front wheels in the center forward position. This step is important because the calibration will teach the control module what it should recognize as the straight-ahead steering position.
2. Apply the parking brake or set the transmission in the PARK position. The vehicle should remain stationary throughout the calibration process.
3. Turn the ignition switch ON, with the engine OFF. Keep the electrical system stable during the procedure and avoid operating unnecessary accessories.
4. Clear any DTCs that may be set. If codes return immediately, diagnose those concerns before assuming the calibration alone will correct the issue.
5. Using a scan tool, perform the EBCM, Special Functions, Steering Pos. Sensor Calibration. On the Buick Enclave, this calibration helps the stability control system compare steering input with yaw, wheel speed, and lateral movement data.
6. Follow the scan tool directions to complete the calibration procedure. Do not turn the steering wheel unless the scan tool specifically instructs you to do so.
7. After procedure is complete, press Exit and cycle the ignition OFF, open the driver door to cancel the Retained Accessory Power and wait one minute. This gives the related modules enough time to power down and store the new calibration value.
8. Cycle the ignition ON and clear all DTCs. Recheck the system with the scan tool and verify that steering position data appears reasonable with the wheels straight ahead.
ELECTRONIC BRAKE CONTROL MODULE REPLACEMENT
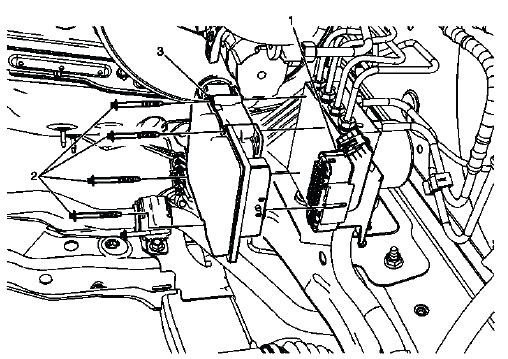
Fig. 4: Identifying Electronic Brake Control Module
Electronic Brake Control Module Replacement
The electronic brake control module is part of the ABS and stability control system. When replacement is required, the repair should be handled carefully because the module communicates with other vehicle systems and may require programming, setup, or calibration after installation. Always verify the original fault before replacing the module, especially when communication, voltage, or configuration codes are present.
BRAKE PRESSURE MODULATOR VALVE REPLACEMENT
Removal Procedure
WARNING: Refer to Brake Fluid Irritant Warning. Avoid direct contact with brake fluid and clean any spilled fluid immediately.
CAUTION: Refer to Brake Fluid Effects on Paint and Electrical Components Caution. Protect nearby painted panels, wiring, and connectors before loosening brake pipes.
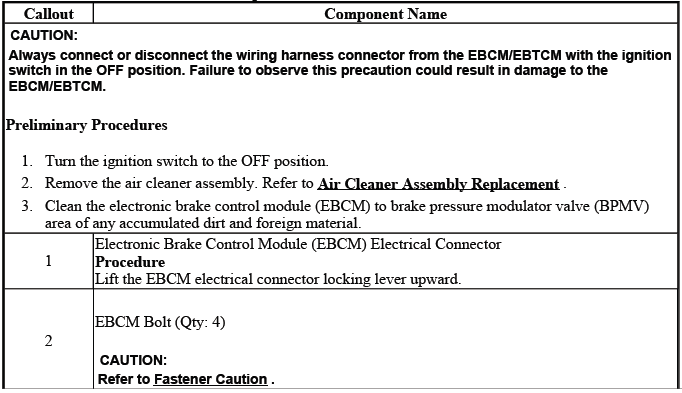
CAUTION: Always connect or disconnect the wiring harness connector from the EBCM/EBTCM with the ignition switch in the OFF position. Failure to observe this precaution could result in damage to the EBCM/EBTCM.
1. Turn the ignition switch to the OFF position. Confirm that the key is not in the RUN position and do not reconnect the electrical connector while the system is powered.
2. Remove the air cleaner assembly. Refer to Air Cleaner Assembly Replacement. Removing the assembly provides the working space needed to access the brake pressure modulator valve and related ABS components.
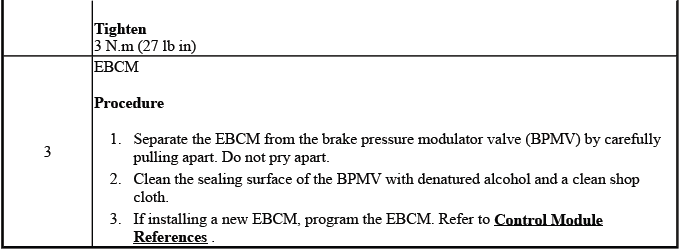
3. Disconnect the electronic brake control module (EBCM) electrical connector (1) by lifting the locking tabs. Pull on the connector body, not the wiring, and inspect the connector area for moisture, corrosion, or damaged terminals while it is accessible.
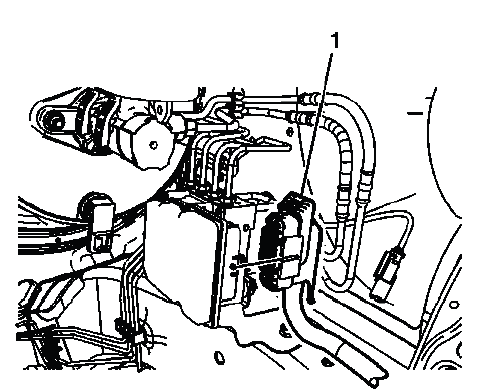
Fig. 5: Locating Electronic Brake Control Module Electrical Connector
4. Disconnect the master cylinder inlet brake pipe fittings (1). Use the correct line wrench to reduce the chance of rounding the fittings, and keep the work area clean to prevent contamination from entering the hydraulic system.
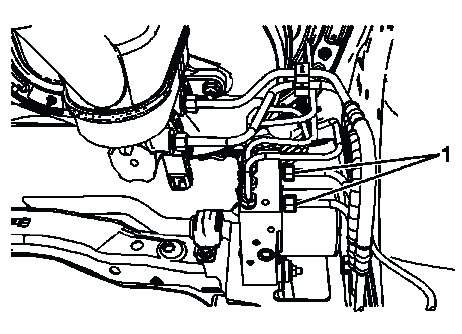
Fig. 6: View Of Master Cylinder Inlet Brake Pipe Fittings
Cap the brake pipe fittings and plug the brake pressure modulator valve (BPMV) inlet ports to prevent brake fluid loss and contamination. This step is important because even a small amount of dirt or moisture inside the hydraulic unit can affect valve operation and brake performance.
5. Disconnect the BPMV outlet port front brake pipe fittings (1). Keep track of each brake pipe position so the lines are reinstalled in the correct ports during assembly.
Fig. 7: Identifying BPMV Outlet Port Front Brake Pipe Fittings
Cap the brake pipe fittings and plug the BPMV outlet ports to prevent brake fluid loss and contamination. On the Buick Enclave, careful handling of the BPMV fittings is especially important because the hydraulic modulator is tied directly into ABS, traction control, and stability control operation.
6. Disconnect the BPMV outlet port rear brake pipe fittings (1). Work carefully around the fittings and keep the brake pipes aligned so they are not twisted or bent during removal.
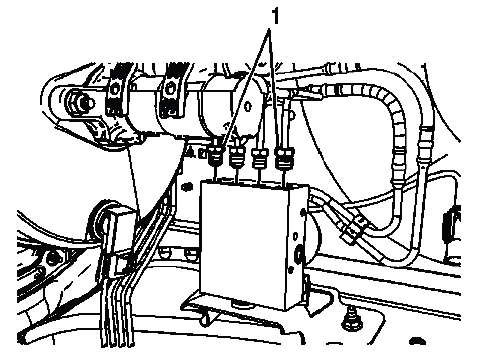
Fig. 8: View Of BPMV Outlet Port Rear Brake Pipe Fittings
Cap the brake pipe fittings and plug the BPMV outlet ports to prevent brake fluid loss and contamination. Keeping the hydraulic openings sealed is important because even small debris or moisture can affect ABS valve operation later.
7. Remove the 2 BPMV bracket nuts (1). Support the assembly as the nuts are removed so the brake pressure modulator valve does not shift suddenly or place stress on the remaining lines and mounting points.

Fig. 9: Identifying BPMV Bracket Nuts
8. Remove the BPMV from the vehicle. Lift the assembly out with controlled movement and avoid striking the modulator body against surrounding brackets, wiring, or brake pipes.
9. Remove the 2 BPMV insulator nuts and washers. Keep the washers and nuts organized so their position can be matched during reassembly.
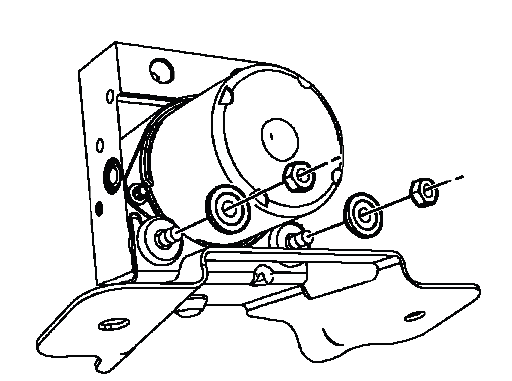
Fig. 10: View Of BPMV Insulator Nuts & Washers
10. Carefully remove the BPMV from the bracket by pulling upward. Do not pry against the modulator housing or force the assembly sideways, because the insulators and bracket can be damaged if the unit is removed unevenly.
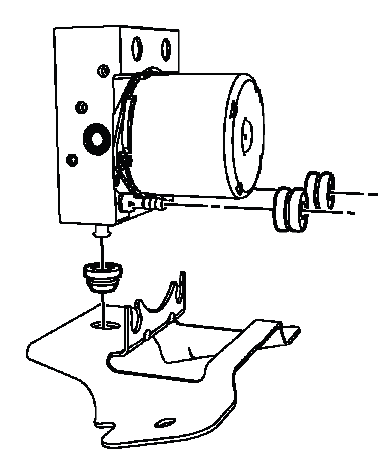
Fig. 11: Identifying BPMV Insulators
11. Remove the 2 BPMV insulators.
Inspect the insulators for damage and replace, if necessary. Cracked, hardened, oil-soaked, or distorted insulators should not be reused because they help isolate vibration and hold the modulator securely in the bracket.
12. Remove the lower BPMV insulator.
Inspect the insulator for damage and replace, if necessary. On the Buick Enclave, worn or damaged BPMV insulators can allow unwanted movement of the hydraulic modulator, which may create noise, stress on brake pipes, or poor component fit after installation.
Installation Procedure
1. Install the 2 BPMV insulators to the BPMV. Make sure each insulator is seated squarely and fully in its mounting position before the modulator is placed back into the bracket.
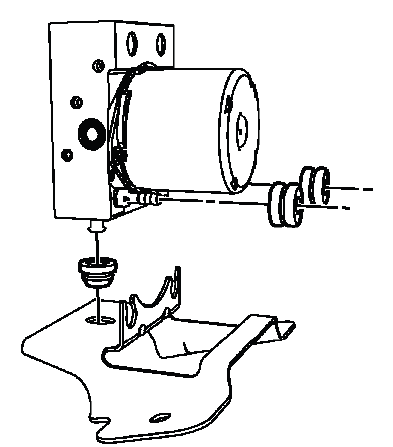
Fig. 12: Identifying BPMV Insulators
Denatured alcohol may be used as an assembly aid to install the insulators. Use only a small amount and allow it to evaporate; do not use grease, petroleum lubricant, or any product that can soften rubber components.
2. Install the lower BPMV insulator to the bracket. Confirm that the insulator is not folded, pinched, or partly seated before continuing.
Denatured alcohol may be used as an assembly aid to install the insulator. The purpose is only to ease installation, not to lubricate the insulator permanently.
3. Carefully install the BPMV to the bracket. Lower the unit into place evenly so the insulators guide the modulator into the bracket without tearing or shifting.
Denatured alcohol may be used as an assembly aid on the insulators to install the BPMV. Once the alcohol evaporates, the insulators should hold the assembly firmly without slipping.
4. Install the 2 BPMV insulator washers and the 2 nuts. Start the nuts by hand first to avoid cross-threading and to make sure the modulator sits flat against the insulators.
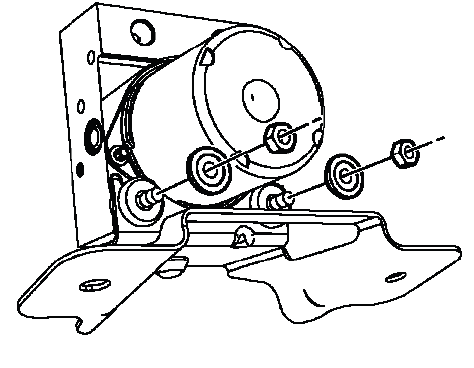
Fig. 13: View Of BPMV Insulator Nuts & Washers
CAUTION: Refer to Fastener Caution. Over-tightening or uneven tightening can damage mounting hardware, distort the bracket, or place stress on the modulator assembly.
Tighten
- Tighten the nuts to 8 N.m (71 lb in).
5. Install the BPMV and bracket assembly to the frame rail. Position the assembly carefully so the brake pipes will line up naturally with their ports during reconnection.
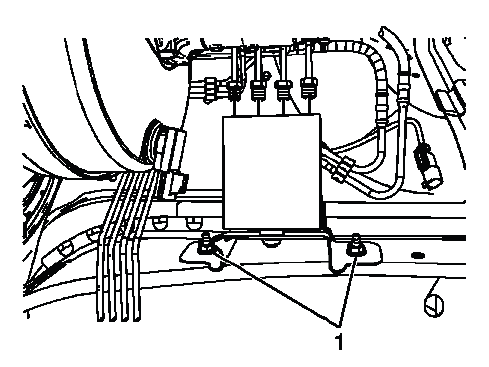
Fig. 14: Identifying BPMV Bracket Nuts
6. Install the 2 BPMV bracket nuts (1). Start both nuts before tightening either one fully so the bracket remains aligned with the frame rail.
Tighten
- Tighten the nuts to 20 N.m (15 lb ft).
7. Connect the BPMV outlet port rear brake pipe fittings (1). Thread the fittings by hand first and make sure each brake pipe enters the port straight, without side loading or binding.
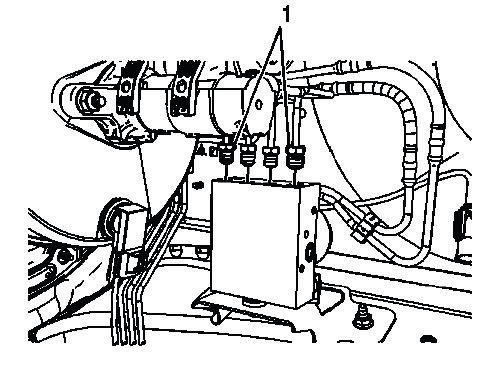
Fig. 15: View Of BPMV Outlet Port Rear Brake Pipe Fittings
Tighten
- Tighten the fittings to 17 N.m (13 lb ft).
8. Connect the BPMV outlet port front brake pipe fittings (1). Verify that the front brake pipes are connected to the correct ports before tightening, since incorrect routing can affect brake hydraulic operation.
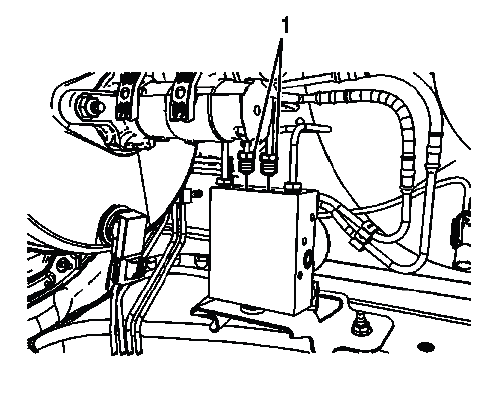
Fig. 16: Identifying BPMV Outlet Port Front Brake Pipe Fittings
Tighten
- Tighten the fittings to 17 N.m (13 lb ft).
9. Connect the master cylinder inlet brake pipe fittings (1). Make sure the fittings are clean and properly started by hand before applying final torque.
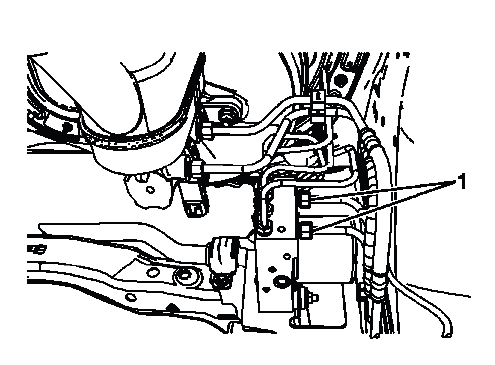
Fig. 17: View Of Master Cylinder Inlet Brake Pipe Fittings
Tighten
- Tighten the fittings to 25 N.m (18 lb ft).
10. Connect the EBCM electrical connector (1). Confirm that the connector is fully seated and locked, and check that no wiring is pulled tight or trapped near the bracket or brake pipes.
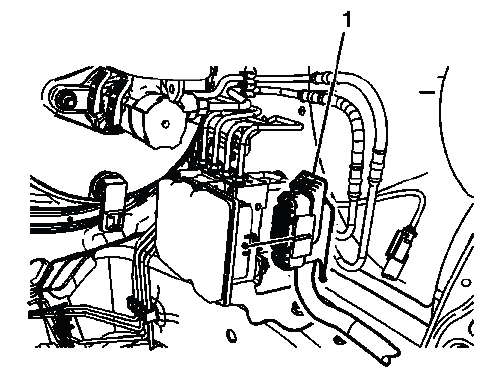
Fig. 18: Locating Electronic Brake Control Module Electrical Connector
11. A new BPMV comes with both the primary and secondary circuits pre-filled with brake fluid. As long as the ignition key has not been cycled, only a base brake bleed is necessary. This prevents unnecessary activation of the ABS valves before the hydraulic system has been properly prepared.
Bleed the hydraulic brake system. Refer to Hydraulic Brake System Bleeding (Manual), Hydraulic Brake System Bleeding (Pressure). Use clean, approved brake fluid and keep the master cylinder reservoir from running low during the bleeding process.
12. Perform the Diagnostic System Check - Vehicle. This confirms that the brake control system communicates correctly and that no related electrical, hydraulic, or configuration faults remain after service.
13. Observe the brake pedal feel after performing the diagnostic system check. If the pedal now feels spongy, air may have been in or may have been introduced into the primary circuit.
If the pedal feels spongy, perform the Anti-Lock Brake System Automated Bleed. On the Buick Enclave, this step may be necessary when air has entered the ABS hydraulic unit and cannot be removed by a standard base bleed alone.
14. Install the air cleaner assembly. Refer to Air Cleaner Assembly Replacement. After installation, check that the air cleaner housing, ducts, clamps, and nearby wiring are correctly positioned and do not interfere with brake components.
BRAKE PRESSURE MODULATOR VALVE PRESSURE SENSOR CALIBRATION
The brake pressure sensor does not require calibration during normal routine service. Calibration may be needed after certain repairs because the EBCM must learn a correct zero-pressure reference when the brake pedal is released. If the learned value is incorrect, the brake control system may misread brake apply pressure and set related chassis control faults.
Calibration of the brake pressure sensor might be required after certain service procedures are performed. Some of these procedures are as follows:
- Electronic brake control module (EBCM) replacement
- Brake pressure modulator valve assembly replacement
The Brake Pressure Sensor Calibration procedure can be completed with a scan tool using the following steps. Before starting, make sure the vehicle is stationary, the brake pedal is fully released, and the electrical system voltage is stable.
1. Apply the parking brake or set the transmission in the P position. The vehicle must not move during calibration.
2. Release the brake pedal. Do not rest your foot on the pedal, because even light pressure can affect the learned pressure value.
3. Install the scan tool to the data link connector. Confirm scan tool communication before selecting the calibration function.
4. Ignition ON, engine OFF.
5. Select Chassis.
6. Select EBCM (Electronic Brake Control Module).
7. Select Programming.
8. Select Brake Pressure Sensor Calibration and follow the scan tool directions to complete the calibration procedure. Read each prompt carefully before confirming the next step.
9. Calibrate Brake Pressure Sensor? Press the Yes, soft key.
10. Programming successful! Press the Confirm, soft key. This confirms that the module has accepted the new brake pressure sensor calibration value.
11. Clear any DTCs that may be set. Recheck the system afterward and verify that no brake pressure sensor, ABS, traction control, or stability control codes return.
BRAKE PRESSURE MODULATOR VALVE BRACKET REPLACEMENT
Removal Procedure
1. Remove the air cleaner assembly. Refer to Air Cleaner Assembly Replacement. Removing this assembly gives clear access to the brake pressure modulator valve bracket and helps prevent accidental contact with nearby brake pipes or wiring.
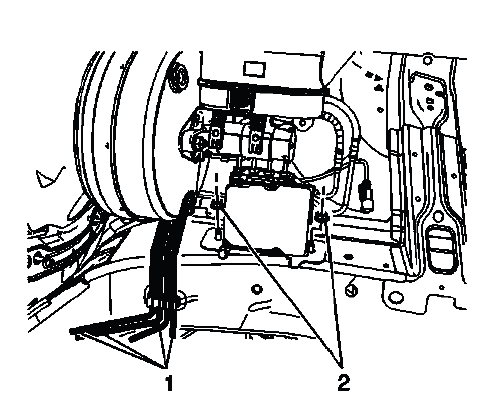
Fig. 19: View Of Front & Rear Brake Pipes
2. Release the front and rear brake pipes (1) from the routing clip on the frame rail. Move the pipes only as much as needed for service access, and avoid bending them sharply or placing side pressure on the fittings.
3. Remove the 2 brake pressure modulator valve (BPMV) bracket nuts (2). Support the bracket area while loosening the nuts so the BPMV assembly does not shift suddenly.
4. Remove the 2 BPMV nuts and washers. Keep the hardware organized for installation and inspect the washers for deformation, corrosion, or damage before reuse.
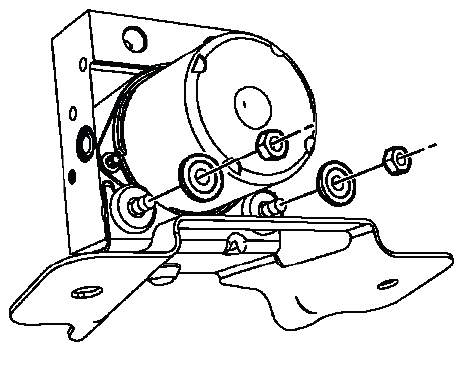
Fig. 20: View Of BPMV Insulator Nuts & Washers
NOTE: Carefully separate the BPMV from the bracket. Do not pry on the accumulator covers on the underside of the BPMV. The covers are not designed to be used as leverage points, and damage in this area can affect hydraulic modulator operation.
5. Carefully lift the BPMV assembly upward to release the BPMV from the bracket. Lift evenly and do not twist the assembly, because the insulators may hold the modulator firmly in place.
Fig. 21: Identifying BPMV Insulators
6. Remove the BPMV bracket. Guide it out carefully so it does not catch on the brake pipes, wiring harness, or frame rail area.
7. Remove the 2 upper BPMV bracket insulators.
Inspect the bracket insulators for damage and replace, if necessary. Any insulator that is cracked, hardened, swollen, torn, or loose in the bracket should not be reused because it helps control vibration and keeps the BPMV correctly positioned.
8. Remove the lower BPMV bracket insulator.
Inspect the bracket insulator for damage and replace, if necessary. On the Buick Enclave, the BPMV bracket and insulators must hold the ABS hydraulic unit securely, because movement in this area can place stress on the brake pipes and create poor alignment during reassembly.
Installation Procedure
1. Install the lower BPMV bracket insulator. Make sure it is seated fully in the bracket and is not folded, pinched, or installed at an angle.
Fig. 22: Identifying BPMV Insulators
Use denatured alcohol on the BPMV bracket insulator as an installation aid, if necessary. Apply only a small amount and allow it to evaporate; do not use petroleum-based lubricants that may damage rubber components.
2. Install the 2 upper BPMV bracket insulators. Verify that both insulators are positioned evenly and sit flush in the bracket openings.
Use denatured alcohol on the BPMV bracket insulators as an installation aid, if necessary. The alcohol helps the insulators slide into place during assembly but should not leave a lasting lubricant film.
3. Install the BPMV bracket to the BPMV. Lower the bracket into position with controlled movement and confirm that the modulator sits naturally in the insulators without forcing the parts together.
4. Install the 2 BPMV washers and nuts. Start the nuts by hand before tightening so the threads are not damaged and the BPMV remains centered in the bracket.
Fig. 23: View Of BPMV Insulator Nuts & Washers
CAUTION: Refer to Fastener Caution. Tightening hardware beyond specification can damage the bracket, distort the insulators, or place unnecessary stress on the hydraulic modulator assembly.
Tighten
- Tighten the nuts to 8 N.m (71 lb in).
5. Install the 2 BPMV bracket nuts (2). Align the bracket with the frame rail before final tightening so the brake pipe routing remains natural and does not pull against the fittings.
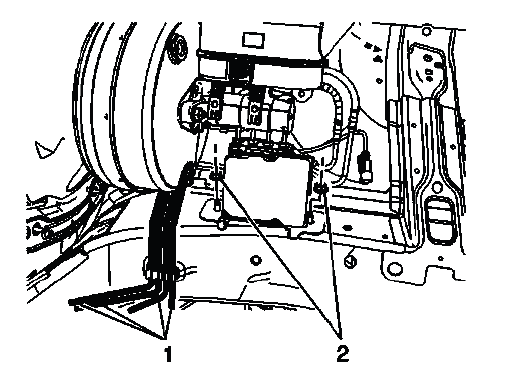
Fig. 24: View Of Front & Rear Brake Pipes
Tighten
- Tighten the nuts to 20 N.m (15 lb ft).
6. Install the front and rear brake pipes (1) to the routing clip on the frame rail. Confirm that the pipes are fully seated in the clip and are not rubbing against the bracket, frame rail, or nearby components.
7. Install the air cleaner assembly. Refer to Air Cleaner Assembly Replacement. After installation, check that the housing, ducts, clamps, and nearby harnesses are properly positioned and do not interfere with the brake pressure modulator valve area.
FRONT WHEEL SPEED SENSOR REPLACEMENT
WARNING: Refer to Brake Dust Warning. Avoid breathing brake dust and use proper cleaning methods when working around the wheel hub, brake rotor, and steering knuckle area.
NOTE: If replacing the wheel speed sensor due to a DTC, inspect the back of the wheel bearing on the encoder surface for metallic chips or metal shavings. If metallic debris is found, clean the encoder surface to prevent interference with the wheel speed sensor signal and setting of a DTC. Refer to Diagnostic System Check - Vehicle to verify and clear the DTC. A clean encoder surface is critical because the sensor reads wheel speed through very small signal changes.
Removal Procedure
1. If replacing the left front wheel speed sensor, remove the air cleaner element. Refer to Air Cleaner Element Replacement. This provides access to the upper connector and harness routing for the left side sensor circuit.
2. If replacing the right front wheel speed sensor, disconnect and position aside the battery positive junction block cables. Refer to Battery Positive Junction Block Cable Replacement. Protect the cable ends and avoid pulling on the wiring while moving the junction block cables out of the work area.
3. Disconnect the wheel speed sensor electrical connector (1). Release the connector lock carefully and inspect the terminals for corrosion, water intrusion, looseness, or bent pins before installing the new sensor.
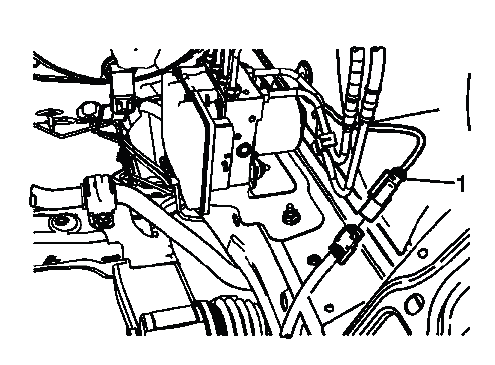
Fig. 25: Identifying Wheel Speed Sensor Electrical Connector
4. Raise and support the vehicle. Refer to Lifting and Jacking the Vehicle. Use the correct lifting points and make sure the vehicle is stable before working near the suspension and wheelhouse.
5. Remove the tire and wheel assembly. Refer to Tire and Wheel Removal and Installation. Set the wheel aside where it will not damage the sensor harness or brake components.
6. Release the wheel speed sensor wire grommet (1) from the wheelhouse. Work the grommet out evenly so it does not tear or leave the harness loose after installation.
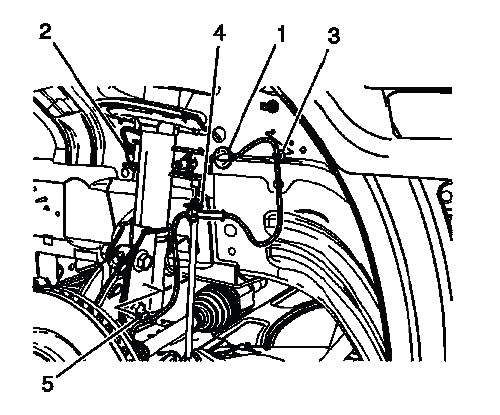
Fig. 26: View Of Wheel Speed Sensor Wire, Wire Grommet, Connector & Harness Routing Clips
7. Carefully pull the wheel speed sensor wire and connector (2) through the wheel house. Do not force the connector through the opening, because damage to the connector body or wiring insulation can create an intermittent ABS signal fault.
8. Release the wheel speed sensor wire harness routing clip (3) from the wheel house. Note the original harness path so the new sensor wire follows the same routing during installation.
9. Release the wheel speed sensor wire harness routing clips (4) and (5) from the suspension strut. The harness must be secured correctly because loose routing can allow contact with the tire, axle, strut, or brake components.
10. Remove the wheel speed sensor bolt. Use care if corrosion is present around the sensor mounting area so the bolt head or sensor body is not damaged during removal.
Fig. 27: Identifying Wheel Speed Sensor Bolt
NOTE: Clean the wheel speed sensor mounting area on the steering knuckle of any accumulated dirt and debris. A dirty mounting surface can prevent the sensor from seating fully and may affect the air gap or signal quality.
11. Pull the wheel speed sensor straight up and out of the steering knuckle. Avoid twisting the sensor aggressively if it is stuck; work it free carefully so the mounting bore is not damaged.
Installation Procedure
1. Install the wheel speed sensor to the steering knuckle. Make sure the sensor seats fully and squarely against the cleaned mounting surface before installing the retaining bolt.
Fig. 28: Identifying Wheel Speed Sensor Bolt
2. Install the wheel speed sensor bolt. Start the bolt by hand first to avoid cross-threading the steering knuckle.
CAUTION: Refer to Fastener Caution. Do not over-tighten the sensor bolt, because the sensor body and mounting flange can be damaged by excessive clamping force.
Tighten
- Tighten the bolt to 9 N.m (80 lb in).
3. Install the wheel speed sensor wire harness routing clips (4) and (5) to the suspension strut. Confirm that the wire has enough slack for normal steering and suspension movement, but not enough to contact rotating or hot components.
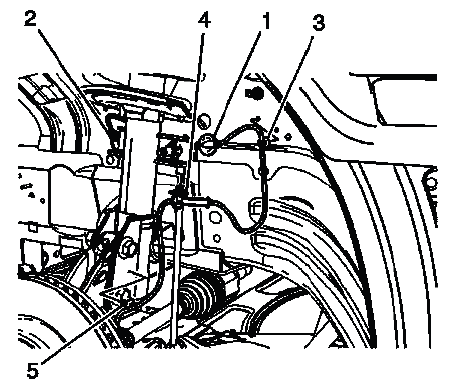
Fig. 29: View Of Wheel Speed Sensor Wire, Wire Grommet, Connector & Harness Routing Clips
For the Buick Enclave, correct wheel speed sensor routing is just as important as the sensor itself. A properly installed harness helps prevent intermittent ABS, traction control, or stability control warnings caused by wire movement, connector strain, or contact with nearby suspension parts.
4. Insert the wheel speed sensor wire electrical connector (2) through the wheel house hole. Feed the connector through carefully so the terminals, connector lock, and wire insulation are not damaged against the edge of the opening.
5. Seat the wheel speed sensor wire harness grommet (1) to the wheel house. Make sure the grommet is fully pressed into place, because an improperly seated grommet can allow water, dirt, or road debris to enter the wheelhouse area and affect harness durability.
6. Connect the wheel speed sensor electrical connector (1). Listen and feel for the connector lock to engage, then verify that the harness is not pulled tight or routed near moving suspension parts.
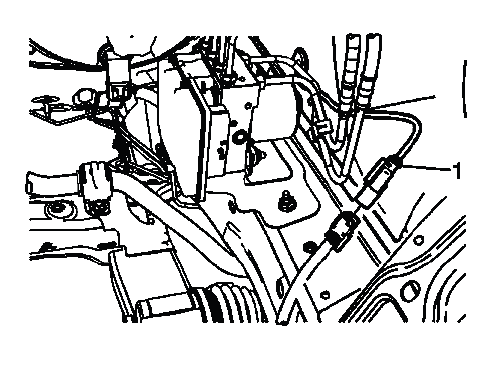
Fig. 30: Identifying Wheel Speed Sensor Electrical Connector
7. Install the tire and wheel assembly. Refer to Tire and Wheel Removal and Installation. Tighten the wheel fasteners using the correct procedure and confirm that the sensor harness remains clear of the tire and wheel.
8. If replacing the right front wheel speed sensor, connect the battery positive junction block cables. Refer to Battery Positive Junction Block Cable Replacement. Confirm that the cable connections are secure and correctly positioned before continuing.
9. If replacing the left front wheel speed sensor, install the air cleaner element. Refer to Air Cleaner Element Replacement. Make sure the air cleaner element and housing are seated properly so no intake leak is created during reassembly.
10. Perform the Diagnostic System Check - Vehicle. This final check confirms that the wheel speed sensor signal is being recognized correctly and that no ABS, traction control, or stability control DTCs remain after the repair.
REAR WHEEL SPEED SENSOR REPLACEMENT
WARNING: Refer to Brake Dust Warning. Use proper precautions when working around brake components, and avoid blowing dust from the brake or wheel hub area with compressed air.
NOTE: If replacing the wheel speed sensor due to a DTC, inspect the back of the wheel bearing on the encoder surface for metallic chips or metal shavings. If metallic debris is found, clean the encoder surface to prevent interference with the wheel speed sensor signal and setting of a DTC. Refer to Diagnostic System Check - Vehicle to verify and clear the DTC. The encoder surface must be clean because the wheel speed sensor reads small changes in the magnetic or signal pattern as the wheel rotates.
Removal Procedure
1. Raise and support the vehicle. Refer to Lifting and Jacking the Vehicle. Use the correct lift points and confirm the vehicle is stable before removing the wheel or working around the suspension.
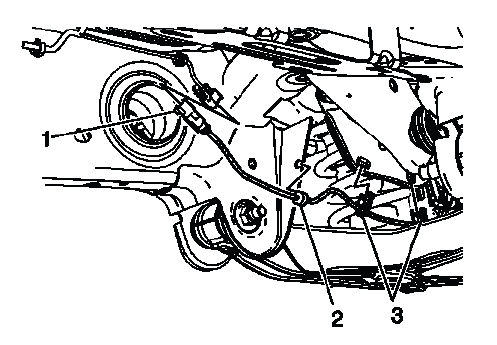
Fig. 31: Identifying Wheel Speed Sensor Electrical Connector
2. Remove the tire and wheel assembly. Refer to Tire and Wheel Removal and Installation. Place the wheel aside where it will not interfere with the sensor harness, brake components, or lower control arm area.
3. Disconnect the wheel speed sensor electrical connector (1). Release the connector lock carefully and inspect the terminals for corrosion, moisture, looseness, or bent pins before installing the new sensor.
4. Release the wheel speed sensor wire harness grommet (2) from the lower control arm bracket. Work the grommet out evenly so it is not torn or stretched during removal.
5. Release the wheel speed sensor wire harness routing clips (3) from the upper suspension link. Note the original harness path before removing the sensor, because the replacement harness must follow the same route to avoid contact with moving suspension parts.
6. Remove the wheel speed sensor bolt. If corrosion or packed dirt is present around the bolt, clean the area first so the tool seats properly and the bolt head is not damaged.

Fig. 32: Identifying Wheel Speed Sensor Bolt
NOTE: Clean the wheel speed sensor mounting area on the wheel knuckle of any accumulated dirt and debris. A dirty or uneven mounting surface can prevent the sensor from seating fully and may affect the air gap, signal quality, or future DTC diagnosis.
7. Pull the wheel speed sensor straight up and out of the wheel knuckle. Do not twist the sensor aggressively if it is stuck; loosen it gradually to avoid damaging the mounting bore.
Installation Procedure
1. Install the wheel speed sensor to the wheel knuckle. The sensor should sit flat against the cleaned mounting surface without being forced into position.
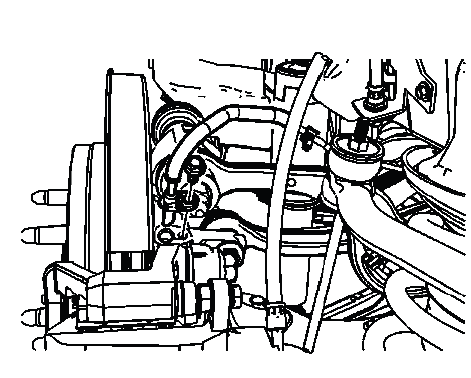
Fig. 33: Identifying Wheel Speed Sensor Bolt
2. Install the wheel speed sensor bolt. Start the bolt by hand first to avoid cross-threading and to keep the sensor aligned correctly in the knuckle.
CAUTION: Refer to Fastener Caution. Do not over-tighten the sensor bolt, because excessive clamping force can damage the sensor mounting flange or the wheel knuckle threads.
Tighten
- Tighten the bolt to 9 N.m (80 lb in).
3. Install the wheel speed sensor wire harness routing clips to the upper suspension link. The harness must be secured in the same routing path used before removal so it has proper clearance during suspension travel.
Fig. 34: View Of Wheel Speed Sensor Wire Harness Routing Clip
4. Install the wheel speed sensor wire harness routing clips (3) to the upper suspension link. Check that the wire is not twisted, stretched, or positioned where it can rub against the tire, wheel, shock, or suspension arm.
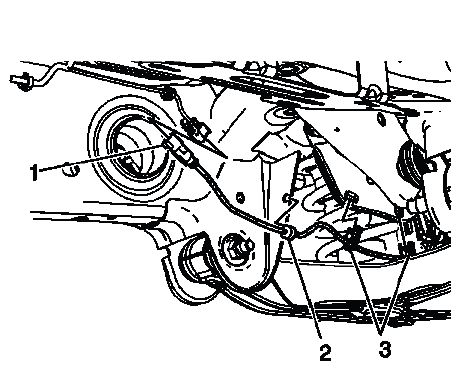
Fig. 35: Identifying Wheel Speed Sensor Electrical Connector
5. Install the wheel speed sensor wire harness grommet (2) to the lower control arm bracket. Press the grommet fully into the bracket so the harness is held firmly and protected from vibration.
6. Connect the wheel speed sensor electrical connector (1). Confirm that the connector is locked and that the wiring has enough slack for normal suspension movement without hanging loose.
7. Install the tire and wheel assembly. Refer to Tire and Wheel Removal and Installation. After installation, verify that the wheel speed sensor harness remains clear of the rotating wheel and tire.
8. Perform the Diagnostic System Check - Vehicle. On the Buick Enclave, this step is important after wheel speed sensor service because the ABS, traction control, and Stabilitrak systems all depend on accurate wheel speed data from each corner of the vehicle.
ELECTRONIC TRACTION CONTROL SWITCH REPLACEMENT

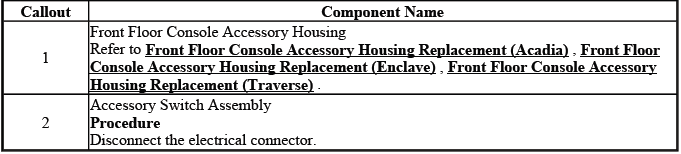
Fig. 36: Identifying Front Floor Console Accessory Housing & Accessory Switch Assembly
Electronic Traction Control Switch Replacement
The electronic traction control switch allows the driver to control traction-related functions from the front floor console area. When replacing this switch, inspect the accessory housing, connector fit, and surrounding trim so the switch seats properly and operates without sticking or poor contact.
VEHICLE YAW SENSOR LEARN
The yaw and lateral accelerometer sensor does not require calibration as part of normal maintenance. Calibration is usually needed only after certain chassis control components have been replaced or when the control module needs to relearn a correct zero reference. This sensor helps the stability control system compare vehicle rotation and side movement against steering angle and wheel speed information.
Calibration of the accelerometer sensor might be required after certain service procedures are performed. Some of these procedures are as follows:
- Electronic brake control module (EBCM) replacement
- Yaw and lateral accelerometer sensor replacement
The Yaw Rate Sensor Learn procedure can be completed with a scan tool using the following steps. Before starting the learn routine, the vehicle must be parked on a level surface, remain still, and have no unnecessary movement inside the cabin.
- Place vehicle on a level surface. A sloped or uneven surface can cause the sensor to learn an incorrect reference value.
- Apply the parking brake or set the transmission in the P position. The vehicle must not move during the calibration process.
- Ignition ON, engine OFF. Keep the electrical system stable and avoid operating accessories during the procedure.
- Install the scan tool to the data link connector and confirm communication with the EBCM.
- Scroll to the EBCM, special functions menu on the scan tool.
- Select Yaw Rate Sensor Recalibration.
- Press the Reset and follow any scan tool prompts until the recalibration routine is complete.
- Clear any DTCs that may be set, then recheck the system to confirm that no yaw sensor, lateral accelerometer, ABS, or stability control faults return.
For the Buick Enclave, a correct yaw sensor learn procedure is essential for stable and predictable Stabilitrak operation. If the sensor reference is not learned properly, the system may misinterpret normal vehicle movement as a loss of control condition.
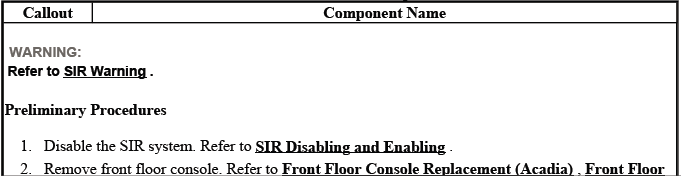
VEHICLE YAW SENSOR WITH VEHICLE LATERAL ACCELEROMETER REPLACEMENT
Fig. 37: View Of Vehicle Yaw Sensor With Vehicle Lateral Accelerometer
Vehicle Yaw Sensor with Vehicle Lateral Accelerometer Replacement
The vehicle yaw sensor with lateral accelerometer is a key input for the stability control system. It measures rotational movement and side acceleration so the control module can compare actual vehicle motion with the driver's steering input. When this component is replaced, handle it carefully, mount it in the correct orientation, and complete the required learn procedure with a scan tool before returning the vehicle to normal operation.