Buick Enclave: Pistons, Connecting Rods & Bearings
* PLEASE READ THIS FIRST *
NOTE: Examples used in this article are general in nature and do not necessarily relate to a specific engine or system. Illustrations and procedures have been chosen to guide mechanic through engine overhaul process. Descriptions of processes of cleaning, inspection, assembly and machine shop practice are included.
Always refer to appropriate engine overhaul article, if available, in the ENGINES section for complete overhaul procedures and specifications for the vehicle being repaired. When these general overhaul procedures are applied to a Buick Enclave engine, use them only as supporting information. Final clearances, piston orientation marks, bearing limits, torque values, and machining decisions must come from the exact engine-specific service data.
RIDGE REMOVAL
NOTE: Examples used in this article are general in nature and do not necessarily relate to a specific engine or system. Illustrations and procedures have been chosen to guide mechanic through engine overhaul process. Descriptions of processes of cleaning, inspection, assembly and machine shop practice are included.
Always refer to appropriate engine overhaul article, if available, in the ENGINES section for complete overhaul procedures and specifications for the vehicle being repaired.
Ridge in cylinder wall must be removed prior to piston removal. Failure to remove ridge prior to removing pistons will cause piston damage in piston ring lands or grooves. The ridge forms near the top of the cylinder where the piston rings stop their upward travel and normal ring wear does not remove material in the same way as the lower bore area. If the piston is forced past this ridge, the top ring, ring land, or piston skirt may be damaged during removal.
With piston at bottom dead center, place rag in bore to trap metal chips. Install ridge reamer in cylinder bore. The rag helps keep metal chips and abrasive debris from falling deeper into the engine. Make sure the piston is positioned low enough to provide safe tool clearance, but do not allow chips to enter oil passages or collect around the crankshaft.
Adjust ridge reamer using manufacturer's instructions. Remove ridge using ridge reamer. DO NOT remove an excessive amount of material. Ensure ridge is completely removed. The goal is to remove only the raised ridge, not to enlarge the cylinder bore. Cutting too deeply can change bore size, damage the cylinder wall, or create an uneven surface that affects later measurement. After the ridge is removed, clean the bore carefully before pushing the piston and connecting rod assembly out of the cylinder.
PISTON & CONNECTING ROD REMOVAL
NOTE: Examples used in this article are general in nature and do not necessarily relate to a specific engine or system. Illustrations and procedures have been chosen to guide mechanic through engine overhaul process. Descriptions of processes of cleaning, inspection, assembly and machine shop practice are included.
Always refer to appropriate engine overhaul article, if available, in the ENGINES section for complete overhaul procedures and specifications for the vehicle being repaired.
Note top of piston. Some pistons may contain a notch, arrow or be marked FRONT. Piston must be installed in proper direction to prevent damage with valve operation. Piston orientation can affect valve relief location, skirt design, pin offset, ring placement, and combustion chamber relationship. Mark the direction clearly before removal so the assembly can be evaluated and reinstalled correctly if it is reused.
Check that connecting rod and cap are numbered for cylinder location and which side of cylinder block the number faces. Proper cap and connecting rod must be installed together. Connecting rod cap must be installed on connecting rod in proper direction to ensure bearing lock procedure. Mark connecting rod and cap if necessary. Pistons must be installed in original location.
Connecting rods and caps are machined as matched pairs. Swapping caps between rods or reversing a cap can distort the bearing bore and cause bearing failure. Before disassembly, mark each connecting rod and cap in a way that will not damage the machined surfaces. On Buick Enclave engine overhaul work, this organization prevents costly mistakes during bearing inspection and final assembly.
Remove cap retaining nuts or bolts. Remove bearing cap. Install tubing protectors on connecting rod bolts. This protects cylinder walls from scoring during removal. Ensure proper removal of ridge. Push piston and connecting rod from cylinder. Connecting rod boss can be tapped with a wooden dowel or hammer handle to aid in removal.
Do not strike the rod bolts, bearing surfaces, piston crown, or machined rod parting faces with a metal tool. Push the piston assembly out gently and keep the rod centered so the bolt ends do not scrape the cylinder wall or crankshaft journal. Once removed, install the cap back onto its original rod loosely to keep the matched parts together until inspection begins.
PISTON & CONNECTING ROD
NOTE: Examples used in this article are general in nature and do not necessarily relate to a specific engine or system. Illustrations and procedures have been chosen to guide mechanic through engine overhaul process. Descriptions of processes of cleaning, inspection, assembly and machine shop practice are included.
Always refer to appropriate engine overhaul article, if available, in the ENGINES section for complete overhaul procedures and specifications for the vehicle being repaired.
Disassembly
Using ring expander, remove piston rings. Remove piston pin retaining rings (if equipped). Note direction of piston installation on connecting rod. On pressed type piston pins, special fixtures and procedures according to manufacturer must be used to remove piston pins. Follow manufacturer's recommendations to avoid piston distortion or breakage.
Piston rings should not be twisted off by hand because this can damage the ring grooves or crack the piston lands. Use the correct ring expander and remove each ring carefully. If the piston pin is a press-fit design, do not attempt to drive it out with improvised tools. Excessive force can bend the connecting rod, distort the piston pin bore, or damage the piston skirt.
Before separating the piston from the connecting rod, record the relationship between the piston front mark and the rod orientation. Some connecting rods have oil squirt holes, chamfers, or bearing tang locations that must face a specific direction. Incorrect assembly can affect lubrication, bearing seating, and piston position in the bore.
Cleaning
Remove all carbon and varnish from piston. Pistons and connecting rods may be cleaned in cold type chemical tank. Using ring groove cleaner, clean all deposits from ring grooves. Ensure all deposits are cleaned from ring grooves to prevent ring breakage or sticking. DO NOT attempt to clean pistons with wire brush.
Clean pistons gently and avoid removing base metal from the crown, skirt, or ring lands. Carbon buildup in the ring grooves can hold the new rings too tightly and prevent them from expanding, sealing, or rotating properly. A clean groove allows the ring to seat correctly and move as designed during engine operation.
Wire brushes, hard scraping tools, and aggressive abrasives can scratch aluminum pistons and create stress points or poor ring sealing. Use approved cleaners and proper groove tools only. After cleaning, rinse the piston thoroughly and remove all chemical residue, loosened carbon, and abrasive particles before measurement. For a Buick Enclave engine repair, clean parts make it much easier to identify scoring, overheating marks, and oil control problems.
Inspection
Inspect pistons for nicks, scoring, cracks or damage in ring areas. Connecting rod should be checked for cracks using Magnaflux procedure. Piston diameter must be measured in manufacturer's specified area.
Look closely at the piston crown, skirt, pin boss, ring lands, and oil drain-back holes. Scuffing on the skirt may indicate overheating, poor lubrication, piston-to-wall clearance problems, or dirt entering the cylinder. Cracks around the pin boss or ring land area require piston replacement. If one piston shows severe damage, the related cylinder wall, connecting rod, bearing, oil nozzle, and lubrication path should also be inspected.
Using telescopic gauge and micrometer, measure piston pin bore of piston in 2 areas, 90 degrees apart. This is done to check diameter and out-of-round.
Accurate measurement is necessary because visual inspection alone cannot confirm fit. The piston pin bore must be round, smooth, and within the allowed clearance. A worn or out-of-round pin bore can create piston noise, uneven loading, and accelerated wear during operation.
Install proper bearing cap on connecting rod. Ensure bearing cap is installed in proper location. Tighten bolts or nuts to specification. Using inside micrometer, measure inside diameter in 2 areas, 90 degrees apart.
Measuring the rod big-end bore with the cap torqued in place shows whether the bore is round and properly sized. The cap must be installed in its original direction and tightened exactly as specified before measurement. If the bore is distorted, the bearing shell may not seat correctly and oil clearance may become uneven around the journal.
Connecting rod I.D. and out-of-round must be within specification. Measure piston pin bore I.D. and piston pin O.D. All components must be within specification. Subtract piston pin diameter from piston pin bore in piston and connecting rod to determine proper fit.
Piston pin fit is important for quiet operation and long service life. Too little clearance can cause binding as the engine warms, while too much clearance can create knock, pin bore wear, or uneven loading. Measure each pin and bore as a matched set rather than assuming all parts are identical.
Connecting rod length must be measured from center of crankshaft journal inside diameter to center of piston pin bushing using proper caliper. Connecting rods must be the same length. Connecting rods should be checked on an alignment fixture for bent or twisted condition. Replace all components which are damaged or not within specification.
A bent or twisted connecting rod can cause the piston to run unevenly in the cylinder bore, leading to skirt wear, ring sealing problems, and cylinder wall damage. Rod length differences can also affect compression height and engine balance. During Buick Enclave piston and connecting rod inspection, any rod that fails dimensional checks, crack inspection, or alignment testing should be replaced rather than reused.
After inspection, keep pistons, pins, rods, caps, bearings, and related hardware organized by cylinder. This prevents mixed parts and makes it easier to compare wear patterns during final diagnosis. Clean, measured, and correctly grouped components are essential before deciding whether the engine can be reassembled with existing parts or requires machining and replacement components.
PISTON & CYLINDER BORE FIT
NOTE: Examples used in this article are general in nature and do not necessarily relate to a specific engine or system. Illustrations and procedures have been chosen to guide mechanic through engine overhaul process. Descriptions of processes of cleaning, inspection, assembly and machine shop practice are included.
Always refer to appropriate engine overhaul article, if available, in the ENGINES section for complete overhaul procedures and specifications for the vehicle being repaired. General measurement practices can explain the process, but the final piston clearance, bore finish, oversize limits, and honing requirements must always match the exact engine being serviced.
Ensure cylinder is checked for taper, out-of-round and properly honed prior to checking piston and cylinder bore fit. See CYLINDER BLOCK. Using dial bore gauge, measure cylinder bore. The cylinder must be clean, dry, and free of ridge, glaze, and loose abrasive residue before accurate measurements are taken. If the bore is tapered, out-of-round, scored, or poorly honed, piston-to-cylinder clearance readings will not reflect how the piston will actually operate under heat and load.
Measure piston skirt diameter at 90 degree angle to piston pin at specified area by manufacturer. Subtract piston diameter from cylinder bore diameter to determine piston-to-cylinder clearance. Clearance must be within specification. Mark piston for proper cylinder location. Piston skirt measurement is usually taken at a specific height because pistons are not perfectly round or straight from top to bottom. They are shaped to expand correctly when hot, so measuring in the wrong location can lead to a false clearance calculation.
Correct piston-to-bore fit is critical for quiet operation, compression sealing, oil control, and long engine life. Too little clearance can cause piston scuffing or seizure after warm-up. Too much clearance can cause piston slap, poor ring sealing, oil consumption, and accelerated skirt wear. During Buick Enclave engine overhaul work, each piston should be matched to its intended cylinder after the bore condition and final size are confirmed.
ASSEMBLING PISTON & CONNECTING ROD
NOTE: Examples used in this article are general in nature and do not necessarily relate to a specific engine or system. Illustrations and procedures have been chosen to guide mechanic through engine overhaul process. Descriptions of processes of cleaning, inspection, assembly and machine shop practice are included.
Always refer to appropriate engine overhaul article, if available, in the ENGINES section for complete overhaul procedures and specifications for the vehicle being repaired. Piston orientation, rod direction, pin fit, and retainer style can vary, so the parts must be assembled exactly as specified for the engine design.
Install piston on connecting rod for corresponding cylinder. Ensure reference marking on top of piston corresponds with connecting rod and cap number. See Fig. 14. The piston front mark, connecting rod number, cap orientation, bearing tang location, and any oiling features must all be aligned correctly. Incorrect orientation can affect valve clearance, piston skirt thrust direction, combustion chamber relationship, or bearing seating.
Lubricate piston pin and install in connecting rod. Ensure piston pin retainers are fully seated (if equipped). On pressed type piston pins, follow manufacturer's recommended procedure to avoid distortion or breakage. The pin should move or press into place only in the manner intended for that design. Forcing the pin with improvised tools can distort the piston pin bore, damage the rod small end, or create a tight spot that may fail after the engine warms up.
After the piston and rod are assembled, verify that the rod moves freely on the pin where applicable and that the retainers are locked securely in their grooves. If a pin retainer is not fully seated, it can come loose during operation and severely damage the cylinder wall. For a Buick Enclave engine repair, this check should be completed before rings are installed and before the assembly is placed near the cylinder bore.

Fig. 14: Installing Typical Piston Pin
CHECKING PISTON RING CLEARANCES
NOTE: Examples used in this article are general in nature and do not necessarily relate to a specific engine or system. Illustrations and procedures have been chosen to guide mechanic through engine overhaul process. Descriptions of processes of cleaning, inspection, assembly and machine shop practice are included.
Always refer to appropriate engine overhaul article, if available, in the ENGINES section for complete overhaul procedures and specifications for the vehicle being repaired. Ring end gap, side clearance, ring orientation, and ring design must be checked against the correct specification before installation.
Piston rings must be checked for side clearance and end gap. To check end gap, install piston ring in cylinder in which it is to be installed. Using an inverted piston, push ring to bottom of cylinder in smallest cylinder diameter. Using the piston to square the ring in the bore helps keep the ring level, which makes the end gap reading more accurate. The ring should be checked in the cylinder where it will actually be used because bore size can vary slightly from one cylinder to another.
Using feeler gauge, check ring end gap. See Fig. 15. Piston ring end gap must be within specification. Ring breakage will occur if insufficient ring end gap exists. When the engine reaches operating temperature, the ring expands. If the gap is too tight, the ring ends can butt together, forcing the ring outward against the cylinder wall and causing scoring, broken ring lands, or piston damage.
Some manufacturers permit correcting insufficient ring end gap by using a fine file while other manufacturers recommend using another ring set. Mark rings for proper cylinder installation after checking end gap. If filing is allowed, remove material slowly and keep the ring ends square. Deburr the ends lightly after fitting, and never widen a gap beyond the service limit in an attempt to make all rings match.
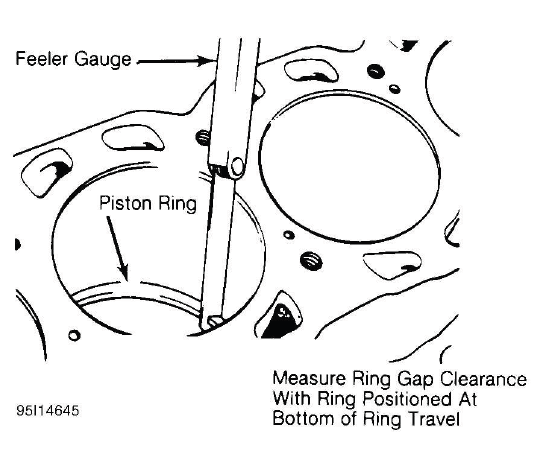
Fig. 15: Checking Piston Ring End Gap
For checking side clearance, install rings on piston. Using feeler gauge, measure clearance between piston ring and piston ring land. Check side clearance in several areas around piston. Side clearance must be within specification. Side clearance allows the ring to move freely in the groove while still maintaining proper control. Carbon, varnish, groove wear, or damaged ring lands can change this clearance and affect sealing.
If side clearance is excessive, piston ring grooves can be machined to accept oversize piston rings (if available).
Normal practice is to replace piston. Excessive side clearance usually means the piston ring groove is worn, hammered, or damaged. Reusing that piston may lead to ring flutter, oil consumption, loss of compression, or broken rings. On Buick Enclave engine overhaul work, piston replacement is often the cleaner and more reliable repair when groove wear is beyond specification.
PISTON & CONNECTING ROD INSTALLATION
NOTE: Examples used in this article are general in nature and do not necessarily relate to a specific engine or system. Illustrations and procedures have been chosen to guide mechanic through engine overhaul process. Descriptions of processes of cleaning, inspection, assembly and machine shop practice are included.
Always refer to appropriate engine overhaul article, if available, in the ENGINES section for complete overhaul procedures and specifications for the vehicle being repaired. Installation should not begin until the cylinder bores, pistons, rings, bearings, rods, caps, and crankshaft journals have all been cleaned, measured, and matched to specification.
Cylinders must be honed prior to piston installation. See CYLINDER HONING under CYLINDER BLOCK. The hone pattern helps the new rings seat against the cylinder wall and supports oil retention during break-in. After honing, the cylinders must be washed thoroughly until no abrasive residue remains. A clean cloth should not pick up gray or gritty material after the bore has been cleaned correctly.
Install upper connecting rod bearings. Lubricate upper bearings with engine oil. Install lower bearings in rod caps. Ensure bearing tabs are properly seated. Position piston ring gaps according to manufacturer's recommendations. See Fig. 16. Lubricate pistons, rings and cylinder walls. Bearing shells must sit fully in the rod and cap without dirt underneath them. Even a small piece of debris behind a bearing can reduce clearance and damage the crankshaft journal.
Before inserting the piston assembly, confirm that the ring gaps are positioned correctly and that the piston mark faces the correct direction. Use a clean piston ring compressor that fits squarely around the piston. Tap the piston into the bore gently with a suitable handle while guiding the connecting rod onto the crankshaft journal. Do not force the piston if resistance is felt; stop and check ring compressor alignment, ring position, and bore condition.
Protect the crankshaft journal during installation so the rod bolts do not scratch it. Once the rod is seated on the journal, install the correct rod cap in its original direction and tighten the fasteners according to the specified procedure. After each piston and rod assembly is installed, rotate the crankshaft carefully to confirm smooth movement before continuing with the next cylinder.
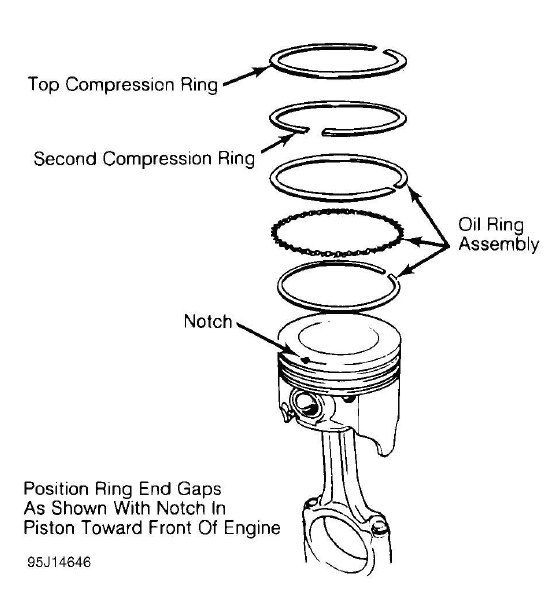
Fig. 16: Positioning Typical Piston Ring End Gap
Install ring compressor. Use care not to rotate piston rings. Compress rings with ring compressor. Install plastic tubing protectors over connecting rod bolts. Install piston and connecting rod assembly. Ensure piston notch, arrow or FRONT mark is toward front of engine. See Fig. 17. Before the piston enters the bore, confirm that the ring gaps are still positioned according to the recommended pattern and that the compressor is seated squarely against the block. If the compressor is tilted or loose, a ring can catch on the deck surface and break during installation.
Guide the connecting rod carefully toward the crankshaft journal while the piston is being tapped into the cylinder. The plastic tubing protectors are important because exposed rod bolts can scratch the cylinder wall or damage the crankshaft journal. On a Buick Enclave engine overhaul, this step should be done slowly, with the piston orientation checked one last time before the assembly is pushed fully into the bore.
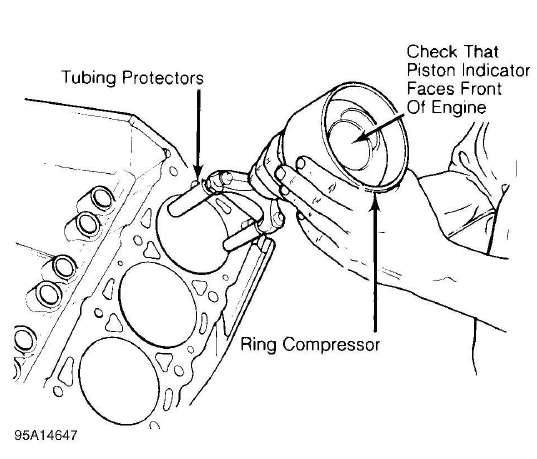
Fig. 17: Installing Piston & Connecting Rod Assembly
Carefully tap piston into cylinder until rod bearing is seated on crankshaft journal. Remove protectors. Install rod cap and bearing. Lightly tighten connecting rod bolts. Repeat procedure for remaining cylinders. Check bearing clearance. See MAIN & CONNECTING ROD BEARING CLEARANCE. Use a clean wooden hammer handle or similar non-metallic tool to tap the piston crown evenly. Do not force the piston if it stops suddenly; remove the assembly and check the ring compressor, ring position, bore condition, and rod alignment before continuing.
Once clearance is checked, lubricate journals and bearings. Install bearing caps. Ensure marks are aligned on connecting rod and cap. Tighten rod nuts or bolts to specification. Ensure rod moves freely on crankshaft. The cap must match its original connecting rod and face the correct direction. If the cap is reversed or installed on the wrong rod, the bearing bore may be distorted and bearing failure can occur even when the fasteners are tightened correctly.
Check connecting rod side clearance. See CONNECTING ROD SIDE CLEARANCE. After each rod is tightened, rotate the crankshaft carefully and feel for binding. A smooth rotation confirms that the piston, rings, rod bearing, and crankshaft journal are working together without obvious interference.
CONNECTING ROD SIDE CLEARANCE
NOTE: Examples used in this article are general in nature and do not necessarily relate to a specific engine or system. Illustrations and procedures have been chosen to guide mechanic through engine overhaul process. Descriptions of processes of cleaning, inspection, assembly and machine shop practice are included.
Always refer to appropriate engine overhaul article, if available, in the ENGINES section for complete overhaul procedures and specifications for the vehicle being repaired. Connecting rod side clearance limits can vary by engine design, crankshaft journal width, rod machining, and bearing arrangement.
Position connecting rod toward one side of crankshaft as far as possible. Using feeler gauge, measure clearance between side of connecting rod and crankshaft. See Fig. 18. Clearance must be within specification. The feeler gauge should slide into the space with light resistance, not be forced between the rod and crankshaft. Measure carefully and keep the rod square on the journal while checking clearance.
Check for improper bearing installation, wrong bearing cap or insufficient bearing clearance if side clearance is insufficient. Connecting rod may require machining to obtain proper clearance. Excessive clearance usually indicates excessive wear at crankshaft. Crankshaft must be repaired or replaced. Side clearance affects oil movement, rod stability, and the way the rod follows the crankshaft journal during operation. Too little clearance can cause heat and binding, while too much clearance may point to worn thrust surfaces or incorrect parts.
When side clearance is not within specification, do not correct the problem by simply loosening the fasteners or mixing caps. Recheck part numbers, rod orientation, bearing installation, cap alignment, and crankshaft condition. During Buick Enclave engine rebuilding, this measurement helps confirm that the rotating assembly is not only tightened, but also properly aligned and free to move as designed.
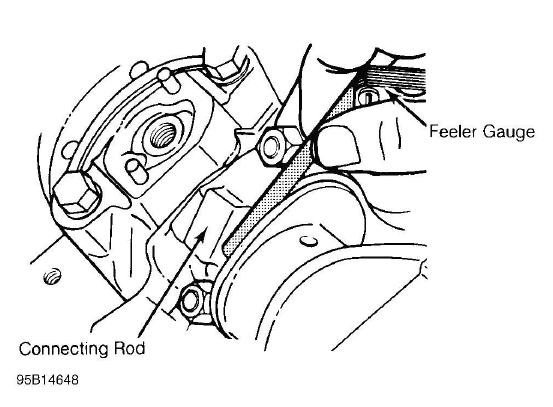
Fig. 18: Measuring Connecting Rod Side Clearance
MAIN & CONNECTING ROD BEARING CLEARANCE
NOTE: Examples used in this article are general in nature and do not necessarily relate to a specific engine or system. Illustrations and procedures have been chosen to guide mechanic through engine overhaul process. Descriptions of processes of cleaning, inspection, assembly and machine shop practice are included.
Always refer to appropriate engine overhaul article, if available, in the ENGINES section for complete overhaul procedures and specifications for the vehicle being repaired. Bearing clearance must be checked against the correct service data because oil viscosity, journal size, bearing material, and engine design all affect the acceptable range.
Plastigage Method
Plastigage method may be used to determine bearing clearance. Plastigage can be used with an engine in service or during reassembly. Plastigage material is oil soluble. This method provides a practical way to check oil clearance without specialized bore measuring equipment, but it must be performed carefully to avoid false readings.
Ensure journals and bearings are free of oil or solvent. Oil or solvent will dissolve material and false reading will be obtained. Install small piece of Plastigage along full length of bearing journal. Install bearing cap in original location. Tighten bolts to specification. The Plastigage should be placed straight across the journal and should not be smeared, stretched, or positioned near an oil hole where the reading may be distorted.
CAUTION: DO NOT rotate crankshaft while Plastigage is installed. Bearing clearance will not be obtained if crankshaft is rotated.
Remove bearing cap. Compare Plastigage width with scale on Plastigage container to determine bearing clearance. See Fig. 19. Rotate crankshaft 90 degrees. Repeat procedure. This is done to check journal eccentricity. This procedure can be used to check oil clearance on both connecting rod and main bearings.
If the flattened Plastigage is wider than expected, the clearance is tighter. If it is narrower, the clearance is larger. Read the material at its widest, most even area and compare it directly to the printed scale. If the clearance is outside specification, inspect the bearing size, journal diameter, cap location, dirt under the bearing shell, and crankshaft condition before deciding on repair.
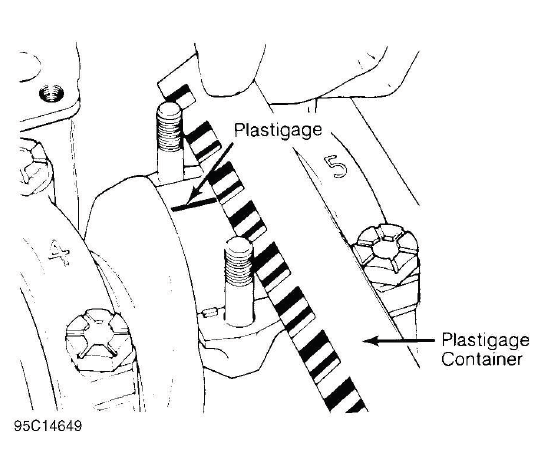
Fig. 19: Measuring Bearing Clearance
Micrometer & Telescopic Gauge Method
A micrometer is used to determine journal diameter, taper and out-of-round dimensions of the crankshaft. See CLEANING & INSPECTION under CRANKSHAFT & MAIN BEARINGS in this article. This method gives more detailed information than Plastigage because it separates journal condition from bearing bore size and helps identify taper, out-of-round, or machining problems.
With crankshaft removed, install bearings and caps in original location on cylinder block. Tighten bolts to specification. On connecting rods, install bearings and caps on connecting rods. Install proper connecting rod cap on corresponding rod. Ensure bearing cap is installed in original location. Tighten bolts to specification. The bearing caps must be seated correctly and torqued exactly as they would be during final assembly, because bearing clearance changes if a cap is loose, reversed, dirty, or installed in the wrong position.
Using a telescopic gauge and micrometer or inside micrometer, measure inside diameter of connecting rod and main bearings bores. Subtract each crankshaft journal diameter from the corresponding inside bearing bore diameter. This is the bearing clearance.
Take measurements at more than one point whenever possible, especially if wear, journal damage, or previous machining is suspected. A clean micrometer reading, correct bearing shell placement, and careful bore measurement are essential for reliable results. On a Buick Enclave engine, improper bearing clearance can lead to low oil pressure, bearing noise, crankshaft scoring, overheating at the bearing surface, or complete bearing failure after start-up.
After all clearances are confirmed, keep each bearing shell and cap matched to its location until final assembly. Cleanliness remains critical at this stage. A small amount of grit behind a bearing shell or on a journal can change clearance enough to damage the engine, even when all measured parts were originally within specification.
