Buick Enclave: Repair Instructions
REAR DIFFERENTIAL CLUTCH CONTROL MODULE REPLACEMENT
Removal Procedure
1. Raise and support the vehicle. Refer to Lifting and Jacking the Vehicle. Make sure the Buick Enclave is stable before working around the rear driveline, torque tube, and rear differential components.
2. Remove the propeller shaft assembly. Refer to Propeller Shaft Replacement. Keep the shaft supported during removal and protect the flange surfaces from impact or contamination.
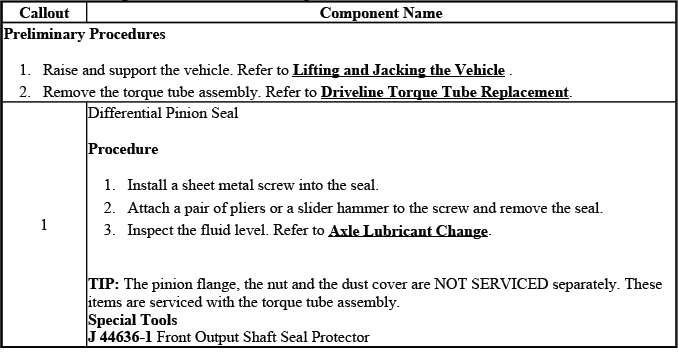
3. Remove the torque tube mounting bolt. This bolt secures the torque tube position, so loosen it carefully and keep the hardware identified for installation.
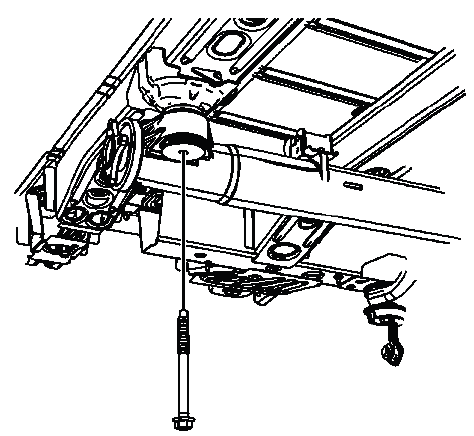
Fig. 2: Identifying Torque Tube Mounting Bolt
4. Lower the torque tube to gain access to the clutch control module. Lower it only as far as needed for service, and do not force the tube against nearby driveline or underbody components.
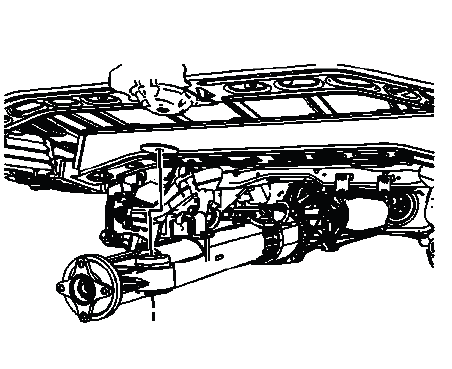
Fig. 3: View Of Torque Tube
NOTE: DO NOT allow the torque tube to hang. Support it with a suitable stand so its weight is not carried by connected components, wiring, seals, or mounts.
5. Disconnect the electrical connectors from the clutch control module. Release the connector locks carefully and pull on the connector body, not the wiring, to avoid terminal or harness damage.
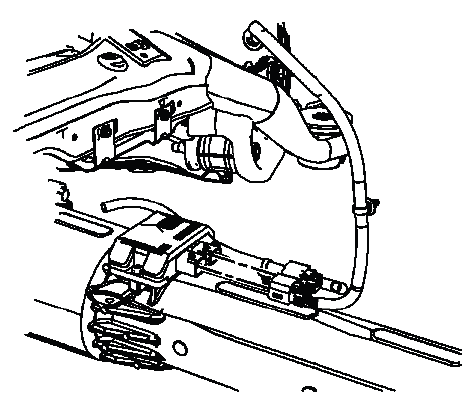
Fig. 4: Identifying Clutch Control Module Electrical Connectors
6. Remove the screws for the clutch control module. Keep the module supported as the last screw is removed so it does not shift or drop from the torque tube.
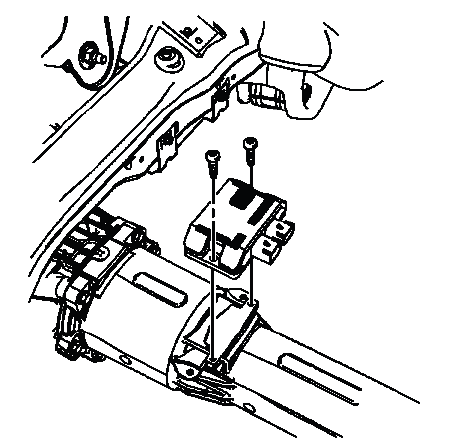
Fig. 5: View Of Clutch Control Module Screws
7. Remove the clutch control module from the torque tube. Inspect the mounting area for dirt, corrosion, damaged sealing surfaces, or signs of moisture intrusion before the replacement module is installed.
Installation Procedure
1. Position the clutch control module on the torque tube. The module should sit flat against the mounting surface, with the connector orientation matching the original installation.

Fig. 6: View Of Clutch Control Module Screws
2. Install the mounting screws for the clutch control module. Start the screws by hand first so the module seats evenly and the threads are not crossed.
CAUTION: Refer to Fastener Caution. The clutch control module screws must be tightened to specification. Over-tightening can damage the module or mounting surface, while under-tightening can allow movement, moisture entry, or poor electrical reliability.
Tighten
- Tighten the screws to 8 N.m (71 lb in).
3. Reconnect the electrical connectors for the clutch control module. Make sure each connector is fully seated and locked, with the wiring routed naturally and not pulled tight across the torque tube.
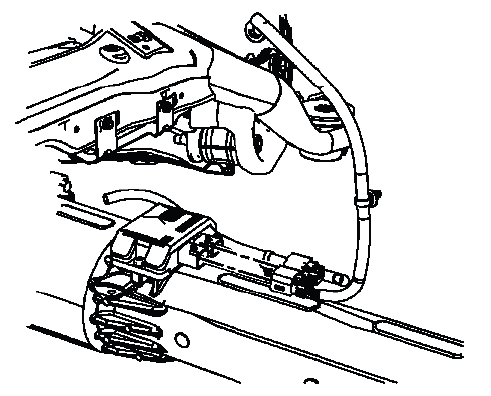
Fig. 7: Identifying Clutch Control Module Electrical Connectors
4. Record the Clutch Control Module RDS number (1). It is located on the Clutch Control Module harness connector. This number will be needed for the calibration procedure. Read the number exactly as shown, because an incorrect RDS entry can prevent proper setup and may cause AWD-related diagnostic trouble codes after installation.
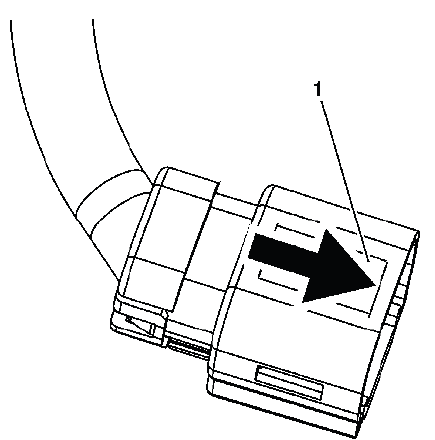
Fig. 8: Identifying Clutch Control Module RDS Number
5. Lift the torque tube back into position. Raise it evenly and align it with its mounting point before installing the bolt.
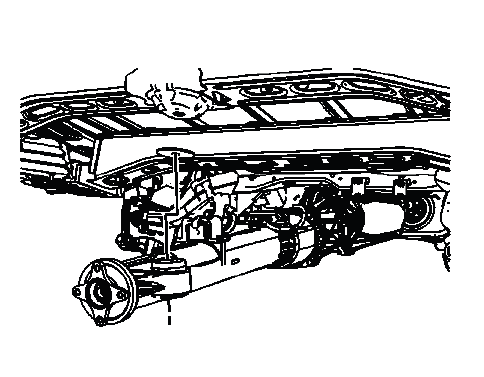
Fig. 9: View Of Torque Tube
6. Install the torque tube mounting bolt. Confirm that the torque tube is seated correctly and not being pulled into position by the bolt alone.
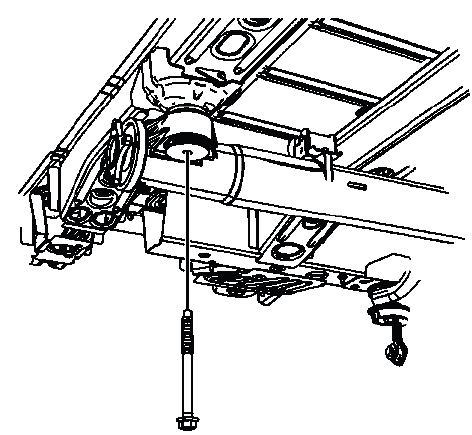
Fig. 10: Identifying Torque Tube Mounting Bolt
Tighten
- Tighten the bolt to 185 N.m (137 lb ft).
7. Install the propeller shaft. Refer to Propeller Shaft Replacement. Align any reference marks made during removal and tighten the related fasteners to specification.
8. Remove the support and lower the vehicle. Check that no tools, stands, or temporary supports remain near the torque tube, propeller shaft, or rear differential area.
9. Reprogram the clutch control module. Refer to Control Module References. Programming and calibration are required so the replacement module can communicate correctly and operate the rear drive system as intended.
REAR AXLE LUBRICANT LEVEL INSPECTION
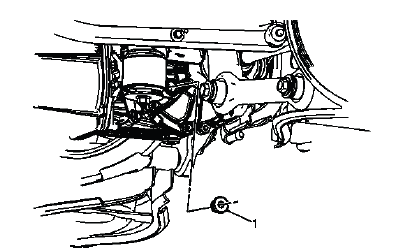
Fig. 11: Locating Rear Differential Fill Plug
Rear Axle Lubricant Level Inspection
Rear axle lubricant level should be checked any time there is a leak concern, rear differential service, abnormal rear axle noise, or suspected fluid loss. Correct fluid level is important because the rear differential, bearings, gears, and clutch-related components depend on the lubricant for cooling, wear protection, and smooth operation.
During inspection, the vehicle should be level and safely supported. Remove the fill plug only after the surrounding area is cleaned, so dirt and road debris do not enter the housing. The lubricant should be even with the bottom of the fill plug opening unless the service specification states otherwise.
AXLE LUBRICANT CHANGE
Removal Procedure
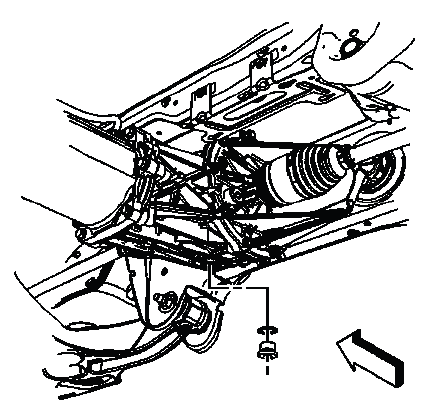
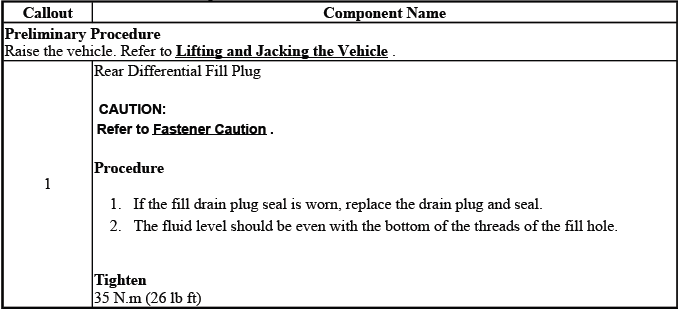
Fig. 12: Identifying Rear Differential Housing Drain Plug
1. Raise and support the vehicle. Refer to Lifting and Jacking the Vehicle. The vehicle should sit securely and level so the axle lubricant can drain correctly and the final fill level can be checked accurately.
2. Remove the drain plug and gasket from the rear differential housing. Allow the lubricant to drain fully, and inspect the drained fluid for metal particles, discoloration, burnt odor, or signs of water contamination.
NOTE: If the drain plug seal is worn, replace the drain plug and seal. Reusing a damaged seal can lead to seepage or a slow lubricant leak after service.
Installation Procedure
1. Install the drain plug and gasket, then tighten to 35 N.m (26 lb ft). Make sure the gasket is seated correctly before tightening the plug.
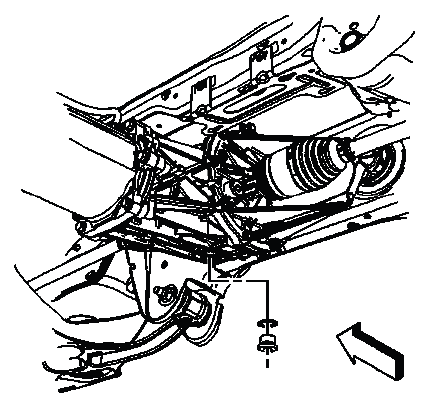
Fig. 13: Identifying Rear Differential Housing Drain Plug
CAUTION: Refer to Fastener Caution. Drain and fill plugs must be tightened to the specified torque. Over-tightening can damage the housing threads, while under-tightening can allow fluid leakage.
2. Remove the fill plug and gasket from the rear differential housing. Clean the area around the fill opening before adding lubricant.
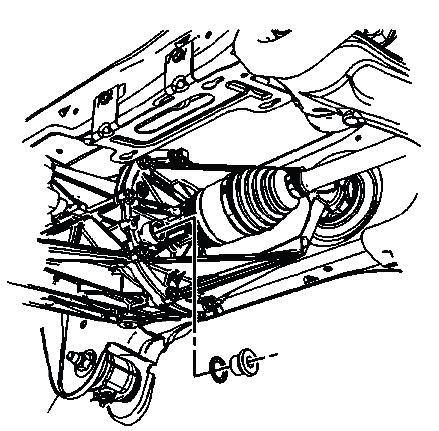
Fig. 14: Locating Rear Differential Fill Plug
3. Fill the rear differential with the proper synthetic gear lubricant. Refer to Adhesives, Fluids, Lubricants and Sealers. Use only the specified lubricant because the rear axle assembly depends on correct viscosity and additive compatibility.
4. Inspect the gear oil level to ensure it is even with the bottom of the fill plug. A low level can cause noise and wear, while overfilling may create aeration or leakage through the vent or seals.
5. Install the fill plug and gasket in the rear differential housing and tighten to 35 N.m (26 lb ft). Wipe the housing clean after installation so any future leak can be identified accurately.
6. Remove the support and lower the vehicle. After the vehicle is back on the ground, check for leaks and confirm that no abnormal rear axle noise is present during operation.
DIFFERENTIAL CLUTCH DRUM ASSEMBLY REPLACEMENT
Removal Procedure
1. Remove the torque tube assembly from the vehicle. Refer to Driveline Torque Tube Replacement. Place the torque tube on a clean, stable work surface so the clutch drum assembly can be handled without contamination or impact damage.
2. Remove the electrical harness retainer (1) from the torque tube (2). Release the retainer without pulling on the harness, because the wiring must remain intact for proper clutch control operation.
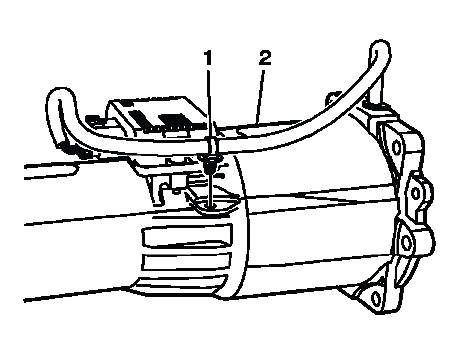
Fig. 15: Identifying Electrical Harness Retainer & Torque Tube
3. Disconnect the electrical connector (1) for the clutch control module (2). Inspect the connector for bent terminals, moisture, corrosion, or damaged locking tabs before continuing.

Fig. 16: View Of Clutch Control Module & Electrical Connector
4. Position 2 pieces of wood along side of the torque tube. The wood supports help stabilize the torque tube and protect it from damage while the clutch drum assembly is released.
5. Position a piece of wood under the clutch assembly in the torque tube. This gives the clutch assembly a controlled landing surface as it comes free.
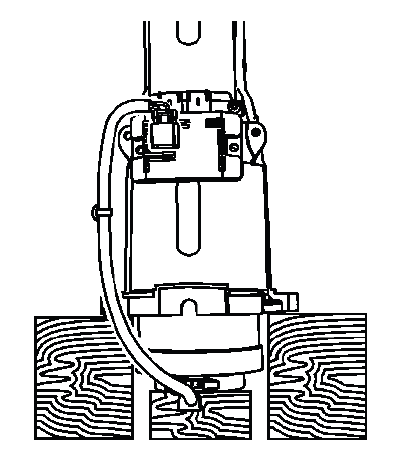
Fig. 17: Identifying Piece Of Wood Under Clutch Assembly
IMPORTANT: It is important to place a piece of wood under the clutch assembly so as not to damage the clutch assembly when it exits the torque tube. Direct impact on the clutch drum can damage the assembly and may create rear drive axle faults after installation.
6. Pick up the torque tube and, with a quick downward motion, snap the torque tube to release the clutch drum assembly from the input shaft. Use controlled movement rather than repeated hard impacts. The goal is to release the assembly cleanly without bending the shaft, damaging the tube, or stressing the harness.
7. Remove the clutch drum (1) assembly from the torque tube. Handle the clutch drum carefully and keep the sealing area clean.
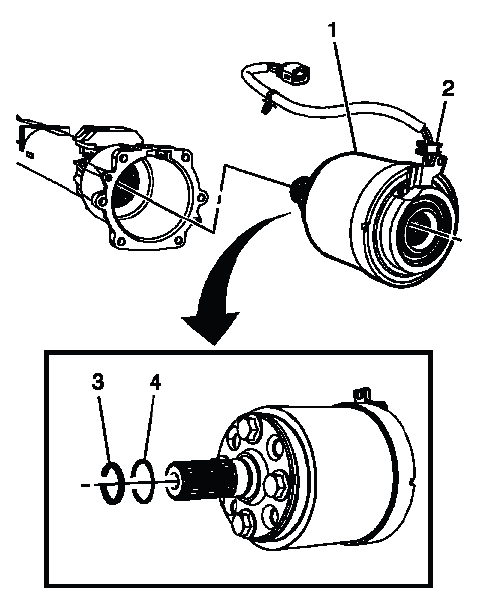
Fig. 18: Locating Clutch Drum, Retaining Clip & Weather Seal
8. Remove and discard the retaining clip (3) and the O-ring (4). DO NOT re-use, replace with NEW only. These parts are designed to seal and retain the assembly correctly, and reusing them can cause leakage, looseness, or poor engagement.
9. Remove the wiring harness and weather seal (2) from the torque tube. Work slowly around the seal so the harness is not pulled, pinched, or cut.
IMPORTANT: When removing or installing the wiring harness and weather seal (2), ensure that the wiring harness does NOT become damaged. The wiring harness is NOT SERVICED separately. If the harness is damaged, additional component replacement may be required.
Installation Procedure
1. Install the NEW O-ring (4) and the retaining clip (3) on the clutch assembly. Lightly check that the O-ring is not twisted and that the retaining clip is seated correctly before the assembly is installed into the torque tube. On the Buick Enclave, this sealing and retention area is critical for reliable rear drive axle operation.
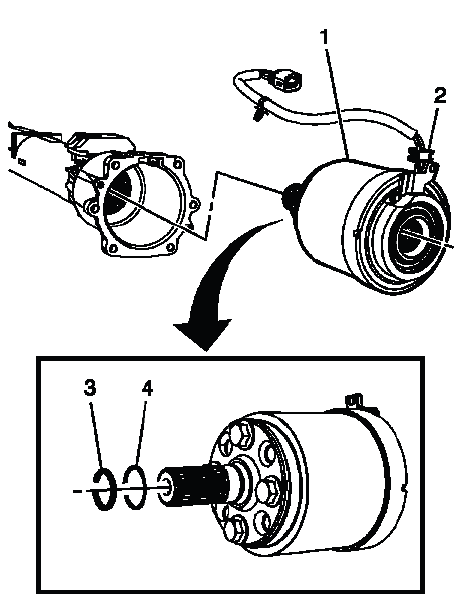
Fig. 19: Locating Clutch Drum, Retaining Clip & Weather Seal
2. Install the clutch assembly (1) in the torque tube. Guide the assembly straight into position so the new O-ring is not rolled, pinched, or cut during installation. The clutch assembly should seat cleanly without being forced at an angle.
3. Position the wiring harness and weather seal (2) in the torque tube. Work the seal into place evenly and make sure the harness follows its original path, with no twists, sharp bends, or tension near the connector area.
4. Install the electrical harness retaining clip (1) in the torque tube (2). The clip should hold the harness securely without crushing the insulation or pulling the wiring out of its natural routing.
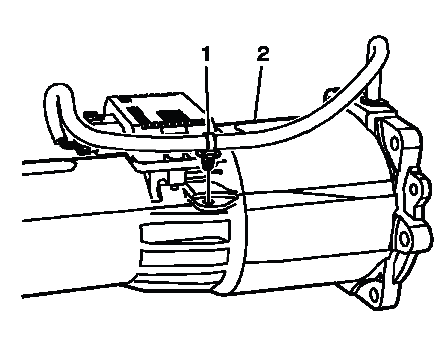
Fig. 20: Identifying Electrical Harness Retainer & Torque Tube
5. Install the electrical connector (1) to the clutch control module (2). Push the connector in until the lock seats fully, then check that the wiring is not stretched across the torque tube or positioned where it could rub during vehicle operation.
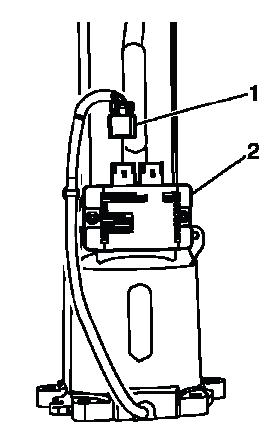
Fig. 21: View Of Clutch Control Module & Electrical Connector
6. Install the torque tube assembly. Refer to Driveline Torque Tube Replacement. Keep the sealing surfaces clean and align the torque tube carefully with the rear differential before tightening any related hardware.
7. Program the rear differential clutch control module. Refer to Control Module References. Programming is required so the module can communicate correctly, store the proper calibration data, and control rear drive axle clutch operation as intended on the Buick Enclave.
DIFFERENTIAL CARRIER BUSHING REPLACEMENT - FRONT
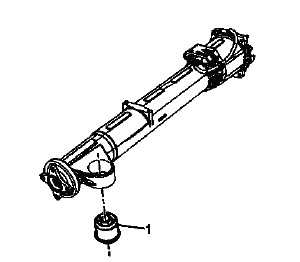
Fig. 22: View Of Front Differential Carrier Bushing
Differential Carrier Bushing Replacement - Front
The front differential carrier bushing supports the carrier and helps control movement of the rear drive axle assembly under torque load. A worn, cracked, oil-soaked, or separated bushing can allow excessive carrier movement, which may show up as clunking, vibration, driveline harshness, or noise during acceleration and deceleration.
Before replacing the bushing, inspect the surrounding mounts, carrier housing, fasteners, and nearby brackets. A bushing failure can sometimes be caused or worsened by loose hardware, fluid contamination, impact damage, or misalignment in the rear differential mounting area.

DIFFERENTIAL CARRIER BUSHING REPLACEMENT - REAR
Tools Required
- J-45725 Cradle Bushing Replacer
Removal Procedure
1. Raise and support the vehicle. Refer to Lifting and Jacking the Vehicle. The vehicle must be stable before the rear differential assembly and frame bushing area are serviced.
2. Remove the rear differential assembly. Refer to Differential Replacement. Support the differential properly during removal so the carrier, brackets, and nearby suspension components are not stressed.
3. Mark a reference point on the frame and old bushing at the 12 and 6 o'clock position to use to align the new bushing. These marks are important because the replacement bushing must be installed in the correct orientation, not simply pressed in at any angle.
Fig. 23: Identifying Reference Point On Frame
4. Position the J-45725-1A (1) on the bushing (2). Make sure the tool sits squarely on the bushing so the press force is applied evenly during removal.
Fig. 24: View Of J-45725-2A & Bushing
5. Position the J-45725-2A (1) on the frame. The receiving tool must be aligned with the bushing opening so the bushing can move out without damaging the frame.
6. Install the threaded rod, bearing and washers. Assemble the tool parts in the correct order so the force is carried through the bearings and washers rather than through the frame surface.
IMPORTANT: Apply a small amount of grease on the threaded rod to lubricate the nuts when turning the nuts. This reduces friction, protects the tool threads, and gives smoother control while the bushing is being removed.
7. Adjust the nuts so that they are touching the J-45725-1A (2) and the J-45725-2A (1). Once the tools are seated, verify that the rod is centered and that the bushing will be pulled straight out.

Fig. 25: Identifying Special Tools - J-45725-1A & J-45725-2A
8. Install the proper size wrenches on the nuts. Use wrenches that fit securely so the nuts can be turned without slipping or damaging the tool.
9. While holding the front wrench (1), rotate the rear wrench (2) to remove the bushing. Apply steady force and watch the bushing as it moves; if it starts to cock or bind, stop and correct the tool alignment before continuing.
Fig. 26: View Of Attaching Nuts
IMPORTANT: In the following service procedure, use only HAND TOOLS when using the J-45725 Cradle Bushing Replacer. Power tools can apply force too quickly, damage the tool, distort the bushing bore, or make the bushing enter and exit unevenly.
10. Remove the special tools. Release the tool tension gradually and keep the components organized for the installation procedure.
11. Remove the bushing from the frame. After removal, inspect the bushing bore for rust, burrs, distortion, or rubber residue that could interfere with the new bushing.
Fig. 27: View Of Frame Bushing
Installation Procedure
1. Before the installation of the new bushing, use a straight edge to draw a line on the new bushing at the 12 and 6 o'clock positions. Ensure that the grooves (1) are at the 12 and 6 o'clock positions. The orientation marks make it easier to install the bushing within the required alignment range.
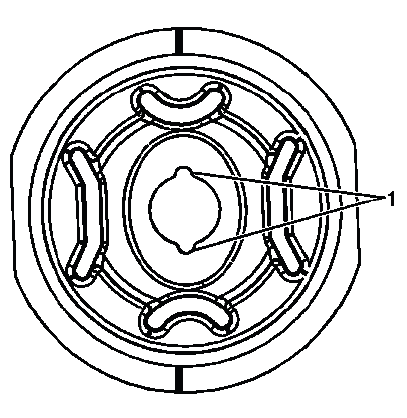
Fig. 28: Identifying Proper Bushing Alignment
IMPORTANT: Failure to perform the following service procedure prior to the installation of the new bushing could cause premature failure of the bushing. Correct alignment allows the bushing to absorb load in the direction it was designed for.
2. Position the new bushing so that the reference marks on the frame and the bushing are in alignment. This will ensure that the new bushing is within the 5º specification required for proper bushing alignment. On the Buick Enclave, this alignment helps control differential movement and reduces the chance of driveline noise or mount stress.
3. Using a block of wood and a hammer, slightly tap the bushing into the frame. This is only to start the bushing and hold it steady, not to drive it fully into place.
IMPORTANT: The following procedure is used only to temporarily hold the new bushing in place so the special tools can be installed for proper installation. This is NOT to be used to fully install the bushing.
4. Assemble the threaded rod, bearings and washers as indicated in step 7 in the removal procedure. Make sure the bearings and washers are clean and correctly stacked before force is applied.
5. Position the J-45725-2 (2) on the inside of the frame. The tool must sit flat and centered to guide the new bushing into the bore evenly.
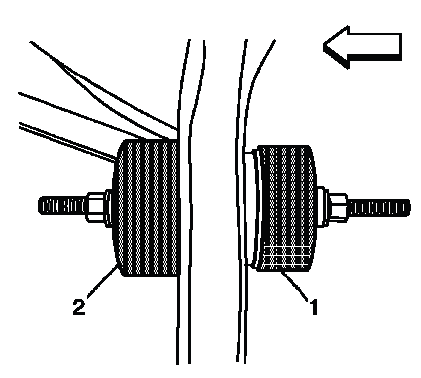
Fig. 29: Identifying Special Tools - J-45725-2 & J-45725-2A
6. Position J-45725-2A (1) on the outside of the frame. Confirm the tool is aligned with the bushing and frame bore before tightening the nuts.
7. Adjust the nuts so that they are touching the J-45725-2 (1) and the J-45725-2A (2). The tool should now be seated and ready to press the bushing into position in a controlled manner.
8. While holding the front wrench (2), rotate the rear wrench (1) to install the bushing. Turn the wrench steadily and monitor the bushing alignment as it enters the frame. If the bushing begins to tilt, stop and realign the tool before continuing.
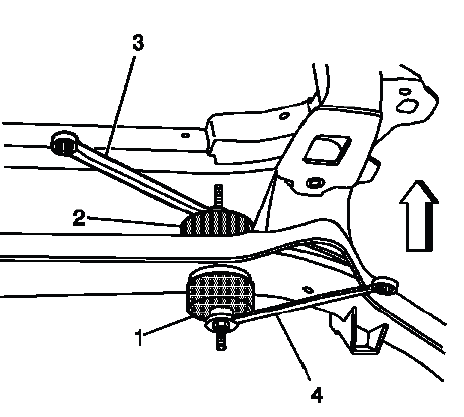
Fig. 30: Tightening Busing Nuts
9. Remove the special tools. Inspect the bushing position and confirm that the reference marks are still aligned and the bushing is fully seated.
10. Install the rear differential assembly. Refer to Differential Replacement. Tighten related fasteners according to specification and verify that the carrier sits naturally in its mounts.
11. Lower the vehicle. After the repair, listen for abnormal clunks or vibration during initial operation, especially during takeoff, coast-down, and load changes.
DRIVELINE TORQUE TUBE REPLACEMENT
Removal Procedure
1. Raise and support the vehicle. Refer to Lifting and Jacking the Vehicle. Make sure there is enough clearance to support and remove the torque tube without allowing it to hang from the rear differential or wiring.
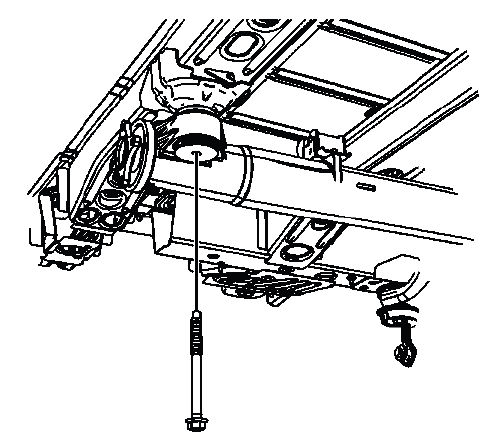
Fig. 31: Identifying Torque Tube Mounting Bolt
2. Remove the propeller shaft assembly. Refer to Propeller Shaft Replacement. Marking and supporting the shaft during removal helps prevent driveline imbalance and flange damage during reassembly.
3. Remove the torque tube mounting bolt. Keep the bolt identified and check the threads for damage or corrosion before reuse.
4. Disconnect the electrical connector from the clutch control module. Release the lock first and pull on the connector body, not the harness.
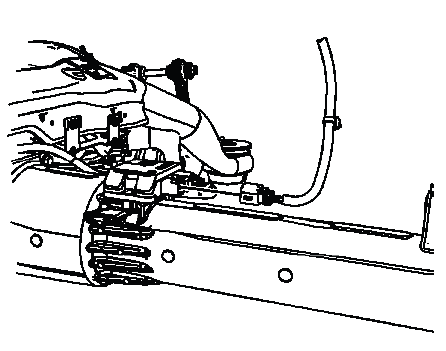
Fig. 32: View Of Clutch Control Module Electrical Connector
5. Remove the clutch control module, if needed. Refer to Rear Differential Clutch Control Module Replacement. Removing the module may provide additional access or protect it during torque tube handling.
NOTE: If removing the torque tube assembly to service the rear differential, the clutch control module does not have to be removed. Avoid unnecessary module removal when it is not required for the repair.
6. Remove the torque tube mounting bolts (1) from the rear differential. Support the torque tube before the final bolts are removed so it does not shift suddenly.
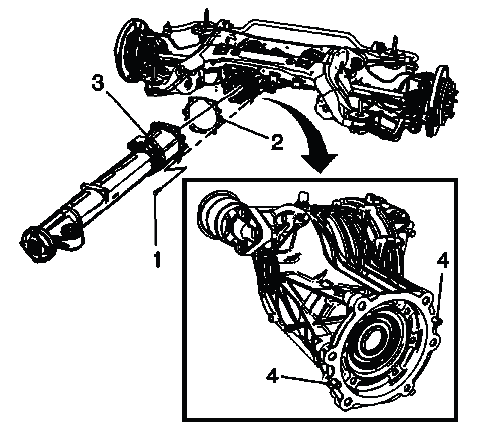
Fig. 33: Locating Torque Tube Mounting Bolts, Torque Tube Gasket, Torque Tube Assembly & Alignment Pins
7. Remove the torque tube gasket (2) from the rear differential and the alignment pins (4). Clean the gasket surfaces carefully without gouging the aluminum or leaving old gasket material behind.
NOTE: DO NOT re-use the old gasket, discard and use NEW only. A reused gasket may not seal correctly and can allow fluid seepage or contamination at the joint.
8. Remove the torque tube assembly (3) from the rear differential assembly. Pull it away evenly from the alignment pins so the sealing surface and mounting face are not damaged.
9. Remove the torque tube assembly (3) from the vehicle. On the Buick Enclave, the torque tube is part of the rear drive axle support and clutch assembly area, so handle it carefully and keep the wiring, seal surfaces, and mating flanges protected.
NOTE: If any fluid is found in the torque tube, check the condition of the pinion oil seal. Fluid inside the torque tube may indicate a sealing concern that should be corrected before reassembly.
Installation Procedure
1. Install the NEW torque tube gasket (2) to the rear differential assembly. Make sure the gasket is seated flat and correctly aligned with the bolt holes and alignment pins before the torque tube is positioned.
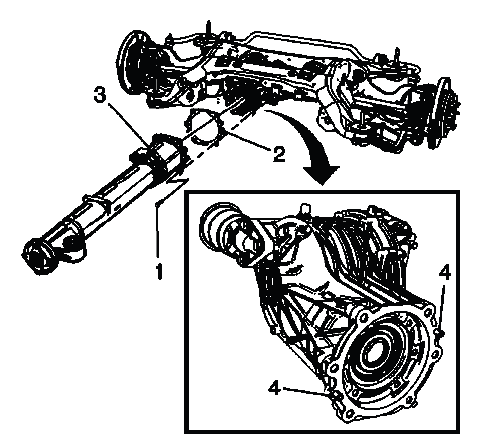
Fig. 34: Locating Torque Tube Mounting Bolts, Torque Tube Gasket, Torque Tube Assembly & Alignment Pins
2. Position torque tube (3) on the alignment pins (4) on the rear differential. Guide the tube straight onto the pins so the new gasket stays flat and the mounting face does not become cocked or pinched during installation.
3. Using a suitable jack stand, support the torque tube assembly. The support should hold the weight of the tube without pushing it out of alignment with the rear differential.
4. Hand tighten the torque tube to differential bolts (1) before torquing to specifications. Starting the bolts by hand helps protect the threads and allows the torque tube to settle evenly against the rear differential housing.
5. Torque the mounting bolts (1) to specifications. Tighten the bolts evenly so the gasket compresses correctly and the torque tube remains square to the rear differential.
CAUTION: Refer to Fastener Caution. Rear drive axle fasteners must be tightened to the specified value. Under-tightening can allow movement or leakage, while over-tightening can damage threads, distort mounting surfaces, or affect component alignment.
Tighten
- Tighten the bolts to 55 N.m (40 lb ft).
6. Install the clutch control module, if needed. Refer to Rear Differential Clutch Control Module Replacement. Make sure the module mounting surface is clean and the module is positioned correctly before the connector is attached.
7. Install the electrical connector for the clutch control module. Push the connector in until the lock seats fully, and verify that the harness is not stretched, twisted, or routed near sharp edges.
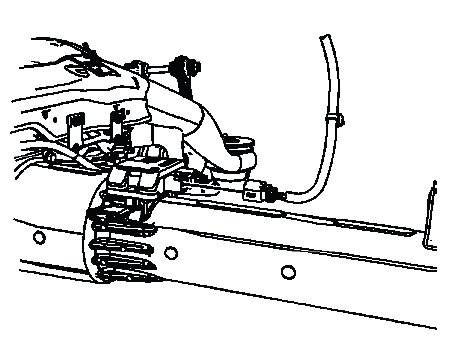
Fig. 35: View Of Clutch Control Module Electrical Connector
8. Using the jack stand or the aid of an assistant, reposition the torque tube to allow installation of the mounting bolt. Move the tube gradually and keep it supported, since forcing it into place can load the mounts or stress the rear differential connection.
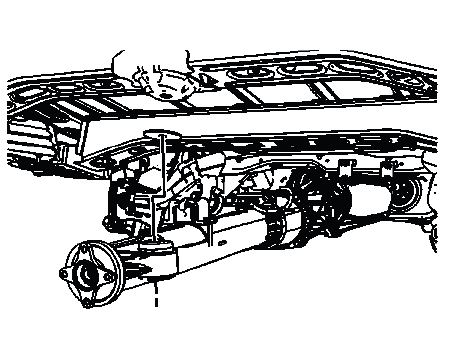
Fig. 36: View Of Torque Tube
9. Install the torque tube mounting bolt. Confirm that the bolt starts cleanly by hand before final tightening.
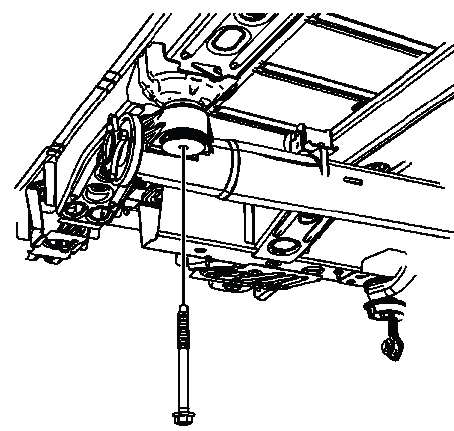
Fig. 37: Identifying Torque Tube Mounting Bolt
Tighten
- Tighten the bolt to 185 N.m (137 lb ft).
10. Install the propeller shaft assembly. Refer to Propeller Shaft Replacement. Align any reference marks made during removal so the driveline balance relationship is maintained.
11. Remove the support and lower the vehicle. Before lowering, make a final check around the torque tube, propeller shaft, electrical connector, and rear differential area to confirm that no tools or temporary supports remain in place.
DIFFERENTIAL CARRIER COVER AND SEAL REPLACEMENT - LEFT SIDE
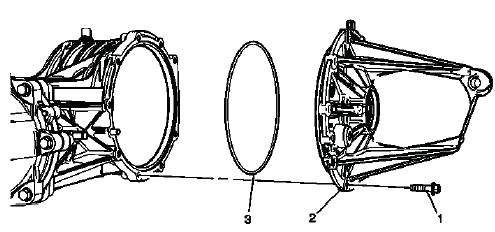
Fig. 38: View Of Left Side Differential Carrier Cover & Seal
Differential Carrier Cover and Seal Replacement - Left Side
The left side differential carrier cover and seal should be inspected whenever there is fluid seepage, axle service, rear differential removal, or visible contamination around the seal area. A leak at this point can lower the lubricant level and may eventually lead to gear noise, bearing wear, or clutch-related rear drive axle concerns.
During service, clean the surrounding area before removing any parts. Dirt around the cover or seal can enter the differential if the area is not cleaned first. On the Buick Enclave, the seal surface, cover seating area, and axle opening should be checked for scratches, corrosion, or wear that could cause a repeat leak after replacement.
DRIVE PINION FLANGE/YOKE AND/OR OIL SEAL REPLACEMENT
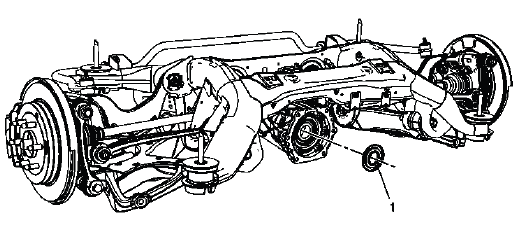
Fig. 39: View Of Differential Pinion Seal
Drive Pinion Flange/Yoke and/or Oil Seal Replacement
The drive pinion flange, yoke, and oil seal are critical sealing and driveline connection points at the rear differential. A worn seal, grooved flange surface, loose yoke, or damaged mating area can cause fluid leakage and may also contribute to driveline vibration or noise.
Before replacing the seal, inspect the pinion flange or yoke surface where the seal rides. If the surface is scored, rusted, pitted, or worn into a groove, a new seal alone may not correct the leak. The flange area should also be checked for looseness, impact damage, and proper alignment with the propeller shaft connection.
DIFFERENTIAL REPLACEMENT
Removal Procedure
1. Raise and support the vehicle. Refer to Lifting and Jacking the Vehicle. Make sure the vehicle is stable and that there is enough working space to support and remove the rear differential assembly safely.
2. Remove the tires and wheels. Refer to Tire and Wheel Removal and Installation. Removing the wheels improves access to the rear wheel drive shafts and related axle components.
3. Drain the rear differential assembly. Refer to Axle Lubricant Change. Draining the lubricant reduces mess during removal and gives an opportunity to inspect the fluid for metal particles, water contamination, or burnt odor.
4. Remove the rear wheel drive shafts. Refer to Rear Wheel Drive Shaft and Rear Axle Shaft Seal Replacement. Protect the shaft splines, seals, and mating surfaces during removal.
5. Remove the propeller shaft assembly. Refer to Propeller Shaft Replacement. Support the shaft and preserve alignment marks so the driveline can be reassembled without introducing vibration.
6. Remove the front torque tube mounting bracket bolt. Keep the bolt identified and inspect it for damaged threads or corrosion before reuse.
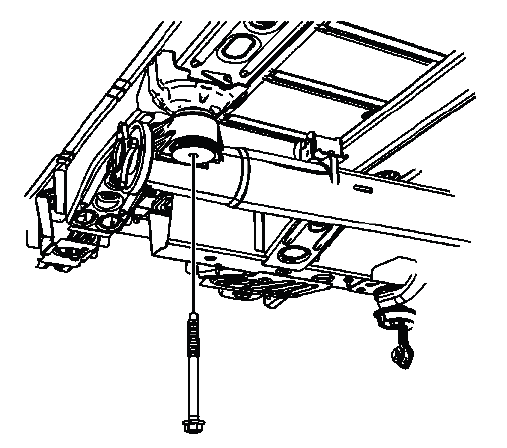
Fig. 40: Identifying Torque Tube Mounting Bolt
7. Lower the front of the torque tube to gain access to the electronic clutch control module. Lower it only enough to access the connector and related components; the tube should remain supported and controlled.
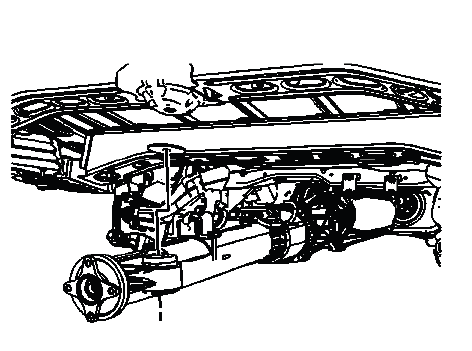
Fig. 41: View Of Torque Tube
8. Disconnect the electrical connector from the electronic clutch control module. Release the lock carefully and pull on the connector body rather than the wiring.
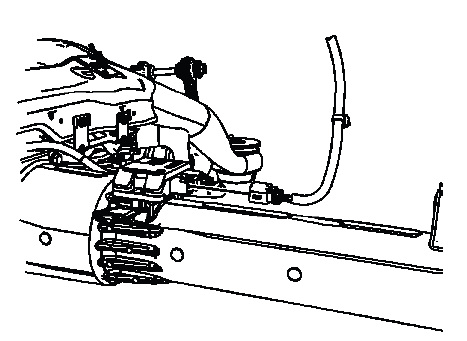
Fig. 42: View Of Clutch Control Module Electrical Connector
9. Support the torque tube with a jack stand. The tube should not hang from the rear differential, wiring, or any remaining mounting point.
10. Support the rear differential assembly with a transmission jack. Balance the assembly on the jack before removing the mounting bolts, because the differential is heavy and awkward to control by hand.
11. Remove the rear differential drive mounting bolts. Loosen the bolts in a controlled manner while confirming the differential remains supported.
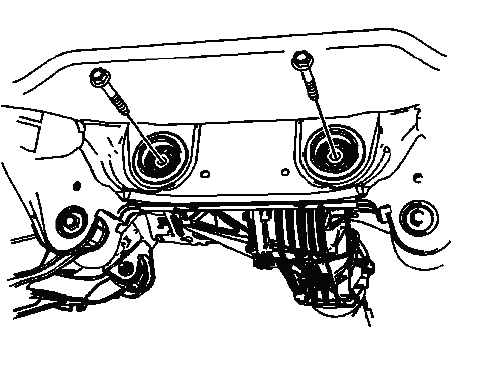
Fig. 43: Identifying Rear Differential Drive Mounting Bolts
12. With the aid of an assistant, remove the rear differential assembly from the vehicle. Lower the assembly slowly and watch for harnesses, brackets, mounts, or axle openings that may catch during removal.
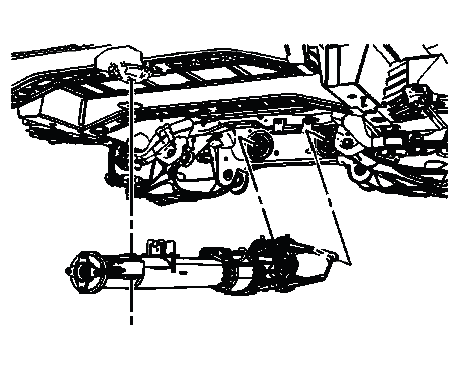
Fig. 44: View Of Rear Differential Assembly
13. Remove the torque tube assembly mounting bolts from the rear differential assembly. Refer to Driveline Torque Tube Replacement. Keep the mating surfaces protected after separation so the new gasket can seal properly during installation.
Installation Procedure
1. Install the torque tube assembly to the rear differential assembly. Refer to Driveline Torque Tube Replacement. Use a new gasket where required and align the torque tube carefully on the guide pins before tightening the bolts.
2. Position the rear differential in the vehicle. Use a transmission jack and an assistant to raise the assembly evenly into place. On the Buick Enclave, correct positioning prevents stress on the mounts, torque tube, axle openings, and clutch control wiring.
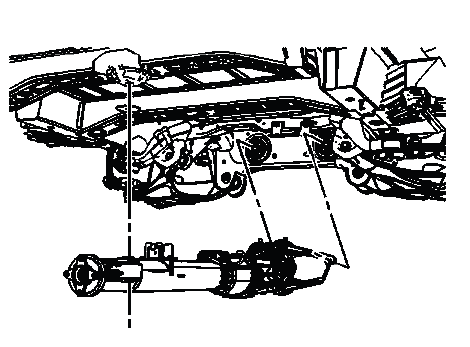
Fig. 45: View Of Rear Differential Assembly
3. Install the rear differential mounting bolts. Start the bolts by hand first, then tighten only after the differential is seated squarely in its mounts.
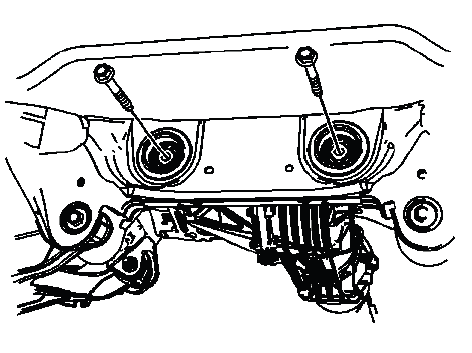
Fig. 46: Identifying Rear Differential Drive Mounting Bolts
CAUTION: Refer to Fastener Caution. Differential mounting bolts carry driveline load and must be tightened to the specified torque. Incorrect tightening can allow movement, noise, vibration, or mount damage.
Tighten
- Tighten the bolts to 160 N.m (118 lb ft).
4. Reconnect the electrical connector for the electronic clutch control module. Make sure the connector lock seats fully and the harness is routed away from the propeller shaft, exhaust heat, and sharp edges.
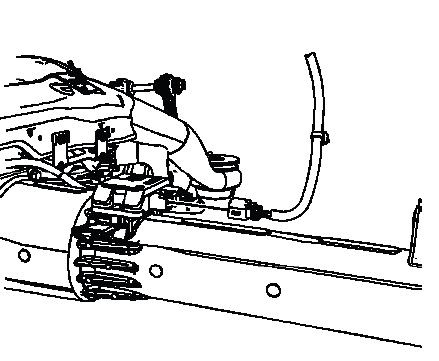
Fig. 47: View Of Clutch Control Module Electrical Connector
5. Lift the torque tube into position. Raise it evenly and avoid using the mounting bolt to pull the tube into alignment.
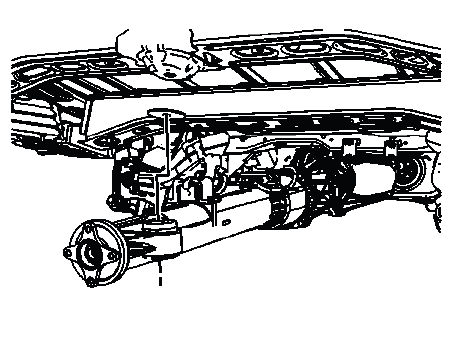
Fig. 48: View Of Torque Tube
6. Install the torque tube bolt. The bolt should thread in smoothly by hand before final torque is applied.
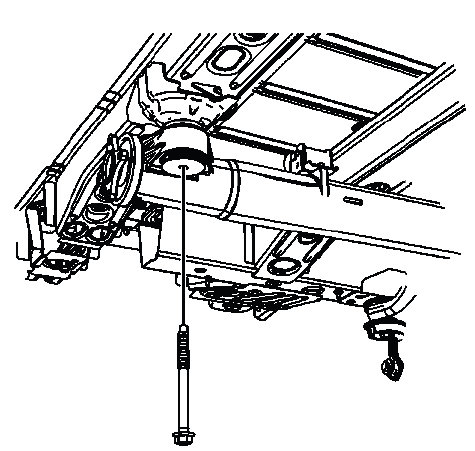
Fig. 49: Identifying Torque Tube Mounting Bolt
Tighten
- Tighten the bolt to 185 N.m (137 lb ft).
7. Install the propeller shaft assembly. Refer to Propeller Shaft Replacement. Align the shaft to its reference marks and tighten the flange fasteners to specification.
8. Refill the rear differential assembly. Refer to Axle Lubricant Change. Use the specified lubricant and verify the level at the fill opening after the vehicle is positioned correctly.
9. Install the rear wheel drive shaft. Refer to Rear Wheel Drive Shaft and Rear Axle Shaft Seal Replacement. Make sure the shaft is fully seated and the seal area is not damaged during installation.
10. Install the tires and wheels. Refer to Tire and Wheel Removal and Installation. Tighten the wheel fasteners according to the correct procedure.
11. Remove the support and lower the vehicle. After the vehicle is lowered, check for leaks, abnormal rear axle noise, warning messages, and proper AWD-related operation during final verification.
TORQUE TUBE ASSEMBLY CLEANING AND INSPECTION
1. Check the torque tube for the following conditions:
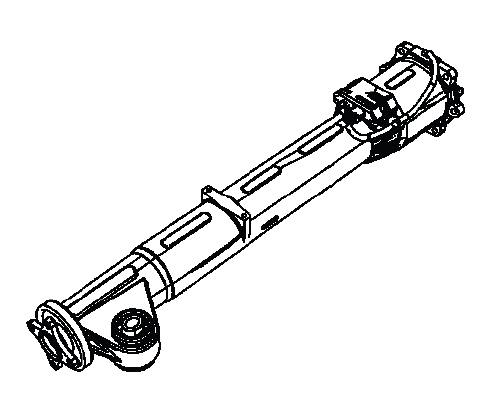
Fig. 50: View Of Torque Tube Assembly
IMPORTANT: The internal components of the torque tube assembly are not serviced separately. Replace the tube and internal components as an assembly. Attempting to repair internal pieces individually can lead to incorrect alignment, bearing concerns, leakage, or rear drive axle malfunction.
- Damage to the driver flange, including dents, cracks, worn mating surfaces, or signs of impact
- Cracks or dents on the exterior of the torque tube, especially near mounting points and machined areas
- Operation of all bearings, checking for roughness, looseness, binding, or abnormal noise during rotation
- Machine surfaces for abnormal wear, scoring, corrosion, gasket damage, or evidence of fluid leakage
2. If any of the above conditions are found to be present, replace the torque tube assembly. A damaged torque tube can affect driveline alignment, sealing, bearing operation, and rear differential performance, so replacement as a complete assembly is the proper repair when service limits are exceeded.
