Buick Enclave: Doing Your Own Service Work. Hood. Engine Compartment Overview
Doing Your Own Service Work
 WARNING
You can be injured and the vehicle could be damaged if you try to do service
work on a vehicle without knowing enough about it.
► Be sure to use the proper nuts, bolts, and other fasteners. Metric and English fasteners can be easily confused. If the wrong fasteners are used, parts can later break or fall off.
You could be hurt.
If doing some of your own service work, use the proper service manual. It tells you much more about how to service the vehicle than this manual can. To order the proper service manual, see Service Publications Ordering Information .
Basic maintenance may appear simple, but many vehicle systems require correct procedures, torque specifications, safety precautions, and approved parts. Using the wrong fluid, fastener, tool, lifting point, or repair method can cause damage or create a safety hazard.
This vehicle has an airbag system.
Before attempting to do your own service work, see Servicing the Airbag-Equipped Vehicle .
Airbag-equipped vehicles require extra caution because impact sensors, wiring, steering wheel components, seat components, and related modules may be located near areas where service work is performed. Do not probe, modify, or disturb airbag-related wiring unless the proper procedure is followed.
Keep a record with all parts receipts and list the mileage and the date of any service work performed.
See Maintenance Records .
Good records help track the service history of the Buick Enclave and can be useful for warranty questions, resale value, maintenance planning, and diagnosing future concerns. Record the type of work performed, the parts used, the mileage, and the date.
Hood
To open the hood:

1. Pull the hood release handle with this symbol on it. It is located under the instrument panel on the driver side of the vehicle.
After pulling the inside release, the hood will partially unlatch but will still be held by the secondary latch at the front of the vehicle. This two-step design helps prevent the hood from opening unexpectedly.
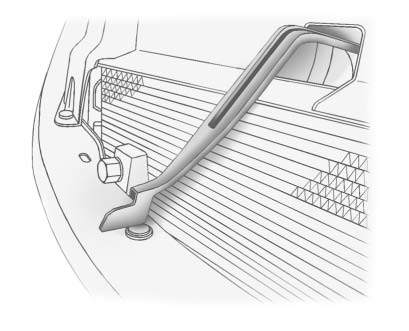
2. At the front of the vehicle, pull up on the bottom center of the grille, and push the secondary hood release to the left.
3. After the lid has been partially lifted, a gas strut automatically lifts and holds the hood in the fully open position.
When the hood is open, keep hands, clothing, tools, and loose items away from moving engine parts and hot surfaces. Even after the engine is turned off, some components may remain hot for a period of time.
Before closing the hood, be sure all filler caps are on properly. Check that no tools, rags, containers, or loose parts have been left in the engine compartment.
Pull the hood down to close.
Lower the hood until the lifting pressure of the strut is reduced.
Then allow the hood to fall and latch into place under its own weight.
Check to make sure the hood is closed. If the hood does not fully latch, gently push the hood down at the front and center until it is completely latched.
Do not drive the Buick Enclave unless the hood is fully secured. An improperly latched hood can lift while driving, block forward visibility, and create a serious safety hazard. After closing, pull up lightly on the front edge to confirm that it is locked in place.
Engine Compartment Overview
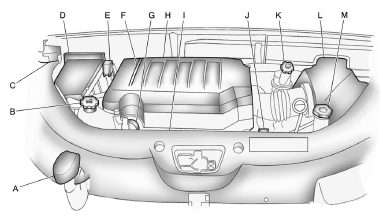
A. Radiator Pressure Cap. See Cooling System .
B. Engine Coolant Recovery Cap. See Cooling System .
C. Remote Negative (−) Terminal.
See Jump Starting .
D. Engine Compartment Fuse Block .
E. Remote Positive (+) Terminal.
See Jump Starting .
F. Power Steering Reservoir and Cap (under engine cover).
See Power Steering Fluid .
G. Engine Oil Fill Cap. See “When to Add Engine Oil” under Engine Oil .
H. Engine Cover .
I. Engine Oil Dipstick (out of view). See “Checking Engine Oil” under Engine Oil
.
J. Automatic Transmission Fluid Dipstick. See “Checking the Fluid Level” under Automatic
Transmission Fluid .
K. Brake Master Cylinder Reservoir. See “Brake Fluid” under Brakes .
L. Engine Air Cleaner/Filter .
M. Windshield Washer Fluid Reservoir. See “Adding Washer Fluid” under Washer Fluid
.
The engine compartment layout helps identify the main service points used during routine inspection and maintenance. Before checking fluids or working under the hood, make sure the vehicle is parked on a level surface, the engine is off, and hot components have had time to cool. Some caps, reservoirs, and terminals may look similar, so always confirm the correct location before adding fluid, jump starting, or performing any service.
In the Buick Enclave, several service items are positioned for easier access, including the washer fluid reservoir, engine oil fill cap, fuse block, and remote jump starting terminals. Other components, such as the power steering reservoir and engine oil dipstick, may require closer inspection or removal of a cover to locate properly.
Use the overview as a guide, but always follow the detailed procedure in the related section before opening caps, checking levels, or connecting jumper cables. Opening a hot cooling system, adding the wrong fluid, or connecting electrical terminals incorrectly can cause injury or vehicle damage.
