Buick Enclave: Cylinder Head Replacement
* PLEASE READ THIS FIRST *
NOTE: Examples used in this article are general in nature and do not necessarily relate to a specific engine or system. Illustrations and procedures have been chosen to guide mechanic through engine overhaul process. Descriptions of processes of cleaning, inspection, assembly and machine shop practice are included.
Always refer to appropriate engine overhaul article, if available, in the ENGINES section for complete overhaul procedures and specifications for the vehicle being repaired. For Buick Enclave engine service, this information should be used as general overhaul guidance only. Final torque values, bolt sequences, gasket requirements, sealant use, and component limits must always come from the exact engine-specific service procedure.
REMOVAL
NOTE: Examples used in this article are general in nature and do not necessarily relate to a specific engine or system. Illustrations and procedures have been chosen to guide mechanic through engine overhaul process. Descriptions of processes of cleaning, inspection, assembly and machine shop practice are included.
Always refer to appropriate engine overhaul article, if available, in the ENGINES section for complete overhaul procedures and specifications for the vehicle being repaired.
Remove intake and exhaust manifolds and valve cover. Cylinder head and camshaft carrier bolts (if equipped) should be removed only when engine is cold. On many aluminum cylinder heads, removal while hot will cause cylinder head warpage. Mark rocker arm or overhead cam components for location.
Before removing the cylinder head, clean loose dirt from the surrounding engine area so debris does not fall into oil passages, coolant passages, or open cylinders. Disconnect and label hoses, connectors, brackets, vacuum lines, and related components as needed. Careful marking during disassembly makes installation more accurate and helps prevent routing mistakes when the Buick Enclave engine is assembled again.
Remove rocker arm components or overhead cam components. Components must be installed in original location. Individual design rocker arms may utilize shafts, ball-type pedestal mounts or no rocker arms. For all design types, wire components together and identify according to corresponding valve. Remove cylinder head bolts. Note length and location. Some applications require cylinder head bolts be removed in proper sequence to prevent cylinder head damage. See Fig. 1. Remove cylinder head.
Keep valve train parts organized exactly as removed. Rocker arms, lifters, camshaft followers, caps, shafts, and related hardware may develop wear patterns with their original positions. Mixing these parts can create noise, accelerated wear, incorrect valve operation, or poor oil control after repair. If the cylinder head is difficult to lift, check again for hidden fasteners, brackets, ground straps, or attached lines before prying against any machined surface.
After the cylinder head is removed, place it on a clean wooden block or suitable work surface so the gasket surface is not scratched. Inspect the old head gasket for signs of coolant leakage, combustion gas leakage, oil passage failure, or uneven clamping. The pattern left on the gasket and deck surface can help identify the reason for the repair, especially if the engine had overheating, coolant loss, misfire, or compression problems.
INSTALLATION
NOTE: Examples used in this article are general in nature and do not necessarily relate to a specific engine or system. Illustrations and procedures have been chosen to guide mechanic through engine overhaul process. Descriptions of processes of cleaning, inspection, assembly and machine shop practice are included.
Always refer to appropriate engine overhaul article, if available, in the ENGINES section for complete overhaul procedures and specifications for the vehicle being repaired.
Ensure all surfaces and head bolts are clean. Check that head bolt holes of cylinder block are clean and dry to prevent block damage when bolts are tightened. Clean threads with tap to ensure accurate bolt torque.
Cleanliness and surface preparation are critical before a cylinder head is installed. The cylinder block deck and cylinder head surface must be free of old gasket material, corrosion, oil, coolant, and abrasive residue. Do not use aggressive tools that can gouge aluminum or change the surface finish. A damaged sealing surface can cause coolant leakage, oil leakage, combustion leakage, or repeat head gasket failure.
Check the cylinder head and block deck for flatness using the proper straightedge and feeler gauge method. If warpage exceeds the service limit, the part must be machined or replaced according to the correct specifications. On a Buick Enclave, overheating history should be taken seriously because aluminum cylinder head distortion may not be obvious without accurate measurement.
Install head gasket on cylinder block. Some manufacturers may recommend sealant be applied to head gasket prior to installation. Note that all holes are aligned. Some gasket applications may be marked so that certain area faces upward. Install cylinder head using care not to damage head gasket. Ensure cylinder head is fully seated on cylinder block.
Position the gasket carefully and confirm that coolant holes, oil passages, dowel locations, and bolt holes line up before the head is lowered into place. Never slide the cylinder head across the gasket once it is positioned, because this can damage the sealing coating or shift the gasket out of alignment. Use guide pins or dowels when required to help lower the head straight down onto the block.
Some applications require head bolts be coated with sealant prior to installation. This is done if head bolts are exposed to coolant passages. Some applications require head bolts be coated with light coat of engine oil.
Always follow the exact bolt preparation instructions for the engine being repaired. If sealant is required, apply only the specified type and amount. If engine oil is required, coat the threads and bolt seating surfaces lightly and evenly. Incorrect lubrication or sealant use can change bolt clamping force, which may cause gasket failure, thread damage, coolant leakage, or inaccurate torque readings.
If torque-to-yield bolts or single-use fasteners are specified, replace them with new bolts. Reusing stretched head bolts can prevent the cylinder head from clamping evenly, even if the torque wrench reading appears correct. Tighten the bolts in the required sequence and in the specified stages. This controlled tightening process helps the cylinder head settle evenly against the gasket and reduces the risk of distortion.
After installation, reassemble the valve train components in their original locations unless the specific service procedure directs otherwise. Lubricate moving parts as required, verify timing alignment where applicable, and rotate the engine by hand before starting if valve train or timing components were disturbed. Once the Buick Enclave engine is running, check for coolant leaks, oil leaks, abnormal noise, overheating, and proper operating temperature after the repair is complete.
Install head bolts. Head bolts should be tightened in proper steps and sequence to specification. See Fig. 1. The tightening process is critical because the cylinder head must clamp evenly against the head gasket and cylinder block. If the bolts are tightened out of sequence or brought to final torque too quickly, the cylinder head may distort, the gasket may not seal evenly, or combustion and coolant sealing problems may appear after the engine is returned to service.
Before tightening, confirm that the correct bolts are being used, the bolt holes are clean and dry, and the threads have been prepared exactly as required by the engine-specific procedure. On the Buick Enclave, this type of work should always follow the exact torque steps, angle procedure, and bolt replacement rules listed for the installed engine. General tightening information is useful for understanding the process, but it must not replace the factory tightening specification.
Install remaining components. Tighten all bolts to specification. Adjust valves if required. See VALVE ADJUSTMENT. Reinstall each part in the correct order and make sure brackets, wiring, hoses, ground straps, and vacuum connections are returned to their original positions. Components that were removed for access should not be tightened by feel; each fastener should be tightened to the specified value to avoid leaks, vibration, misalignment, or thread damage.
NOTE: Some manufacturers require that head bolts be retightened after specified amount of operation. This must be done to prevent head gasket failure. If a retorque procedure is listed for the engine, it should be completed exactly as instructed, including the required operating time, cooling period, and tightening sequence.
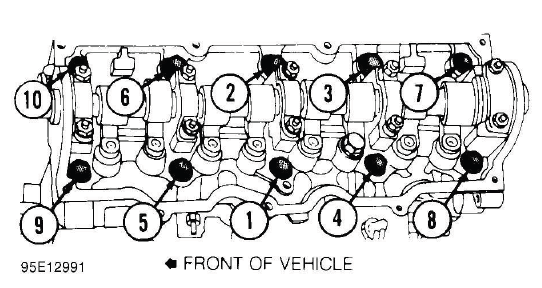
Fig. 1: Typical Cylinder Head Tightening or Loosening Sequence
VALVE ADJUSTMENT
NOTE: Examples used in this article are general in nature and do not necessarily relate to a specific engine or system. Illustrations and procedures have been chosen to guide mechanic through engine overhaul process. Descriptions of processes of cleaning, inspection, assembly and machine shop practice are included.
Always refer to appropriate engine overhaul article, if available, in the ENGINES section for complete overhaul procedures and specifications for the vehicle being repaired. Valve adjustment procedures vary widely by engine design, so the correct specification for the exact engine must always be used before any clearance is changed.
Engine specifications will indicate valve train clearance and temperature at which adjustment is to be made on most models. In most cases, adjustment will be made with a cold engine. In some cases, both a cold and a hot clearance will be given for maintenance convenience. The specified temperature matters because metal parts expand as the engine warms, and the measured clearance can change noticeably between a cold and hot engine.
Valve clearance affects how the valves open, close, seal, and transfer heat. If clearance is too tight, the valve may not fully seat, which can cause compression loss, rough running, burned valves, or hard starting. If clearance is too loose, the valve train may become noisy and the valve may not open fully, reducing performance and causing accelerated wear.
On some models, adjustment is not required. Rocker arms are tightened to specification and valve lash is automatically set. On some models with push rod actuated valve train, adjustment is made at push rod end of rocker arm while other models do not require adjustment. When a hydraulic lifter system is used, the adjustment may be controlled by lifter preload rather than a simple fixed clearance. For Buick Enclave engine service, verify whether the installed valve train design is adjustable before attempting to change any setting.
Clearance will be checked between tip of rocker arm and tip of valve stem in proper sequence using a feeler gauge. Adjustment is made by rotating adjusting screw until proper clearance is obtained. Lock nut is then tightened. Engine will be rotated to obtain all valve adjustments to manufacturer's specifications. The feeler gauge should slide with a light, even drag. If the gauge is loose, the clearance is too wide; if the gauge must be forced, the clearance is too tight.
When rotating the engine for valve adjustment, turn it only in the proper direction and use the recommended crankshaft turning point. The valve being checked must be positioned on the base circle, or heel, of the camshaft. Measuring while the cam lobe is partly lifting the valve will give an incorrect reading and may lead to an improper adjustment.
Some models require hydraulic lifter to be bled down and clearance measured. Push rods of different length can be used to obtain proper clearance. Clearance will be checked between tip of rocker arm and tip of valve stem in proper sequence using a feeler gauge. If different push rod lengths are used for correction, each push rod should be matched to the location that requires it, and all parts should be kept organized during assembly.
Hydraulic lifter bleed-down procedures must be performed carefully because trapped oil inside the lifter can change the measurement. If preload or clearance is checked before the lifter is correctly prepared, the reading may be misleading. This can result in valve train noise, poor idle quality, misfire, or valve sealing concerns after the engine is started.
Overhead cam engines designed without rocker arms actuate valves directly on a cam follower. A hardened, removable disc is installed between the cam lobe and lifter. Clearance will be checked between cam heel and adjusting disc in proper sequence using a feeler gauge. Engine will be rotated to obtain all valve adjustments. In this type of design, the thickness of the adjusting disc or shim determines the final clearance. The technician must measure carefully and select the correct replacement disc if the clearance is outside specification.
On overhead cam engines designed with rocker arms, adjustment is made at valve end of rocker arm. Ensure valve to be adjusted is riding on heel of cam on all engines. Clearance will be checked between tip of rocker arm and tip of valve stem in proper sequence using a feeler gauge. Adjustment is made by rotating adjusting screw until proper clearance is obtained. Lock nut is then tightened. Engine will be rotated to obtain all valve adjustments to manufacturer's specifications.
After all valve clearances are checked or adjusted, rotate the engine again and recheck any valve that was changed. Lock nuts, adjusters, shims, followers, and related parts must be secure before the valve cover is installed. Once the Buick Enclave engine is reassembled and started, listen for abnormal valve train noise, verify smooth idle, and check for oil leaks around the valve cover and related sealing areas.
