Buick Enclave: Specifications, Repair Instructions
SPECIFICATIONS
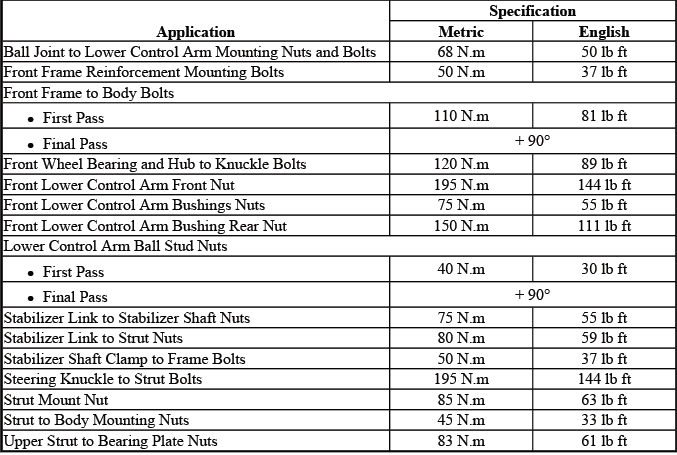
FASTENER TIGHTENING SPECIFICATIONS
Fastener Tightening Specifications
ADHESIVES, FLUIDS, LUBRICANTS AND SEALERS
Adhesives, Fluids, Lubricants and Sealers

REPAIR INSTRUCTIONS
STABILIZER SHAFT REPLACEMENT
Removal Procedure
1. Raise and support the vehicle. Refer to Lifting and Jacking the Vehicle. Make sure the vehicle is stable before working around the front frame, stabilizer shaft, steering linkage, or drivetrain components.
2. Remove the front tire and wheel assemblies. Refer to Tire and Wheel Removal and Installation. Removing both front wheels gives clear access to the stabilizer links, frame fasteners, and suspension hardware.
3. Remove the bolt from the intermediate shaft bracket to the front cradle. Refer to Front Wheel Drive Intermediate Shaft Replacement. This allows the front frame to be lowered enough for stabilizer shaft removal without placing strain on the intermediate shaft bracket.
4. Remove the rear propeller shaft, if equipped. Refer to Propeller Shaft Replacement. On AWD-equipped vehicles, this step provides the clearance needed to lower the front frame and maneuver the stabilizer shaft out of position.
5. Disconnect the outer tie rods from the steering knuckles. Refer to Steering Linkage Outer Tie Rod Replacement. Do not strike the steering knuckle or tie rod stud directly, and protect the tie rod boot from damage during separation.
6. Disconnect the stabilizer shaft links from the stabilizer shaft. Refer to Stabilizer Shaft Link Replacement. Hold the link stud as needed to prevent the joint from spinning while the retaining nut is removed.
7. Position an adjustable jack stand underneath the left rear and right rear of the front frame. The supports help control the frame as it is lowered and prevent sudden movement while the stabilizer shaft is removed.
8. Remove the left and right frame reinforcement mounting bolts. Keep the hardware organized and note the installed position of each reinforcement before removal.
Fig. 1: Identifying Frame Reinforcement Mounting Bolts
9. Loosen the front frame reinforcement mounting bolts (1). Do not remove the bolts completely unless required; loosening them allows controlled movement of the frame and reinforcement assembly.
Fig. 2: Identifying Front Frame Mounting Bolts
10. Loosen the front frame mounting bolts (2). Loosen the bolts evenly so the frame can drop in a controlled and balanced manner.
11. Loosen the front frame rear mounting bolts (1). Support the frame with the adjustable jack stands before lowering it away from the frame rails.
Fig. 3: Locating Rear Frame Mounting Bolts
12. Lower the front frame (1) from the frame rail (2) until enough clearance is gained to remove the stabilizer shaft. Lower only as much as needed, and watch for tension on hoses, wiring, drivetrain parts, steering components, and mounting points.
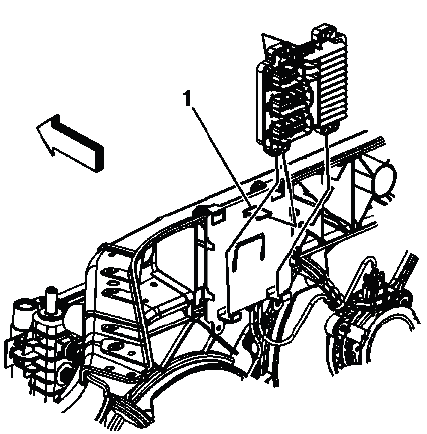
Fig. 4: Identifying Frame & Frame Rail
13. Remove both left and right stabilizer shaft insulators. Refer to Stabilizer Shaft Insulator Replacement. Inspect the insulator contact areas for wear marks, corrosion, or polished areas that may indicate movement or noise.
NOTE: If replacing the stabilizer shaft, use NEW insulators.
14. Remove the stabilizer shaft from the vehicle. Work the shaft out slowly and avoid forcing it against the frame, steering gear, exhaust components, or suspension parts.
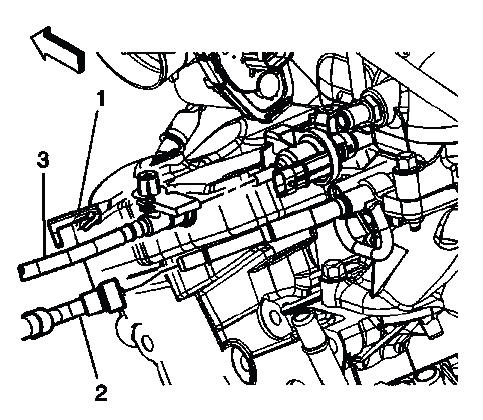
Fig. 5: Positioning Stabilizer Shaft
NOTE: It may be necessary to maneuver the stabilizer shaft in order to remove the stabilizer shaft from the front frame.
Installation Procedure
1. Position the stabilizer shaft on the front frame. Install the shaft in the same orientation as the original part, with the bends and link attachment points aligned correctly for the front suspension layout.
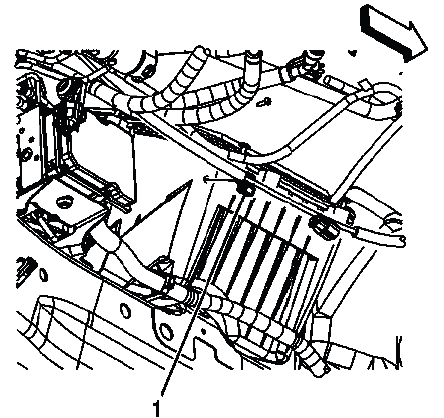
Fig. 6: Positioning Stabilizer Shaft
2. Install the left and right stabilizer shaft insulators and brackets. Refer to Stabilizer Shaft Insulator Replacement. If a new stabilizer shaft is installed, use new insulators so the shaft is supported correctly and does not create unwanted noise.
3. Connect the stabilizer shaft links to the stabilizer shaft. Refer to Stabilizer Shaft Link Replacement. Make sure the links are not twisted and that the joints are positioned naturally before tightening.
4. Using the jack stands, raise the front frame to the vehicle body leaving a gap of approximately 12 mm (0.5 in). Raise the frame evenly on both sides so the mounting points align without forcing the bolts.
5. Install the front frame mounting bolts (2) and tighten to 110 N.m (81 lb ft). Start each bolt by hand first to avoid cross-threading the frame mounting points.

Fig. 7: Identifying Front Frame Mounting Bolts
CAUTION: Refer to Fastener Caution.
6. Tighten the front frame mounting bolts an additional 90º. Use the correct angle-tightening method so the fasteners reach the required clamping load.
7. Tighten the front frame reinforcement mounting bolts (1) to 50 N.m (37 lb ft). Confirm the reinforcements are seated flat before final tightening.
8. Install the front frame rear mounting bolts (1) and tighten to 110 N.m (81 lb ft). These bolts help locate and secure the rear of the front frame to the body structure.

Fig. 8: Locating Rear Frame Mounting Bolts
9. Tighten the front frame rear mounting bolts an additional 90º. Apply the additional angle evenly and do not reuse damaged or stretched fasteners.
10. Install the left and right front frame reinforcement mounting bolts and tighten to 50 N.m (37 lb ft). Verify that both reinforcements are fully aligned with the frame and body mounting points.
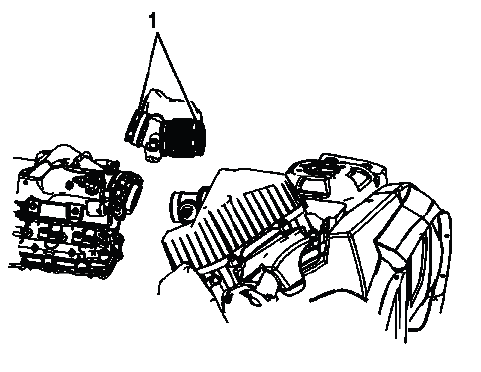
Fig. 9: Identifying Frame Reinforcement Mounting Bolts
11. Remove the adjustable jack stands. Confirm the front frame is fully secured before removing support from beneath the vehicle.
12. Install the bolt from the intermediate shaft bracket to the front cradle. Refer to Front Wheel Drive Intermediate Shaft Replacement. Check that the bracket is seated correctly and that no wiring or hose is trapped between the bracket and cradle.
13. Connect the outer tie rods to the knuckle. Refer to Steering Linkage Outer Tie Rod Replacement. After tie rod service, verify the connection is tight and inspect the boot for damage.
14. Install the rear propeller shaft, if equipped. Refer to Propeller Shaft Replacement. Make sure all driveline fasteners are tightened to specification and the shaft is aligned correctly.
15. Install the front tire and wheel assemblies. Refer to Tire and Wheel Removal and Installation. Seat the wheels against clean hub surfaces before tightening the wheel fasteners.
16. Remove the support and lower the vehicle. After stabilizer shaft replacement on the Buick Enclave, road test the vehicle and listen for clunks, rattles, or binding. A wheel alignment may be required if front frame position, steering linkage, or suspension geometry was disturbed.
STABILIZER SHAFT LINK REPLACEMENT
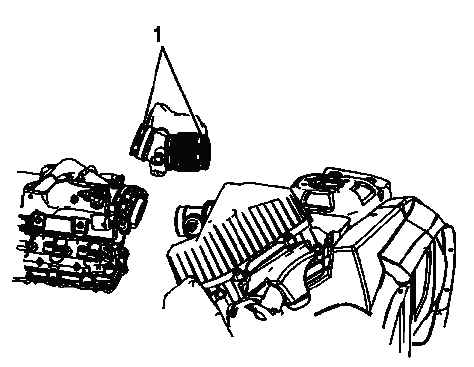
Fig. 10: Identifying Stabilizer Shaft Link
Stabilizer Shaft Link Replacement
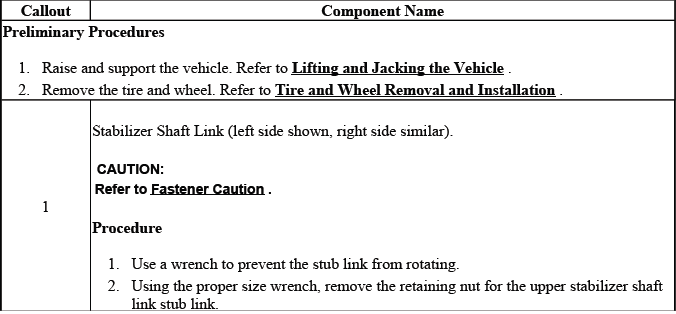
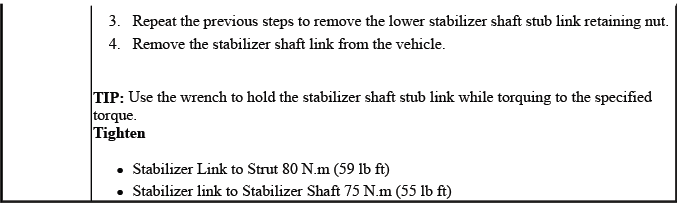
The stabilizer shaft links connect the stabilizer shaft to the suspension and help control body roll during cornering. When replacing a link, inspect the ball joint boots, mounting studs, nuts, and link alignment. A worn stabilizer link can cause a rattle or clunk over small bumps, especially at low speeds.
STABILIZER SHAFT INSULATOR REPLACEMENT

Fig. 11: Identifying Stabilizer Shaft Insulator
The stabilizer shaft insulators support the shaft in the front frame brackets and help isolate suspension noise. Replace insulators that are cracked, hardened, swollen, loose, or polished from shaft movement. During installation, make sure the insulator split and bracket are positioned correctly so the stabilizer shaft is held firmly without binding.
Stabilizer Shaft Insulator Replacement

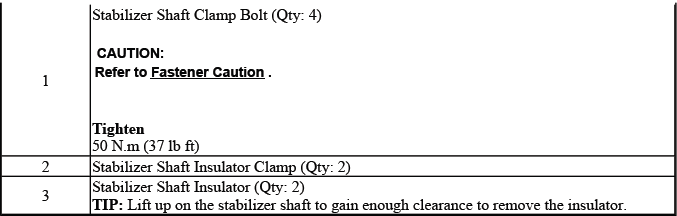
The stabilizer shaft insulator supports the stabilizer shaft inside the front suspension frame bracket and helps reduce vibration, road harshness, and small suspension noises. During replacement, check the shaft surface for rust, polished wear marks, looseness, or signs that the bar has been shifting inside the bushing. The new insulator should sit flat in the bracket, with no twist, pinch, dirt buildup, or corrosion trapped between the rubber and the mounting surface.
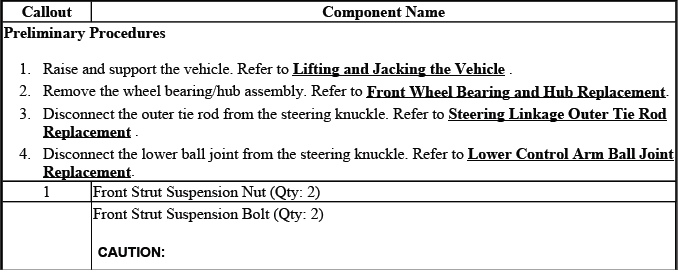
LOWER CONTROL ARM BALL JOINT REPLACEMENT
Removal Procedure
1. Remove the lower control arm assembly. Refer to Lower Control Arm Replacement. Taking the control arm out of the vehicle gives safe access to the riveted ball joint and prevents damage to nearby brake, axle, and suspension components.
2. Install the lower control arm in a vise. Clamp the arm firmly enough to keep it stable, but do not crush, bend, or distort the control arm structure. Use soft jaws or protective pads when needed.
3. Drill or grind off the head of the rivet. Keep the drill or grinder controlled and centered so the control arm mounting holes are not enlarged, gouged, or weakened during rivet removal.
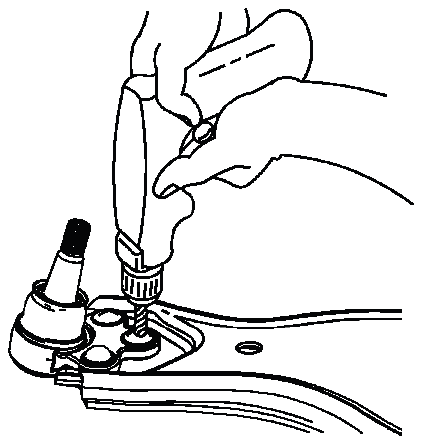
Fig. 12: Drilling Off Head Of Rivet
NOTE: Use a center punch to aid in starting the drill if drilling the rivet.
4. Use a punch and a hammer to loosen the rivets from the lower control arm. Support the arm solidly while driving the rivets out, so the arm does not flex or move in the vise.
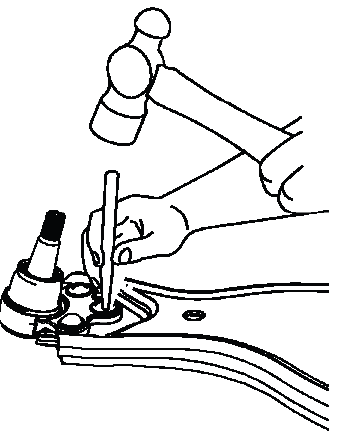
Fig. 13: Removing Rivets With A Punch And A Hammer
5. Remove the rivets from the lower control arm. Once they are out, clean the ball joint mounting pad and remove burrs, sharp edges, or metal chips before fitting the replacement joint.
Fig. 14: Removing Rivets
6. Enlarge the hole for the ball joint bolt to 31/64. Drill straight through the original opening and remove only the material required for the replacement hardware. After drilling, clean away all chips so they cannot damage the new joint boot or control arm surface.
Fig. 15: Removing/Installing Ball Joint At Lower Control Arm
7. Remove the ball joint from the lower control arm. Before installation, examine the arm for cracks, elongated holes, corrosion around the mounting pad, or any deformation that could prevent the new joint from seating properly.
Installation Procedure
1. Position the ball joint on the lower control arm. Align the replacement joint with the prepared holes and make sure the flange rests evenly against the arm without rocking or leaving a gap.
Fig. 16: Removing/Installing Ball Joint At Lower Control Arm
2. Install the ball joint mounting nuts and bolts. Fit the fasteners in the correct direction and keep the joint fully seated while the hardware is brought down evenly.
Fig. 17: View Of Ball Joint Mounting Nuts & Bolts
CAUTION: Refer to Fastener Caution.
NOTE: When tightening the mounting nuts and bolts for the ball joint, hold the bolt and torque the nut for the proper torque measure.
Tighten
- Tighten the mounting nuts to 68 N.m (50 lb ft).
3. Remove the lower control arm assembly from the vise. Handle the arm carefully so the new ball joint boot is not torn, pinched, or contaminated with grinding dust or metal particles.
4. Install the lower control arm. Refer to Lower Control Arm Replacement. Seat the control arm bushings, ball joint stud, and mounting hardware correctly before final tightening.
5. Check the front end alignment of the vehicle. Refer to Wheel Alignment Specifications. Ball joint or lower control arm service can change front suspension geometry, so alignment confirmation is required before the Buick Enclave is returned to normal road use.
FRONT WHEEL BEARING AND HUB REPLACEMENT
Special Tools
- J 42129 Wheel Hub Puller
CAUTION: The wheel bearing and hub assembly includes a magnetic encoder with built-in permanent magnets that the wheel speed sensor senses. Any contact with another magnet will damage the encoder magnets. The damage will cause a diagnostic trouble code to be set and will require wheel bearing and hub replacement.
Removal Procedure
1. Raise and support the vehicle. Refer to Lifting and Jacking the Vehicle. The vehicle must be securely supported before any wheel, brake, drive shaft, or hub components are removed.
2. Remove the tire and wheel. Refer to Tire and Wheel Removal and Installation. Place the wheel aside where it will not contact the brake hose, wheel speed sensor wiring, or suspension parts.
3. Remove the front brake rotor. Refer to Front Brake Rotor Replacement. If the brake caliper or bracket must be moved, support it properly and do not allow it to hang by the brake hose.
4. Remove the wheel drive shaft retaining nut and washer. Refer to Front Wheel Drive Shaft Replacement. Protect the axle shaft threads and avoid hammering directly on the end of the shaft.
5. Install the J 42129 Wheel Hub Puller to the wheel bearing and hub. Position the puller squarely so pressure is applied evenly across the hub assembly.
6. Using the J 42129 Wheel Hub Puller, separate the wheel drive shaft from the wheel bearing and hub. Apply steady force and keep the tool aligned to avoid damaging the axle shaft, hub face, or magnetic encoder area.
7. Remove the J 42129 Wheel Hub Puller from the wheel bearing and hub assembly. Look over the tool contact area and confirm that the hub and axle shaft are free before continuing.
8. Remove the front wheel bearing hub bolts. Clean loose debris from around the bolt heads and mounting area so the socket seats fully and the knuckle is not damaged.

Fig. 18: View Of J 28733-B Installed Onto Wheel Hub
9. Remove the wheel bearing and hub assembly. If the hub is stuck in the knuckle bore, work it loose evenly and avoid contact with the magnetic encoder surface used by the wheel speed sensor.
Fig. 19: Identifying Wheel Bearing & Hub Assembly
Installation Procedure
1. Position the wheel bearing and hub assembly in the knuckle. The knuckle bore and mounting face must be clean, flat, and free of corrosion so the hub can seat fully.

Fig. 20: Identifying Wheel Bearing & Hub Assembly
2. Using an approved solvent, clean the old threadlocker from the threads of the wheel bearing hub and the bolts. Dry the threads completely before applying new threadlocker so the compound bonds correctly.
Fig. 21: View Of J 28733-B Installed Onto Wheel Hub
3. Apply the high-temperature, high-strength threadlocker to 2/3 of the threads of the wheel bearing and the bolts. Use a continuous coating over the required area so the fasteners can resist heat, vibration, and suspension load.
NOTE: Ensure that there are no gaps in the threadlocker and allow to dry approximately 10 minutes before installing the wheel bearing bolts.
4. Install the retaining bolts for the wheel bearing and hub. Start each bolt by hand first, then bring them down evenly so the hub remains straight in the knuckle.
CAUTION: Refer to Fastener Caution.
Tighten
- Tighten the bolts to 120 N.m (89 lb ft).
5. Install the front brake rotor. Refer to Front Brake Rotor Replacement. The rotor should sit flush against the hub face without rust scale or debris trapped behind it.
6. Install the wheel drive shaft retaining nut and washer. Refer to Front Wheel Drive Shaft Replacement. Follow the correct tightening procedure so the axle and bearing are secured without affecting hub operation.
7. Install the tire and wheel. Refer to Tire and Wheel Removal and Installation. Make sure the wheel seats evenly against the hub before tightening the wheel fasteners.
8. Remove the support and lower the vehicle. After the hub repair, road test the vehicle and confirm there is no bearing noise, vibration, ABS warning, or wheel speed sensor concern.
STEERING KNUCKLE REPLACEMENT
The steering knuckle carries several critical front suspension and brake loads. It supports the wheel bearing and hub assembly, connects to the strut, receives the lower ball joint and tie rod, and maintains the wheel’s position while the vehicle steers and brakes. Before replacement, check for impact marks, distorted mounting ears, stripped threads, corrosion in the hub bore, cracked casting areas, or any damage that could affect alignment or bearing seating. After steering knuckle service, check the front suspension alignment and confirm that the Buick Enclave tracks straight with normal steering response.
Fig. 22: Identifying Steering Knuckle
Steering Knuckle Replacement
The steering knuckle is a major load-bearing part of the front suspension. It supports the wheel bearing and hub assembly, connects the strut to the lower ball joint, carries steering input through the tie rod, and keeps the wheel positioned correctly under braking and cornering loads. During replacement, check every mating surface for rust buildup, impact marks, damaged threads, cracked casting areas, or distortion that could affect alignment or hub seating.
LOWER CONTROL ARM REPLACEMENT
Special Tools
- J 42188-B Ball Joint Separator
For regional equivalent tools, refer to Special Tools. Use the correct separator tool so the lower ball joint can be released without damaging the steering knuckle, joint boot, or control arm.
Removal Procedure
1. Raise and support the vehicle. Refer to Lifting and Jacking the Vehicle. The vehicle must be stable before working around the front suspension, steering linkage, and lower control arm mounting points.
2. Remove the tire and wheel. Refer to Tire and Wheel Removal and Installation. This provides access to the steering knuckle, tie rod, lower ball joint, and control arm fasteners.
3. Disconnect the outer tie rod end from the steering knuckle. Refer to Steering Linkage Outer Tie Rod Replacement. Protect the tie rod boot and avoid striking the stud directly during separation.
4. Turn the knuckle to the left. This improves access to the lower ball joint nut and allows the separator tool to be positioned more accurately.
5. Using the J-42188-A (2) and a wrench, loosen the lower ball joint nut. Keep the tool aligned with the joint so the force is applied evenly and the knuckle is not damaged.

Fig. 23: Identifying J 42188 Ball Joint Separator
6. Using the J 42188-B separator (1), disconnect the lower ball joint from the knuckle. Do not pry against the ball joint boot or distort the knuckle opening while separating the joint.
7. Remove the lower ball joint nut (1). Once the nut is removed, keep the control arm supported so it does not drop suddenly or pull against surrounding components.
Fig. 24: Identifying Lower Ball Joint Retaining Nut
8. Remove the front lower control arm front nut (4) from the stud (3). Note the fastener position and keep the hardware organized for installation.
Fig. 25: Identifying Control Arm Mounting Bolt And Nut
9. Remove the lower control arm rear nut (2) and bolt (1). Support the control arm while the rear fastener is removed so the bushing sleeve does not bind in the frame bracket.
10. Remove the front lower control arm (1) from the vehicle. Guide the arm out carefully and avoid damaging the ball joint boot, drive shaft boot, brake hose, wheel speed sensor wiring, or frame mounting surfaces.
Fig. 26: Identifying Lower Control Arm
Installation Procedure
1. Position the front lower control arm (1) in the frame. Align the bushing sleeves with the mounting points before starting any fastener, and make sure the arm is not twisted in the frame brackets.
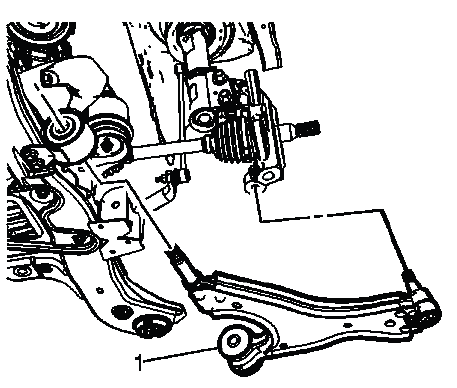
Fig. 27: Identifying Lower Control Arm
2. Install the front lower control arm rear nut (2) and bolt (1). Hand tighten the rear nut (2). Leaving the rear fastener hand tight allows the arm to settle into position before final torque is applied.
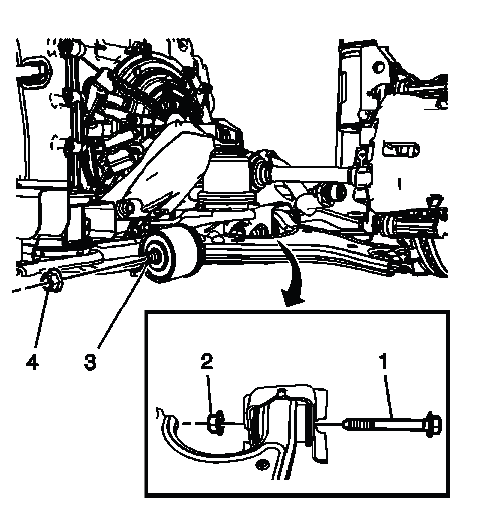
Fig. 28: Identifying Control Arm Mounting Bolt And Nut
3. Install the front lower control arm front nut (4) to the stud (3) and tighten to 195 N.m (144 lb ft). Seat the bushing bracket fully against the mounting surface before tightening to specification.
CAUTION: Refer to Fastener Caution.
4. Tighten the front rear lower control arm rear nut (2) to 150 N.m (111 lb ft). Use the appropriate size wrench to hold the bolt while torquing the nut so the fastener does not rotate and disturb the bushing position.
NOTE: Use the appropriate size wrench to hold the bolt while torquing the nut.
5. Connect the lower ball joint in the knuckle. Make sure the ball joint stud is fully seated in the knuckle before installing the retaining nut.
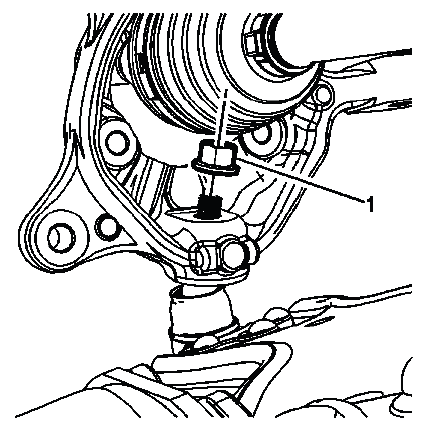
Fig. 29: Identifying Lower Ball Joint Retaining Nut
6. Install the ball joint nut and tighten to:
- First Pass: 40 N.m (30 lb ft)
- Final Pass: plus 90º.
7. Connect the outer tie rod end. Refer to Steering Linkage Outer Tie Rod Replacement. After the tie rod is connected, confirm the boot is not twisted or pinched.
8. Install the tire and wheel assembly. Refer to Tire and Wheel Removal and Installation. Clean the wheel and hub mating surfaces before installation so the wheel seats evenly.
9. Remove the support and lower the vehicle. After lower control arm service, check the front alignment and road test the Buick Enclave for stable steering, normal tracking, and absence of suspension noise.
FRONT LOWER CONTROL ARM BUSHING REPLACEMENT
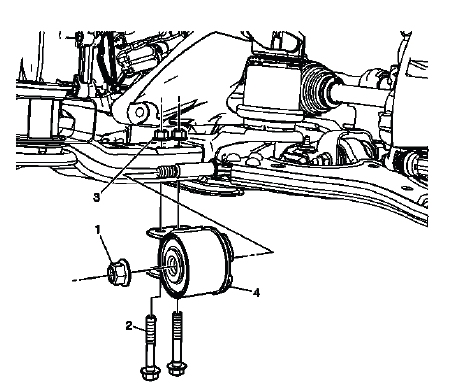
Fig. 30: Identifying Lower Control Arm Bushing & Bracket
Front Lower Control Arm Bushing Replacement

The front lower control arm bushing helps isolate road vibration while allowing controlled movement of the arm. Replace the bushing if the rubber is cracked, separated from the sleeve, oil-soaked, loose in the bracket, or causing clunks during braking and acceleration. Bushing orientation matters, so compare the replacement part with the original before pressing it into place.
FRONT LOWER CONTROL ARM REAR BUSHING REPLACEMENT
Special Tools
- CH-48107 Bushing Remover and Installer
- J 2619-01 Slide Hammer and Adapter
- J 5590 Installer and Remover
Removal Procedure
1. Remove the front lower control arm assembly. Refer to Lower Control Arm Replacement. Removing the arm provides the access and support needed to remove the bushings without bending the control arm.
2. Install the lower control arm in a soft jawed vise. Clamp it securely enough to hold it steady, but do not crush the arm or mark the bushing bores.
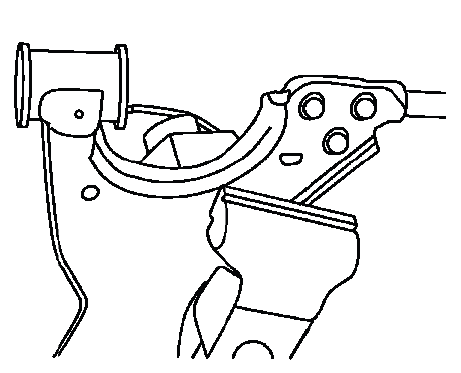
Fig. 31: View Of Lower Control Arm In Soft Jawed Vise
3. Assemble the J 2619-01 Slide Hammer and Adapter and the CH-48107 Bushing Remover and Installer. Confirm the tool adapters are seated squarely before applying force to the bushing.

Fig. 32: Identifying Special Tools J 2619-01 & CH-48107
4. Position the J 2619-01 Slide Hammer and Adapter and the CH-48107 Bushing Remover and Installer lower control arm bushing. The tool should line up with the bushing bore so the bushing comes out straight rather than cocking in the arm.
5. Using the J 2619-01 Slide Hammer and Adapter and the CH-48107 Bushing Remover and Installer, remove the front lower control arm bushing. Work steadily and avoid damaging the control arm bore or the surrounding stamped surface.
6. Using the J 5590 Installer and Remover, remove the rear lower control arm bushing. After removal, clean the bore and check for burrs, corrosion, distortion, or cracks before installing the new bushing.
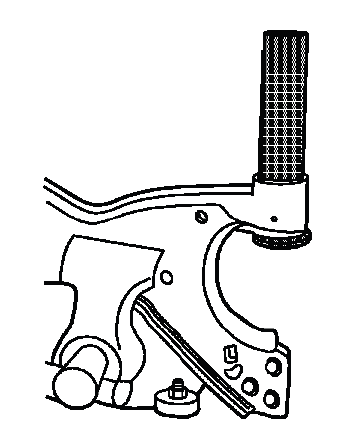
Fig. 33: Identifying Special Tool J 5590
Installation Procedure
1. Position the front and rear bushings so that they are equally in the control arm. The bushings must be centered and aligned correctly so the lower control arm can move through its normal range without preload or binding.
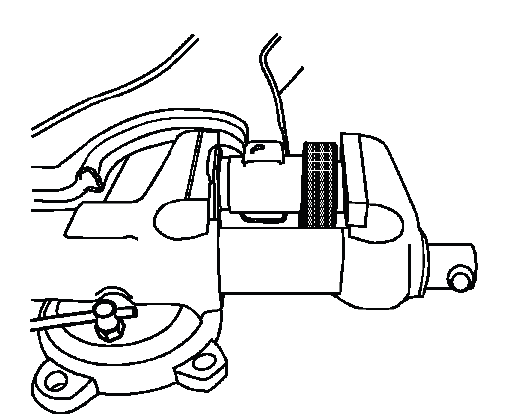
Fig. 34: Identifying Front & Rear Bushings
2. Position the CH-48107 Bushing Remover and Installer on the front bushing. Make sure the tool sits squarely against the bushing and the control arm bore before applying pressure.
3. Using the vise, compress the front and rear bushings until they are seated. Apply pressure gradually so the bushings move straight into position and do not cock, tear, or distort the control arm.
4. Remove the lower control arm from the vise. Handle the arm carefully and check that both bushings remain centered and fully seated after tool pressure is released.
5. Remove the CH-48107 Bushing Remover and Installer from the front bushing. Confirm that the bushing lip, sleeve, and rubber surface were not damaged during installation.
6. Install the lower control arm in the vehicle. Refer to Lower Control Arm Replacement. After installation, verify the arm moves naturally in the frame brackets and that the front suspension alignment is checked before normal road use.
WHEEL STUD REPLACEMENT
Special Tools
- J 35917 Ball Joint Remover
Removal Procedure
WARNING: If you are replacing the wheel(s), the wheel stud(s), the wheel nut(s) or the wheel bolt(s), install only new GM original equipment parts. Installation of used parts or non-GM original equipment parts may cause the wheel to loosen, loss of tire air pressure, poor vehicle handling and loss of vehicle control resulting in personal injury.
1. Raise and support the vehicle. Refer to Lifting and Jacking the Vehicle. The vehicle must be firmly supported before wheel, brake, or hub components are removed.
2. Remove the tire and wheel. Refer to Tire and Wheel Removal and Installation. Place the wheel aside so it cannot fall against the brake rotor, brake hose, or wheel speed sensor harness.
3. Remove the brake rotor. Refer to Front Brake Rotor Replacement. Removing the rotor provides direct access to the bearing/hub flange and the damaged wheel stud.
4. Use the J 35917 Ball Joint Remover in order to press the wheel stud (1) from the bearing/hub (2). Press the stud out straight and avoid striking the hub flange with a hammer, as impact damage can affect hub runout or bearing life.
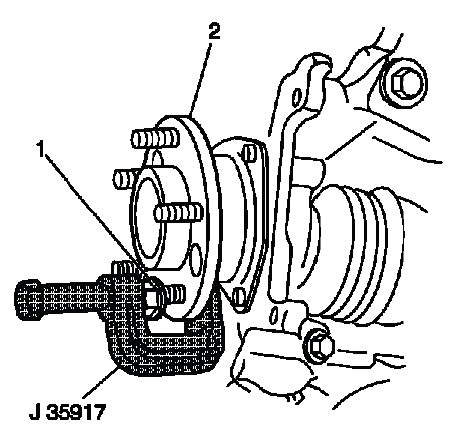
Fig. 35: Identifying J 35917 To Press Wheel Stud From Bearing/Hub
Installation Procedure
1. Install a new wheel stud from the back side of the bearing/hub. Make sure the splines line up with the hub flange before drawing the stud into place.
2. Install 3 flat washers (1) to the wheel stud (3). The washers create a smooth bearing surface for the nut and help draw the stud in evenly.
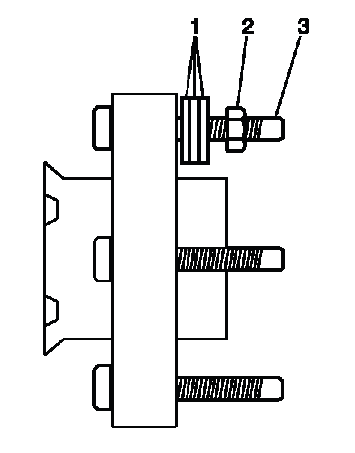
Fig. 36: Identifying Washers, Wheel Stud & Hex Nut
3. Install a hex nut (2) to the wheel stud (3). Thread the nut on by hand first so it does not cross-thread the new stud.
4. Tighten the hex nut until the stud head is fully seated in the bearing/hub flange. Watch the back side of the flange and confirm the stud shoulder is pulled completely flush.
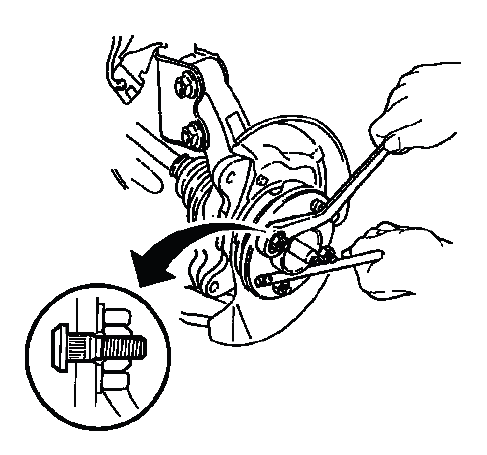
Fig. 37: Seating Stud Head Fully In Bearing/Hub Flange
5. Remove the hex nut and the washers from the wheel stud. Check that the stud is straight and that the threads were not damaged during installation.
6. Install the brake rotor. Refer to Front Brake Rotor Replacement. The rotor should sit flush against the hub face without rust scale, washers, or debris trapped behind it.
7. Install the tire and wheel. Refer to Tire and Wheel Removal and Installation. Use the correct wheel nuts and tighten them evenly in the proper pattern.
8. Lower the vehicle. After the repair, confirm that the wheel is seated properly and that no vibration, wheel looseness, or brake pulsation is present during a careful road test.
STRUT AND SHOCK ABSORBER INSPECTION (STRUT)
NOTE: The strut assembly DOES NOT have to be removed from the vehicle to perform the following inspection procedure.
NOTE: A light film of oil on the top portion of the strut is normal. DO NOT replace the strut for this condition.
Fig. 38: Illustrating Of Strut Conditions
Condition 1
Oil or fluid residue only on the bottom of the strut tube or on other strut components, and not originating from the shaft seal, is not a strut related problem. DO NOT replace the strut for this condition. Look for other external leaks, overspray, road contamination, or fluid dripping from another component above the strut.
Condition 2
Light film/residue on the strut tube, but not on the spring seat and originating from the shaft seal, is a NORMAL condition. DO NOT replace the strut. A slight film can occur during normal strut operation and does not automatically indicate loss of damping performance.
Condition 3
Oil drip or trail down the strut tube and originating from the shaft seal is an ABNORMAL condition. Replace the strut. A visible trail from the seal usually indicates that the internal fluid is escaping and damping performance may be reduced.
Condition 4
Extreme wet film of oil covering the strut tube and pooling in the spring seat and originating from the shaft seal is an ABNORMAL condition. Replace the strut. Heavy leakage can affect ride control, braking stability, tire contact, and overall front suspension performance.
Inspection
1. Verify the customer's concern is present. If the concern is present, continue to the next step. If the concern is not present, then the vehicle is operating normally. Confirm the complaint under the same conditions described by the customer, such as rough roads, braking, turning, or highway driving.
2. Raise and support the vehicle. Refer to Lifting and Jacking the Vehicle. Support the vehicle securely so the front suspension can be checked without load shifting or unsafe movement.
NOTE: The strut assembly DOES NOT have to be removed from the vehicle to perform the following inspection procedure.
3. Visually inspect each of the shock absorbers or struts for external fluid leaks. Refer to the following conditions 1, 2, 3 and 4 for visual inspection. Clean dirt from the area if necessary so the source of any fluid can be identified accurately.
- If conditions 1 or 2 are found, continue to step 4.
- If conditions 3 or 4 are found, replace strut. Refer to Strut Replacement below.
4. If equipped with electronic suspension control system, ensure that the system is working properly. Refer to the appropriate Diagnostic Starting Point - Electronic Suspension Control information. A control system concern can sometimes imitate a weak or noisy strut complaint.
5. Use your hands in order to lift up and push down on each corner of the vehicle 3 times. Remove your hands from the vehicle. If the corner motion exceeds 2 cycles, replace the strut. If the strut does not exceed 2 cycles, NO repair is necessary. This bounce check helps confirm whether the strut is controlling spring movement properly on the Buick Enclave.
STRUT ASSEMBLY REMOVAL AND INSTALLATION
Removal Procedure
1. Remove the air inlet grille. Refer to Air Inlet Grille Panel Replacement. This provides access to the upper strut mounting area from above.
2. Raise and support the vehicle. Refer to Lifting and Jacking the Vehicle. Make sure the vehicle is stable before disconnecting the stabilizer link, wiring harness, or strut-to-knuckle fasteners.
3. Remove the stabilizer link at the front strut. Refer to Stabilizer Shaft Link Replacement. Support the link as needed and avoid twisting the link boot or stud during removal.
4. Remove the wheel speed sensor wiring harness (1) and (2) from the front strut (3). Release the harness retainers carefully so the wiring is not stretched, cut, or pulled away from the sensor.
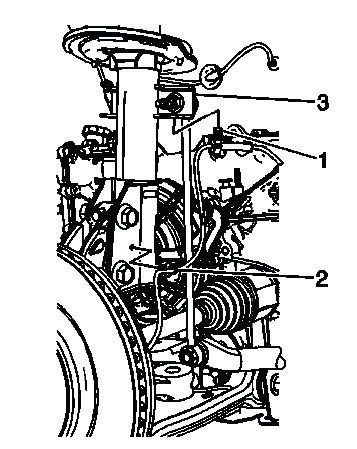
Fig. 39: Identifying Wheel Speed Sensor Wiring Harness & Front Strut
5. If removing the front strut to service any other suspension or steering component, scribe a line in the steering knuckle against the front strut. This will aid in the realigning the front suspension. Marking the position helps return the knuckle close to its original location, but it does not replace a proper alignment check after service.
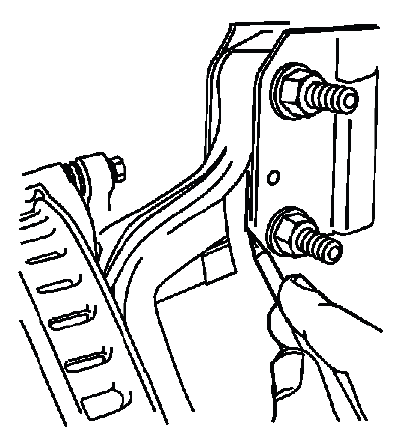
Fig. 40: Scribing Strut To Knuckle
6. Lower the vehicle to gain access to the upper strut mounting bolts. Lower it only as needed and keep the vehicle secure while working from the upper side.
7. Remove the front strut mounting bolts and nuts. Support the knuckle and strut area so the assembly does not shift suddenly when the fasteners are removed.
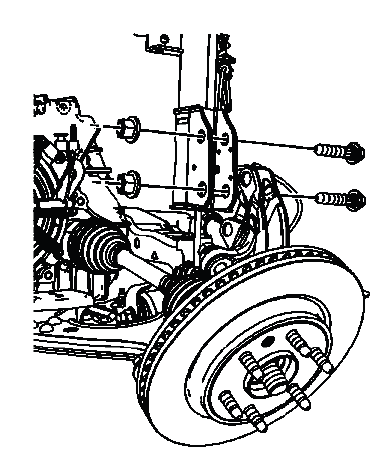
Fig. 41: Identifying Front Strut Mounting Bolts & Nuts
8. Remove the upper strut mounting nuts. Hold the strut assembly securely while the last nut is removed so it does not fall, damage the fender area, or pull on the brake hose or wiring. After strut removal, keep the spring and strut assembly upright and follow the correct spring handling procedure before disassembly.
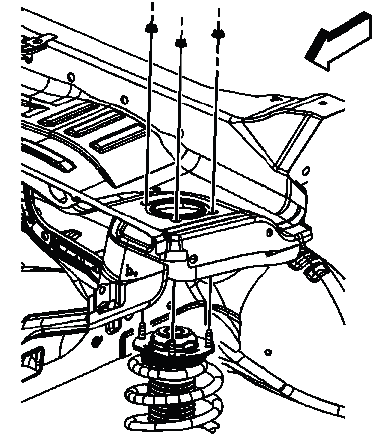
Fig. 42: Identifying Upper Strut Mounting Nuts
9. Separate the front strut from the steering knuckle. Support the steering knuckle as the strut is separated so the brake hose, wheel speed sensor harness, and drive shaft boot are not pulled or stressed.
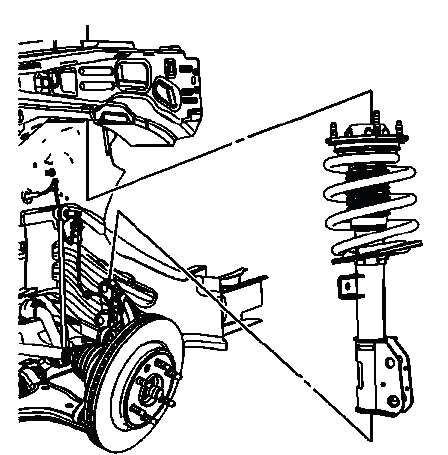
Fig. 43: Identifying Front Strut Assembly
NOTE: To reduce the brake hose stress during strut removal, install a jack stand under the steering knuckle.
10. Remove the front strut assembly from the vehicle. Guide the assembly out carefully and keep it away from the fender edge, brake hose, ABS wiring, and surrounding suspension components.
11. If replacing the strut or the spring, refer to Strut, Strut Component or Spring Replacement. Do not disassemble the strut assembly unless the coil spring is secured in an approved compressor.
Installation Procedure
1. Position the front strut in the strut tower. Align the upper studs with the tower openings and hold the assembly steady so the mount sits flat against the body.

Fig. 44: Identifying Upper Strut Mounting Nuts
2. Install the upper strut mounting nuts. Start each nut by hand first to avoid cross-threading and to keep the strut mount seated evenly in the tower.
CAUTION: Refer to Fastener Caution.
Tighten
- Tighten the mounting nut to 45 N.m (33 lb ft).
3. Raise the vehicle. Make sure the vehicle is supported securely before working around the steering knuckle and lower strut mounting points.
4. Position the front strut on the steering knuckle. Bring the knuckle into alignment with the strut bracket without forcing the brake hose, wheel speed sensor harness, or axle shaft.
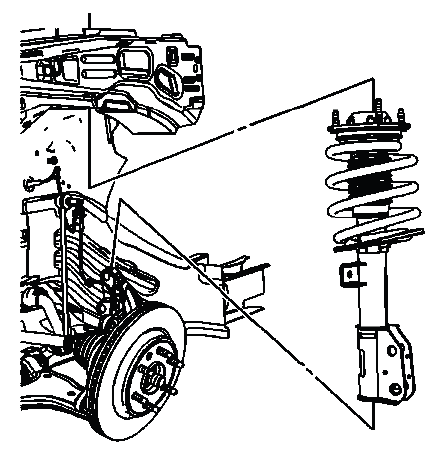
Fig. 45: Identifying Front Strut Assembly
NOTE: To reduce the brake hose stress during strut installation, install a jack stand under the steering knuckle.
NOTE: If installing the front strut after servicing another steering or suspension component, align the front strut to the scribe mark on the steering knuckle.
5. Install the front strut to steering knuckle mounting nuts and bolts. If a scribe mark was made during removal, use it to return the strut and knuckle close to their original relationship before tightening.
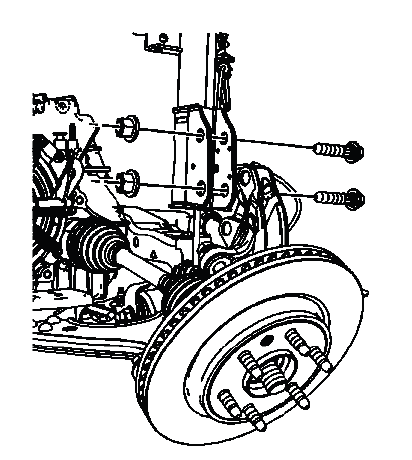
Fig. 46: Identifying Front Strut Mounting Bolts & Nuts
Tighten
- Tighten the mounting nut to 195 N.m (144 lb ft).
6. Install the stabilizer link at the front strut. Refer to Stabilizer Shaft Link Replacement. Make sure the link stud is not spinning freely and that the boot is not twisted during tightening.
7. Install the wheel speed sensor wiring harness (1) and (2) on the front strut (3). Route the harness exactly as originally installed so it will not rub the tire, strut, spring, brake hose, or steering knuckle during suspension travel.
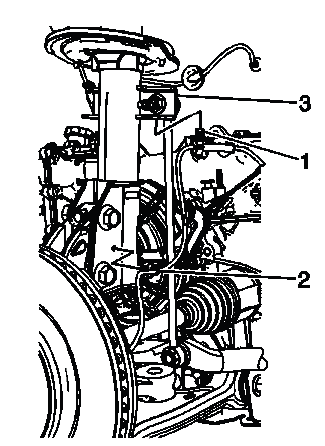
Fig. 47: Identifying Wheel Speed Sensor Wiring Harness & Front Strut
8. Install the air inlet grille. Refer to Air Inlet Grille Panel Replacement. Confirm the grille panel and seals are seated correctly before closing out the upper strut area.
9. Align the front end. Refer to Wheel Alignment Measurement. Strut-to-knuckle position can affect camber and toe, so a front alignment check is required after this repair. Road test the Buick Enclave after alignment to confirm stable tracking, normal steering return, and no suspension noise.
SUSPENSION SHOCK/STRUT DISPOSAL
WARNING: Use the proper eye protection when drilling to prevent metal chips from causing physical injury.
1. Clamp the strut in a vise horizontally with the rod (1) completely extended. Secure the strut firmly, but do not crush the tube or damage the rod surface.
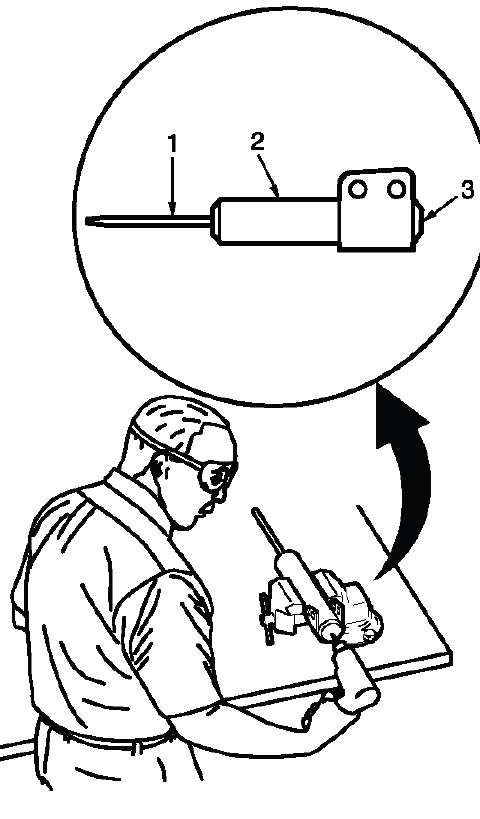
Fig. 48: Drilling Hole In Strut At Center Of End Cap
2. Drill a hole in the strut at the center of the end cap (3) using a 5 mm (3/16 in) drill bit. Gas or a gas/oil mixture will exhaust when the drill bit penetrates the strut. Use shop towels in order to contain the escaping oil. Keep your face and hands away from the drilling point as internal pressure is released.
3. Remove the strut from the vise. Keep the drilled hole pointed away from your body and work area surfaces that could be contaminated by oil.
4. Hold the strut over a drain pan vertically with the hole down. Allow the fluid to drain completely before disposal.
5. Move the rod (1) in and out of the tube (2) to completely drain the oil from the strut. Continue cycling the rod until oil flow has stopped, then dispose of the drained fluid and strut according to local regulations.
STRUT, STRUT COMPONENT OR SPRING REPLACEMENT
Special Tools
- J 42991 Strut Rod Nut Socket
- J 45400 Strut Spring Compressor
Disassembly Procedure
1. Remove the strut from the vehicle. Refer to Strut Assembly Removal and Installation. Place the strut assembly on a clean work surface and keep it upright until it is secured in the spring compressor.
2. Install the strut (2) in the J 45400 Strut Spring Compressor (1). Make sure the spring is properly seated in the compressor shoes and that the tool is aligned with the spring before compression begins.
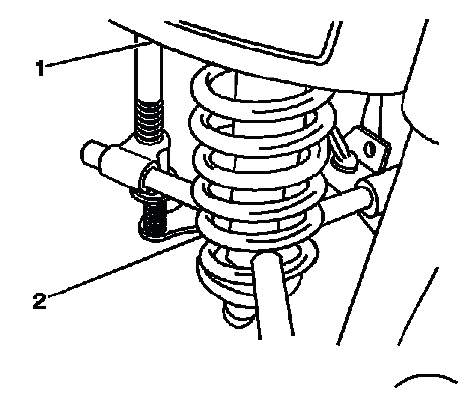
Fig. 49: Compressing/Releasing Lower Part Of Shock Spring
3. Turn the spring compressor forcing screw (1) until the coil spring (2) is compressed. Compress the spring evenly and only as much as needed to remove load from the upper strut mount.
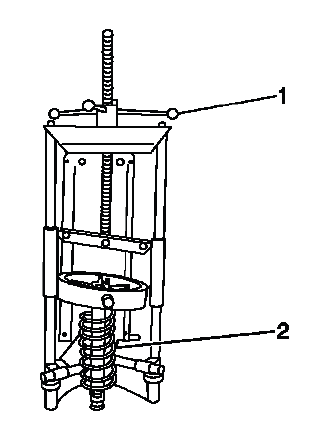
Fig. 50: View Of Compressor Forcing Screw & Coil Spring
NOTE: The spring is compressed when the strut moves freely.
4. Using a socket or a wrench hold the strut rod, use the J 42991 Strut Rod Nut Socket and a ratchet wrench, remove the strut rod nut. Keep the rod from turning while loosening the nut so the internal strut components are not damaged.
5. Remove the strut from the J 45400 Strut Spring Compressor. Maintain control of the strut body as it is separated from the compressed spring and mount.
6. Loosen the compressor forcing screw (1) until the upper strut mount and coil spring (2) may be removed. Release spring tension slowly and evenly.
7. Remove the upper strut mount and the coil spring from the J 45400 Strut Spring Compressor. Check the spring, mount, bearing, isolators, jounce bumper, and dust shield for cracks, wear, distortion, or damage before reuse.
Assembly Procedure
1. Prior to reassembling the strut components, apply a small amount of lubricant to the strut rod and the inside of the jounce bumper. Refer to Adhesives, Fluids, Lubricants and Sealers. Use only the recommended lubricant and avoid getting it on the spring seat or mounting surfaces.
2. Install the coil spring and upper strut mount to the J 45400 Strut Spring Compressor. Position the spring end correctly in the seat and align the mount as it was originally installed.
3. Turn the spring compressor forcing screw (1) until the coil spring is compressed. Compress the spring enough to allow safe installation of the strut and retaining nut without forcing the parts together.
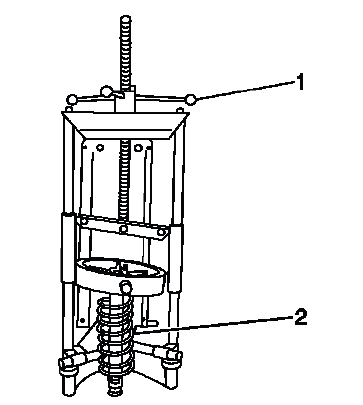
Fig. 51: View Of Compressor Forcing Screw & Coil Spring
4. Install the strut to the coil spring and upper strut mount. Confirm the spring is correctly seated at both ends and that the mount is oriented properly.
5. Loosely install the strut retaining nut. Thread the nut by hand first so it starts cleanly on the strut rod.
6. Using a socket or a wrench hold the strut rod. Prevent the rod from turning while the retaining nut is tightened.
7. With the wrench or socket holding the strut rod, use the J 42991 Strut Rod Nut Socket and a torque to install the upper strut mount nut. Tighten the strut mount nut to 85 N.m (63 lb ft). Correct torque is important for secure mount retention and quiet front suspension operation.
CAUTION: Refer to Fastener Caution.
8. Remove the strut from the J 45400 Strut Spring Compressor. Release the compressor only after confirming the spring is seated properly and the retaining nut is fully tightened.
9. Install the strut to the vehicle. Refer to Strut Assembly Removal and Installation. After installation, perform the required alignment check and confirm the front suspension operates quietly through steering and suspension travel.
