Buick Enclave: Diagnostic Information and Procedures
TRANSMISSION FLUID COOLER FLUSHING AND FLOW TEST
GM service information shows that restricted or plugged transmission oil coolers and cooler pipes can reduce lubrication flow, raise transmission operating temperature, and contribute to premature transaxle failure. In many repeat repair situations, the failure is not caused only by the transmission unit itself, but by debris, restriction, or poor flow remaining in the cooling circuit after the original repair. For this reason, transmission oil cooler flushing and flow testing must be treated as part of the repair process, not as an optional clean-up step.
When a Buick Enclave transmission has been removed for service, the cooler and cooler lines should be flushed and flow tested before the repaired or replacement transaxle is placed back into operation. This procedure includes the auxiliary transmission oil cooler if the vehicle is equipped with one. The goal is to remove contamination, confirm the cooler can pass the required amount of fluid, and document the final flow result.
NOTE: Use the DT 45096 transmission oil cooling system flush and flow test tool or equivalent to flush and flow test the transmission oil cooler and the oil cooler pipes after the transaxle is removed for repairs.
Only GM Goodwrench DEXRONVI automatic transmission fluid should be used when doing a repair on a GM transmission. Using the correct fluid is important because the flush machine, cooler circuit, and transmission hydraulic system are designed around the proper fluid characteristics.
Time allowance for performing the cooler flow checking and flushing procedure has been included in the appropriate labor time guide operations since the 1987 model year. The service procedure steps for oil cooler flushing and flow testing are as follows:
Cooler Flow Check and Flushing Steps
- Machine Set-up
- Determine Minimum Flow Rate
- Back Flush
- Forward Flush
- Flow Test
- Code Recording Procedure
- Clean-up
Each step should be completed in sequence. Skipping the back flush, forward flush, or flow test can leave the technician without proof that the cooler circuit is clean and capable of supporting the transmission after repair.
Special Tools
- DT 45096 Transmission Oil Cooling System Flush and Flow Test Tool
- DT 45096-50 Transmission Cooler Flush Adapter
- Shop air supply with water/oil filters, regulator and pressure gauge - minimum 90 psi
- Eye protection
- Rubber gloves
For equivalent regional tools, refer to Special Tools. Eye protection and gloves should be used because the procedure involves pressurized fluid, shop air, and waste automatic transmission fluid that may be hot or contaminated.
Machine Set-up
1. Verify that the main power switch (1) is in the OFF position. The machine should always be checked before hoses, power leads, or fluid are connected so it does not start unexpectedly during setup.

Fig. 1: View Of Main Power Switch & Main Function Switch
2. Place the main function switch (2) in the IDLE position. This keeps the tool in a neutral state while the power, fluid, and air supply connections are being prepared.
3. Connect DT 45096 flush and flow test tool to the vehicle 12V DC power source by connecting the red battery clip to the positive, +, battery post on the vehicle and connect the negative lead to a known good chassis ground. Make sure the clips are secure and that the leads are routed away from moving parts, hot exhaust components, and sharp edges.
Fig. 2: Connecting To 12V DC Power Source
4. Turn the main power switch to the ON position. Watch the display and verify that the unit powers up normally before filling or operating the machine.
5. Fill the supply tank with DexronVI through the fill port. Pour the fluid carefully to avoid introducing dirt into the supply tank. Clean fluid is necessary because anything placed into the machine can be pushed through the cooler circuit during flushing.
Fig. 3: Filling Supply Tank With Transmission Fluid
CAUTION: Do not overfill the supply vessel. Damage to the unit may result. To verify the fluid level, view the LCD screen display while filling the unit, to ensure the fluid level does not exceed 30 L (32 qt).
6. Reinstall and tighten the fill cap. Make sure the cap is fully seated so the machine can build and control pressure correctly during the flushing and flow test procedure.
7. Connect a shop air supply hose to the quick-disconnect on the rear panel marked SUPPLY AIR. The air supply should be filtered, regulated, and capable of meeting the minimum pressure requirement. Moisture or oil in the air supply can reduce tool performance and contaminate the system.
Fig. 4: Applying Shop Air Supply Hose To Quick-Disconnect
Determine Minimum Flow Rate
1. From the machine display, identify the temperature of the automatic transmission fluid that is stored in the supply vessel of DT 45096 flush and flow test tool. Fluid temperature matters because viscosity changes with temperature, and cooler flow must be judged against the correct temperature-based minimum value.
Fig. 5: Identifying Machine Display Of Automatic Transmission Fluid
Temperature
2. Determine whether the transmission oil cooler is steel or aluminum by using a magnet (1) at the cooler flange (2) at the radiator. This distinction is needed because the minimum acceptable flow rate is selected from the correct material table.
Fig. 6: Identifying Transmission Oil Cooler Metal Composition
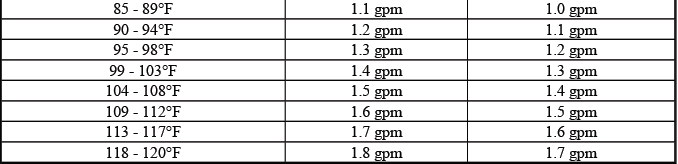
3. Refer to the table below. Using the temperature from step 1, locate on either the Steel MINIMUM Flow Rate table or the Aluminum MINIMUM Flow Rate table the minimum flow rate in gallons per minutes (GPM). Record the minimum flow rate in GPMs and the supply fluid temperature for further reference. Recording these values before the flow test prevents confusion when comparing the tested result later.
Example
- Fluid temperature: 75ºF
- Cooler type: Steel
The MINIMUM flow rate for this example would be 0.8 GPM.
4. Inspect transmission oil cooler lines for damage or kinks that could cause restricted oil flow. Repair as needed and refer to the appropriate GM service manual procedures. A kinked, crushed, twisted, or internally restricted line can fail the flow test even when the cooler core itself is usable.
Minimum Flow Rate in Gallons Per Minute (gpm)

Back Flush Procedure
1. Connect the DT 45096-50 cooler flush adapter (1) to the vehicle transmission oil cooler supply and return lines at the transmission. Make sure each connection is fully seated so the tool can move fluid through the cooler circuit without leakage or pressure loss.
Fig. 7: Identifying Special Tool - J 45096-50
2. Connect the black supply hose (1) to the return line, top connector of the transmission and the clear waste hose (2) to the feed line, bottom connector of the transmission, to the vehicle cooler lines. This is the reverse flow - backflush direction. Reverse flow helps loosen debris that may be trapped against the normal direction of fluid travel.
Fig. 8: View Of Black Supply Hose And Clear Waste Hose
3. Turn the main function switch to the FLUSH position. Allow the machine to operate for 30 seconds. Watch the waste hose and container area for signs of heavy debris, discoloration, or restricted flow.
Fig. 9: View Of Main Function Switch FLUSH Position
4. Turn the main function switch to the IDLE position and allow the supply vessel pressure to dissipate. Do not disconnect hoses until pressure has dropped, because pressurized ATF can spray from the fittings.
Fig. 10: View Of Main Function Switch IDLE Position
Forward Flush
1. Disconnect the supply and waste hoses from the vehicle cooler lines. Reverse the supply and waste hoses to provide a normal flow direction. This step follows the backflush by pushing fluid through the cooler circuit in the same direction it will flow during vehicle operation.
Fig. 11: Identifying Supply And Waste Hoses
2. Turn the main function switch to the FLUSH position and allow machine to operate for 30 seconds. The forward flush should help carry loosened material out of the cooler and lines before the final flow measurement is taken.
Fig. 12: View Of Main Function Switch FLUSH Position
Flow Test
1. Turn the main function switch to the FLOW position and allow the oil to flow for 15 seconds. Observe and note the flow rate; this is the TESTED flow rate. The reading should be stable enough to compare against the minimum flow rate selected earlier from the temperature and cooler material table.

Fig. 13: View Of Main Function Switch FLOW Position
NOTE: If the flow rate is less than 0.5 gpm, the LCD displays an error message.
Refer to the Troubleshooting section of the operation manual.
2. Compare the TESTED flow rate to the MINIMUM flow rate information previously recorded.
- If the TESTED flow rate is equal to or greater than the MINIMUM flow rate recorded, the oil cooling system is functioning properly. Perform Code Recording Procedure.
- If the TESTED flow rate is less than the MINIMUM flow rate previously recorded, repeat the back flush and forward flush procedures.
3. If the TESTED flow rate is less than the MINIMUM flow rate after the second test, perform Code Recording Procedure.
- Replace the transmission oil cooler.
- Reconnect supply and waste hoses to the cooler lines in the normal flow direction. Perform Flow Test.
- Perform Code Recording Procedure.
If the cooler fails the repeated flow test, replacement is required because continued use can starve the transmission of cooling and lubrication flow. On a Buick Enclave, a restricted cooler left in service after transmission repair can quickly damage the repaired unit and create a repeat failure.
Code Recording Procedure
1. Turn the main function switch to the CODE position. The code recording step creates a service record of the tested flow result and helps document that the cooler flushing and flow check were completed.
Fig. 14: View Of Main Function Switch CODE Position
2. Record TESTED flow rate, temperature, cycle and seven-character flow code information on repair order. This information should be written clearly because it documents the cooler condition at the time of service.
NOTE: If power is interrupted prior to the recording of the seven-character code, the code will be lost and the flow rate test will need to be repeated.
The flow test must run for a minimum of 8-10 seconds and be above 0.5 GPM for a code to be generated.
Clean-up
1. Turn the main function switch (2) to the IDLE position and allow the supply vessel pressure to dissipate. Waiting for pressure to drop prevents fluid spray when the hoses are disconnected.
Fig. 15: View Of Main Power Switch & Main Function Switch
2. Turn the main power switch (1) to the OFF position. Confirm the machine is no longer operating before removing the power leads.
3. Disconnect the supply and waste hoses and the 12-volt power source from the vehicle. Cap or control the hose ends as needed to prevent fluid from dripping onto painted surfaces, wiring, exhaust parts, or the shop floor.
NOTE: A small amount of water may drain from the bottom of the unit when the air supply is disconnected. This is a normal operation of the built-in water separator.
4. Disconnect the air supply hose from DT 45096 flush and flow test tool. Keep the hose end under control as the connection is released.
Fig. 16: Applying Shop Air Supply Hose To Quick-Disconnect
5. Dispose of the waste ATF in accordance with all applicable federal, state and local requirements. Used automatic transmission fluid should be handled as waste fluid and kept out of drains, soil, and general trash. After cleanup, wipe the cooler line connections and surrounding areas so any later seepage can be identified during final inspection.
