Buick Enclave: Repair Instructions
TRANSMISSION FLUID COOLER PIPE CONNECTOR REPLACEMENT - RADIATOR
The transmission fluid cooler pipe connector at the radiator must seal correctly and hold the cooler line securely under normal operating pressure and temperature. A damaged connector, weak retainer, worn seal, or contaminated fitting can allow fluid seepage, line movement, or a loss of cooler flow. Before removing the connector, clean the surrounding area so dirt does not enter the cooler circuit or remain trapped around the fitting.
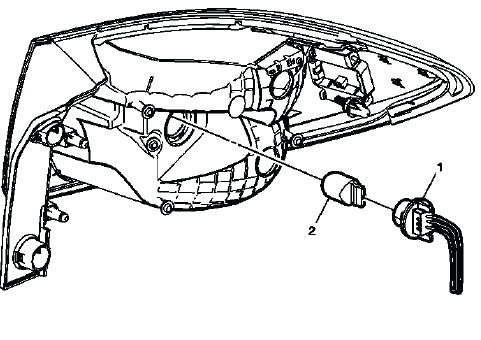
Fig. 17: View Of Transmission Fluid Cooler Hose/Pipe Connector
Transmission Fluid Cooler Pipe Connector Replacement - Radiator
When replacing the radiator-side cooler pipe connector, inspect both the fitting and the cooler pipe end. The pipe should be round, clean, and free of burrs, grooves, corrosion, or damage where it enters the connector. A new connector may still leak if the line end is distorted or if old debris remains in the sealing area. On a Buick Enclave, this repair should also include a final check for correct cooler line routing so the line is not rubbing against the radiator support, fan shroud, brackets, or nearby components.
TRANSMISSION FLUID COOLER HOSE/PIPE QUICK-CONNECT FITTING DISCONNECTION AND CONNECTION
The quick-connect fitting allows the transmission oil cooler pipe to be disconnected and reconnected without cutting the line. Even though the fitting is compact, it must be handled carefully. Forcing the pipe, prying against the connector, or reusing a damaged retaining clip can create a leak or allow the line to separate later. Always work with the correct release tool and keep the fitting clean during service.
Special Tools
- DT-28585 Universal Snap Ring Remover for the 5/8 inch Line
- DT-41623-B 3/8 inch Line Quick Release Tool
Removal Procedure
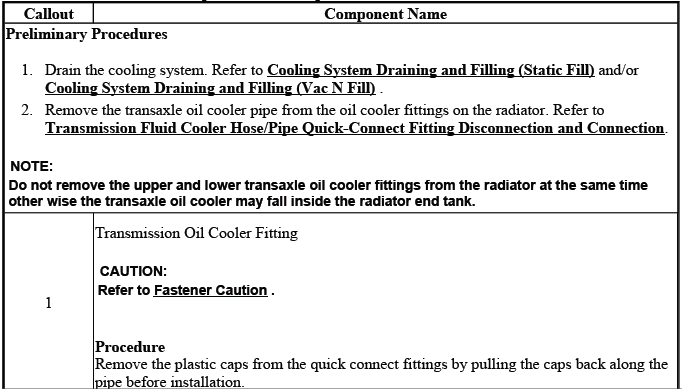
1. Remove the plastic cap from the quick connect fitting by pulling the cap back along the pipe. Do not cut or twist the cap unless replacement is required. The cap helps protect the fitting from dirt and gives a visual indication that the connection is fully covered after assembly.
2. Install the DT-41623-B 3/8 inch line quick release tool onto the transmission oil cooler (TOC) pipe or use the DT-28585 universal snap ring remover for the 5/8 inch line. Make sure the tool is positioned evenly around the line so it can contact the retainer correctly.
Fig. 18: View Of J 41623-B & Generator Cooling Inlet Pipe
3. Slide the DT-41623-B 3/8 inch line quick release tool toward the TOC pipe fitting or use the DT-28585 universal snap ring remover for the 5/8 inch line. Keep the tool square to the fitting while sliding it forward. If the tool is angled, it may not release the retainer fully.
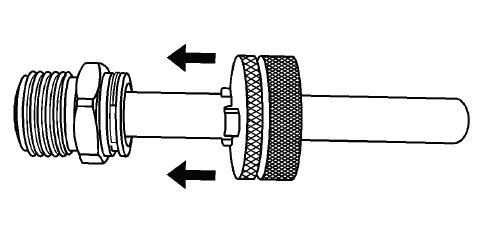
Fig. 19: Sliding J 41623-B Toward Generator Cooling Inlet Pipe Fitting
4. Connect the DT-41623-B 3/8 inch line quick release tool onto the TOC pipe fitting. The tool must engage the fitting deeply enough to lift the retaining clip away from the pipe bead.
Fig. 20: Rotating Quick-Connect On Coolant Pipe
NOTE: Rotate the DT-41623-B 3/8 inch line quick release tool to engage the TOC pipe fitting's retainer slots.
The DT-41623-B 3/8 inch line quick release tool should be nearly flush with the fitting.
5. Rotate the DT-41623-B 3/8 inch line quick release tool or use the DT-28585 universal snap ring remover for the 5/8 inch line until the retainer clip (1) rises above the fitting retainer seat. Work slowly and avoid spreading the clip more than necessary. A distorted retainer can lose its holding force and should not be reused.
Fig. 21: Rotating Quick-Connect Until Retainer Clip Rises Above Fitting
Retainer Seat
6. Pull back on the TOC pipe to disengage the pipe from the TOC pipe fitting. Pull straight away from the fitting rather than twisting sharply. If the line does not release, confirm that the retainer is fully lifted before applying more force.
Fig. 22: View Of J 41623-B & Generator Cooling Inlet Pipe
7. Remove the DT-41623-B 3/8 inch line quick release tool or the DT-28585 universal snap ring remover for the 5/8 inch line from the TOC pipe. After removal, inspect the fitting bore, seal area, pipe bead, and retainer seat for damage or debris.
Installation Procedure
1. Install the TOC pipe into the TOC pipe fitting. Push the pipe straight into the fitting until the retainer engages. Do not lubricate the connection with an unapproved product, because some materials can damage seals or attract dirt.
Fig. 23: View Of Generator Cooling Inlet Pipe & Generator Cooling Inlet Pipe
Fitting
NOTE: Discard the TOC retaining clip and install a new retaining clip.
A distinct snap should be heard or felt when assembling the TOC pipe to the fitting. This sound or feel indicates that the line bead has passed the retainer and the pipe is locked in place.
2. Install the plastic cap onto the quick connect fitting. The plastic cap should snap onto fitting and spin freely by hand. If the cap does not seat, check whether the line is fully inserted or whether the connector is damaged.
3. To ensure the cooler line is properly installed, give the cooler pipe a gentle pull. The line should remain locked in the fitting without sliding out. After the transmission is filled and operated, inspect the connection again for seepage.
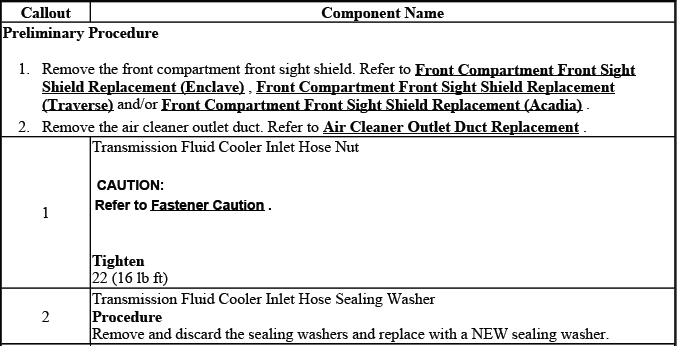
FLUID COOLER INLET HOSE REPLACEMENT
The fluid cooler inlet hose carries hot transmission fluid from the transmission toward the cooling circuit. A leaking, kinked, cracked, swollen, or restricted inlet hose can reduce cooling performance and may lead to higher transmission temperature. Before replacement, note the original routing and the location of any retainers, clips, shields, or brackets.
Fig. 24: Fluid Cooler Inlet Hose
Fluid Cooler Inlet Hose Replacement
During installation, route the inlet hose away from exhaust heat, sharp edges, moving parts, and areas where the hose may rub against the body or engine compartment hardware. Make sure every connector is fully seated and locked. After service, run the engine, check the transmission fluid level by the correct procedure, and inspect the hose ends for leaks under operating pressure.

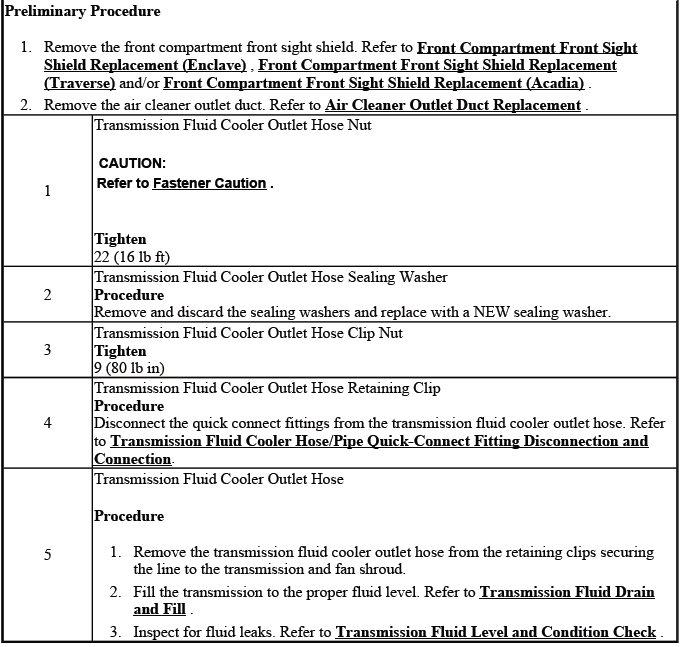
FLUID COOLER OUTLET HOSE REPLACEMENT
The fluid cooler outlet hose returns cooled transmission fluid from the cooler circuit back toward the transmission. A restriction, poor connection, or leak in this hose can affect lubrication flow and temperature control. Check the outlet hose for collapsed sections, abrasion marks, damaged fittings, and signs of fluid residue before removing it.
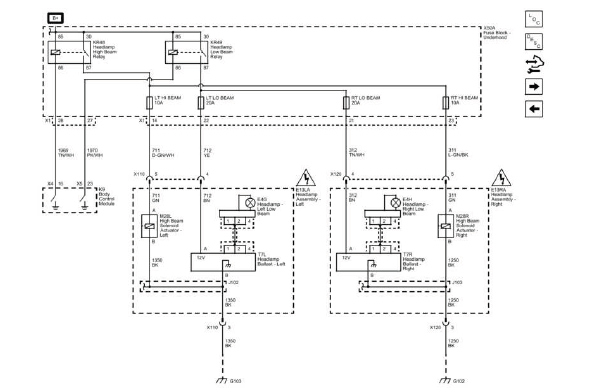
Fig. 25: Fluid Cooler Outlet Hose
Fluid Cooler Outlet Hose Replacement
Install the replacement outlet hose in the same path as the original. Avoid twisting the hose during installation, and confirm that it has enough clearance from hot or moving components. On a Buick Enclave, both cooler hoses should be inspected together because one damaged line often indicates age, heat exposure, or routing issues that may affect the other line as well.

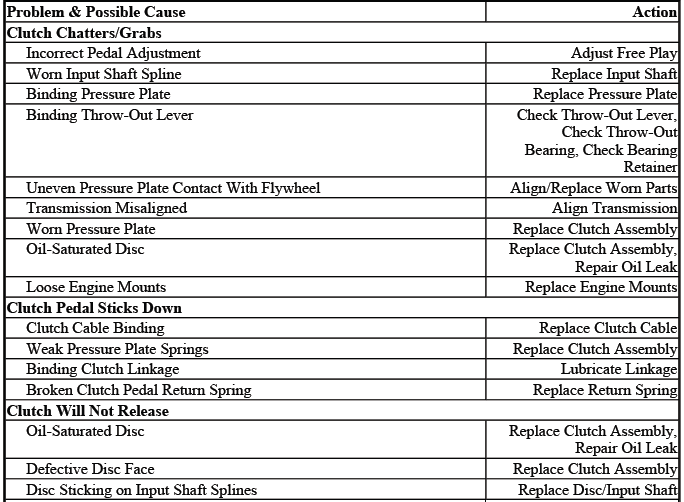
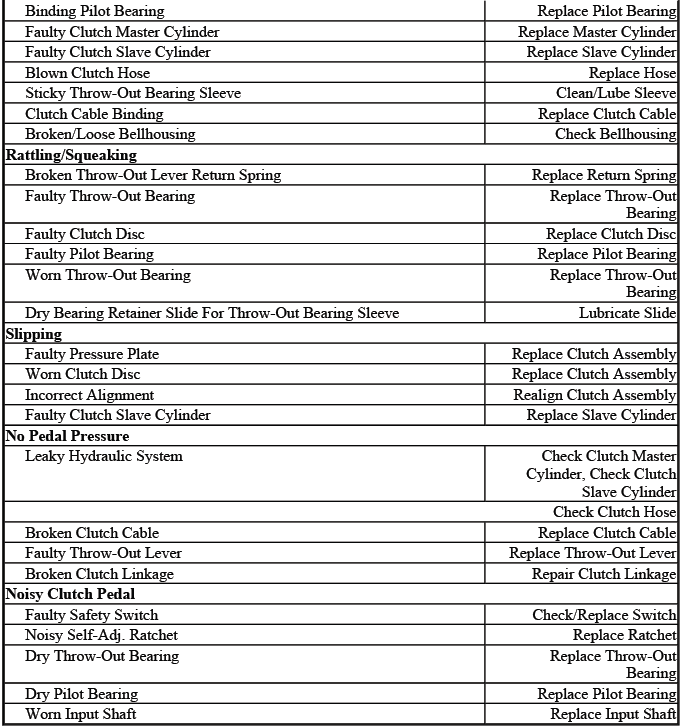
Clutch Trouble Shooting
* PLEASE READ THIS FIRST *
NOTE: This is GENERAL information. This article is not intended to be specific to any unique situation or individual vehicle configuration. For model-specific information see appropriate articles where available.
ALL MODELS
NOTE: This is GENERAL information. This article is not intended to be specific to any unique situation or individual vehicle configuration. For model-specific information see appropriate articles where available.
CLUTCH TROUBLE SHOOTING
Clutch troubleshooting should begin by confirming the complaint and identifying the exact operating condition. Slipping, chatter, hard shifting, noise, incomplete release, pedal vibration, or unusual engagement feel can have different causes. Although this information is general, the same diagnostic idea applies: verify the symptom first, then check linkage, hydraulic operation, clutch wear, release components, mounting condition, and related driveline parts before replacing major components.