Buick Enclave: Repair Instructions
INTERMEDIATE STEERING SHAFT BOOT REPLACEMENT
Removal Procedure
1. Turn the steering wheel to the straight forward position and lock the steering column. The front wheels should remain pointed straight ahead before the intermediate shaft is disconnected, because steering wheel rotation after separation can damage the SIR coil centering.
CAUTION: With wheels of the vehicle facing straight ahead, secure the steering wheel utilizing steering column anti-rotation pin, steering column lock or a strap to prevent rotation. Locking of the steering column will prevent damage and a possible malfunction of the SIR system.
The steering wheel must be secured in position before disconnecting the following components:
- The steering column
- The intermediate shaft(s)
- The steering gear
After disconnecting these components, do not rotate the steering wheel or move the front tires and wheels. Failure to follow this procedure may cause the SIR coil assembly to become un-centered and cause possible damage to the SIR coil. If you think the SIR coil has become un-centered, refer to your specific SIR coil's centering procedure to re-center SIR Coil.
2. Raise and support the vehicle. Refer to Lifting and Jacking the Vehicle. Make sure the vehicle is stable before working near the steering gear, front suspension, or wheelhouse area.
3. Remove the left front tire and wheel assembly. Refer to Tire and Wheel Removal and Installation. Removing the wheel gives better access to the intermediate steering shaft boot and lower shaft connection.
4. Disengage the intermediate steering shaft boot from the steering gear and from the intermediate steering shaft upper seal. Work the boot loose carefully so the sealing lips are not torn or stretched during removal.
5. Remove the intermediate steering shaft lower bolt (1). Discard the bolt. This fastener is not intended to be reused, because the replacement bolt includes the required locking feature for proper retention.
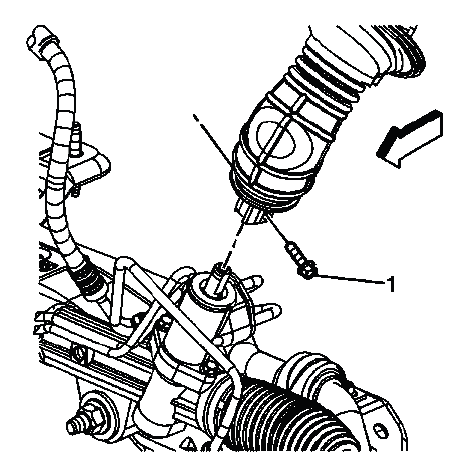
Fig. 7: Identifying Intermediate Steering Shaft Bolt
6. Disconnect the intermediate steering shaft from the steering gear. Keep the steering column locked and avoid rotating the shaft once it is separated from the gear.
7. Remove the intermediate steering shaft boot (1). Slide the boot off carefully and inspect the surrounding area for dirt, water marks, corrosion, or wear that could indicate the boot was not sealing correctly.

Fig. 8: Identifying Intermediate Steering Shaft Boot
NOTE: Do not tear the intermediate steering shaft boot.
Installation Procedure
1. Install the intermediate steering shaft boot (1). Position the boot in the same orientation as the original part and make sure it is not folded, twisted, or trapped against the shaft.
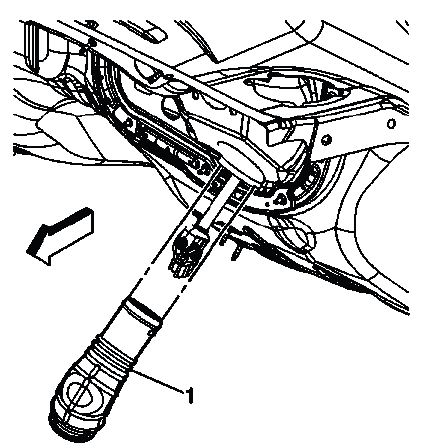
Fig. 9: Identifying Intermediate Steering Shaft Boot
2. Connect the intermediate steering shaft to the steering gear. Install the NEW intermediate steering shaft lower bolt (1) and tighten to 25 N.m (18 lb ft). Start the bolt by hand first so the joint aligns correctly before final tightening.
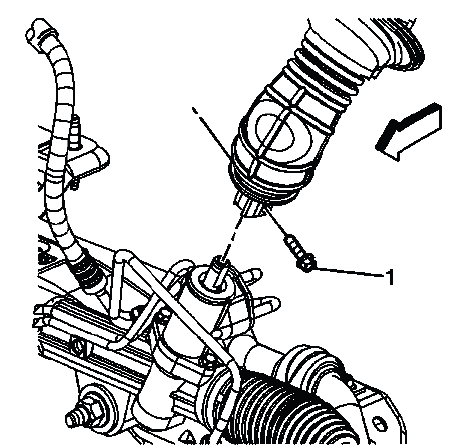
Fig. 10: Identifying Intermediate Steering Shaft Bolt
CAUTION: Refer to Fastener Caution.
NOTE: A NEW intermediate steering shaft lower bolt has a thread locking adhesive patch on the threads.
3. Install the intermediate steering shaft boot to the steering gear and to the intermediate steering shaft upper seal. Seat both ends evenly so the boot seals the opening and protects the shaft joint area from water, road splash, and debris.
NOTE: Install the intermediate steering shaft boot in the correct position.
4. Install the left front tire and wheel assembly. Refer to Tire and Wheel Removal and Installation. Confirm the wheel is seated correctly against the hub before the vehicle is lowered.
5. Lower the vehicle. After lowering, verify that the steering wheel remains centered and that no binding, rubbing, or abnormal feel is present during a careful steering check.
INTERMEDIATE STEERING SHAFT REPLACEMENT
Removal Procedure
1. Turn the steering wheel to the straight forward position and lock the steering column. On the Buick Enclave, this step protects the SIR coil and keeps the steering column relationship controlled while the intermediate shaft is removed.
CAUTION: With wheels of the vehicle facing straight ahead, secure the steering wheel utilizing steering column anti-rotation pin, steering column lock or a strap to prevent rotation. Locking of the steering column will prevent damage and a possible malfunction of the SIR system.
The steering wheel must be secured in position before disconnecting the following components:
- The steering column
- The intermediate shaft(s)
- The steering gear
After disconnecting these components, do not rotate the steering wheel or move the front tires and wheels. Failure to follow this procedure may cause the SIR coil assembly to become un-centered and cause possible damage to the SIR coil. If you think the SIR coil has become un-centered, refer to your specific SIR coil's centering procedure to re-center SIR Coil.
2. Raise and support the vehicle. Refer to Lifting and Jacking the Vehicle. Use stable support points and keep the steering system unloaded before disconnecting the lower shaft joint.
3. Disengage the intermediate steering shaft boot from the steering gear and from the intermediate steering shaft upper seal. Move the boot aside carefully to gain access to the shaft connection without tearing the rubber.
4. Remove the intermediate steering shaft lower bolt (1). Discard the bolt. Since this bolt uses a locking adhesive patch, always replace it during installation.
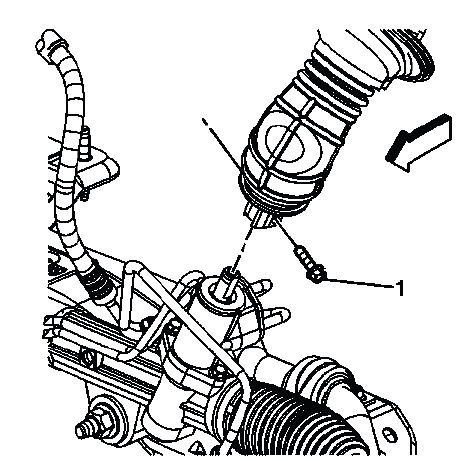
Fig. 11: Identifying Intermediate Steering Shaft Bolt
5. Disconnect the intermediate steering shaft from the steering gear. Do not rotate the steering wheel or allow the front wheels to turn while the shaft is separated.
6. Remove the left side instrument panel insulator panel. Refer to Instrument Panel Insulator Panel Replacement - Left Side. This provides access to the upper intermediate shaft connection inside the vehicle.
7. Remove the intermediate steering shaft upper bolt (1). Discard the bolt. Keep the shaft supported as the bolt is removed so it does not drop or pull against the steering column shaft.
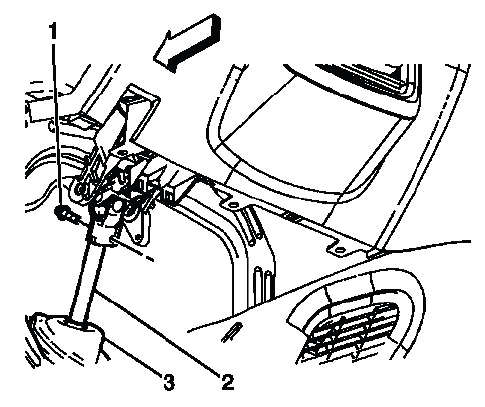
Fig. 12: Identifying Intermediate Steering Shaft Components
8. Disconnect the intermediate steering shaft (2) from the steering column shaft. Work the shaft free carefully and avoid prying against the column shaft or damaging the splines.
9. Disconnect the intermediate steering shaft upper seal (3) from the dash panel. Inspect the seal area for damage, misalignment, or evidence of water entry before installation of the replacement shaft.
10. Remove the intermediate steering shaft from the vehicle. Guide it out slowly, watching both ends of the shaft so it does not scratch trim, wiring, the dash panel seal area, or steering gear components.
NOTE: Spreading both ends of the new or removed intermediate steering shaft while out of the vehicle will help with the installation.
Installation Procedure
1. Position the intermediate steering shaft (2) in the vehicle. Route it through the original path and align both ends before installing the bolts. The shaft should not be forced into place or installed with the joints misaligned.
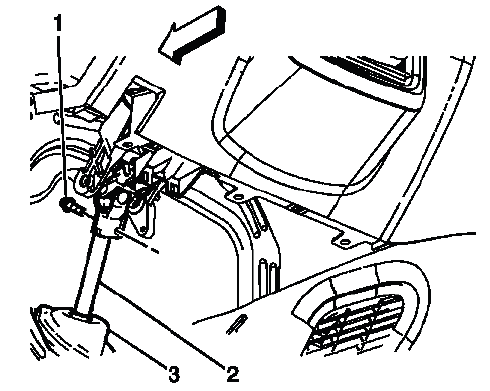
Fig. 13: Identifying Intermediate Steering Shaft Components
2. Connect the intermediate steering shaft to the steering column shaft. Make sure the shaft is fully seated on the column shaft and that the splines align correctly before the new upper bolt is installed.
3. Install the NEW intermediate steering shaft upper bolt (1) and tighten to 22 N.m (16 lb ft). Tighten the bolt to specification so the upper joint is secured without damaging the steering column shaft connection.
CAUTION: Refer to Fastener Caution.
NOTE: A NEW intermediate steering shaft upper bolt has a thread locking adhesive patch on the threads.
4. Connect the intermediate steering shaft upper seal (3) to the dash panel. Seat the seal evenly around the opening to help prevent water, dust, noise, and air movement from entering the cabin.
5. Install the left side instrument panel insulator panel. Refer to Instrument Panel Insulator Panel Replacement - Left Side. Make sure the panel is positioned correctly and does not interfere with the steering shaft or nearby wiring.
6. Connect the intermediate steering shaft to the steering gear. Install the NEW intermediate steering shaft lower bolt (1) and tighten to 25 N.m (18 lb ft). For Buick Enclave steering shaft service, confirm both upper and lower shaft connections are fully seated and tightened before unlocking the steering column or turning the wheel.
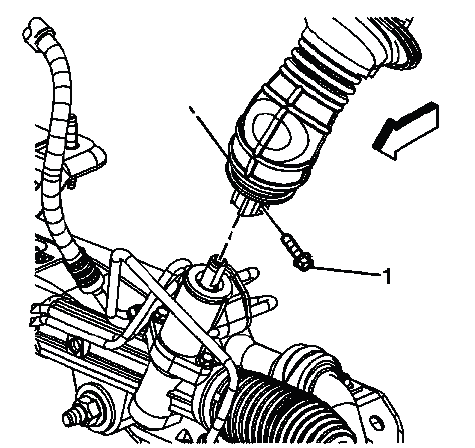
Fig. 14: Identifying Intermediate Steering Shaft Bolt
NOTE: A NEW intermediate steering shaft lower bolt has a thread locking adhesive patch on the threads.
7. Install the intermediate steering shaft boot to the steering gear and to the intermediate steering shaft upper seal. Seat the boot evenly at both ends so it protects the shaft connection from water, dust, road splash, and debris.
NOTE: Do not tear the intermediate steering shaft boot. Install the boot in the correct position.
8. Lower the vehicle. After the vehicle is on the ground, confirm that the steering wheel remains centered, the steering column is unlocked only after both shaft bolts are secured, and the steering operates smoothly without binding or abnormal noise.
STEERING COLUMN ACCIDENT DAMAGE INSPECTION
Inspection Procedure
1. Inspect the capsules on the steering column bracket assembly. Verify that the capsules are seated securely in the bracket slots, then check for any looseness by pushing and pulling them by hand. These capsules are designed to help manage steering column movement during a collision, so any looseness, separation, or misalignment must be treated seriously. If the capsules are not secure, perform one of the following procedures:
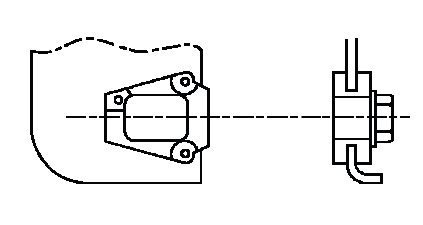
Fig. 15: Inspecting Capsules On Steering Column Bracket Assembly
- If the bracket is bolted to the jacket assembly, replace the bracket.
- If the bracket is welded to the jacket assembly, replace the jacket assembly.
2. Inspect the jacket assembly for collapse by measuring the distance from the lower edge of the upper jacket to a defined point on the lower jacket. If measured dimensions (A), are not within specifications (100 mm), install a steering column. A collapsed or shifted jacket assembly can indicate accident damage even if the steering column appears normal at first glance.
Fig. 16: Inspecting Jacket Assembly Dimensions
NOTE: Measurement procedure only for manually adjusted steering columns.
STEERING COLUMN UPPER TRIM COVER REPLACEMENT
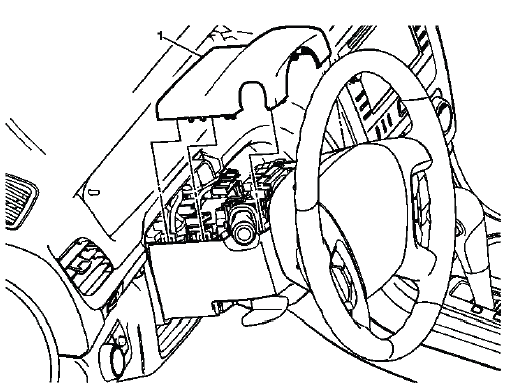
Fig. 17: Steering Column Upper Trim Cover
Steering Column Upper Trim Cover Replacement
The upper steering column trim cover should be removed and installed carefully to avoid breaking retaining tabs or marking the visible trim surface. Before installation, check that the cover does not pinch wiring, interfere with the tilt/telescope lever or switch, or rub against the steering wheel during rotation.
STEERING COLUMN LOWER TRIM COVER REPLACEMENT
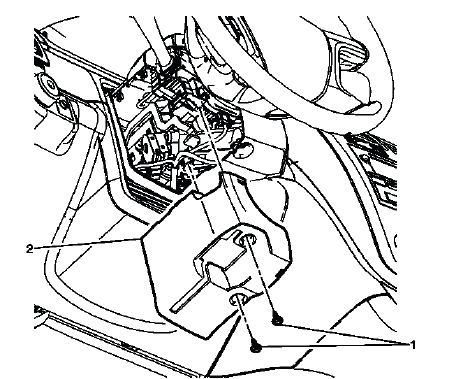
Fig. 18: Steering Column Lower Trim Cover
Steering Column Lower Trim Cover Replacement

When servicing the lower steering column trim cover, confirm that all retainers are aligned before pressing the cover into place. A mispositioned lower cover can create steering column noise, interfere with switch operation, or leave an uneven trim gap around the column.
TELESCOPING STEERING COLUMN CALIBRATION
Tilt/Telescoping Soft Stops
After replacement of the memory seat module (MSM), it is necessary to program the tilt/telescoping soft stops. This calibration teaches the module the safe travel limits of the steering column so the motors stop before the column reaches its mechanical end points.
Each soft stop is a programmable end of travel that is set approximately 1.3 cm (0.5 in) from the mechanical end of travel. The steering column has a soft stop set at each end of the telescoping in/out and tilt up/down movement. The system uses soft stops to prevent wear on the system by ensuring that the steering column movement stops before it reaches its mechanical end of travel in any direction. The soft stops are initially programmed at the factory. The stop positions may be reprogrammed, which is necessary any time the MSM, the tilt actuator or telescope actuators are replaced, as described in the following procedure.
On the Buick Enclave, completing this learn procedure is important for normal column movement and memory recall operation. If the soft stops are not learned, the module may disable tilt or telescope operation and store a calibration-related diagnostic trouble code.
Tilt/Telescoping Soft Stop Programming Procedure
- Turn ON the ignition, with the engine OFF. Maintain stable battery voltage during the procedure so the scan tool communication and module learning process are not interrupted.
- Connect a scan tool to the vehicle.
- Select Model Year.
- Select LD Truck.
- Select Brand.
- Product Line.
- Select Body.
- Select Memory Seat
- Select Special Functions
- Select Driver Seat.
- Select Learn Column Soft Stops.
- Follow the scan tool on-screen instructions. Allow the column to complete the commanded movements without obstruction, and do not operate the tilt/telescope switch manually during the learn process unless instructed by the scan tool.
TURN SIGNAL SWITCH BRACKET REPLACEMENT
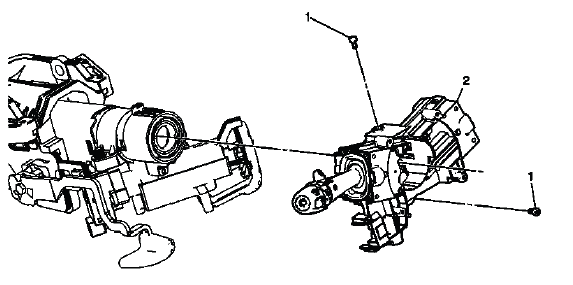
Fig. 19: Identifying Turn Signal Switch Bracket
Turn Signal Switch Bracket Replacement
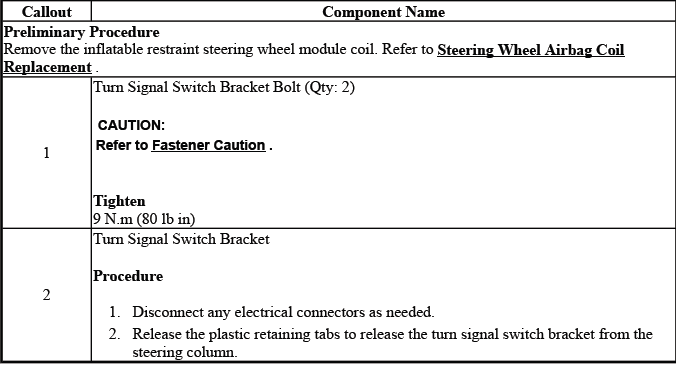
The turn signal switch bracket supports the multifunction switch assembly and helps keep the switch aligned with the steering column. During replacement, inspect the bracket area for cracked plastic, loose mounting points, worn retainers, or wiring that may be trapped under the bracket.
TURN SIGNAL MULTIFUNCTION SWITCH REPLACEMENT
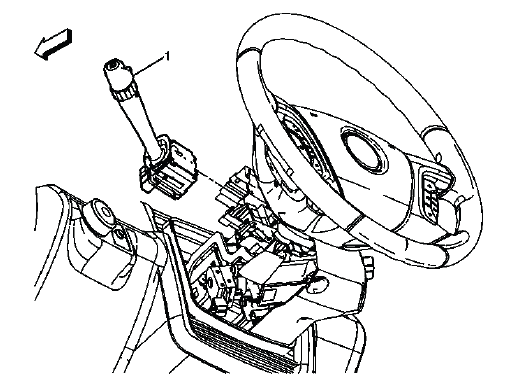
Fig. 20: Identifying Turn Signal Multifunction Switch
Turn Signal Multifunction Switch Replacement
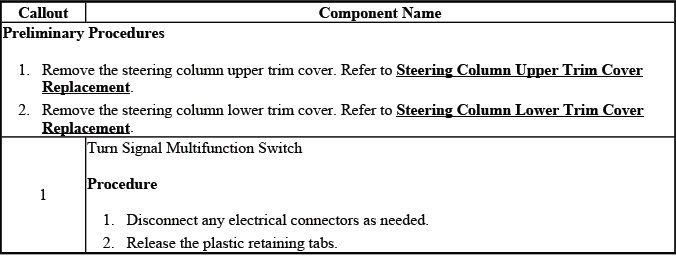
The turn signal multifunction switch may include several driver control functions depending on equipment. Handle the switch and connector carefully, and verify that the stalk moves cleanly through each detent after installation.
STEERING WHEEL HEAT CONTROL MODULE REPLACEMENT (TRAVERSE)
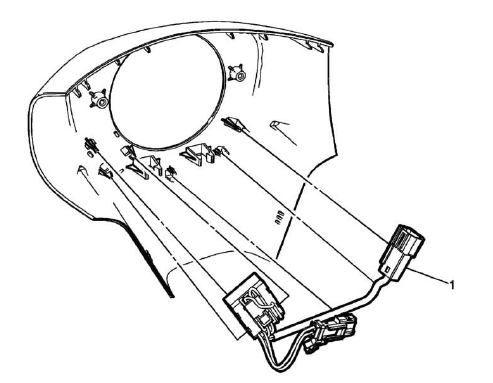
Fig. 21: Steering Wheel Heat Control Module
Steering Wheel Heat Control Module Replacement (Traverse)

When replacing a steering wheel heat control module, inspect the connector terminals and steering wheel harness before installing the new module. A poor connection, pinched wire, or moisture intrusion can cause repeat heated steering wheel complaints even after module replacement.
STEERING WHEEL REPLACEMENT
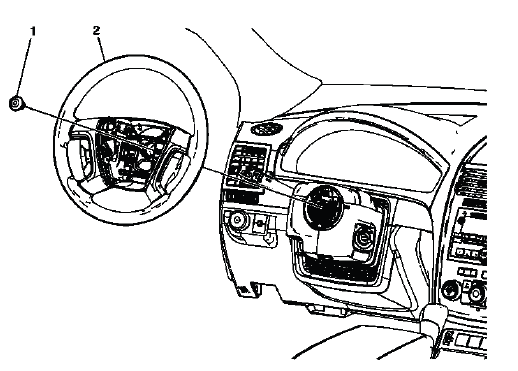
Fig. 22: Identifying Steering Wheel
Steering Wheel Replacement
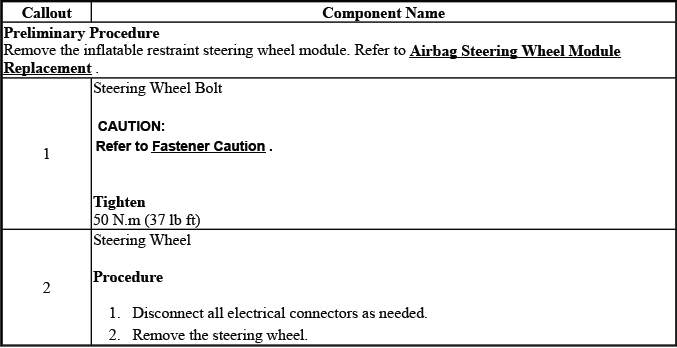
Steering wheel replacement should be performed with the steering wheel centered and the SIR system handled according to the required safety procedures. After installation, verify that the wheel is aligned, all controls operate, and no trim or wiring interferes with steering wheel rotation.
STEERING COLUMN TILT WHEEL AND TELESCOPE SWITCH REPLACEMENT
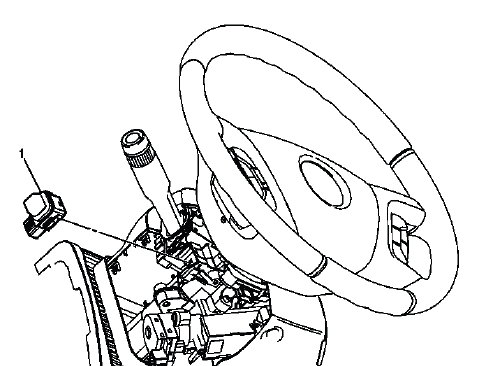
Fig. 23: View Of Steering Column Tilt Wheel and Telescope Switch
Steering Column Tilt Wheel and Telescope Switch Replacement
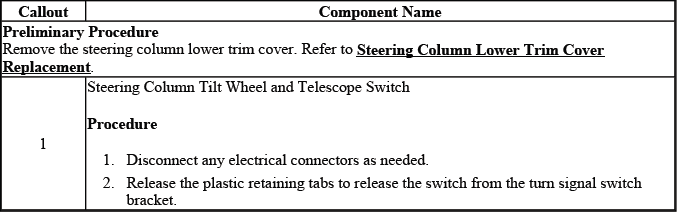
The tilt wheel and telescope switch sends driver movement requests to the control module. After replacement, cycle the column through all available directions and verify that the scan tool switch parameters change correctly between inactive and active states.
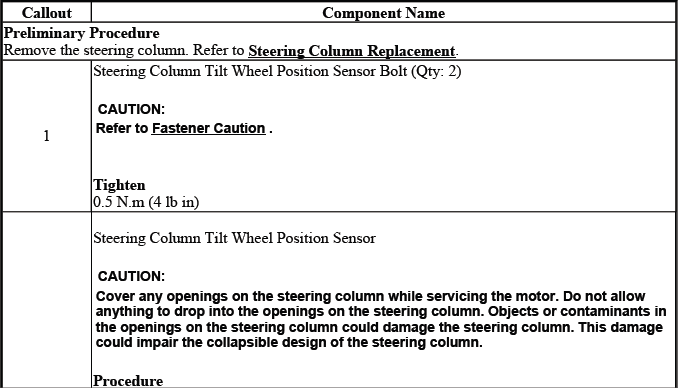
STEERING COLUMN TILT WHEEL POSITION SENSOR REPLACEMENT
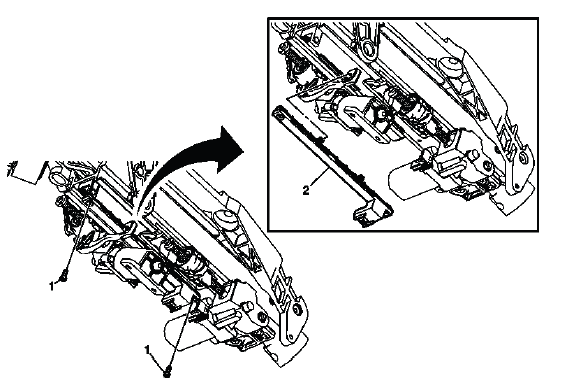
Fig. 24: Identifying Steering Column Tilt Wheel Position Sensor
Steering Column Tilt Wheel Position Sensor Replacement
The steering column tilt wheel position sensor provides feedback used to track the tilt position of the column. If the sensor signal is out of range, erratic, or does not change during column movement, inspect the connector and wiring before replacing parts, then perform the required verification after service.
STEERING COLUMN REPLACEMENT
Removal Procedure
1. Turn the steering wheel to the straight forward position and lock the steering column. Keep the front wheels pointed straight ahead before any steering shaft or column connection is separated, because uncontrolled steering wheel rotation can damage the SIR coil centering.
CAUTION: With wheels of the vehicle facing straight ahead, secure the steering wheel utilizing steering column anti-rotation pin, steering column lock or a strap to prevent rotation. Locking of the steering column will prevent damage and a possible malfunction of the SIR system.
The steering wheel must be secured in position before disconnecting the following components:
- The steering column
- The intermediate shaft(s)
- The steering gear
After disconnecting these components, do not rotate the steering wheel or move the front tires and wheels. Failure to follow this procedure may cause the SIR coil assembly to become un-centered and cause possible damage to the SIR coil. If you think the SIR coil has become un-centered, refer to your specific SIR coil's centering procedure to re-center SIR Coil.
2. Remove the left side instrument panel (I/P) insulator panel. Refer to Instrument Panel Insulator Panel Replacement - Left Side. Removing this panel provides access to the lower steering column area and the related mounting and wiring points.
3. Remove the driver knee bolster. Refer to Driver Knee Bolster Replacement (Acadia) , Driver Knee Bolster Replacement (Enclave) and Driver Knee Bolster Replacement (Traverse). Handle the trim carefully so the retainers and visible finish are not damaged.
4. Remove the I/P Instrument Cluster Trim Plate. Refer to Instrument Panel Cluster Trim Plate Replacement (Acadia) , Instrument Panel Cluster Trim Plate Replacement (Enclave) and Instrument Panel Cluster Trim Plate Replacement (Traverse). This step improves access around the upper column and instrument panel carrier.
5. Remove the steering column housing cover bolts. Refer to Steering Column Housing Cover Replacement. Keep the fasteners organized so the covers can be reinstalled in their original locations.
6. Disconnect all electrical connectors as necessary. Release each connector lock before pulling the connector apart, and inspect the terminals for damage, corrosion, or any signs of previous repair.
7. If equipped, remove the steering column lower support brace bolts (1) and the steering column lower support brace (2). Support the column as needed so it does not shift suddenly when the brace is removed.
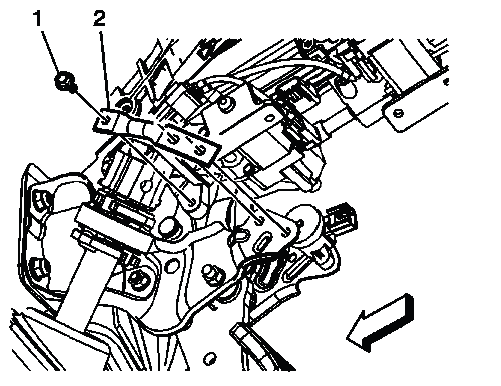
Fig. 25: Identifying Steering Column Lower Support Brace
8. Remove the intermediate steering shaft upper bolt (1). Discard the bolt. This fastener uses a locking feature and should not be reused during installation.
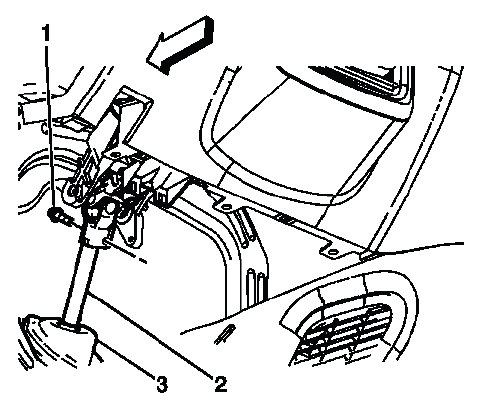
Fig. 26: Identifying Intermediate Steering Shaft Components
9. Disconnect the upper intermediate steering shaft (2) from the steering column. Do not pull the intermediate steering shaft lower seal (3) away from the body panel. Keep the shaft aligned and avoid forcing it against the seal or dash opening.
10. Remove the steering column nuts (2) and the steering column bolts (1). Support the column while removing the final fasteners so it does not drop or pull on wiring, trim, or the instrument panel carrier.
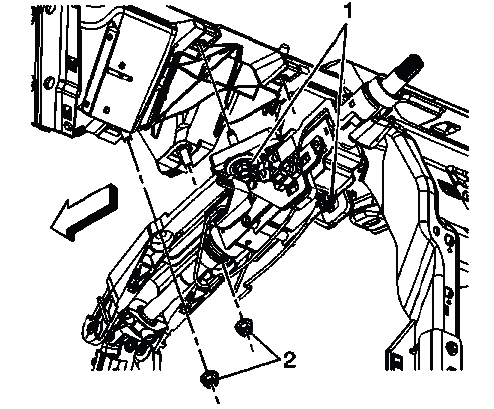
Fig. 27: Identifying Steering Column Nuts & Bolts
11. Remove the steering column from the vehicle. Guide the column out carefully to avoid damaging the instrument panel trim, wiring harnesses, dash seal area, or column-mounted components.
12. Transfer any parts as necessary. Compare the removed steering column with the replacement unit before installation and move over any required brackets, covers, switches, sensors, or hardware that are not supplied with the new assembly.
Installation Procedure
1. Install the steering column to the vehicle and start the steering column nuts (3, 4) and bolts (1, 2) by hand using the following sequence. The column must be positioned squarely against the I/P carrier before clamping force is applied.
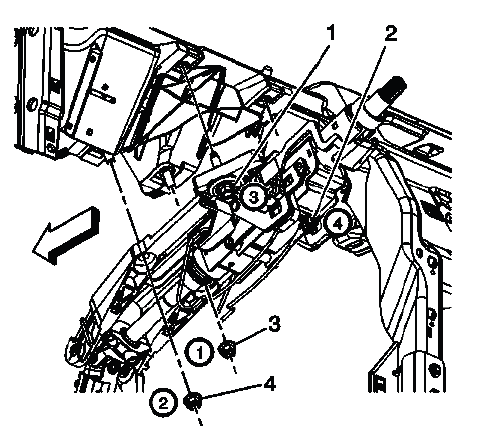
Fig. 28: Identifying Steering Column Nuts & Bolts
NOTE: Hand tighten the nuts and the bolts in sequence. DO NOT apply any clamping force.
- Position the steering column in the vehicle. Align the column with the instrument panel carrier and the intermediate shaft opening before starting the fasteners.
- Hand start the steering column nuts (3, 4).
- Hand start the steering column bolts (1, 2).
- Hold the steering column flush against the I/P carrier. Do not allow the column to hang at an angle while the fasteners are being started.
- Hand tighten steering column nut (3).
- Hand tighten steering column nut (4).
- Hand tighten steering column bolt (1).
- Hand tighten steering column bolt (2).
2. Tighten the steering column nuts (3, 4) and bolts (1, 2) in the following sequence. Tightening in order helps the column seat evenly and prevents stress on the mounting bracket or I/P carrier.
CAUTION: Refer to Fastener Caution.
NOTE: Tighten the nuts and the bolts in sequence to the specification.
- Tighten steering column nut (3) to 27 N.m (20 lb ft).
- Tighten steering column nut (4) to 27 N.m (20 lb ft).
- Tighten steering column bolt (1) to 27 N.m (20 lb ft).
- Tighten steering column bolt (2) to 27 N.m (20 lb ft).
3. Connect the intermediate steering shaft (2) to the steering column shaft. Make sure the shaft is fully seated and aligned before installing the new upper bolt.
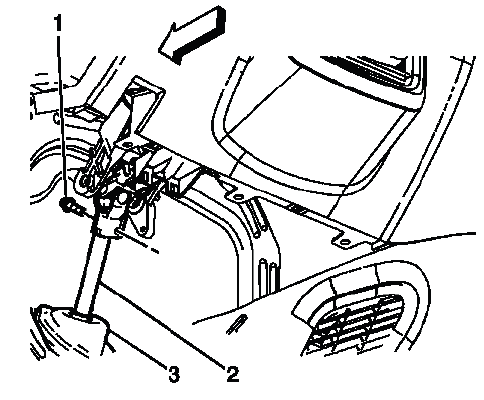
Fig. 29: Identifying Intermediate Steering Shaft Components
4. Install the NEW intermediate steering shaft upper bolt (1) and tighten to 22 N.m (16 lb ft). Start the bolt by hand first, then tighten it to specification after confirming the shaft joint is fully seated.
NOTE: A NEW intermediate steering shaft upper bolt has a thread locking adhesive patch on the threads.
5. Ensure the intermediate steering shaft upper seal (3) is seated correctly. The seal should sit evenly against the dash panel to help prevent water, dust, air leaks, and road noise from entering the cabin.
6. If equipped, install the steering column lower support brace (2) and the steering column lower support brace bolts (1) and tighten to 10 N.m (89 lb in). Confirm that the brace is not trapped against wiring or trim before tightening the bolts.
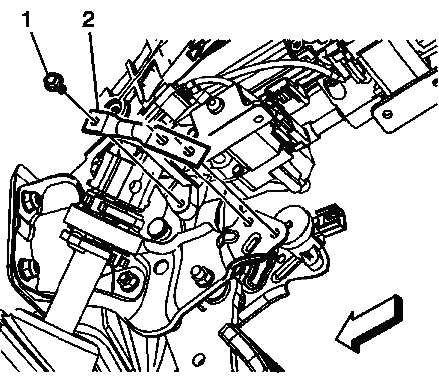
Fig. 30: Identifying Steering Column Lower Support Brace
7. Connect all electrical connectors as necessary. Verify that every connector is fully seated and locked, especially connectors for steering wheel controls, column position components, SIR-related circuits, and any power tilt/telescope equipment.
8. Install the steering column housing cover bolts. Refer to Steering Column Housing Cover Replacement. Check that the upper and lower covers fit evenly and do not rub against the steering wheel or column-mounted switches.
9. Install the I/P Instrument Cluster Trim Plate. Refer to Instrument Panel Cluster Trim Plate Replacement (Acadia) , Instrument Panel Cluster Trim Plate Replacement (Enclave) , Instrument Panel Cluster Trim Plate Replacement (Traverse). Make sure the trim plate retainers engage without pinching wiring behind the panel.
10. Install the left side I/P insulator panel. Refer to Instrument Panel Insulator Panel Replacement - Left Side. Confirm the panel is positioned away from the steering shaft and pedal area.
11. If equipped with a power tilting and telescoping steering column, calibrate the telescoping steering column. Refer to Telescoping Steering Column Calibration. On the Buick Enclave, calibration allows the MSM to relearn the soft stops so the column stops before reaching its mechanical end of travel. After installation, verify steering wheel alignment, column movement, switch operation, and that no related warning messages or DTCs return.
STEERING ANGLE SENSOR REPLACEMENT
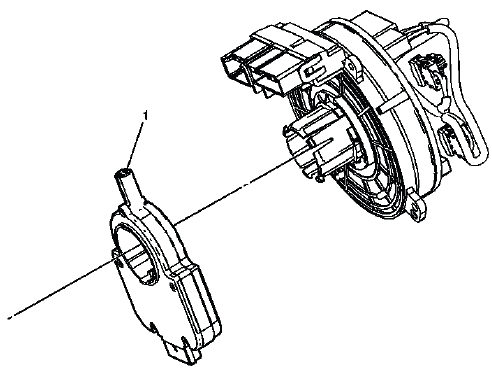
Fig. 31: Identifying Steering Angle Sensor
Steering Angle Sensor Replacement
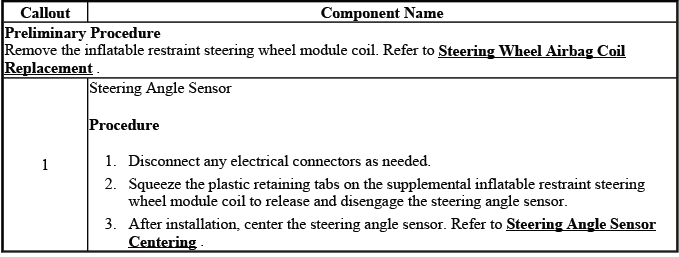
The steering angle sensor provides steering wheel position information used by related chassis and stability control systems. During replacement, keep the steering wheel centered, avoid rotating the column unexpectedly, and handle the sensor carefully so its internal centering is not disturbed. After service, perform any required setup, calibration, or scan tool verification so the Buick Enclave steering and stability systems receive accurate steering angle data.
