Buick Enclave: Diagnostic Information and Procedures
SYMPTOMS - PARK BRAKE
IMPORTANT: Before diagnosis begins, review the Park Brake System Description and Operation so the normal apply, hold, and release behavior of the system is clearly understood.
Refer to Park Brake System Description and Operation. A parking brake concern is easier to diagnose when the system is viewed as one connected mechanical assembly rather than as one separate part. On the Buick Enclave, pedal travel, cable movement, shoe adjustment, rotor condition, and rear brake hardware all work together, so a small problem in one area can quickly show up as poor holding force or incomplete release.
Visual/Physical Inspection
- Look for aftermarket devices, non-factory repairs, added hardware, or modified components that may interfere with normal park brake operation.
Pay close attention to the parts that can be reached or seen without major disassembly. Damaged cables, loose retainers, missing clips, bent levers, corrosion, seized hardware, poor cable routing, or signs of previous incorrect repair can all create the same type of symptom at the pedal.
The feel of the park brake pedal also tells part of the story. Rough movement, extra slack, a sharp change in resistance, unusual noise, or a slow return after release can help point the diagnosis in the right direction before any parts are removed.
Symptom List
Use the symptom-based diagnostic procedure below to separate a holding problem from a release problem. Most complaints will fall into one of two areas: the park brake does not hold the vehicle securely, or it does not fully release after being applied.
Park Brake Will Not Hold or Release
PARK BRAKE WILL NOT HOLD OR RELEASE
Park Brake Will Not Hold or Release
A park brake that will not hold may have worn shoes, poor adjustment, glazed or contaminated lining, stretched cables, damaged actuating hardware, or a rotor hat surface that no longer gives the shoes a clean contact area. When the park brake will not release, the cause is often different: seized cables, sticky levers, over-adjustment, rust inside the rear brake assembly, or hardware that has shifted out of its normal position.
When this concern appears on a Buick Enclave, it is better not to rush straight into parts replacement. A tight pedal does not always mean the rear shoes are applying correctly, and a loose-feeling pedal does not always mean the fault is only at the pedal side. The rear brake assemblies, cables, and shoe adjustment should be checked together so the real cause is not missed.
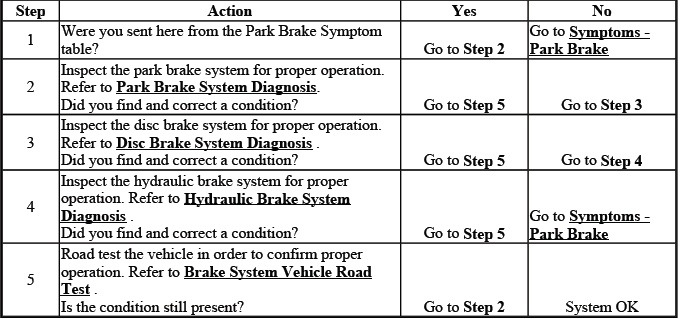
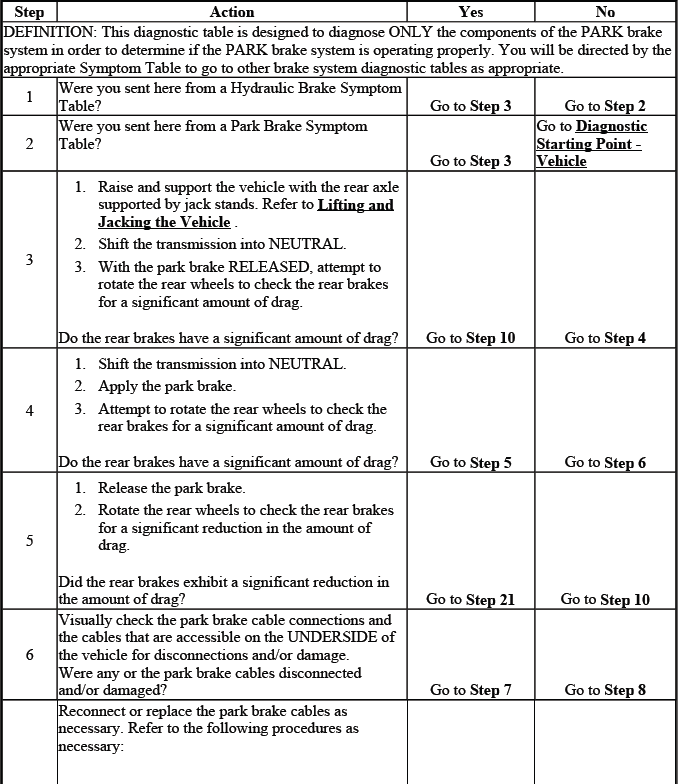
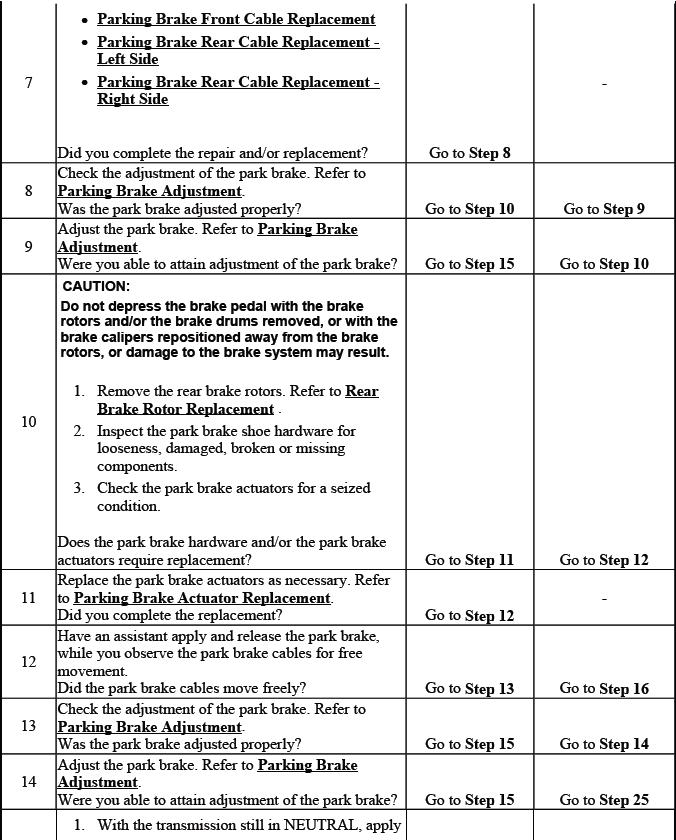
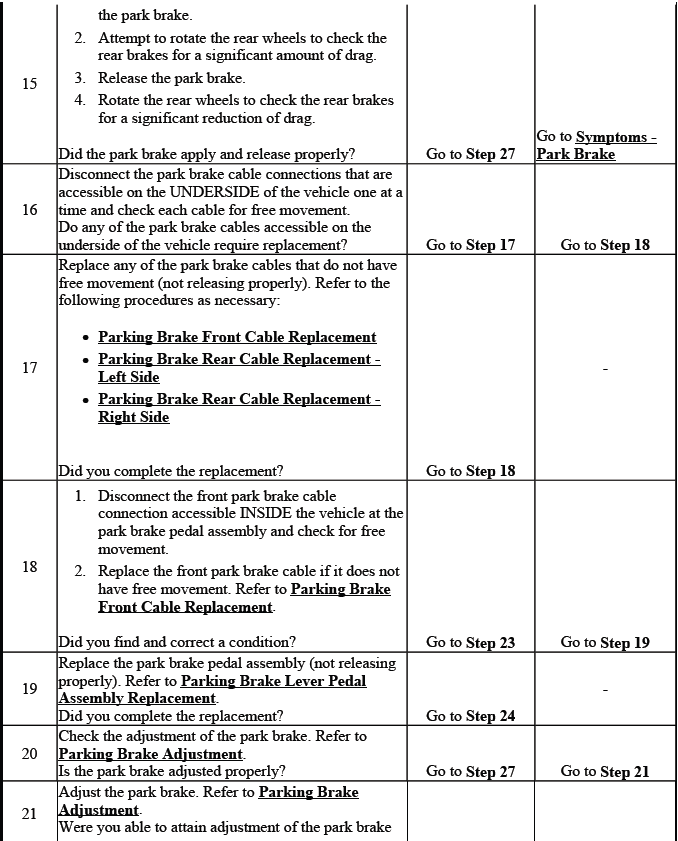
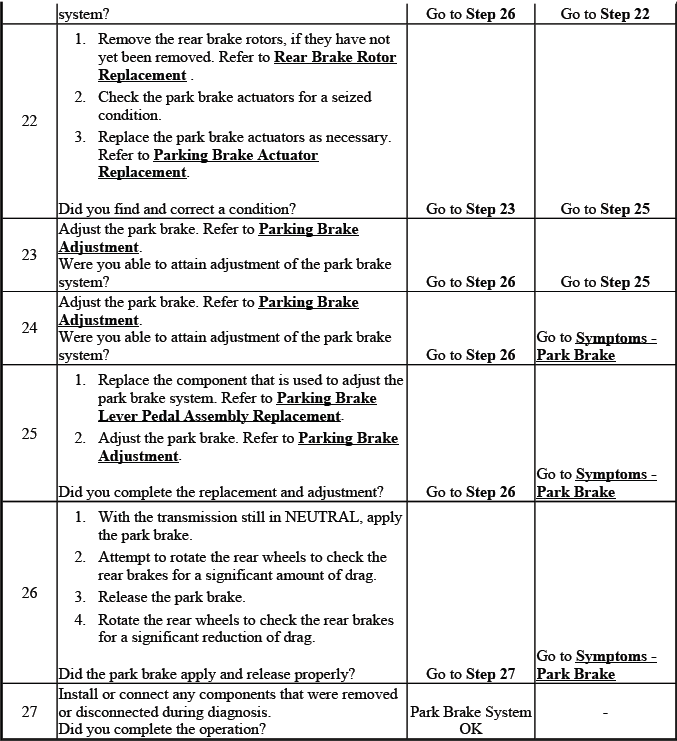
PARK BRAKE SYSTEM DIAGNOSIS
Park Brake System Diagnosis
A good park brake diagnosis starts with the complaint and then follows the system in a practical order, from the pedal or control side toward the rear brake assemblies. This keeps the inspection organized and helps avoid overlooking simple faults such as cable misrouting, damaged retainers, a seized adjuster, or contaminated lining.
If the vehicle rolls with the park brake applied, compare the pedal travel with the actual movement at the rear brakes. Both rear assemblies should apply with even force, and the shoes should sit at the correct clearance inside the rotor hat. If the brake stays partly applied after release, the focus should shift toward cable drag, a lever that does not return, damaged shoe hardware, or an adjustment that is too tight.
The hydraulic rear brakes may still feel normal even when the park brake has a mechanical problem of its own. For that reason, the Buick Enclave park brake inspection should include both the outside cable path and the internal shoe area whenever the symptom remains after basic checks and adjustment.
PARKING BRAKE SHOE INSPECTION
WARNING: Refer to Brake Dust Warning. Brake dust may contain materials that should not be inhaled. Do not clean brake components with compressed air; use approved brake cleaning methods during service.
1. Raise and support the vehicle. Refer to Lifting and Jacking the Vehicle. Make sure the vehicle is stable before working around the rear brake assemblies.
2. Remove the tire and wheel assembly. Refer to Tire and Wheel Removal and Installation. With the wheel removed, the rear brake area can be viewed clearly and the park brake hardware can be checked without obstruction.
3. Remove the rear brake caliper bracket with the rear brake caliper. Refer to Rear Brake Caliper Bracket Replacement. Support the caliper so the brake hose is not twisted, stretched, or forced to carry the caliper weight.
4. Remove the rear brake rotor. Refer to Rear Brake Rotor Replacement. If the rotor does not come off easily, the park brake shoe may be adjusted too tightly against the inside of the rotor hat.
NOTE: DO NOT apply the park brake pedal with the rotors removed. Applying the pedal with the rotor removed can overextend or displace the park brake shoes and hardware, creating extra repair work or causing incorrect reassembly.
5. Check the park brake shoe and lining closely. Replace the park brake shoe and lining if any of the following conditions are found:
- Excessive wear, shown by the park brake lining being worn down to the shoe
- Cracked, separated, broken, or heat-damaged park brake lining
- Oil, grease, brake fluid, axle lubricant, or other fluid contamination on the park brake lining
The shoe contact points, springs, adjuster, actuator lever, and retaining hardware should also be examined as part of the same service step. Uneven wear, heavy rust, bent hardware, or a lever that moves slowly can keep the park brake from holding with steady force. If the lining is glazed or contaminated, cleaning is usually not enough; once the friction material is affected, replacement is the more reliable repair.
6. Adjust the park brake shoe. Refer to Parking Brake Adjustment. Adjustment should be done only after the shoe condition and hardware movement have been verified. On the Buick Enclave, the clearance matters: too much clearance reduces holding force, while too little clearance can create drag, heat, noise, and early wear.
7. Install the rear brake rotor. Refer to Rear Brake Rotor Replacement. The rotor should seat fully and rotate without abnormal drag after installation.
8. Install the rear brake caliper with the rear brake caliper bracket. Refer to Rear Brake Caliper Bracket Replacement. Tighten the fasteners according to the specified procedure and make sure the caliper sits correctly over the rotor.
9. Install the tire and wheel assembly. Refer to Tire and Wheel Removal and Installation. Tighten the wheel fasteners evenly and to specification.
10. Lower the vehicle. After the vehicle is back on the ground, apply and release the park brake several times to feel for smooth operation and full release. If the original complaint was poor holding force, verify the repair on a suitable incline or by using the approved service procedure. If the complaint was a release problem, make sure the rear wheels are not dragging after the pedal is released.
