Buick Enclave: Compact Spare Tire. Jump Starting
Compact Spare Tire
 WARNING
Driving with more than one compact spare tire at a time could result in loss of braking and handling. This could lead to a crash and you or others could be injured. Use only one compact spare tire at a time.
The compact spare tire, if the vehicle has one, is intended for temporary use only. It was fully inflated when the vehicle was new, but air pressure can drop over time even when the spare has never been used. Check the compact spare regularly so it is ready when needed.
The compact spare tire should be inflated to 420 kPa (60 psi).
After installing the compact spare on the vehicle, stop as soon as it is safe and practical to do so and confirm that the spare tire is inflated correctly. Do not assume the spare is ready simply because it looks normal; compact spare tires can lose pressure slowly while stored under the vehicle.
The compact spare is designed to perform acceptably at speeds up to 105 km/h (65 mph) for distances up to 5 000 km (3,000 mi). This allows the driver to finish a trip or reach a repair location, but it should not be treated like a full-size road tire.
For the Buick Enclave, the compact spare is a temporary support solution, not a long-term replacement. Replace it with a full-size tire as soon as possible. Doing so helps restore normal braking, handling, ride quality, traction, and drivetrain operation, while also keeping the spare in good condition in case it is needed again.
Notice: When the compact spare is installed, do not take the vehicle through an automatic car wash with guide rails.
The compact spare can get caught on the rails, which can damage the tire, wheel, and other parts of the vehicle.
The compact spare has different dimensions from the regular road tires. Because of this, guide rails, curbs, deep ruts, and certain automatic car wash tracks may contact the spare differently than they would a standard tire.
Do not use the compact spare on other vehicles.
Do not mix the compact spare tire or wheel with other wheels or tires. They will not fit. Keep the spare tire and its wheel together.
The All-Wheel Drive (AWD) system will be automatically disabled when you use the compact spare.
To restore AWD operation and prevent excessive wear on the AWD clutch, replace the compact spare tire with a full-size tire as soon as possible. Driving longer than necessary on the compact spare can place extra stress on the system and may affect how the Buick Enclave responds in low-traction conditions.
Notice: Tire chains will not fit the compact spare. Using them can damage the vehicle and can damage the chains too. Do not use tire chains on the compact spare.
If additional traction is needed, do not try to force chains onto the compact spare. The spare is not designed for that use, and the lack of clearance can damage surrounding components. Drive slowly and arrange for proper tire repair or replacement instead.
Jump Starting
For more information about the vehicle battery, see Battery.
If the vehicle's battery has run down, another vehicle and jumper cables may be used to start it. Jump starting must be done in the correct order because batteries can release explosive gas, electrical systems can be damaged by improper connections, and moving engine parts can cause injury once the engine starts.
Before beginning, inspect the area around both vehicles. The vehicles should be close enough for the jumper cables to reach without stretching, but they must not touch each other. Keep loose clothing, jewelry, tools, and cable ends away from fans, belts, pulleys, and other moving parts.
WARNING
Batteries can hurt you. They can be dangerous because:
► They contain acid that can burn you.
► They contain gas that can explode or ignite.
► They contain enough electricity to burn you.
If you do not follow these steps exactly, some or all of these things can hurt you.
Battery acid can injure skin and eyes, and battery gas can ignite from a spark, flame, or even a poor cable connection. Work carefully, keep the cable clamps separated, and do not lean directly over either battery while making the connections.
Notice: Ignoring these steps could result in costly damage to the vehicle that would not be covered by the warranty.
Trying to start the vehicle by pushing or pulling it will not work, and it could damage the vehicle.
Do not attempt to push-start or tow-start the Buick Enclave. The electrical and transmission systems are not designed for that method, and trying it may create additional damage instead of solving the low battery problem.
1. Check the other vehicle. It must have a 12-volt battery with a negative ground system.
Notice: Only use a vehicle that has a 12-volt system with a negative ground for jump starting. If the other vehicle does not have a 12-volt system with a negative ground, both vehicles can be damaged.
If you are not sure what type of electrical system the other vehicle has, do not connect the jumper cables. Using the wrong system can damage control modules, charging components, or other electrical parts.
2. Get the vehicles close enough so the jumper cables can reach, but be sure the vehicles are not touching each other. If they are touching, it could create an unwanted ground connection.
You would not be able to start your vehicle, and the bad grounding could damage the electrical systems.
To avoid the possibility of the vehicles rolling, set the parking brake firmly on both vehicles involved in the jump start procedure. Put an automatic transmission in P (Park) or a manual transmission in Neutral before setting the parking brake. If one of the vehicles is a four-wheel-drive vehicle, be sure the transfer case is not in Neutral.
Make sure the jumper cables are long enough to reach the proper terminals without pulling tight. A stretched cable can slip off a terminal or fall into moving engine parts when the engine starts.
Notice: If the radio or other accessories are left on during the jump starting procedure, they could be damaged. The repairs would not be covered by the warranty. Always turn off the radio and other accessories when jump starting the vehicle.
3. Turn off the ignition on both vehicles. Unplug unnecessary accessories plugged into the cigarette lighter or accessory power outlets. Turn off the radio and all lamps that are not needed. This will help avoid sparks and reduce electrical load on both batteries.
And it could save the radio.
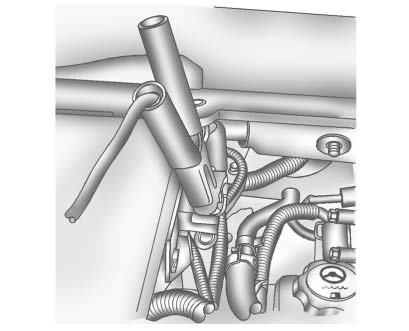
4. Open the hoods and locate the positive (+) and negative (−) terminal locations on the other vehicle. Your vehicle has a remote positive (+) and a remote negative (−) jump starting terminal. See Engine Compartment Overview for more information on the terminal locations.
Use the remote jump starting terminals provided for the Buick Enclave instead of guessing at battery or ground locations. These terminals are placed to make the connection safer and easier during jump starting.
WARNING
Using a match near a battery can cause battery gas to explode.
People have been hurt doing this, and some have been blinded.
Use a flashlight if you need more light.
Be sure the batteries have enough water. You do not need to add water to the ACDelco® battery or batteries installed in your new vehicle. But if a battery has filler caps, be sure the right amount of fluid is there. If it is low, add water to take care of that first. If you do not, explosive gas could be present.
Battery fluid contains acid that can burn you. Do not get it on you. If you accidentally get it in your eyes or on your skin, flush the place with water and get medical help immediately.
Never use a match, lighter, or open flame to inspect a battery or terminal area. If more light is needed, use a flashlight and keep sparks away from the battery. If battery fluid contacts skin or eyes, rinse immediately with clean water and seek medical help.
WARNING
Fans or other moving engine parts can injure you badly. Keep your hands away from moving parts once the engine is running.
Electric cooling fans can start unexpectedly, and belts or pulleys can begin moving as soon as the engine runs. Route the cables so they cannot fall into the fan area or touch hot exhaust components.
5. Check that the jumper cables do not have loose or missing insulation. If they do, you could get a shock. The vehicles could be damaged too.
Before connecting the cables, remember the basic cable path. Positive (+) connects to positive (+), or to a remote positive (+) terminal if the vehicle has one. Negative (−) connects to a heavy, unpainted metal engine part or to a remote negative (−) terminal if the vehicle has one.
Do not connect positive (+) to negative (−), because this will create a short circuit that can damage the battery and possibly other parts. Do not connect the negative (−) cable directly to the negative (−) terminal on the dead battery, because this can cause sparks near the battery.
6. Connect the red positive (+) cable to the positive (+) terminal of the dead battery.
Use a remote positive (+) terminal if the vehicle has one.
Make sure the clamp grips cleanly and securely. A loose clamp can spark, heat up, or fall off while the jump start is being attempted.
7. Do not let the other end touch metal. Connect it to the positive (+) terminal of the good battery. Use a remote positive (+) terminal if the vehicle has one.
8. Now connect the black negative (−) cable to the negative (−) terminal of the good battery. Use a remote negative (−) terminal if the vehicle has one.
Do not let the other end touch anything until the next step.
The other end of the negative (−) cable does not go to the dead battery. It goes to a heavy, unpainted metal engine part, or to a remote negative (−) terminal on the vehicle with the dead battery.
9. Connect the other end of the negative (−) cable at least 18 inches (45 cm) away from the dead battery, but not near engine parts that move.
The electrical connection is just as effective there, and the chance of sparks getting back to the battery is much lower.
Your vehicle has a remote negative (−) terminal for this purpose.
Choose a solid, unpainted metal point or the specified remote negative terminal. Do not clamp to a painted bracket, plastic part, thin metal edge, fuel line, or moving component.
10. Now start the vehicle with the good battery and run the engine for a while.
Letting the assisting vehicle run briefly can help transfer charge and stabilize voltage before attempting to start the vehicle with the discharged battery.
11. Try to start the vehicle that had the dead battery. If it will not start after a few tries, it probably needs service.
Do not keep cranking for long periods. If the engine does not start after several attempts, the battery may be too weak, the connection may be poor, or another electrical or starting system problem may be present.
Notice: If the jumper cables are connected or removed in the wrong order, electrical shorting may occur and damage the vehicle. The repairs would not be covered by the vehicle warranty. Always connect and remove the jumper cables in the correct order, making sure that the cables do not touch each other or other metal.
Keep the clamps separated during removal. A loose cable end can swing into metal parts and create a spark or short circuit. Work slowly and keep track of each cable end as it is disconnected.
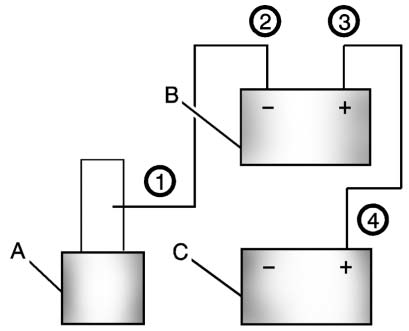
Jumper Cable Removal
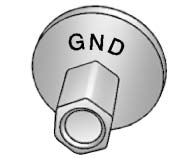
A. Heavy, Unpainted Metal Engine Part or Remote Negative (−) Terminal
B. Good Battery or Remote Positive (+) and Remote Negative (−) Terminals
C. Dead Battery or Remote Positive (+) Terminal
To disconnect the jumper cables from both vehicles, do the following:
1. Disconnect the black negative (−) cable from the vehicle that had the dead battery.
2. Disconnect the black negative (−) cable from the vehicle with the good battery.
3. Disconnect the red positive (+) cable from the vehicle with the good battery.
4. Disconnect the red positive (+) cable from the other vehicle.
After the cables are removed, allow the started vehicle to run long enough to stabilize. If the battery warning light remains on, if the vehicle stalls again, or if the battery repeatedly goes dead, the charging system and battery should be inspected. For the Buick Enclave, repeated jump starting is a sign that the battery, alternator, cables, or electrical load may need diagnosis rather than another temporary boost.
